Showing posts with label Watercooler Wednesday Challenge. Show all posts

Wednesday, May 30, 2018

WWC172 - Anything Goes Challenge

Hi stampers.  May is a five week month so that means we get to do a no host "Anything Goes" challenge at Watercooler Wednesday this week.  Are you up for the challenge.
This challenge runs until 5:00pm Mountain Time on Monday June 4th, 2018.  Check out the rules and the linky here. Hope you'll join in and have some fun!

For my project today I'd like to share a "Get Well" card that I've been working on which features one of the new Hostess sets for the upcoming catalogue year, called Hand Delivered.  I think you're going to like it.

Here's My Card:
I pulled my colour scheme for this card from the absolutely stunning new designer paper called "Tranquil Textures".  Although you're going to see this designer paper as the focus in many nautical themed projects, it also works well with other themes.  The designs are so beautiful and the colour mix is so soothing.  
The inside features more of the Tranquil Textures paper and a beautiful samp set called "Sorry For Everything".  
Supplies:

Stamp Sets:
Hand Delivered #146808 and Sorry For Everything #143820

Card Stock and Designer Paper:
Whisper White, Mint Macaron, Night of Navy and Tranquil Textures DSP #146331

Ink:  
Mint Macaron, Pineapple Punch, Night of Navy, Momento Tuxedo Black

Accessories:
Sizzix Rectangular Pin Point Frames (Non-SU), Big Shot, Paper Trimmer, Aqua Painter, Dimensionals, Tom Bow Glue, Misti

Details:


1.  This is an A2 card with a top fold.  The card base is a 4 1/4" x 11" piece of Whisper White that is scored and folded at 5 1/2".  

2. The first layer is a 5 1/4" x 4" piece of Tranquil Textures designer series paper. Because I never like to waste anything, I stamped the girl's skirt in the center of this panel and cut it out before adhering the DSP to the card base.

 3. I used Sizzix Rectangle Pinpoint Dies to cut a 3" x 4" Whisper White panel and a 3 3/8" x 4 3/4" Mint Macaron panel. The Night of Navy panel measures 3 1/8" x 4 1/8" and was cut out with my paper trimmer. All three panels were glued together with Tom Bow glue and then attached to the center of the card with Tear N' Tape. 
The Pinpoint Rectangles add a nice finished touch to these layers.

4.  The image of the girl's skirt and legs was stamped on a scrap of Whisper White with Momento Tuxedo Black ink and cut out with detail scissors.   As noted above I also stamped this image on the center of the DSP layer and fussy cut out just the skirt, which was glued to the Whisper White skirt/legs image. I lightly coloured around the DSP design on the skirt with my aqua painter and Pineapple Punch ink.  The girls legs were coloured with a skin toned blender pen.

5.  To get the mottled effect on the Whisper White layer I applied Mint Macaron ink to an Acryllic Block and stamped it straight onto the card stock.  I stamped the small cluster of dots randomly in Night of Navy ink and then stamped the flowers and coloured them with the Aqua Painter. 

6.  The sign the girl is holding was created by stamping the  image on Whisper White card stock and cutting it out with detail scissors.  I added Dimensionals to the back of this piece and it was attached above the waist band on the girl's skirt.  The sentiment "Hope You Feel Better Soon" was stamped in Night of Navy Ink on Mint Macaron.  This piece was punched out with a 1" square punch and adhered to a 1 1/8" x 1 1/8" layer of Night of Navy cardstock.  These layers were adhered to the center of the sign.  The girls fingers were coloured with a skin toned blender pen. 

7.  For the inside panel I cut a 5 1/4" x 4" panel of Whisper White Card stock and stamped the sentiment "Sorry" in Mint Macaron ink.  The "to hear you're not feeling well" sentiment was stamped in Night of Navy ink.  Two groupings of flowers were stamped in Momento Tuxedo Black ink and coloured with an aqua painter.  A 1" x 4" strip of the Tranquil Textures DSP was adhered to the bottom of the panel.  

On June 1st Stampin' Ups! new Annual catalogue will be available and you'll be able to check out all the images for the stamps and papers used in this card.  In the meantime I hope you've enjoyed this new product sneak peak and my card design.  

If you haven't had a chance to check out all the wonderful cards from the other Watercooler Wednesday Design Team you can click here.  Have fun and please come back for another visit.  

Happy Stamping!
Penny Tokens Stampin' Spot  

<a href="https://www.bloglovin.com/blog/2199104/?claim=7kgqrg74q3x">Follow my blog with Bloglovin</a>
Blogger link

Wednesday, May 23, 2018

WWC171 - Heidi's "All About Christmas" Challenge


This week the wonderfully talented Heidi Weaver is our hostess for the "All About Christmas" challenge at Watercooler Wednesday.  

I personally love these seasonal challenges as they really help me get an early start on my Christmas cards.  How about you?  Would you like to join us in making a Christmas themed project or card?  If so check out all the information on our home page.  This challenge is open until 5:00pm Mountain time on Monday May 28th, 2018.

Here's My Card:
I had so much fun making this Christmas card today and I'm delighted to share it with you.  

As you're probably aware by now, Stampin' Up! has revamped it's colour families and the new colours will be available in the release of the new Annual Catalogue on June 1st, 2018.  I can't wait that long however, so I though I'd give you a sneak peak at one of my favourites from the newly revamped "Brights Collection".  It's called "Gorgeous Grape".

I'm a big lover of purple and honestly I haven't felt this giddy about using purple in my Christmas card making since Stampin' Up! retired Concord Crush several years ago.  Check out these two favourites: November Christmas Card Class and Monkey86: Holidays & Sketch Challenge

So here's my Walking in the Winter Woods:


Just imagine it's around supper time in late November, and the sun is disappearing over the hillside as you finish your walk in the woods.  Snow is softly falling and the light is reflecting those last rays............


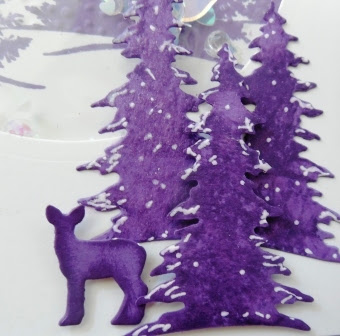
These beautiful trees and deer were die cut using the recently retired Card Front Builder Die set. These die cuts were perfect for adding an upclose scene to the bottom of the card.  I glued two trees to the card front and acetate window panel and then attached the deer and single tree with Dimensionals.  Before attaching these elements, I ran the Scenic Seasons tree stamp and Gorgeous Grape ink over the die cut tree to give the illusion of branches, and coloured around the edges with a sponge dauber. I also dabbled White Gel Pen around the tips of the trees and painted on a generous coating of Clear Wink of Stella.  These trees really shimmer and look like they have a fresh coating of snow.   


Supplies:
Stamp Up Stamp Sets:
Carols of Christmas (R), Christmas Bliss (R), Scenic Season (R)
Card Stock and Designer Papers:
Gorgeous Grape (New), Whisper White and Window Acetate 3 x 3 Sheet
Inks:  
Gorgeous Grape (New), Versa Mark
Accessories:
Big Shot, Paper Trimmer, Card Front Builder Die (R), Circle Thinlet Dies (R), Stitched Shapes Circle Dies, Wink of Stella, White Gel Pen, Sparkle Blends - Fairy Dust from Doodles Paper, Modern Label Punch, Softly Falling Embossing Folder, Heat Gun, White Embossing Powder, Adhesive Strips, Tom Bow Adhesive and Dimensionals.

Details:
1.  The card is an A2 Shaker Card with a top fold.  The base measured 4 1/4 x 11 and is scored at 5 1/2".  

2.  A 5 1/4" x 4" layer was cut from Gorgeous Grape card stock.  Before adhering this layer to the base I die cut the trees and deer from  the center of the card stock.

3.  The next panel is 5 1/8" x 3 7/8" and I cut a 3 1/4" circle in the top half.  

4.  For the window cover I cut a 3 1/2 x 3 1/2" piece of Window Acetate and adhered to the back of the panel in step 3.  Before adhering I wiped the Acetate Window sheet with my Stamping Buddy to remove any static electricity. To build the shaker wall I built a circle shape using adhesive strips and the cut circle as a guide.  

5.  The next layer is a 4" x 4" Whisper White panel that adheres to the back of the shaker outline.  I stamped the tree scene from Scenic Seasons in Gorgeous Grape and embossed to the bottom of the tree line with the Softly Falling Embossing Folder.  The dots from the embossing folder on the tree were gently sanded so it looked like fresh fallen snow.  

6.  I added Sparkle Blends Fairy Dust from Doodles Paper Playground to the inside of the shaker circle before adding the layer from step 5.  I added additional Adhesive Strips to this layer and mounted it to the card front.  

7.  I stamped the sentiment "Seasons Greetings and A Happy New Year" in Versa Mark ink on a scrap of Gorgeous Grape card stock and then heat set it.  I used the old Modern Label punch to cut out this sentiment and attached it to the top of the Acetate circle on the card front with Dimensionals.  

8.  Details related to the tree and deer scene at the bottom of the card are noted above in the photos. 

7.  I stamped the Peace on Earth sentiment from Carols of Christmas in Gorgeous Grape on a scrap of Whisper White and then cut it out with the 3" circle from Stitched Shapes dies.  This was mounted on a 3 1/4" circle of Gorgeous Grape cardstock and mounted to the inside of the card.  

I hope you enjoyed my Christmas card today.  Although it's not considered a traditional Christmas colour I think the Gorgeous Grape is very regal and works perfectly in creating this scene.  I'd love to hear your thoughts and suggestions for stamping with non-traditional colours in your creations.  

If you haven't already visited the other Design Team Artists I hope you'll revist the links before moving on.  Click here to return to the home page. 

Happy Stamping!
Penny Tokens Stampin' Spot 

Wednesday, May 9, 2018

WWC#169 - Charlotte's All Occasions - Anything Goes Challenge


Are you ready for this week's challenge at Watercooler Wednesday?  I know I am, and so is Charlotte who is our wonderful host this week.  Charlotte's  challenge is about making a card or project for "any occasion".  That's right, it could be for a Birthday, a Wedding, maybe an Anniversary...........what ever you decide, because there's so many different occasions to celebrate.  

The WWC169  challenge will be open until 5:00pm Mountain Time on Monday May 14th, so there's plenty of time to make something and join in the fun.  All the instructions and rules for joining this blog challenge can be found here.   I hope you'll play along. 

Here's My Card: 
Friends recently moved into our neighborhood and have been busy doing a full renovation of their new home.  In preparation for their reveal, I wanted to make a special welcome card featuring the 2017 Stampin' Up! hostess set called "In The City" based on a card created by a UK stamper named Monica Gale.  I loved her version but tweaked it a bit to make it my own.  Here's my card.....


Supplies: 
Stamp Sets:  In The City (143771), Petite Pairs (122497) and Holiday Home (135095) 
Card Stock:  Natural Ivory and Calypso Coral
Ink:  Momento Tuxedo Black Ink, Versa Mark and Old Olive, Calypso Coral, Pool Party, Crumb Cake, Bermuda Bay, Daffodil Delight Stampin' Blends. 
Accessories:  Misti Mini Stamping Platform, Big Shot, Paper Trimmer, Big AEKSUCCESS Alphabet Dies (54-80032), Dimensionals, Washi Tape, Very Vanilla Embossing Powder, Embossing Buddy and Heat Gun.

Details:

1.  The card base is 8 1/2" x 5 12" scored at 4 1/4"  from Natural Ivory card stock. 

2.  Cut two 5 3/8" x 4 1/8" piece of Calypso Coral for the 1st layer on the front of the card and for the first layer for the inside of the card.  Adhere to base. 

3.  Cut two pieces of Natural Ivory measuring 4" x 5 1/4" for the front stamped layer and the inside stamped layer.  

4.  Place Natural Ivory front cover piece in the stamping platform and create a scene by placing the stamps along the card front and then stamp with Momento Tuxedo Black ink.  Colour the scene with Stampin' Blends.  Spritz lightly with Night of Navy ink.  Ground the building and truck by drawing a line along connecting with houses and defining the road.  

5.  Once the scene has been stamped position the die cuts above the street scene, raising and lowering the position of the letters to make sure all four spelled out the word HOME.  I held the dies in position with Washi Tape and then ran them through the Big Shot.  

6.  Remove the letters and save the center part of the "O".  On a scrap of Calypso Coral cut another set of letters and adhere them to the Natural Ivory  letters. Attach Adhesive Strips to the back of the letters. 

7.  Glue the stamped layer to the Calypso Coral layer and glue to the card base. 

8.  Remove the backing from the adhesive strips and carefully position in place.  Attach the center of the "O" to the card base with glue dots.


9.  On a scrap of Natural Ivory stamp the sentiment "happy new home" from the Holiday Home stamp set.  Cut the words apart with a pair of snips and discard t he word "home".  Glue the other two words "happy" and "new" to strips of Calypso Coral card stock and attach abve the "M" in Home. 

10.  On the other 4" x 5 1/4" piece of Natural Ivory stamp another scene from In the City.  Colour with Stampin' Blends.  Stamp the sentiment "so glad you're here" from Petite Pairs above the houses.  Glue to Calypso Coral layer and to card base. 


I had such fun making this card I decided to make a second one using Crumb Cake and Old Olive card stocks. I also stamped the sentiment "Welcome to our Block" from the In the City stamp set onto Old Olive card stock with Versa Mark ink.  I embossed it with Very Vanilla Embossing Powder and a heat gun and attached the sentiment with Dimensionals to the card front.  I really liked how this turned out, and it will be the actual card I give my friends.  


Thanks for dropping by today and checking out my card.  I'd love to have a comment from you.  Which version of my card do you like best?  Have you tried an Eclipse card yet?  What about the In the City Stamp set, do you love it too?  Here's one last look at these cards.   

If you haven't done so already don't forget to check out the Watercooler Main page for inspiration from the rest of the Watercooler Design Artists.  

Happy Stamping!
Penny Tokens Stampin Spot 

Wednesday, April 11, 2018

WWC #165 - Tenia's "All About Occasions" Challenge

Hi stampers! Last week was a blur getting ready for weekend house guests and celebrating my mom's 96th birthday.  What a busy time with absolutely no time for stamping, which I missed.  I've spent the time cooking up a storm, cleaning and entertaining.  All worthwhile though, as it was totally great seeing and being together with my family, especially after the tragedy in Hombolt Saskatchewan.  Hug those you love and celebrate when you can.   

This week's Watercooler Wednesday Challenge is being hosted by Tenia Nelson and it's "All About Occasions".  We hope you'll play along with us and post a card or project.  Like the scrolled list says it can be "Any" occasion such as a birthday, wedding, sympathy, retirement - the sky's the limit.

It's easy to link up to our challenge  and it's open until 5:00pm on Monday April 16th, 2018.  

Here's My Card: 
I needed a milestone birthday card last week for a girlfriend who's sensitive about her age.  I wanted to give her a laugh and not emphasize her actual age  so I chose this great stamp from Artistic Impressions called "29 Again".  I think it worked out perfectly.   


Supplies:
Stamp Sets:  29 Again Artistic Impressions (AI), Picture Perfect Birthday, Swirly Birds
Ink:  Emerald Envy, Momento Tuxedo Black, Skin Toned SU Blendability Markers
Stampin' Blends:  Crumb Cake, Light Pink, 
Card Stock:  Basic Black, Whisper White, Emerald Envy
Accessories:  Paper Trimmer,  Sequins, Aqua Painter, Tom Bow Glue

Details:
1.  The card base is an 8 1/2" x 5 1/2" piece of Basic Black card stock, scored at 4 1/4".

2.  The first layer is a 5 3/8" x 4 1/8" piece of Emerald Envy card stock.

3.  The third layer is a 5 1/4" x 4" piece of Whisper White that has been stamped with the small to large swirly circles from Swirly Birds stamp set.  I only stamped from the top left corner to the bottom right corner, leaving some white space on the upper right of this panel. 

4.  There are three layers to the image panels.  The first one is a piece of Basic Black that measures 2 1/4" x 4 1/4".  The next panel in Emerald Envy measures 2 1/8" x 4 1/8", and the Whisper White panel the image is stamped on measures 2" x 4".  

5.  I stamped the "29 Again" AI image with Momento Tuxedo Black ink.  The image is coloured with an Aqua Painter directly from the Emerald Envy ink pad.  I used the skin tone Stampin' Blendabilities that were out a few years ago for the facial features, legs and arms.   
This is such an incredibly fun image to colour.  I added some sequins for some pizzazz.  I probably should have done some more shading with the hair and added some Wink of Stella here and there on her balloon or the flowers on the dress, but oh well, next time.

6.  The inside panel measures 5 1/4" x 4" and is stamped with the sentiment and party blowers from a Picture Perfect Birthday stamp set.  Love this set! 
I love these stamps from the Picture Perfect Birthday Set .... what fun!
Well that's it for this challenge.  I hope you liked my 29 Again Birthday Card.  I know the recipient will get a kick out of it.  Let me know what you think.  I hope I inspired you to get out your ink pads and start colouring your images.  

If you haven't checked out the other members of the Watercooler Wednesday Design Team, be sure to do so.  They've done such a fabulous job on their cards this week.  Click here to return to the Watercooler Wednesday WWC#165 challenge.


I'm also entering this card at the following challenges:
http://audsentimentschallengeblog.blogspot.ca/2018/04/201-happy-birthday-aud-sentiments.html
and
http://seizethebirthday.blogspot.ca/2018/04/vibrant-colors.html

Happy Stamping!
Penny Tokens Stampin' Spot 

Wednesday, February 28, 2018

WWC#159 - Marsha's "All About Christmas" Challenge

Hi Stampers.  Thanks for dropping by for the Watercooler Wednesday Challenge which is being hosted by Marsha and is "All About Christmas".  It's never too early to get working on your cards for next season and to that end, Marsha is challenging you to build your Christmas stash by making a card and posting it on this site.
Once you've made a card just snap a picture of it, post it on your blog, Facebook or other Social Media site, and then add your link to our LINKSKY at the bottom of our challenge page. The WWC158 Challenge is open until 5:00pm Mountain Time Monday March 5th, 2018.

Here's My Card:
My project for this week involves a very simple fun fold technique that creates an amazing WOW card.  This card is called a Bridge Fold and it's one of those cards that can be dressed up or down and used for any occasion.  Here's mine:

Supplies:
Card Stock: Whisper White 
DSP:  Merry Little Christmas (R Holiday2017)
Specialty Paper:  Silver Foil 
Accessories:  Paper Trimmer, Big Shot, Silver Foil Christmas Stickers from Simply Creative. Home Town Greetings Edgelit Dies, Dimensionals, Foam Tape,
Detail Scissors.

Details:
The Bridge Fold card makes for a terrific WOW card and can be made with many variations. The bridge piece can be made wider, it can be decorated, it can even be made with a window sheet so it's transparent and there are also different sizes of cards. 


Whatever style you choose, the Bridge Fold is simple to make and very impressive to look at. And, last but not least, the best part of all is that you can make two cards from one sheet of 8 ½” x 11” cardstock. It folds flat and can be sent in a standard A2 envelope. Gotta love that!
 

1. Cut base card stock to 8” x 4 ¼” and score at 1 ¼”, 2 ½” 5 ½” and 6 ¾”.


2. Cut four 1” x 4” pieces of card stock for mats.  I used Silver Foil. adhere to the two sides of the card base.

3. Cut four 3/4" x 3 3/4" strips of DSP and adhere to Silver Foil Mat.

4. Cut a 2 3/4" x 4" Silver Foil Mat for center of card and adhere.

5.
Cut a 2 1/2" x 3 3/4" piece of DSP and adhere to the Silver Foil Mat. Note: If you just intend to stamp a sentiment or write a note sub out the DSP for Whisper White card stock or colour of your choice, and do stamping or writing before attaching the bridge.


For the inside panel I cut out images from the Home Town Greetings die cut set.  The church and house were attached to the backing with glue after silver foil inserts were added to the back of each of the buildings.  there are two rows of buildings and the second or outer one was mounted with Foam Tape. I used store bought silver stars and sentiments from Simply Creative and attached them with Tear N tape. 
6. For the bridge cut a 5 ½” x 1 1/4"” strip of Silver Foil Card Stock and a 1" x 5 1/4" strip of DSP adhere together.

For my bridge I cut out a wintery scene with the Home Town Greeting dies and positioned it over the DSP after attaching silver foil to the backs of each of the houses.  
7. To mount the bridge strip to the card base fold the left hand side of the card so that the outer flap is facing outwards.  Measure up from the bottom of the card for whatever placement you want and then adhere the strip only to the front left panel.

8.  Open up and lay the center and right side panels face up and attach the right side of the bridge strip to the last panel on the right. Note: The bridge panel is only attached to the far left and far right panels. Because this is the way the card will open and shut, I used Tear N' Tape to secure.

9.  The back of the card has ample room for writing a message.  Personally I would layer a Basic Black and Whisper White  panel using the same dimensions as in #5 and attach it to the back. This panel would be my sentiment and my message or I could make a slot to attach a gift card.   Like I said the possibilities are many.

Back view of the card showing ample room for adding a sentiment or a pocket to hold a gift card.  See my note above about adding mats.
And that's all there is to it folks. This is a fun card and there are lots of examples on Pinterest and You Tube. I hope that you enjoyed my Christmas Bridge Card and will leave me a comment about it. Let me know if you've ever made one and if so how did your dimensions very from mine. Were they the same or larger.

If you came straight here and haven't taken the time to see the other Watercooler Wednesday Design Team members creations just click here to go to the challenge.  All the rules for using the Linsky are on that page too.

Before I go I also want to share the sad news that Judy Markowitz has left our design team because of family health issues.   I personally am going to really miss Judy's originality and creativity, but hope that she'll still join in on the challenges when she gets a chance.  

In Judy's place, we are welcoming Tenia Nelson to our group of Watercooler Artists.  Tenia hails from Denver, Colorado and we've been wowed by her edgy and eye-catching creations in previous challenges.  


Happy Stamping!
Penny Tokens Stampin' Spot 

NESTS OF CHRISTMAS PAPER PUMPKIN ALTERNATIVES USING #fms#662

 Here's the latest sketch challenge from Freshly Made Sketches #662 and designed by Jen T.  Make sure you check out the Design Team car...