Showing posts with label All About Christmas Challenge. Show all posts

Wednesday, May 23, 2018

WWC171 - Heidi's "All About Christmas" Challenge


This week the wonderfully talented Heidi Weaver is our hostess for the "All About Christmas" challenge at Watercooler Wednesday.  

I personally love these seasonal challenges as they really help me get an early start on my Christmas cards.  How about you?  Would you like to join us in making a Christmas themed project or card?  If so check out all the information on our home page.  This challenge is open until 5:00pm Mountain time on Monday May 28th, 2018.

Here's My Card:
I had so much fun making this Christmas card today and I'm delighted to share it with you.  

As you're probably aware by now, Stampin' Up! has revamped it's colour families and the new colours will be available in the release of the new Annual Catalogue on June 1st, 2018.  I can't wait that long however, so I though I'd give you a sneak peak at one of my favourites from the newly revamped "Brights Collection".  It's called "Gorgeous Grape".

I'm a big lover of purple and honestly I haven't felt this giddy about using purple in my Christmas card making since Stampin' Up! retired Concord Crush several years ago.  Check out these two favourites: November Christmas Card Class and Monkey86: Holidays & Sketch Challenge

So here's my Walking in the Winter Woods:


Just imagine it's around supper time in late November, and the sun is disappearing over the hillside as you finish your walk in the woods.  Snow is softly falling and the light is reflecting those last rays............


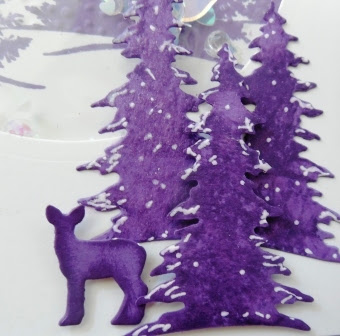
These beautiful trees and deer were die cut using the recently retired Card Front Builder Die set. These die cuts were perfect for adding an upclose scene to the bottom of the card.  I glued two trees to the card front and acetate window panel and then attached the deer and single tree with Dimensionals.  Before attaching these elements, I ran the Scenic Seasons tree stamp and Gorgeous Grape ink over the die cut tree to give the illusion of branches, and coloured around the edges with a sponge dauber. I also dabbled White Gel Pen around the tips of the trees and painted on a generous coating of Clear Wink of Stella.  These trees really shimmer and look like they have a fresh coating of snow.   


Supplies:
Stamp Up Stamp Sets:
Carols of Christmas (R), Christmas Bliss (R), Scenic Season (R)
Card Stock and Designer Papers:
Gorgeous Grape (New), Whisper White and Window Acetate 3 x 3 Sheet
Inks:  
Gorgeous Grape (New), Versa Mark
Accessories:
Big Shot, Paper Trimmer, Card Front Builder Die (R), Circle Thinlet Dies (R), Stitched Shapes Circle Dies, Wink of Stella, White Gel Pen, Sparkle Blends - Fairy Dust from Doodles Paper, Modern Label Punch, Softly Falling Embossing Folder, Heat Gun, White Embossing Powder, Adhesive Strips, Tom Bow Adhesive and Dimensionals.

Details:
1.  The card is an A2 Shaker Card with a top fold.  The base measured 4 1/4 x 11 and is scored at 5 1/2".  

2.  A 5 1/4" x 4" layer was cut from Gorgeous Grape card stock.  Before adhering this layer to the base I die cut the trees and deer from  the center of the card stock.

3.  The next panel is 5 1/8" x 3 7/8" and I cut a 3 1/4" circle in the top half.  

4.  For the window cover I cut a 3 1/2 x 3 1/2" piece of Window Acetate and adhered to the back of the panel in step 3.  Before adhering I wiped the Acetate Window sheet with my Stamping Buddy to remove any static electricity. To build the shaker wall I built a circle shape using adhesive strips and the cut circle as a guide.  

5.  The next layer is a 4" x 4" Whisper White panel that adheres to the back of the shaker outline.  I stamped the tree scene from Scenic Seasons in Gorgeous Grape and embossed to the bottom of the tree line with the Softly Falling Embossing Folder.  The dots from the embossing folder on the tree were gently sanded so it looked like fresh fallen snow.  

6.  I added Sparkle Blends Fairy Dust from Doodles Paper Playground to the inside of the shaker circle before adding the layer from step 5.  I added additional Adhesive Strips to this layer and mounted it to the card front.  

7.  I stamped the sentiment "Seasons Greetings and A Happy New Year" in Versa Mark ink on a scrap of Gorgeous Grape card stock and then heat set it.  I used the old Modern Label punch to cut out this sentiment and attached it to the top of the Acetate circle on the card front with Dimensionals.  

8.  Details related to the tree and deer scene at the bottom of the card are noted above in the photos. 

7.  I stamped the Peace on Earth sentiment from Carols of Christmas in Gorgeous Grape on a scrap of Whisper White and then cut it out with the 3" circle from Stitched Shapes dies.  This was mounted on a 3 1/4" circle of Gorgeous Grape cardstock and mounted to the inside of the card.  

I hope you enjoyed my Christmas card today.  Although it's not considered a traditional Christmas colour I think the Gorgeous Grape is very regal and works perfectly in creating this scene.  I'd love to hear your thoughts and suggestions for stamping with non-traditional colours in your creations.  

If you haven't already visited the other Design Team Artists I hope you'll revist the links before moving on.  Click here to return to the home page. 

Happy Stamping!
Penny Tokens Stampin' Spot 

Wednesday, January 24, 2018

Watercooler Wednesday WWC154 Judy's "All About Christmas" Challenge

 
The days are starting to get longer although they seem to be flying by just as fast if not faster than a month ago.  I haven't been able to scrounge up much stamping time or Mojo since the New Year but managed to get my card finished for this week's Watercooler Wednesday "All About Christmas" Challenge being hosted by Judy Markowitz.  Nothing like getting an early start on making my Christmas cards for next season!  
How about starting your Christmas stash early too. Make a card or project and link your creation with the InLinkz at the bottom of this challenge.  It's easy!

Here's some details:
          1.-No back-linking to previous posts, your must be a new project.
          2. You must link your project back to our challenge 

          3. You must link directly to your post, not simply your general blog.
          4. Can't be linked to more than 8 challenges including ours.
          5. Have fun!

Oh, and don't forget to  use the link-up below to share your project.  The Linky closes Monday, January 29th at 5:00 p.m. Mountain Standard Time.


Here's My Card:

I've made another fun Twist N' Pop card for this week's challenge.  Hands down this card style is one of my favourite fancy folds, and you'll see many examples of it on my blog.  If you're interested in making one simply click here and check out this post for all the measurements and my working template. 

Outside Details:
One of the things I really like making for these Twist N' Pop cards is the belly band.  The belly band is "the keeper of the gate".  It's what holds back the mystery of these special cards.  Honestly with a good belly band you have absolutely no idea what's going to show up inside the card until it comes off.  What fun!
For that very reason I try to make the belly band extra special.  For this card I wanted the sentiment to be bold so I chose the Special Delivery sentiment from Merry Little Labels.  It's stamped in Cherry Cobbler ink on Whisper White card stock and cut out with the large oval from Stitched Shapes Thinlets.  

For some glitz n' glam I cut out a larger oval from Red Glimmer Paper and mounted that with foam tape behind the sentiment layer.  I added a 3/4" x 4 strip of designer paper on the front of the band and then attached the Special Delivery label with Tear N' Tape to the center front.

The card front itself is very simple and has no embellishment.  I added a 5 1/4" x 4" layer of Whisper White card stock followed by a layer of patterned paper   from "Season of Style" DSP. This paper was around a few seasons ago and I still absolutely love the colourful zig zag pattern.   The chevrons of colour are Early Espresso, Crumb Cake, Cherry Cobbler and Old Olive.  Perfect!


When the belly band comes off it reveals Santa Claus and his pack of reindeer, in all their festive glory. 
Inside Details:
Every Twist N' Pop card I make has an inside story. This one begins with Santa's Reindeer, who're eager and ready to "guide his sled tonight". I stamped the reindeer images with Stampin' Ups! Cookie Cutter Christmas which was carried over from last year. I stamped them with Momento Tuxedo Black ink on Crumb Cake and then fussy cut out all those cute little heads with my detail scissors. If you don't like fussy cutting there's a coordinating builder punch.


Using an oval or other shape as a support when you're grouping images really helps to hold them together, so I cut a 3" oval from Whisper White for these ones. Rudolph's shiny nose was cut from Red Glimmer Paper and I scattered some red sequins about for extra shine. I also added a 5 1/4" x 4" piece of Season of Style designer paper to this panel. 

I kept the bottom panel of the card very simple by only adding a 5 1/4 x 4" layer of Whisper White card stock.  I stamped Merry Christmas from Teeny Tiny Sayings in Cherry Cobbler and cut this piece and the Old Olive layer out with the two coordinating dies from the Stitched Sayings Thinlet set.  

Center Panels:
There are four center panels each adding a little bit more to the story and helping to support the greeting.  
The first panel represents the homes waiting for Santa's special delivery and consists of three layers of images.  It starts with a 3 1/4 x 2 1/4" piece of DSP followed by a 2" x 3" piece of Whisper White card stock.  I cut out the sky with the Card Front Builder dies and added a piece of silver shimmer paper behind the Whisper White panel to light up the night sky.  The houses were cut from Basic Black card stock with the Home Town Greeting Edgelit and placed on a slant.  I used the retired Sleigh Ride Edgelits to cut out the final layer of sleigh and horse from Whisper White card stock.  
The second panel is Santa's Suit and is simply constructed from Cherry Cobbler and Basic Black card stocks.  I added a silver glimmer paper square for the belt buckle and some Black Basic Rhinestones for the buttons.  

For the third panel I stamped the Santa Claus image from Cookie Cutter Christmas on a piece of Whisper White Card Stock and cut this panel out with the Pinpoint Rectangles Die. I cut out two more panels from Whisper White and Cherry Cobbler card stock and attached the Santa panel to them before adhering to the DSP.   I stamped and fussy cut a second  Santa image and coloured it with markers and Wink of Stella on the bear, cuffs and hat.

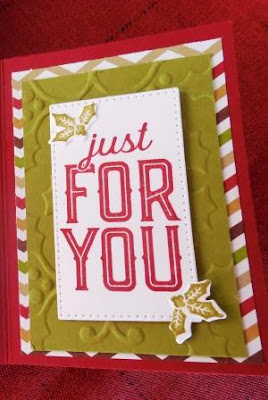
The fourth and final panel has a layer of Old Olive that was embossed with the Holly Textured Impressions Embossing Folder.  The sentiment "Just for You" is from the Merry Little Labels stamp set and the sprigs of holly were cut out with the Card Front Builder die set


Supplies:
Stamp Sets: Cookie Cutter Christmas, Merry Little Labels, Teeny Tiny Sayings
Card Stock: Whisper White, Cherry Cobbler, Basic Black, Old Olive
DSP:  Red and Silver Glimmer Paper, Season of Style (R)
Ink: Momento Tuxedo Black, Cherry Cobbler and Old Olive
Accessories:  Big Shot, Paper Trimmer, Detailed Scissors, Dimensionals, Foam Tape, Tear N' Tape, Black Rhinestones, Wink of Stella, Home Town Greetings Edgelits, Memory Box Pinpoint Rectangles #30065, Holly EF, Stitched Shapes Ovals, Sleigh Ride Edgelits, Card Front Builder Thinlets, Large Oval Punch,

I hope you enjoyed today's Watercooler Wednesday Challenge and that you've had time to check out my template and tutorial on my previous post just click here.. I also hope you've checked out the entries from all the Design Team members at the Watercooler Wednesday challenge as there are so many great ideas and inspiration.

Happy Stamping!
Penny Tokens Stampin Spot  

Last Free Shipping of the Year - December 9, 10 11, 2024

Heads up, it's time for the last FREE SHIPPING promo of the year! From December 9–11, you can shop and save on all qualifying orders of...