Hi stampers! Christmas is just around the corner and I don't know about you, but I'm way behind this year with my card making and Christmas preparations. I've been thrown off schedule with all the events happening where I live and company, but I wouldn't have changed it for the world. Life happens!
With that in mind, this week's Watercooler Wednesday challenge is going to span two weeks instead of our regular one week, to accommodate everyone's busy schedule and Christmas week. I think everyone will give a round of applause to our Administrators for arranging that. I know I will.
 Remember this Linky doesn't close until Monday, January 1st, 2018 at 5 p.m. Mountain Standard Time, so you've got plenty of time to get crafting. All you need to do is follow a few simple rules and link up your post to our blog using the Linky. Check out the details on Watercooler Wednesday Challenge blog's home page. Hope you'll join us.
Here's My Card:


This week I'm adding to my Masculine birthday stash and have chosen a country western theme for those male friends and relatives who are "a little bit country".
Supplies:
Stamp Set: Country Living, Basic Butterfly and Cupcakes Clear Stamps, Howdy from Artful Impressions
Card Stock: Whisper White, Crumb Cake, Early Espresso
DSP and Specialty Papers: Coffee Break DSP, Gold Foil
Ink: Early Espresso, Crumb Cake and Momento Tuxedo Black, H2O Twinkles
in brown shades
Accessories: Big Shot, Paper Trimmer, Circle Dies, Sponge Daubers,Stamp-a-ma-jig, Tom Bow Adhesive, Dimensionals, Aqua Painter.
When I began making this card I couldn't decide whether I wanted to showcase the boots or the guitar from the Country Living stamp set but after a few trial runs, I wound up doing a bit of both.
The Details:
The card base is an 8 1/2" x 5 1/2" piece of Crumb Cake card stock that was scored and folded at 4 1/4". I added an Early Espresso layer that measured 5 1/4" x 4 followed by a 5 1/7" x 3 7/8" piece of the coffee ring paper from the Coffee Break Designer Series paper pack.
 I added three more layers to the card front a gold foil, an Early Espresso and a Whisper White. When I was trying to decide how to feature the guitars, I began stamping using my Stamp-a-ma-jig to place the guitars end to end on a larger sheet of Whisper White card stock. I stamped the guitars in Early Espresso and coloured them with a wash of Crumb Cake and the H20's.
 I had a small Artistic Impressions stamp that said "howdy" that I thought would lend to the country feel and I stamped it randomly between the guitars with Early Espresso ink.
I splattered Crumb Cake and Early Espresso inks over this panel to give it a weathered look. When I finished stamping I cut this panel to 3" x 4 1/2" and adhered it to a piece of Early Espresso that measured 3 1/8" x 4 5/8". This panel was attached to a 3 2/8" x 4 6/8" Gold Foil panel with Dimensionals. The Gold Foil panel was glued to the center of the DSP panel.
Love those boots. I started out by stamping the boots with Momento Tuxedo Black ink on a piece of Whisper White card stock and then I applied a wash of Crumb Cake ink with my Aqua Painter. I layered on Early Espresso and some of my H2O inks in various shades of brown to finish off the design. In real life the boots look pretty leathery which was the look I was going for. The boots were added to the front layer with Dimensionals.

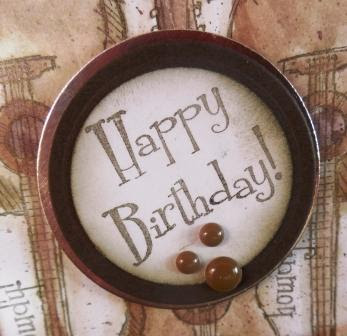
I stamped the "Happy Birthday" sentiment from my Cupcake Clear Stamps set on a piece of Whisper White card stock and cut it out with a 1 1/4" circle punch. I sponged the edges of the circle with Early Espresso. I cut additional circles from Early Espresso and Gold Foil and layered the sentiment to them. The Dots are from my stash and I can't remember the Manufacturer.
The inside of the card features the "Happy Birthday" sentiment from the Basic Butterfly stamp set, some more of the Coffee Break paper and a spare guitar that was left over from my earlier efforts. After I took the pictures of the inside of the card I actually added a 1/4" x 5" strip of Early Espresso to cover the meet lines between the DSP and the White card stock. It was an afterthought but worked well.

Well that's it for today's post. Just a simple card, but I know it will make one of our friends very happy. How about you, do you struggle with themes for your masculine cards? Do your like the country theme in this card? I'd love to hear your thoughts on this and my card.
If you haven't already done so don't forget to drop by and check out the awesome masculine cards contributed by the rest of the design team. They're pretty stunning and inspiring. Just click here to return to the Watercooler Wednesday WWC150 Challenge. Thanks for stopping by!
Happy Stamping!
Penny Tokens Stampin Spot
With that in mind, this week's Watercooler Wednesday challenge is going to span two weeks instead of our regular one week, to accommodate everyone's busy schedule and Christmas week. I think everyone will give a round of applause to our Administrators for arranging that. I know I will.

Here's My Card:


This week I'm adding to my Masculine birthday stash and have chosen a country western theme for those male friends and relatives who are "a little bit country".
Supplies:
Stamp Set: Country Living, Basic Butterfly and Cupcakes Clear Stamps, Howdy from Artful Impressions
Card Stock: Whisper White, Crumb Cake, Early Espresso
DSP and Specialty Papers: Coffee Break DSP, Gold Foil
Ink: Early Espresso, Crumb Cake and Momento Tuxedo Black, H2O Twinkles
in brown shades
Accessories: Big Shot, Paper Trimmer, Circle Dies, Sponge Daubers,Stamp-a-ma-jig, Tom Bow Adhesive, Dimensionals, Aqua Painter.
When I began making this card I couldn't decide whether I wanted to showcase the boots or the guitar from the Country Living stamp set but after a few trial runs, I wound up doing a bit of both.
 |
| Country Living Stamp Set |
The card base is an 8 1/2" x 5 1/2" piece of Crumb Cake card stock that was scored and folded at 4 1/4". I added an Early Espresso layer that measured 5 1/4" x 4 followed by a 5 1/7" x 3 7/8" piece of the coffee ring paper from the Coffee Break Designer Series paper pack.


I splattered Crumb Cake and Early Espresso inks over this panel to give it a weathered look. When I finished stamping I cut this panel to 3" x 4 1/2" and adhered it to a piece of Early Espresso that measured 3 1/8" x 4 5/8". This panel was attached to a 3 2/8" x 4 6/8" Gold Foil panel with Dimensionals. The Gold Foil panel was glued to the center of the DSP panel.
Love those boots. I started out by stamping the boots with Momento Tuxedo Black ink on a piece of Whisper White card stock and then I applied a wash of Crumb Cake ink with my Aqua Painter. I layered on Early Espresso and some of my H2O inks in various shades of brown to finish off the design. In real life the boots look pretty leathery which was the look I was going for. The boots were added to the front layer with Dimensionals.

I stamped the "Happy Birthday" sentiment from my Cupcake Clear Stamps set on a piece of Whisper White card stock and cut it out with a 1 1/4" circle punch. I sponged the edges of the circle with Early Espresso. I cut additional circles from Early Espresso and Gold Foil and layered the sentiment to them. The Dots are from my stash and I can't remember the Manufacturer.

The inside of the card features the "Happy Birthday" sentiment from the Basic Butterfly stamp set, some more of the Coffee Break paper and a spare guitar that was left over from my earlier efforts. After I took the pictures of the inside of the card I actually added a 1/4" x 5" strip of Early Espresso to cover the meet lines between the DSP and the White card stock. It was an afterthought but worked well.

Well that's it for today's post. Just a simple card, but I know it will make one of our friends very happy. How about you, do you struggle with themes for your masculine cards? Do your like the country theme in this card? I'd love to hear your thoughts on this and my card.
If you haven't already done so don't forget to drop by and check out the awesome masculine cards contributed by the rest of the design team. They're pretty stunning and inspiring. Just click here to return to the Watercooler Wednesday WWC150 Challenge. Thanks for stopping by!
Happy Stamping!
Penny Tokens Stampin Spot