Tuesday, January 31, 2023

There's Some New Kits in Town

STAMPIN' UP! - KIT COLLECTIONS 

I love kits.  How about you?  Kits take all the worry out of choosing colours, designer paper and other coordinating accents.  

Did you know that beside Paper Pumpkin Kits, that Stampin' Up! also has a wide variety of other kits?  If you didn't,  you've been missing out on something very special.  You can check out all the kits that are available by clicking here. 

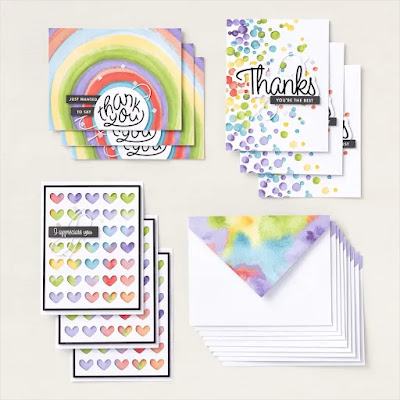
This kit came out at the beginning of January and it's so popular.  If you like to make quick and easy note or thank you cards, this will be one to check out.  It's called Saying Thanks.  


Wow, wow, wow!  Make nine bright, colourful cards in no time to say thank you, recognise friends, and share your gratitude with a bright watercolour wash that won’t go unnoticed! The Saying Thanks kit features die-cut elements you can use for peek-through cards (and maybe a cute stencil.... just saying). Each kit comes with printed die-cut sentiments in Dutch, English, French, and German.

SAYING THANKS  #162361

Price:  $18.00 CDN (before shipping and handling).

Kit Includes:

  • * Printed and foil die-cut words
  • * Pre-designed projects
  • * Step-by-step instructions
  • * Pre-cut pieces (No prep work! Get right to crafting)
  • * Makes 9 cards: 3 each of 3 designs
  • * Folded card size: 5-1/2" x 4-1/4" (14 x 10.8 cm)
  • * 9 pre-printed envelopes
  • * Enough adhesive to complete projects
  • * White baker's twine
  • * Iridescent diamond sequins
  • * A 9-7/8" x 6-1/2" x 1-3/4" (25.1 x 16.5 x 4.4 cm) printed designer box for storage or crafting on the go 

Product colours: Basic Black, Daffodil Delight, Gorgeous Grape, Granny Apple Green, Poppy Parade, Tahitian Tide

COMING FEBRUARY 1ST, 2023

Tomorrow is the start of a new month and here is a sneak peek at a great home decor wreath kit that goes on sale February 1st, 2023.  What fun!  


WREATH OF BLOOMS 

Price             $18.00 CAD plus shipping and handling.  

Available:      February 1st, 2023 

Kit includes: 

  • One 8" (20.3 cm) diameter chipboard wreath.
  • Precut paper pieces that can be rolled and shaped into three-dimensional blossoms.
  • Multicolored brads to keep everything together.
  • Thick twine to hang your wreath.
  • Enough adhesive* to complete the project.
  • Coordinating colors: Cajun Craze, Calypso Coral, Crumb Cake, Garden Green, Night of Navy, Pear Pizzazz, Petal Pink, So Saffron, white.
Note:  You'll need a hot glue gun for this project, which is not included in the kit.

Check out Sarah Douglas.  Stampin' Ups! CEO while she demonstrates how simple and easy it is to put together this charming wreath.  


Well I personally can't wait until tomorrow when this beautiful wreath is released.  Thanks for stopping by.

Happy Stamping!
Penny Tokens Stampin' Spot

Congrats Stampin' Up! for 35 Great Years!


Congratulations and Happy Anniversary Stampin' Up!  Glad to say I've been a long time customer and a Demo for part of your journey!  Well done!  

Happy Stamping!
Penny Tokens Stampin' Spot

Penny Hanuszak, CDN Independent Stampin' Up Demo

Sunday, January 29, 2023

How Do You Like Your Carrots?

Today is a quick post featuring the Thanks a Bunch stamp set from Stampin' Up!  This set is available for FREE with a qualifying purchase during SALE-A-BRATION.

Thanks a Bunch - Sale-A-Bration 2023 FREE with $60 qualified purchase. 

I had another chance to experiment with this stamp set I really like being able to pair it up with some of the fun plaid and check designs in the Dandy Design paper pack which is also available for FREE during SALE-A-BRATION.  The designs blend so well.  

Dandy Designs - Sale-A-Bration 2023 FREE with $120 qualified purchase
includes 48 sheets of 12 x 12 two-sided designer series paper (dsp) 

Here Are My Cards: 


I've created two cards from the same paper designs, one being horizontal and the other being vertical.  I can't decide which one I like best.  Perhaps you can help me and let me know in your comments which is your favourite.

The card base for both cards starts with an 8 1/2" x 5 1/2" piece of Fresh Freesia card stock which has been scored at 4 1/4" on both.  A 5 1/4" by 4" layer of Whisper White was adhered next.  Before putting this layer down I cut out tags for the sentiment two from each layer .....why waste the card stock!  
I stamped the sentiments which are from the Thanks a Bunch stamp set in Rich Razzleberry ink on the tags and mounted them to the finished card with dimensionals.   

I like to use the "Love It Chop It" method to cut the Dandy Designs designer series paper into workable layers.  To do this I basically cut a 12 x 12 sheet of designer paper into 3 equal strips in this case 4" x 12", and then cut each of those strips into 2 pieces that measure 5 1/4" and one that measures 1 1/2" x 4" strip.  Nothing is wasted.   

For this card I cut the 4" x 5 1/4" pieces of designer paper to 3 3/4" x 5" for the top  layer and adhered that to the Whisper White layer.  The scrap 1/4" strip was cut to 3 3/4" wide and used on the inside layer of Whisper White, as a design element. Because I had already cut 4 sheets of the dsp that was coordinated, that gave me a variety of strips and layers to mix and match.  For these cards I chose to pair the Fresh Freesia squares with the Fresh Freesia plaid papers.  Voila!  It lends a real crisp look to the cards.  

By changing up the paper layers and strips I'm able to achieve two different designs.  My favourite is the plaid design with the small check strip.  What about you? 

The orange carrots were coloured with Mango Melody as the base, followed by the etching stamp in Paper Pumpkin and then Cajun Craze while the purple carrot started with Fresh Freesia followed by  Rich Razzleberry.  They are so beautiful and rich looking in these colours.  The leaves are a mixture of Garden and Granny Apple Green inks.  

I hand cut both the carrots and leaves and layered them together using mini glue dots and dimensionals.  The  beautiful cord is on page 59 of the Mini Catalogue and is called Three Twine Combo pack.  The three colors of twine are Pumpkin Pie, Garden Green and Coastal Cabana.  This twine is thin but has ties and lays beautifully on the card stock.  I also added some self-adhesive sequins that I had in my stash to both cards. 
Three Twine Pack 10 years in each spool come as a Combo. 

This card features the Garden Green Twine.  The twine was wrapped around the plaid strip and I used large glue dots to hold the ends to the back of the strip.  I cut a 6" piece to tie the bow and then trimmed it down to size.  It's also held down with a mini glue dot above the carrot. 

In this card you get a better view of the Pumpkin Pie Twine that's wrapped around the dsp strip.  I think it adds a fun element to the card and some contrast to the DSP. 

I didn't take a picture of the inside of the card but you can sort of catch a glimpse of it in this photo.  Basically I added a 5 1/4" x 4" piece of Whisper White mat, and glued the left over 1/4" plaid strip that I mentioned earlier to the side of the mat. See, no waste!  


Well I hope you enjoyed seeing my "carrot" cards and will come back again  to see what else I've made using these featured products and more from both the Holiday Mini and the SALE-A-BRATION catalogues.  

If you live locally in Abbotsford and are interested in attending a class to make a grouping of four cards using these products let me know.  I'll be posting more samples later this week.  

HAPPY STAMPING!
Penny Tokens Stampin' Spot!

Penny Hanuszak, CDN Independent Demo 

Tuesday, January 24, 2023

Thanks a Bunch

Have you checked out the Sale-A-Bration 2023 selection of products that you can get for FREE when you place a qualifying order for Stampin' Up! goodies?  If not check it out here.  There are some really great stamp sets and designer paper.  

The Thanks a Bunch stamp set is on page 5 of the Sale-A-Bration flyer and is a 19 piece photopolymer stamp set that you're going to fall in love with.

This two-step stamping set makes it easy to build and create a scene. It includes a  half a dozen greetings to help you create fun friendship, spring themed cards, and some crazy abstracts if you let your imagination roam free.  This set comes in English and French versions, so make sure you've selected the correct version order # when you place your on-line order.    

If you're not familiar with two-step stamping, check out this how to video from Stampin' Up!:

The two-step stamps allow you to add detail when you layer two or more images to create a final image.  This makes your images more life like by adding texture, shadow and dimension in the colours you choose.  For the best stamping experience use Stampin' Ups! clear acrylic blocks numbers, a, b, c, and h or a Stamperatus stamping platform and play with this set before you create with it.  

Here's My First Card With this Stamp Set: 

Once again I've made use of the Dandy Designs 12 x 12 designer series paper from the Sale-A-Bration flyer, page 14 to add layers to my card front. This fun designer paper pack is available for FREE, once you place a $120 or more order.  

If you're starting out as a new Stampin' Up! Demo, this is a good product choice for your starter kit.  


These beautiful polka dots, stripes, and mini pattern designed papers provide many options for building layers on your card. For this card I chose two patterns in Calypso Coral and coordinated them with Calypso Coral and Whisper White card stocks.

I stamped off the carrots and leaves three times on a piece of Whisper White card stock and then used a rectangle die piece to cut out the image. This piece was layered on a mid-sized die from the Scalloped Contours die set.

My carrots were stamped off once scrap paper using Pumpkin Pie ink and then I added the second step stamp using full strength Pumpkin Pie for the contrast. Carrots come in so many colours that you can really have fun experimenting and choosing the colours that you prefer.

I stamped off the broadleaf in Old Olive ink before stamping above the carrot tops and then stamped over that with full strength Garden Green ink.
The sentiment was stamped in Garden Green and mounted on Garden Green cardstock.  

I hope you enjoyed my Thanks a Bunch card.  I'm going to be playing with this set more and letting my imagination fly so I can discover new and unique ways of using the images.  So stay tuned and come back for a visit. 

HAPPY STAMPING!
PENNY TOKENS STAMPIN' SPOT 
Penny Hanuszak, CDN Independent Stampin' Up! Demo 

Monday, January 23, 2023

Freshly Made Sketches - FMS#569

 For today's card I'm inspired by this sketch by Jacquie at Freshly Made Sketches:

Here is My Card: 

I recently purchased the Perched on a Tree bundle from Stampin' Up! but I hadn't used the actual stamps yet.  Here is my rendition of the FMS#569 using this set.  In my card the branch represents the cross piece on the bottom of the card, but I didn't want to take it all the way across.  

Here are some additional images:  


A neighbor recently had a fall on slippery grass and is now recovering, so I thought this card with it's soft colours and little bird would be cheery for her as she recovers and covey that we are thinking of her.  


The base card stock which is 8 1/2" x 5 1/2" is Soft Sea Foam, a colour I don't use a lot, but when I do, I really like it.  The bird was coloured with Stampin' Blends in a mixture of Soft Suede, Crumb Cake, So Saffron and Daffodil Delight. I didn't like the white edges showing around the bird so I used a Soft Suede marker to colour around them, but I don't really like that look.  I think the next time I use this bird image I'll stamp directly onto Crumb Cake card stock and work in the blends from there.  

Because several people will be putting their "get well" thoughts on the inside of this card I left lots of open space for message writing.  I added a strip of the Fancy Flora paper to both of the inside panels.  This beautiful designer paper reminds me of impressionist art work, especially Monet and Van Gogh.  It comes in a 6 x 6 pack. 
So many soft and beautiful designs to choose from.  I know I'll be using this a lot in future projects. 


HAPPY STAMPING!
PENNY TOKENS STAMPIN' SPOT


Penny Hanuszak, CDN Independent Stampin' Up! Demo


Sunday, January 22, 2023

Book Binding Card Featuring Adorable Owls

I just couldn't resist sharing one more Adorable Owls card with you.  The format or style of the card is called a Book Binding card.  For information on how to make this wonderful card click here to see one of my previous posts and instructions. 

How cute is this little one.  For this owl I chose Gray Granite Stampin' Blends for the feathers.  I put a dark gray outline around the face and then used a White Blender pen to softly draw in the colour.  I liked this effect and so I did the same for the owl's tummy. The eyes were coloured with Balmy Blue and Nuvo drops were added for a little shine and I lengthened the eyelashes with a black marker.  So sweet.  
The book binding card format is one of the quickest cards you'll ever make and it  has an instant WOW factor.  Another great feature of this card is that it doesn't use a ton of paper or card stock to make it.  In fact you can get two book binding cards from one sheet of 8 1/2 x 11" card stock.  


I took advantage of the beautiful papers in the Dandy Designs designer series pack to help choose my ink colours.  If I make this card again, I'll use my Fresh Freesia blends to add some tone around the edges of the DSP.  Fresh Freesia and Pale Papaya are a natural colour pairing and work well together in this card, to lend a very feminine look.    


This card combines sentiments from the Framed Florets stamp set and images from  the Adorable Owls.  I also stamped the large flower from Framed Florets and coloured it with Pale Papaya and Dark Flirty Flamingo Blends. I absolutely love the font mix in the Framed Florets set, especially the "Wishes for a Beautiful Birthday" sentiment.  


So I've shown you a few different cards to make during this series of Adorable Owls and I hope you've enjoyed looking at them as much as I did making them.  This grouping of cards would make a fun class.  Let me know if you live in the Abbotsford area and you'd like to participate in an Adorable Owls class.  I'd love to hear from you.  


HAPPY STAMPING!
PENNY TOKENS STAMPIN' SPOT!
Penny Hanuszak, CDN Independent Stampin' Up! Demo


Monday, January 16, 2023

Pop Up Birthday Cards with Adorable Owls

 Today's post includes a couple of cards made with Pop Up techniques and feature the following products:

  • Dandy Designs DSP - Sale-A-Bration Level 2 FREE with $120 purchase* #160836 
Here is Card Number One:

This is called a Pop and Flip fancy fold card and is an ideal card style for birthdays of any age.  It never fails to bring a smile when the card is opened.  This one features one of the beautiful plaid paper designs in Calypso Coral, Pale Papaya and Fresh Freesia colours, from the Dainty Designs 12 x 12 Designer Series Paper.

I really like this Pop and Flip design because it's quick and easy to assemble and has a real WOW factor for anyone receiving the card.  You can check this post for a masculine version of the card I made in December.  My inspiration for this card Pop and Flip card came from Dawn Griffiths.  Here is the link to her video.   

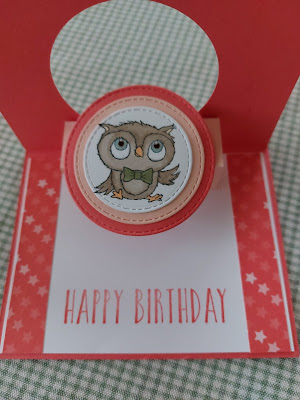
Here is Card Number Two:  Pop Out Swing Fold Card

This second card is also a fancy fold action card.  It's called a Pop Out Swing Fold. and there are many versions and tutorials on Youtube.  The one that inspired me was again created by Dawn Griffith.  Click here to view how to make this card.


This sweet little owl is coloured with Stampin' Blends. I used Crumb Cake Light and Dark for the Owl, light and dark Pale Papaya  for the beak, inside the ears, a little colour for the cheeks and the owl's feet.  The sweet little bow tie was coloured with light and dark Calypso Coral blends. 

Dawn Griffiths and the link to her Youtube instructions is here.  

I really like this last card style.  Although I didn't take a picture of it, I have added two Whisper White panels on the reverse side of the folded section for writing a message.  This works better and for me than adding a writing panel over top of the DSP.  

This is an example of one I made for an anniversary this month.  I've used papers and stamps from Stampin' Up's Everything's Rosy retired suite.  On this card I added a Whisper White panel that measures 3" x 3 1/2" and scored at the center for the message.  


I hope you enjoyed today's cards and will try out "pop up" cards in future.  They're fun and add a bit of zest to  birthday and other occasion cards.  I'd love to hear about your favourite fancy fold style so drop me a comment and I'll get back to you.  

HAPPY STAMPING!
PENNYTOKENS STAMPIN' SPOT
Penny Hanuszak, CDN Independent Stampin' Up! Demo 

Shop My 24/7 Online Store 
Click here to go to my online shop 


OCTOBER IS HERE!

Happy 1st of October!  This tenth month is one of the busiest months' of the year for me and my family.  We start off the with my hubby&...