Wednesday, July 26, 2017

Watercooler Wednesday #129 - Libby's All About Christmas Challenge

I can't believe it's mid-July already and time for the Watercooler Wednesday Christmas Challenge.  This is one of my favourite monthly challenges because it ensures I'm not caught short when it comes time to get my Christmas cards ready for mailing, and I just love seeing what everyone else made.  

Libby Fens is hosting this week's challenge, and has created a super delightful card to get us into the Christmas card mood.  

This challenge is open until Monday July 31st at 5pm MST, so why don't you get busy and make your own super Christmas card. 

Our design team takes great delight in looking at all the entries and each of us picks a card at the end of the challenge that inspires us, so why don't you play along.  All the rules are on the Watercooler Wednesday home page.

Here's My Card:
Being a Stampin'Up! demonstrator really has it's perks. For example I was able to pre-order a new stamp and die set bundle called Carols of Christmas prior to the Holiday Catalogue being distributed on September 1st.  I'm using the stamp set for today's card.


Supplies:
Stamp Sets:  Carols of Christmas, Six Sayings (R)
Ink:  Cherry Cobbler
Card Stock and Paper:  Cherry Cobbler, Garden Green, Whisper White and Me Merry Designer Series Paper (2017) 
Accessories:  Stitched Shapes Thinlet Dies, Big Shot, Paper Trimmer, Cherry Cobbler Ribbon(R), Dimensionals, Tom Bow Adhesive

   
Details:
Card Base:  8 1/2" x 5 1/2" Garden Green card stock(cs) scored at 4 1/4". 

1st Layer: 41/8" x 5 3/8" Cherry Cobbler adhered to card base.

2nd Layer:  2 pieces of  Be Merry DSP measuring 4" x 2 5/8" adhered to 1st layer.  This is fabulous paper/1

3rd Layer:  3 1/4 x 3 1/4 square of Cherry Cobbler cs, 2 7/8 x 2 7/8" square Garden Green cs, and 2 6/8 x 2 6/8" Stitched Shapes Square.  Stamp sentiment on Whisper White layer with Cherry Cobbler Ink.  Glue all layers together and mount in card c enter over the ribbon.
Ribbon layer:  Cut   a 5 to 6" piece of ribbon and adhere over the line where the two DSP pieces matched up.

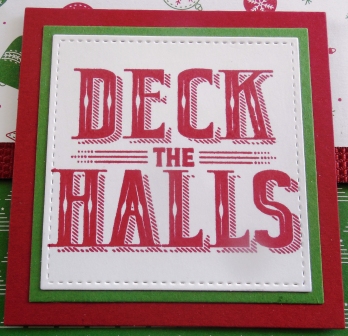
Inside of card:  Add a 4" x 51/4" Cherry Cobbler card stock and a Whisper White piece measuring 3 3/4" x 5" for the 
That's all there is to it.  A simple card with a beautiful solid image!  The beauty of this card is not only did it come together in a blink of an eye, but it is thin so will be totally mailable.

How do you like this featured stamp?  I can see it appearing on cards, packaging, picture decor and more come this holiday season.  Right now it's available for FREE for anyone wanting to sign up with Stampin' Up! until July 31st but on August 1st it becomes available to everyone as a pre-Christmas Holiday Catalogue treat.  Now that's exciting!  

If you haven't done so already visit the Watercooler Wednesday All About Christmas post to check out the design team members inspiring cards. So many awesome designs and I know you're going to love them too!  

Happy Stamping!
Penny Tokens Stampin' Spot

Tuesday, July 25, 2017

One More Week To Collect Bonus Dollars

Just a reminder .........the clock is ticking!   Only six more days to collect Bonus Dollars. This offer ends July 31st, 2017.  Don't miss out.  

Earn $6 Bonus Dollars for every $60 CDN spent during month of July.  Bonus Coupons are emailed to you and you can cash them in with any order in August. 

Happy Stamping:  
Penny Tokens Stampin' Spot

2 Great Reasons To Sign up With Christmas In July Offer


Ho! Ho! Ho!  
Time is flying!  


Stampin’ Up!'s Christmas in July promotion makes it easier than ever to sign up to be a business or hobby demonstrator, but you only have a few days to take advantage of this fantastic offer.


Sign up to join my team as a new demonstrator between now and July 31st and you’ll  get your brand new business or hobby off  to a fast start! Stampin' Up!'s Demonstrator Starter Kit is completely customizable! Build your Starter Kit your way! For just $135, you get your choice of up to $165 worth of any current Stampin' Up! products an a business supply pack valued at $70!  That's a total value of $235! 

Spend your Starter Kit dollars on your favorite stamp sets and accessories and build your own kit then add the following for FREE!
•  FREE Essentials Gift Pack (valued at  $68 CDN)
o    #103579 Paper Snips
o    #104332, SNAIL Adhesive
o    #130148 Grid Paper
o    #118485 Two Acrylic  D Blocks (one for you and one for a stamping friend!)
o    #102300 Bone Folder

Note:  When you sign up, the Essentials Gift Pack is automatically added to your Starter Kit.  The rest is up to you.
•  FREE Carols of Christmas Stamp Set from the upcoming Holiday Catalog That’s an added $26 CDN and you get a head start on those Christmas projects!

So are you ready?  All you have to do to join my team and take advantage of this great offer is to click here or you can call me if you have questions or need assistance with my IDA Code.  I'm looking forward to having you join my team.

Happy Stamping!
Penny Tokens Stampin' Spot

Wednesday, July 19, 2017

Watercooler Wednesday #128 - Heidi's Masculine "Anything Goes" Challenge

Heidi is hosting this week's Watercooler Wednesday Challenge and it's one of our most popular themes - Masculine Anything Goes.  The Design Team has gone all out to provide you with some terrific examples of Masculine cards and I expect we'll have some great entries for this one.  

I hope you'll join us by linking up your creation with the InLinkz at the bottom of the challenge. 

Here's the Rules:
1. This must be a new project---no back-linking to a previous post.
2. You must link your project back to our challenge (details at top of page).
3. You must link directly to your post, not simply your general blog.
4. Please link to no more than 8 challenges, including ours.
5. Have fun! 


Just click here to go to the Watercooler Wednesday Challenge and use the link-up for WWC128 to share your project. The Linky closes on Monday, July 24th at 5:00 p.m. Mountain Daylight Time and winners will be posted on Tuesday, June 25th at 5:00 p.m. MDT.
Here's My Card: 
In case you haven't noticed, I like to challenge myself by trying out different fancy folds.  

This week's card was inspired by a Dutch Fold Christmas card created by the incredible Dawn Griffiths.  After watching her video on Youtube I was inspired to run to my craft room and pull together this masculine version of her card.  Hope you like it.


Supplies:Stamp Sets:  One Wild Ride, Cool Treats, Gorgeous Grunge, and  Badges & Banners.
Card Stock:  Very Vanilla, Basic Gray, Delightful Dijon and Urban District DSP
Inks:  Momento Tuxedo Black, Delightful Dijon, Basic Gray, Smokey Slate
Accessories:  Paper Trimmer, Tom Bow Glue, Best Badge Punch, Urban Underground Embellishments.

Details:
Once I decided on my stamp sets, card stock and ink colours this card took me from start to finish about 15 minutes to assemble.  It was really straight forward.  Here's how I cut and assembled the pieces:

1.  Card Base:  Cut a 7 1/8" x 8" piece of Delightful Dijon card stock and score on the 8" side at 2" and at 6".  Turn and score from the top on the 7 1/8" side at 2 3/8" to the first score line and then from the bottom on that side to the first score line.  Turn to the next side and score at 2/38 all the way from top to bottom.  Okay now the hard part is out of the way. 

2. From Very Vanilla Card Stock cut the following pieces and then do all your stamping and adhere to Basic Gray pieces:
  • Outside stamped panel - cut 1 piece 3" x 3 3/4"
  • Inside stamped panel - cut 1 piece 3 1/2" x 4"
  • Inside dutch doors - cut 2 pieces 1 1/2" x 1 7/8"
3.  From Basic Gray Card Stock cut the following pieces:
  • Front and inside flap panel - cut 2 pieces 2 1/8" x 3 3/4" 
  • Front panel - cut 1 piece 3 1/4" x 4.  When adhering this piece to the front flap only add tear n' tape or glue to the left side.
  • Outside Dutch Doors - cut 2 pieces 1 3/4" x 2 1/8" 
  • Inside Dutch Doors - cut 2 pieces 1 3/4" x 2 1/8" 
  • Inside panel that attaches to card base - cut 1 piece 3 3/4" x 4 1/2".
 4.  From Designer Series Paper cut the following pieces:
  • For front and inside flap panel cut 2 pieces of DSP 1 7/8" x 3 1/2" and adhere to basic gray pieces.
  • For outside Dutch Doors cut 2 pieces of DSP 1 1/2" x 1 7/8" and adhere to the basic gray panels.   

      Stamping:
For the front panel I stamped the Motorcycle from One Wild Ride on the card stock in Momento Tuxedo Black ink.  I stamped another Motorcycle on a post it note, fussy cut it out and then placed it over top of the first Motorcycle as a mask.  

I stamped the "Life's a Journey" image in black ink over top of the mask because I only wanted the upper portion to show behind the bike.  Before putting this stamp away I stamped it on a scrap piece of Very Vanilla card stock and cut it out with the Best Badge punch.  This was adhered to the inside of the front panel  overhang. 


I stamped "Happiest Birthday" from the Cool Treats stamp set in the center of the inside Very Vanilla Panel.  I stamped "You're" and "Cool" from the same set on the upper Dutch Door.  I also stamped the "Route 66" image from One Wild Ride on a scrap of Very Vanilla and then fussy cut it out and attached it to the side of "Cool".  

I stamped the "No. 1" from Best Badges in Delightful Dijon on the Very Vanilla Dutch Door piece. 

I stamped the large spotted stamp from Gorgeous Grunge after stamping off twice in Smokey Slate and again in Delightful Dijon on the Motorcycle, You're Cool and No. 1 panels.

I added three screw embellishments from the retired Urban Underground Embellishments on an angle to the front panel.

And that's how I made this card. What do you think? If you like it please leave me a comment. I'd love to hear how you liked this version of the Dutch Fold.

Don't forget to check out the WWC128 post to see the designs from the rest of our Watercooler Wednesday artists.  They've put together some awesome inspiration for this Masculine Challenge.

Happy Stamping!
Penny Tokens Stampin' Spot

Wednesday, July 12, 2017

Watercooler Wednesday Challenge #127 - Judy's "All About Birthdays Challenge"

Here we are again for another Watercooler Wednesday Challenge.  This week Judy is hosting an "All About Birthdays" challenge.
This challenge is open until Monday July 17th at 5pm Mountain Time.  We hope you'll join us.  All the details for linking up your creation and our rules are posted on the home page of the Watercooler Wednesday Challenge Blog.  See you there!  

Here's My Card:
At the end of May before Stampin' Up transitioned into the new Annual Catalogue, I had an opportunity to purchase the Life Me Up Bundle featuring hot air balloons and clouds.   For this week's Watercooler Wednesday challenge I've made a Birthday card using this set and a fancy fold card called a Double Z Joy card, and I'm so excited to share it with you.

Supplies:
Stamp Sets:  Lift Me Up (142896) and Birthday Blooms (140658)
Ink: Night of Navy
Card Stock: Whisper White, Night of Navy and Silver Glimmer Paper (135314)
DSP:  Carried Away Designer Series Paper from the Spring Occasions Catalogue (Retired)
Accessories: Paper Trimmer, Big Shot, Heat Gun, Stamp-a-ma-jig, Bone Folder, Up and Away Thinlet Dies (142748), Tom Bow Glue, Tear N' Tape, Dimensionals.


Details:
1.  The card base  is Whisper White Card Stock measuring 11" x 4 1/4" and is scored at 2 3/4" and 5 1/2".  I used my bone folder to burnish the mountain and valley folds on the card base.

2. Before adding the Z fold panel decorate the card base with DSP and stamping. Begin on the front panel by adhering a 2 1/2 x 4" piece of DSP.  I absolutely adored this Carried Away DSP and couldn't wait to cut into it.  On the For the center panel stamp a collage of large and small balloons and clouds with Night of Navy ink.  Cut a 4" x 5 1/4" piece of DSP and adhere on the back panel. 

3. The Z Fold begins with a 10" x 2 3/4" piece of Night of Navy card stock scored at 2 3/4" and 5 1/2".  Before decorating, attach the Z Fold Panel to the center of the card base. To begin adhere two strips of Tear N' Tape to each of the end panels of the Z fold and remove the strips from the adhesive part. Now close the card base and hold the Z fold panel over the center of the card base.  Eye-ball where you want to place the Z fold and then press it down to the card base.  Your Z fold is now attached and ready for finishing.

4. To decorate the front panel cut a piece of Whisper White card stock 2 1/2" x 4 1/4" and adhere to the first panel of the Z fold. Stamp the sentiment "Hope Your Day......." in Night of Navy Ink in bottom right corner.  Using the Up and Away Thinlet Die cut out three clouds from Silver Glimmer Paper and adhere with Mini and Regular Dimensionals above the sentiment.  Using the Up and Away Thinlet Dies cut out a Night of Navy and a Silver Glimmer Paper hot air balloon.  Offset the balloon images with the silver one on the bottom and glue together with Tom Bow glue.  Adhere the balloon die cut to the front panel  and card base with dimensionals. Note:  I purposefully did not remove the slats from the basket on the die cuts so I would have a solid surface to put my glue and dimensionals on. 


5.  To finish the Z fold decorating cut two 2 1/2" x 2 1/2" piece of Whisper White card stock and adhere to the center and end panels. Cut a 2 1/4" x 2 1/4" piece of DSP and adhere on the center panel.  Note:  When you cut this piece try to keep the design looking the same as the other DSP pieces.  Finish off the Z fold by stamping the sentiment "Happiest of Birthdays To You" from the Birthday Blooms stamp set in Night of Navy.         

And that's it!  This is a quick and easy card to make.  Remember when you are cutting DSP that has an up and down pattern to make sure all pieces are cut in the same direction.  I'm totally in love with this Balloon and Mountain scene from the Carried Away DSP and didn't want to waste any of it with miss-cuts so I cut the 12 x 12  paper into two 6" x 12" strips and then cut my remaining pieces from these.  

Well that's it for today's card.  I hope you enjoyed my pictures and details on how to make this card and that it inspires you in some way.  As always, I appreciate your leaving me comments as it in turn helps to inspire me. Before you get on your way use this link to check out the birthday cards from the rest of the Watercooler Wednesday Design team.  You'll find some great inspiration there.  
Happy Stamping!
Penny Tokens Stampin' Spot 

Wednesday, July 5, 2017

Watercooler Wednesday Challenge #126 - Fiona's Feminine "Anything Goes" Challenge

Well it's a whole new month, and we're starting it off with a fresh new look.  What do you think of our new banner and badges?  It was time to update our Watercooler Wednesday image and I think that Heidi Weaver and Marsha Reid have done an excellent job of recreating our look.  I'm loving it and I think it's very modern and cool looking.  

This week's WWC126 challenge, hosted by Fiona Whitehead has a "Feminine" Anything Goes theme. 
If you're interested in playing along with this challenge all the rules can be found on the Watercooler Wednesday Home Page.  This challenge runs until 5:00pm MT Monday June 10th, 2017.   

Here's My Card: 
With summer finally heating up this week, I've noticed one of Nature's true wonders, the dragonfly, is back.  I've spotted several around my garden and have watched them in fascination.  Because they've so inspired me, I decided to feature dragonflies on my Feminine "Anything Goes" card this week.


Supplies: Stamp Sets:  Dragonfly Dreams and Beautiful You
Card Stock:  Whisper White and Tranquil Tide
Ink:  Tranquil Tide
Accessories:  Paper Trimmer, Basic Rhinestones, Tom Bow Glue, Wink of Stella, Score Pal.


Dimensions:1.  Card Base measures 8" x 7 1/4" and is scored at 4". Whisper White.

2.  1st Layer - 3 1/4" x 6 5/8" Tranquil Tide

32nd Layer - 3 1/8" x 6 1/2" 

4.  I stamped two Dragonfly images from Dragonfly Dreams on the 2nd layer in Tranquil Tide ink and added 5 Basic Rhinestones to the body of each of them.  The sentiment "Live with Passion, Laugh Out Loud and Love Deeply " is from the Beautiful You stamp set.   Wink of Stella was brushed across the wings to add some magical shimmer.

   
5.  Even Clean and Simple cards sometimes need a little boost of elegance, so using my Score Pal I scored a line 1/4" around the Tranquil Tide layer on the card front.

6.  I stamped the dancing girl and the sentiment "Life Looks Beautiful on You", in Tranquil Tide ink in the bottom right hand side of the card base inside the card.  
So that's it for this week's post.  Thanks for dropping by to take a look.  I hope you liked the clean and simple lines of this card.  Leave me a comment if you get a chance and come back next week for another great Watercooler Wednesday challenge.

Happy Stamping!
Penny Tokens Stampin' Spot

Happy St. Patty's Day!

Rainbows, a Pot of Gold, Leprechauns green beer and shenanigans are all part of celebrating St. Patty's Day on March 17th. I have a sma...