Showing posts with label Carols of Christmas. Show all posts

Wednesday, May 23, 2018

WWC171 - Heidi's "All About Christmas" Challenge


This week the wonderfully talented Heidi Weaver is our hostess for the "All About Christmas" challenge at Watercooler Wednesday.  

I personally love these seasonal challenges as they really help me get an early start on my Christmas cards.  How about you?  Would you like to join us in making a Christmas themed project or card?  If so check out all the information on our home page.  This challenge is open until 5:00pm Mountain time on Monday May 28th, 2018.

Here's My Card:
I had so much fun making this Christmas card today and I'm delighted to share it with you.  

As you're probably aware by now, Stampin' Up! has revamped it's colour families and the new colours will be available in the release of the new Annual Catalogue on June 1st, 2018.  I can't wait that long however, so I though I'd give you a sneak peak at one of my favourites from the newly revamped "Brights Collection".  It's called "Gorgeous Grape".

I'm a big lover of purple and honestly I haven't felt this giddy about using purple in my Christmas card making since Stampin' Up! retired Concord Crush several years ago.  Check out these two favourites: November Christmas Card Class and Monkey86: Holidays & Sketch Challenge

So here's my Walking in the Winter Woods:


Just imagine it's around supper time in late November, and the sun is disappearing over the hillside as you finish your walk in the woods.  Snow is softly falling and the light is reflecting those last rays............


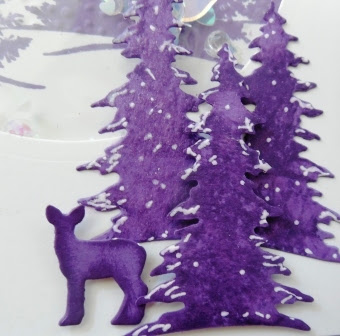
These beautiful trees and deer were die cut using the recently retired Card Front Builder Die set. These die cuts were perfect for adding an upclose scene to the bottom of the card.  I glued two trees to the card front and acetate window panel and then attached the deer and single tree with Dimensionals.  Before attaching these elements, I ran the Scenic Seasons tree stamp and Gorgeous Grape ink over the die cut tree to give the illusion of branches, and coloured around the edges with a sponge dauber. I also dabbled White Gel Pen around the tips of the trees and painted on a generous coating of Clear Wink of Stella.  These trees really shimmer and look like they have a fresh coating of snow.   


Supplies:
Stamp Up Stamp Sets:
Carols of Christmas (R), Christmas Bliss (R), Scenic Season (R)
Card Stock and Designer Papers:
Gorgeous Grape (New), Whisper White and Window Acetate 3 x 3 Sheet
Inks:  
Gorgeous Grape (New), Versa Mark
Accessories:
Big Shot, Paper Trimmer, Card Front Builder Die (R), Circle Thinlet Dies (R), Stitched Shapes Circle Dies, Wink of Stella, White Gel Pen, Sparkle Blends - Fairy Dust from Doodles Paper, Modern Label Punch, Softly Falling Embossing Folder, Heat Gun, White Embossing Powder, Adhesive Strips, Tom Bow Adhesive and Dimensionals.

Details:
1.  The card is an A2 Shaker Card with a top fold.  The base measured 4 1/4 x 11 and is scored at 5 1/2".  

2.  A 5 1/4" x 4" layer was cut from Gorgeous Grape card stock.  Before adhering this layer to the base I die cut the trees and deer from  the center of the card stock.

3.  The next panel is 5 1/8" x 3 7/8" and I cut a 3 1/4" circle in the top half.  

4.  For the window cover I cut a 3 1/2 x 3 1/2" piece of Window Acetate and adhered to the back of the panel in step 3.  Before adhering I wiped the Acetate Window sheet with my Stamping Buddy to remove any static electricity. To build the shaker wall I built a circle shape using adhesive strips and the cut circle as a guide.  

5.  The next layer is a 4" x 4" Whisper White panel that adheres to the back of the shaker outline.  I stamped the tree scene from Scenic Seasons in Gorgeous Grape and embossed to the bottom of the tree line with the Softly Falling Embossing Folder.  The dots from the embossing folder on the tree were gently sanded so it looked like fresh fallen snow.  

6.  I added Sparkle Blends Fairy Dust from Doodles Paper Playground to the inside of the shaker circle before adding the layer from step 5.  I added additional Adhesive Strips to this layer and mounted it to the card front.  

7.  I stamped the sentiment "Seasons Greetings and A Happy New Year" in Versa Mark ink on a scrap of Gorgeous Grape card stock and then heat set it.  I used the old Modern Label punch to cut out this sentiment and attached it to the top of the Acetate circle on the card front with Dimensionals.  

8.  Details related to the tree and deer scene at the bottom of the card are noted above in the photos. 

7.  I stamped the Peace on Earth sentiment from Carols of Christmas in Gorgeous Grape on a scrap of Whisper White and then cut it out with the 3" circle from Stitched Shapes dies.  This was mounted on a 3 1/4" circle of Gorgeous Grape cardstock and mounted to the inside of the card.  

I hope you enjoyed my Christmas card today.  Although it's not considered a traditional Christmas colour I think the Gorgeous Grape is very regal and works perfectly in creating this scene.  I'd love to hear your thoughts and suggestions for stamping with non-traditional colours in your creations.  

If you haven't already visited the other Design Team Artists I hope you'll revist the links before moving on.  Click here to return to the home page. 

Happy Stamping!
Penny Tokens Stampin' Spot 

Wednesday, August 23, 2017

Watercooler Wednesday #133 - Penny's All About Christmas Challenge


It's time for another Watercooler Wednesday "All About Christmas" Challenge, and guess what?  I'm hosting this week.  

I thought I would start off the Christmas Challenge using the one stamp set that is currently available prior to the Holiday Catalogue going live on September 1st, called "Carols of Christmas".    You're going to see a lot of cards made with this stamp set and matching die cuts and the reason is simple, combined they create a remarkable range of combinations and beautiful stamping experiences.   

Here's My Card:


Supplies:
Stamp Sets: Carols of Christmas #144804, Colorful Seasons #143726, Six Sayings Hostess set #139852(R)
Card Stock: Dapper Denim, Whisper White
DSP: Color Theory Paper Pack - Dapper Denim and White Crackle
Inks: Dapper Denim and Versa Mark
Accessories: Big Shot, Paper Trimmer, Card Front Builder Framelit #144674, Stitched Shapes Framelits (Circle), Snow Flurry Punch #139680, White Embossing Powder, Basic Rhinestones

Details:  
1.  Cut Dapper Denim card base to measure 8 1/2" x 5 1/2" and score at 4 1/4".

2.  Cut a 5" x 4" piece of Whisper White for the next layer and cut out the corner pattern with the beautifully efficient Corner Builder Framelits.  Line up the die close to the edge of the card stock and make sure its even before running through the big shot. Tip:  When you need to make sure a cut is precisely in place use a bit of Washi Tape to hold the die down before cutting.  Works like a charm.  Glue the panel to the card base using a fine detail liquid glue around the edges of this layer and make sure the lines and corners are adhered.  

3.  Cut a 2 1/4" x 4 3/8" Dapper Denim panel and top with a 2" x 4 1/8" piece of the dapper denim crackle design paper from the Color Theory paper pack.  Randomly stamp the small and large snow flakes from the Colorful Seasons stamp set in Dapper Denim ink.  Glue to center of Whisper White layer. 


4.  Cut a 3 1/4" circle from Dapper Denim card stock and a 3" Stitched Circle from Whisper White card stock.  

Here you can see the snowflakes stamped on the designer series paper. 
5.  Stamp the Peace on Earth sentiment in the center of the circle and randomly stamp the small snowflake from Colorful Seasons around the edges of the sentiment.  Note:  I stamped my sentiment and snowflakes* prior to cutting it out with the die and the images were too far apart to show up properly on the cut image.  In future I'll cut my circle first and then stamp on it. Lesson learned. 
*Oops, you can barely see those small snowflakes stamped around the edges of this circle.  Next time I'll cut out the circle before stamping additional images.

6.  Stamp two small snowflakes on a scrap of Dapper Denim card stock with Versa Mark ink and emboss with White Embossing powder**.  Cut out the snowflakes with the Snow Flurry Punch and mount to card face and circle with dimensionals.
When I was stamping this snowflake for my Perpetual Calendar project last month I made a great discovery. The small snowflake in the Colorful Seasons stamp set is almost the same shape as the small snowflake in the Snow Flurry punch.  What do you think?  Pretty close and gives a different look from the die in the matching framelits.   Just sayin'......

**Okay, who put the Very Vanilla Embossing Powder cap on the Whisper White jar?   I didn't really notice this color variation until I was taking pictures of my card.  When I checked my Embossing Powder bottles sure enough there had been a switch-up with the caps.......... another oops?
7.  Cut a 5 1/4" x 4" piece of Whisper White card stock for the inside panel.  Stamp a sentiment in the center.  I used the Merry Christmas to You and Yours from the retired "Six Sayings Hostess Stamp set".  I really love the size and style of the fonts in this set and use them often.  To finish off the inside panel I randomly stamped a couple more snowflakes.
Well there you have it, the first of many cards I'll be making and sharing with you featuring the Carols of Christmas stamp set and Card Builder Framelits. I hope you like it as much as I do and will leave me a comment.

If you haven't already checked out the rest of the Design Team Artists creations this week, I suggest you do so. What a fantastic range of cards and inspiration.
Happy Stamping! 
Penny Tokens Stampin' Spot

Wednesday, July 26, 2017

Watercooler Wednesday #129 - Libby's All About Christmas Challenge

I can't believe it's mid-July already and time for the Watercooler Wednesday Christmas Challenge.  This is one of my favourite monthly challenges because it ensures I'm not caught short when it comes time to get my Christmas cards ready for mailing, and I just love seeing what everyone else made.  

Libby Fens is hosting this week's challenge, and has created a super delightful card to get us into the Christmas card mood.  

This challenge is open until Monday July 31st at 5pm MST, so why don't you get busy and make your own super Christmas card. 

Our design team takes great delight in looking at all the entries and each of us picks a card at the end of the challenge that inspires us, so why don't you play along.  All the rules are on the Watercooler Wednesday home page.

Here's My Card:
Being a Stampin'Up! demonstrator really has it's perks. For example I was able to pre-order a new stamp and die set bundle called Carols of Christmas prior to the Holiday Catalogue being distributed on September 1st.  I'm using the stamp set for today's card.


Supplies:
Stamp Sets:  Carols of Christmas, Six Sayings (R)
Ink:  Cherry Cobbler
Card Stock and Paper:  Cherry Cobbler, Garden Green, Whisper White and Me Merry Designer Series Paper (2017) 
Accessories:  Stitched Shapes Thinlet Dies, Big Shot, Paper Trimmer, Cherry Cobbler Ribbon(R), Dimensionals, Tom Bow Adhesive

   
Details:
Card Base:  8 1/2" x 5 1/2" Garden Green card stock(cs) scored at 4 1/4". 

1st Layer: 41/8" x 5 3/8" Cherry Cobbler adhered to card base.

2nd Layer:  2 pieces of  Be Merry DSP measuring 4" x 2 5/8" adhered to 1st layer.  This is fabulous paper/1

3rd Layer:  3 1/4 x 3 1/4 square of Cherry Cobbler cs, 2 7/8 x 2 7/8" square Garden Green cs, and 2 6/8 x 2 6/8" Stitched Shapes Square.  Stamp sentiment on Whisper White layer with Cherry Cobbler Ink.  Glue all layers together and mount in card c enter over the ribbon.
Ribbon layer:  Cut   a 5 to 6" piece of ribbon and adhere over the line where the two DSP pieces matched up.

Inside of card:  Add a 4" x 51/4" Cherry Cobbler card stock and a Whisper White piece measuring 3 3/4" x 5" for the 
That's all there is to it.  A simple card with a beautiful solid image!  The beauty of this card is not only did it come together in a blink of an eye, but it is thin so will be totally mailable.

How do you like this featured stamp?  I can see it appearing on cards, packaging, picture decor and more come this holiday season.  Right now it's available for FREE for anyone wanting to sign up with Stampin' Up! until July 31st but on August 1st it becomes available to everyone as a pre-Christmas Holiday Catalogue treat.  Now that's exciting!  

If you haven't done so already visit the Watercooler Wednesday All About Christmas post to check out the design team members inspiring cards. So many awesome designs and I know you're going to love them too!  

Happy Stamping!
Penny Tokens Stampin' Spot

Paper Pumpkin Alternatives April 2024 and Sketch Challenges

The past week was so busy that time literally flew by.  I have a number of projects on the go, including working on my April 2024 Paper Pump...