Friday, March 18, 2011

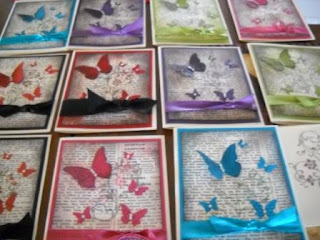
Beautiful Wings Thank You Cards

Along with all the March Birthday Cards, I also need to send thank you cards to a number of folks who've had us for dinner, invited us to play golf and for customers who have orderd from me during the current Sale-A-Bration promotion.
Since I had a number of cards to make I wanted a design that was easy to reproduce and one that I could use for not only "Thank You Cards" but for other occasions too such as "Sympathy", "Thinking of You", "Just a Note", or an "Anniversary" or Wedding card".  I know I won't get bored with the design I came up with and these cards go together so quickly they'd be great for a swap or being made in an assembly line fashion. 

When thinking of what design I would make I remembered seeing a lot of cards and scrapbook pages that have incorporated the Basic Black and Very Vanilla DSP "Newsprint" (117166 page 174 of IB&C). This DSP is the perfect medium for stamping on.  And, by matching the ink, mounting and embellishment cardstocks, and ribbon, it makes for a very pretty and easy card.  I chose Very Vanilla cardstock for my card base and the coloured cardstock and matching satin ribbons I chose were:  Cherry Cobbler, Melon Mambo, Elegant Eggplant, Tempting Turquoise and Old Olive. 

Here are some pictures of my samples.  Hope you enjoy them.  Let me know.


By matching the card stock for the embellishments, the ribbon  and mounting card stock piece, you get a strong colour surge.  I've tied in the ink by sponging and using markers in the same color on the flowers in the swirl stamp.  The leaves are stamped in Wasabi and Pear Pizzazz greens which I've added using markers.  I've also used the 2-way glue pen along the stems and then added dazzling diamonds for a glittery but subtle effect. You can just see the little trails of glitter in the picture above.  I added  Basic Rhinestones to the butterflies for the final touch. 

Inside of the card stamped with the label from Baby Blossoms and the swirl from Elements of Style.  I stamped the label in ink that matched the cardstock on the front of the card and I used my Wild Wassabi and Pear Pizzazz marker pens for the "thank you" sentiment.  It just seemed to tie everything together.

Cards and matching envelopes.


Monday, March 14, 2011

How Do You Like Your Cupcakes

Ever since the Occasions Mini Catalogue launched on January 4th, I've been head over heels in love with the Create a Cupcake Punch and matching Stamp set featured on page 22 of the catalogue.  I knew the Create a Cupcake Stamp set would be the perfect stamp set to use for birthday cards because it's so cute and cupcakes are so in vogue right now!  With March being one of the biggest birthday months for all my girlfriends, I got busy yesterday crafting cupcake birthday cards.  The following are a sampling of my cards inside and out.  Hope you enjoy them. 


By flipping the little cupcake bottom you can create a nice little purse.  The large and small oval punches complete the flap and handle.  A Basic Rhinestone acts as a clasp on the purse fronts.  I've added a purse and one of the cute sentiments from this set on the inside of the card. 


I made five cards using the Create a Cupcake stamp set. Each card is made with a mixture of either Baja Breeze or Pacific Blue card stock for the base and details in Regal Rose and Riding Hood Red DSP and card stock.    Each card front features a singleton cupcake with a cherry on top.  The icing is stamped in pink pirouette ink and then blinged up using a two-way glue pen and Dazzling Diamonds glitter.  Although the 5 cards are basically the same I've tweaked the fronts and the insides so there are minor changes, i.e. changed up the ribbons and bows,  changed the angle of the red riding hood base card  and the sentiments.  Here are some closeups.


You might also recognize the DSP I've used for some of the cards.  Although the striped and large polka dot designed papers are from the glittery designer series paper called Candy Cane Christmas that was featured in the Holiday Mini Catalogue (2010), they work with the cupcake theme too.  If you're interested in making any or all of these cards let me know (pennyhanuszak@telus.net).  I will be holding a card class in April that will feature this punch and stamp set. 

Saturday, March 12, 2011

His Mom's Perogys

When my husband who is of Ukrainian decent was growing up he always looked forward to his mother's home style cooking. What man doesn't!  His mom made all the traditional Ukrainan meals including varenyky (small little pastries filled with fruit) head cheese, holubtsi/holubchi (cabbage rolls), lazy cabbage, halushki (sugared donut holes) and his favourite Sauerkraut Perogy. In fact everyone in the family was head over heels in love with her perogys.  Although his mother was English she learned the secret of making these and other traditional meals from her mother-in law, and she would lovingly make them for his father and siblings.  My husband loved these little fried dumplings served with sour cream, lots of fresh white onions and a big hunk of fried Ukrainian or kubasa sausage.  I never learned to make Ada's perogys when I first married my husband, and unfortunately she passed away in 1982.  I searched her cook book and bits and scraps of recipes she had but she never recorded her treasured recipes, she knew them by heart.

Some time after she passed away, I was reading a celebrity interview in the TV weekly with hockey great #99, Wayne Gretsky and he had given them his mom's recipe for perogys.  It sounded so similar to what my husband's mother made that I just had to try out this recipe, and lo and behold the family agreed with great glee that they were just like Ada's!  I've done some tweaking over the years and here is my recipe.  Hope you enjoy it:

1 ½ cups warm water
5 cups all purpose flour plus ¼ cup
1 tsp salt
4 tbsps oil
2 eggs well beaten
1 large can or jar of sauerkraut
1 large white onion chopped
Package of Crisco lard
Tin foil for freezing perogies
Butter and sour cream

1. Mix 5 cups flour and salt in a large bowl
.


2. Add the oil and eggs to 1 ½ cups of warm water, and mix well.


3. Stir the liquid into the flour and mix until smooth.


4. Cover and let stand for two hours.
5. Drain sauerkraut and put in frying pan. Add 1 cup of chopped onion and heat in frying pan until onions are transparent. Turn off heat.
6. Fill a large deep pot with water and bring to a boil.
7. Sprinkle dough with flour and roll out until about ¼ inch thick and cut into 3-inch circles.


8. Place a spoonful of sauerkraut and onion filling on one half of each round. Moisten the inside edge and fold over and seal edge securely all around.


9. Drop six perogies into boiling water. Stir occasionally to prevent from sticking. Cook for 3-4 minutes. They will float to the surface when they are done. Remove with a slotted spoon.

10. If serving immediately, fry in butter in a frying pan. Serve with sautéed onions and sour cream.
11. If freezing for future use, place boiled perogies on a sheet of tin foil. Coat with 1 tablespoon of the Crisco lard and sprinkle with fresh cut white onion. Fold the tin foil into packets and freeze for up to 3 months.


Potato Cheese filling:
Mix sautéed onions, dry curd cottage cheese, shredded cheddar cheese and bacon bits into mashed potatoes. Add a mashed clove of garlic if you fancy that flavour. Season with salt and pepper to taste.

Hope you enjoy this recipe. As Easter approaches I plan on making this recipe for our big meal. 

Thursday, March 10, 2011

Masculine Birthday Card

It was my brother-in-law Ken's birthday at the end of February and I made him a tri-fold card.  Both the stamp set an DSP that I used are retired but work well for a masculine card.  The stamp set which is from 2004 is called "Bareback". The cardstock that I've used is So Saffron, Dusty Durango and Early Espresso.

This card design is one of my favourites and is so easy to make.  You simply:

*Cut a piece of card stock 5 1/2" x 12 inches for your base.
*Score on the 12 inch length at 2,4,8, and 10 inches
*on the 5 1/2 side, measure in 1 1/2" and cut from the 2" scoreline to the 10" scoreline, flip cardstock and repeat on the other side. 
*Fold card on score lines.  When folded you will have a T-shaped piece for the front of the card and when looking down at the card you will see zig zag boxes.  See picture below. 
* To decorate sections cut dsp as follows:  4 pieces of dsp 1 3/8/ x 1 3/8,  2 pieces of dsp 1 3/8 x 3 7/8, 2 pieces of patterned paper 2 3/8 x 3 7/8.  Adhere all pieces to the card base. Decorate front T shape with large stamped image.  I've mounted mine using a scallop circle. 

Here are some views of the finished card:


Here's a side view of the card showing the zig zag shape of the cuts.
I love this sentiment, it's so beautiful!

Tuesday, March 8, 2011

Canada Workbox Giveaway

While visiting Andrea Walford's awesome blog today, I read about a contest called the “Canada Workbox Giveaway ” which is open to Canadian crafters interested in winning one of their fabulous workboxes.  These are self-contained storage centers that fold up to look like cupboards, but in fact open up to reveal the most awesovery clever storage/work centers.  If you're a Canadian stamper and interested in finding out how to enter this contest please visit Andrea's site by clicking "here for the complete rules. 
There are actually 9 preliminary draws being held, and if you are the lucky winner of the preliminary giveaway hosted by the Original Scrapbox you will win a Ribbon Box (Retail $19.95) and one entry into the Grand Prize Drawing for a Raised Panel Vanilla Workbox which is one of their most popular and sought-after items. Giveaway open from March 1st to March 8th, 2011 at 11:59pm.

If you are selected as a preliminary winner of the Ribbon Box, you will then be entered into the grand prize drawing held on The Original Scrapbox Website on March 11, 2011. On that date, a random drawing will select a winner from all of the finalists to receive one Raised Panel Vanilla Workbox (value $1295.00 U.S. dollars).  *The contest is open to addresses in Canada only*

Happy St. Patty's Day!

Rainbows, a Pot of Gold, Leprechauns green beer and shenanigans are all part of celebrating St. Patty's Day on March 17th. I have a sma...