Tuesday, February 28, 2017

On February 21st Stampin' Up! let us know about their second release of FREE products for the 2017 Sale-A-Bration sales period.  The release included two new stamp sets and today I want to share a video by Carrie Cudney demonstrating how to use one of them.  

She's demonstrating how to be creative with the Make a Medallion stamp set, which is so versatile.  This set is an 8 piece Photopolymer that coordinates with the Circle Framelit Dies.  You can't purchase this stamp set but you can earn it for FREE by placing a minimum $60CDN order (before tax & shipping and handling) with me before March 31st, 2017.  Check out my on-line store.

Here's Carrie's great video presentation:

Happy Stamping!
Penny Tokens Stampin Spot

Wednesday, February 22, 2017

Sale-A-Bration - 2nd Release - New Items

Just when you think Sale-A-Bration couldn't get any better… Stampin' Up has
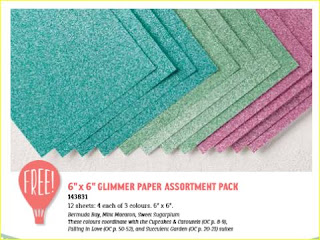
added 2 new stamp sets and a super awesome 6x6 stack of Glimmer Paper. How cool is that!  This additional promotion is available between February 21st and March 31st.  Get yours while the supplies last.

What Is All The Fuss About?
To earn any of these three new products you simply have to place an order of $60 CDN.  Other ways to take advantage are by hosting workshops or joining Stampin' Up!
 

Make a Medallion Stamp Set - photopolymer - #143274


6x6 Glimmer Paper Pack Assortment: Bermuda Bay, Mint Macaron, Sweet Sugarplum #143831

Reverse Words Stamp Set, clear mount #143319 or wood mount #143316

New Flyer:
CLICK HERE to view the brochure with the 3 new releases

Bringing Back Birthdays .... cards that is!

In this day of technology and speed most people tend to respond to special occasions and events by sending out e-cards and Facebook messages.  Sending or giving a friend a card the old fashioned way, is often overlooked by the sender, but the receiver never forgets the delight of picking up the mail and discovering something special, just for them.  It's like getting extra presents!

For my birthday this month I received greetings both electronic and by mail and I was delighted with all of them. Everyone was so thoughtful and it made my day so special.  

I just had to share three very special handmade cards I received.They simply made my day and you couldn't wipe the grin of my face or replace the joy in my heart as I opened them.  Thanks Betty Lee, Phyllis and Heather for not only remembering my day but for sharing in my joy of a hand made card and taking the time to drop them in the mail.  

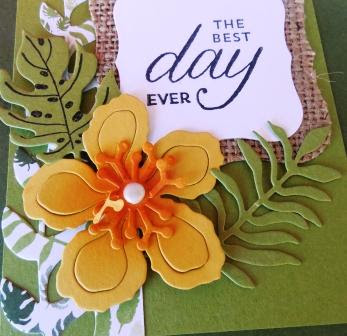
Betty Lee's card was made with the beautiful Botanical Builder Dies and paper.  The tropical feel of this card just made me so happy.  I loved it!
Oops that stamen got a little bent out of shape when I was photographing this card.  The colouring on this flower and leaf are fantastic.  I also like the burlap die cut in the background.  It really enhances the sentiment.  Great job Betty Lee.

Phyllis' "Beautiful You".  This is like a mini piece of art!

I'm a super huge fan of the Stampin' Up! Beautiful You stamp set  and this card just embodies the versatility you can achieve by adding colour.  Beautiful Phyllis.  I was blown away by the colour mix and artistry in this card, not to mention the good wishes for my day!
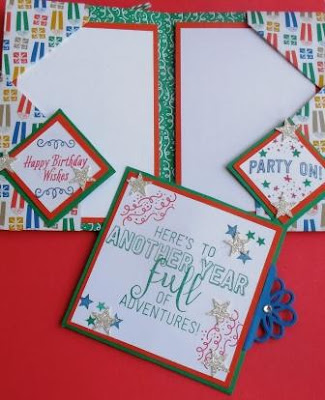
Inside and out these cards designed by my wonderful sister Heather, were so awesome.  I'm a huge fan of Graphic 45 Designer papers and Stamps and this one is especially beautiful.  I love that this card is tall.  I'm so used to seeing A2 sizes that it was refreshing to get one in this style.  Something I'll have to remember. 

I love the sentiment Heather used for this card.  It's absolutely so true and I really try to live that mantra.   The stamped image reminds me of one of my favourite paintings by Jack Vetriano, "The Singing Butler".  Awesome!  Thanks so much Heather for remembering me in this way. 
I hope you enjoyed this card share as much as I did.  Once again ladies thanks for making my day!

Happy Stamping!
Penny Tokens Stampin' Spot 

Watercooler Wednesday - #107 Penny's Masculine Anything Goes Challenge

Hi stampers!  Welcome back to the Watercooler Wednesday challengeThis week I'm happy to bring you a Masculine Challenge.  The style is an "anything goes" challenge so there aren't really any restrictions other than it has to be a guy card.    
Here's My Card:
I made this masculine birthday card for my dear brother-in-law Ken's February birthday.  Ken's kind of a burly guy but he's not reluctant to say he likes bling and he certainly is a fan of Stampin Up!, so I thought a combo of Bear Hugs and Balloon Adventure would fit the bill for his special day.
This is a Shadow Box card. I've haven't made a Shadow Box card for some time now, but when I saw a recent Dawn Griffiths post on Youtube  using Balloon Adventures and this card style, I knew I wanted to CASe it.  

What a fun card to make! I fell in love with this card style all over again.  For sizing and details on how to make a Shadow Box card just click on Dawn's name above for a direct link to the video.


Supplies:
Stamp Sets: Bear Hugs, Balloon Adventures, Bella and Friends
Card Stock:  Soft Suede, Very Vanilla, Basic Black
DSP:  Gold Glimmer Paper,  Type Style Designer Paper (R)
Ink: Tuxedo Momento Black, Soft Suede, Crumb Cake
Accessories:  Balloon Pop-Up Thinlet Dies, Bunch of Banners Thinlets, Big Shot, Trimmer, Dimensionals, Tom Bow Glue,Glue Dots.
Balloon Pop Up Thinlet Dies

Balloon Adventures part of the Party Animal Suite in the new Occasions 2017 Catalogue.
The sentiment is from Balloon Adventures, the little bear is from Bear Hugs and the small balloon  image is from Bella and Friends. The Very Vanilla panel is 5" x 3 1/2" and is layered on Basic Black.

The layers for my card front are:  5 1/2 x 8 1/2" Soft Suede card base.  1st layer is  5 1/4" x 4" Very Vanilla, 5" x 3 3/4" DSP layer.  For the layers with the bear I cut a 3" x 3 1/2" Soft Suede, 2 3/4" x 3 1/4" Basic Black and a 2 1/2" x 3" Very Vanilla panels.
Here's a side view of the sentiment and balloons.  The "Party On" sentiment is from the Balloon Adventures stamp set. I stamped it in Momento Tuxedo Black ink on a scrap of Very Vanilla card stock and then cut it out with the Bunch of Banners Thinlet Dies.  The edges  were sponged with Soft Suede ink and I used a thumping technique to apply for ink to the banner to give it a mottled appearance.   I used the negative image dots from the die cut balloons as additional trim and applied them with glue dots. 

The Gold Glimmer Paper balloons were perfect for this card.   They add such sparkle to the soft Suede paper.  The large balloon die from Balloon Pop-Up Thinlets fits perfectly on this panel of the card so no extra trimming is required.  I used the "Let's Celebrate" stamp from the Balloon Adventures Stamp Set.
Well that's it for today.  I hope you enjoyed this card and will add this technique to your collection of fancy fold cards. If you haven't already checked out the other Watercooler Wednesday Design Artist's cards make sure you stop by. This challenge is open until 5:00pm MT so if you'd like to link up your masculine card creation, we'd be thrilled to have you join us. 


Happy Stamping!Penny Tokens Stampin' Spot 

Thursday, February 16, 2017

Wacky Watercooler February 2017 Spring Fever Blog Hop

Hope you had a wonderful Valentine's Day this week. I know for some of you you're still getting winter storms so you'll probably welcome our thoughts of better things to come with our Spring Fever Blog Hop which runs from today through Saturday February 18th, 2017.  Hopefully no matter what your weather situation, you'll be able to have happy Spring thoughts.  

The Wacky Watercooler blog hop is a circular hop so no matter whether you start at the beginning of the list or enter at some other point, if you continue moving from participant to participant you'll always wind up where you started. 

This time around I'm very excited to be starting off the hop, so you're either beginning or ending at my site.  Hope I don't disappoint.  There are a total of 8 other talented paper crafters following me who're all eager to share their creative and exciting projects with you, so I hope you'll relax, settle in and enjoy the hop! 

My First Project - Sparkles:  
It seems I'm caught up in Sparkles and Birthdays this week, so it's appropriate that my first project combines both.  This is a fun birthday/gift card holder I've made for a very special girlfriend of mine who absolutely "sparkles" in everything she does.  

Supplies:
Stamp Sets:  Love Sparkles #143183
Card Stock:  Whisper White and Smokey Slate, Silver Glimmer Paper, Silver Foil Card Stock
DSP:  A Little Foxy Designer Series Paper Stack #141637
Ink:  Momento Tuxedo Black
Accessories:  Big Shot, Mini Treat Bag Framelit, Balloon Pop-Up Thinlet #142753, Star Blast Edgelits#142763, Tom Bow Glue, Basic Rhinestones, Stitched Rectangles (Non-Su)

 
This project started with a Mini Treat Bag made with the dies of the same name.  Since my friend is such a glam and glitzy girl, I chose this beautiful designer paper from the "A Little Foxy Designer Series Paper stack to go with my gray and white theme. It was perfect.  Note:  You need two 6x6 sheets to complete the mini bag.

I absolutely love the Star Blast Edgelits.  They just instantly create happiness and excitement on a project.  For this bag I cut both a Smokey Slate and a Silver Glimmer Paper star blast image.  I attached them with Mini Glue dots at the base so the stars would still bob and move around once they were adhered to the bag front. For some additional glam I added a strip of silver foil to the Smokey Slate card stock base and adhered this piece on an angle across the bag. 

For the sentiment I stamped the "Sparkle" sentiment In Momento Tuxedo Black ink on a scrap of Whisper White card stock and cut it out with a non-SU stitched rectangle die.  I added some silver foil stars and Basic Rhinestones to complete the sentiment piece.    

The inside gift card was made with a piece of Whisper White card stock that measures 5 1/4" x 3 7/8".  The overlay was made by cutting a piece of Smokey Slate card stock with the Balloon Pop-Up Thinlet.  

I added touches of Silver Glimmer paper for the balloons and stars and some small Basic Rhinestones.  I cut two Smokey Slate bows using the Bow die cut from this set for the handle on the card.  The sentiment "It's Your Day" is from the Love Sparkles stamp set.


The back of the insert has a 2" by 3 7/8" piece of the designer series paper across the bottom. It was attached with a small amount of Tom Bow glue on three sides. The gift card slides in length-wise in the center. The sentiment "happy birthday" was stamped at the top of the insert with Momento Tuxedo Black ink. 


My Second Project:  A No-Cut DSP Gift Folder CASE

My second project is also birthday related and uses products from the Party Animal Collection in the Occasions 2017 catelogueMy inspiration for this project came from the very talented Diane Barnes, who has been making what she calls a "No-Cut Patterned Paper Gift Folder" since 2008.   

Here's What I Came Up With:

This is the front of the folder.  

Inside the gift folder are two side pockets where you can add notes.  I've left mine blank so I can personalize for the fellow I'm going to give this to. 


This is the back view of the gift card holder. The Pacific Point bow on the side is the gift card pullout. Because of the additional pull-out, you would have to custom make an envelope to hold this card.


Supplies:
Stamp Sets: Balloon Adventures #142823, Love Sparkles #143183, and Avante Garden (143272 - Happy Birthday)
Ink: Emerald Envy, Watermelon Wonder, Pacific Point
Paper: Party Animal Designer Series Paper, Silver Glimmer Paper
Card Stock: Emerald Envy, Tangerine Tango, Watermelon Wonder, Pacific Point, Whisper White.
Accessories: Balloon Pop-Up Thinlet Dies #142753, Star Punch from Itty Bitty Accents Punch Pack (R), Banners Framelits #132173, Lots of Labels Thinlet Dies #138281, Emerald Envy Bakers Twine, Dimensionals, Tear N' Tape, Tom Bow Glue, Simply Scored, Trimmer and Big Shot.
Side view of the Gift Folder

The blue tab on the side is for the gift card.  It is tucked into this side-seam.
 
This is the front of the actual gift card holder that I designed and added to the card.  It comes complete with it's own little tab on the side that I cut out with the Balloon Pop-Up Thinlet Dies.  I slid this into the side seam created by the fold in the card stock and it fits snugly inside. 
Here you can see I just created a small pocket on the reverse of the holder that the gift card can just slide into.
I loved the fact that there are all kinds of neat little folds and hiding places on this gift card holder. And, although I basically CASED Diane's design I like adding my own take on a project, such as adding glue on some folds so that the package didn't come apart and I also created a square gift card holder that I could tuck into the side seam. 

Assembly:
Because Diane happily shares her template and fabulous instructions for this Gift Folder, on her blog, I've provided this link so you can check out her post on this topic.  I'm sure you'll be just as eager as I was to create one or maybe several of this fun gift card bag(s).  Whatever you do please acknowledge her and drop her a comment, let her know I sent you.  

Project Three:   Avant Garden Spring Card
With Spring just around the corner and a plethora of birthdays coming up in March and April I decided to make a simple card using the Avant Garden stamp set for my third project.  You can't buy this stamp set, but you can earn it for free during Sale-A-Bration with the purchase of $60.00 CDN from any of the other Stampin' Up! catalogues currently available.  

I stamped three of the bouquet images on a piece of 3 1/2 x 3 1/2" Very Vanilla card stock.  I water coloured the flowers and stems with Sweet Sugarplum and Pear Pizazz inks.  To get the fullness in the image, I restamped three more floral images, painted them and fussy cut them out attaching various bits and pieces to the original stamped flowers with dimensionals.

Well you've come to the end of my projects for this hop and I hope that I've inspired your creative side in some way.  Now it's time to move on to the wonderful Kath Rick's blog so she can wow you with her projects.  Have fun and remember to leave some comments along the way..... we love to hear from you.


Heidi Weaver


Happy Stamping!
Penny Token's Stampin Spot

Wednesday, February 15, 2017

Water Cooler Wednesday - #106 Heidi's Clean & Simple Challenge


 It's time for this week's Watercooler Wednesday Challenge #106, hosted by the incredibly talented Heidi Weaver.  Heidi is challenging us to make a Clean and Simple Card with Sparkle.
The rules are simple for our Clean And Simple challenge.  Show lots of open space, use minimal layers and use minimal embellishments.  The Watercooler Artists have given you many great examples of what our Clean And Simple challenge looks like.

Here's My Card: 
You'll see by my use of the word "Sparkle" that I chose to interpret this challenge quite literally.  I simply couldn't resist since we have a fun new Stampin' Up! stamp set called "Love Sparkles" in the new Occasions Catalogue.

Supplies:
Stamp Sets:  Love Sparkles #143183 and Balloon Adventures #142823
Card Stock:  Whisper White and Basic Black
Ink:  Momento Tuxedo Black
Accessories: Trimmer, Stamp-a-ma-jig,Tom Bow Glue, Basic Rhinestones, Wink of Stella.
 
Love Sparkles #143183  There are 13 rubber stamps in this set that are sure to help you get your glam on!  I used the little spray of stars and the word sparkle to enhance this card and loved the results.

Balloon Adventures #142823  Such a fun stamp set! I love all the sentiments and there are so many ways to use this 17 piece Photopolymer two-step stamp set that co-ordinates with the Balloon Thinlet Pop-up Dies.  Bundle and save 15%.

Assembly:
1.  Cut an 8 1/2" x 5 1/2" base from Whisper White card stock
2.  Cut a 51/4" x 4" Basic Black mat for the first layer.  Adhere to base.
3.  Cut a 5 1/8" x 3 7/8" Whisper White piece for the top mat.
4.  Starting at left edge of top mat randomly stamp a series of stars from top to bottom in Momento Tuxedo Black Ink.  Note by positioning in a different direction as you stamp each image, it will create a ribbon like effect. Colour these stars with Clear Wink of Stella.
Link stamped image as you move along the length of paper so the design flows.
5.  Cut a 1/4" x 5 1/8" strip of Basic Black  and adhere to top mat 1 1/2" from left edge.  Evenly space Basic Rhinestones down this strip.
6.  Using a Stamp-ma-jig for perfect placement stamp "Sparkle" four times.  Use the Clear Wink of Stella brush to add tiny sparkling details on each of the  letters.  Adhere this mat to the Basic Black one.  
7.  Cut a 51/4 x 4" Basic Black mat for the inside of the card and adhere with Tom Bow glue.
8. Cut a 5 1/8" x  3 7/8" Whisper White layer.  
9.  Stamp the sentiment "No One Deserves a Happier Birthday Than You" from the Balloon Adventure stamp set in Tuxedo Black Ink in the center.  
Voila this card is finished!   

Well that's it for me this week.  If you haven't had a chance to check out the other Watercooler Wednesday Design Team Artist's creations, just click on the link to return to the home page.  


And, how about playing along? If you liked this challenge give me some feedback and I hope you'll add your own "Sparkle" Clean and Simple card to our linky. This challenge is open until 5pmMT Monday February 20th.  We'd love to see your creativity and what you can do with our theme!

Happy Stamping!
Penny Token's Stampin' Spot

Let It Snow Tag Card - Top Three Atlantic Hearts Sketch Challenge

      I just saw the results for the Design Team picks for the Atlantic Hearts Sketch Challenge #593 and I'm thrilled to say that my ca...