Showing posts with label Gift Card Holder. Show all posts

Tuesday, May 9, 2017

Month of May Eastern Palace Series - Project #3


Today's project is a "no-cut patterned paper folder" to hold birthday wishes and a gift card and features a full 12 x 12 sheet of the beautiful Eastern Palace Specialty Designer Series Paper.    

For details on how this "no-cut patterned paper folder" comes together, please check out Diane Barnes Color Me Happy Blog.  Diane has very generously shared her tutorial and tips on making these folders.  Make sure you leave her a comment if you plan on using her tutorial. 
The Eastern Palace Specialty Designer Series Paper is perfect for this type of card, because you see both sides of the paper, and trust me they are all beautiful.  The Tranquil Tide and Dapper Denim are so rich looking together but pair them up with Fresh Fig and  Gold Foil card stocks, and it turns this into a WOW look.   

The inside view of the no-cut patterned folder.  Love it!

This view shows the inside of the folder with the two note cards removed.  The pockets are perfect for holding a 3 1/4" x 5 1/4" note card.  I add two of the Eastern Gold Vinyl Stickers which are fast becoming "faves" to jazz up the inside a bit.
The two note cards contain the birthday greetings and a gift card can be attached to the back of either note card. "The Happiest of Birthdays To You" sentiment is from the Birthday Blooms stamp set.  I stamped the dotted triangle image from Eastern Beauty set in Fresh Fig ink in the corners of both note cards. I stamped the sentiment "enjoy today" from the Eastern Beauty set on the second note card, but it looked too plain so I stamped this fancy square image in Tranquil Tide over top of it.  Again it looked too plain, so I stamped the scroll work image in the points of the square.  What a difference that made and it was fun experimenting with some of the smaller stamps.
Supplies:
Stamps:  Eastern Beauty Photopolymer and Birthday Blooms 
Ink:  Fresh Fig, Tranquil Tide
Card Stock:  Dapper Denim, Fresh Fig, Tranquil Tide, Very Vanilla and Gold Foil
Accessories:  Big Shot, Paper Trimmer, Banners Thinlet Dies, Eastern Medallions Thinlits Dies, Stitched Shapes Thinlet Dies, 1/2 Circle punch, Mini Tassels Assortment, Eastern Gold Vinyl Stickers, Basic Pearls, Detail Paper Snips, Dimensionals, Tom Bow Glue. 
I absolutely love how this belly band turned out.  It's got that Moroccan Arabian Knights thing going on, and promises riches on the inside of the card (or at least that's what I imagine).  The belly band started with a 1" x 9" strip of Dapper Denim card stock.   I added a strip of the Eastern Gold Vinyl Stickers to the top and bottom of the band.  Next  I cut two banners from Gold Foil and Tranquil Tide card stock and layered them together with tear and tape.  The Tranquil Tide banner was embossed with the retired Perfect Polk A Dots Embossing Folder. I combined the Eastern Medallions #6, #5 and #4 dies for the Fresh Fig layer and a #10 and 11 for the Tranquil Tide layer of the medallion. The center was a 1/2" circle punched from Fresh Fig and a small Gold Vinyl Sticker and small pearl.  Six medium sized pearls were adhered to the Tranquil Tide flower and a gold tassels from the Mini Tassel Assortment was adhered to the base of the medallion with mini glue dots.  The finished medallion was adhered to the banners and belly band with tear and tape to make sure it was secured strongly. 
 
Eastern Gold Vinyl Stickers


Mini Tassels - 6 to a pack - 2 each of Gold, Fresh Fig and Tranquil Tide


Well that's it for today's project.  I hope you liked it and will try out this "no-cut patterned paper folder".  It's an awesome way to use your DSP.  

Happy Stamping!
Penny Tokens Stampin' Spot  

Thursday, February 16, 2017

Wacky Watercooler February 2017 Spring Fever Blog Hop

Hope you had a wonderful Valentine's Day this week. I know for some of you you're still getting winter storms so you'll probably welcome our thoughts of better things to come with our Spring Fever Blog Hop which runs from today through Saturday February 18th, 2017.  Hopefully no matter what your weather situation, you'll be able to have happy Spring thoughts.  

The Wacky Watercooler blog hop is a circular hop so no matter whether you start at the beginning of the list or enter at some other point, if you continue moving from participant to participant you'll always wind up where you started. 

This time around I'm very excited to be starting off the hop, so you're either beginning or ending at my site.  Hope I don't disappoint.  There are a total of 8 other talented paper crafters following me who're all eager to share their creative and exciting projects with you, so I hope you'll relax, settle in and enjoy the hop! 

My First Project - Sparkles:  
It seems I'm caught up in Sparkles and Birthdays this week, so it's appropriate that my first project combines both.  This is a fun birthday/gift card holder I've made for a very special girlfriend of mine who absolutely "sparkles" in everything she does.  

Supplies:
Stamp Sets:  Love Sparkles #143183
Card Stock:  Whisper White and Smokey Slate, Silver Glimmer Paper, Silver Foil Card Stock
DSP:  A Little Foxy Designer Series Paper Stack #141637
Ink:  Momento Tuxedo Black
Accessories:  Big Shot, Mini Treat Bag Framelit, Balloon Pop-Up Thinlet #142753, Star Blast Edgelits#142763, Tom Bow Glue, Basic Rhinestones, Stitched Rectangles (Non-Su)

 
This project started with a Mini Treat Bag made with the dies of the same name.  Since my friend is such a glam and glitzy girl, I chose this beautiful designer paper from the "A Little Foxy Designer Series Paper stack to go with my gray and white theme. It was perfect.  Note:  You need two 6x6 sheets to complete the mini bag.

I absolutely love the Star Blast Edgelits.  They just instantly create happiness and excitement on a project.  For this bag I cut both a Smokey Slate and a Silver Glimmer Paper star blast image.  I attached them with Mini Glue dots at the base so the stars would still bob and move around once they were adhered to the bag front. For some additional glam I added a strip of silver foil to the Smokey Slate card stock base and adhered this piece on an angle across the bag. 

For the sentiment I stamped the "Sparkle" sentiment In Momento Tuxedo Black ink on a scrap of Whisper White card stock and cut it out with a non-SU stitched rectangle die.  I added some silver foil stars and Basic Rhinestones to complete the sentiment piece.    

The inside gift card was made with a piece of Whisper White card stock that measures 5 1/4" x 3 7/8".  The overlay was made by cutting a piece of Smokey Slate card stock with the Balloon Pop-Up Thinlet.  

I added touches of Silver Glimmer paper for the balloons and stars and some small Basic Rhinestones.  I cut two Smokey Slate bows using the Bow die cut from this set for the handle on the card.  The sentiment "It's Your Day" is from the Love Sparkles stamp set.


The back of the insert has a 2" by 3 7/8" piece of the designer series paper across the bottom. It was attached with a small amount of Tom Bow glue on three sides. The gift card slides in length-wise in the center. The sentiment "happy birthday" was stamped at the top of the insert with Momento Tuxedo Black ink. 


My Second Project:  A No-Cut DSP Gift Folder CASE

My second project is also birthday related and uses products from the Party Animal Collection in the Occasions 2017 catelogueMy inspiration for this project came from the very talented Diane Barnes, who has been making what she calls a "No-Cut Patterned Paper Gift Folder" since 2008.   

Here's What I Came Up With:

This is the front of the folder.  

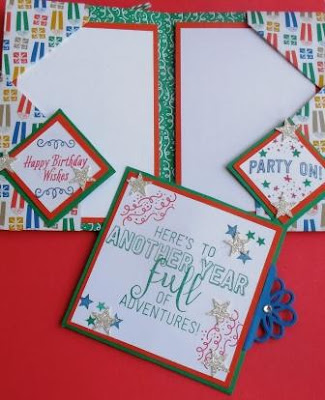
Inside the gift folder are two side pockets where you can add notes.  I've left mine blank so I can personalize for the fellow I'm going to give this to. 


This is the back view of the gift card holder. The Pacific Point bow on the side is the gift card pullout. Because of the additional pull-out, you would have to custom make an envelope to hold this card.


Supplies:
Stamp Sets: Balloon Adventures #142823, Love Sparkles #143183, and Avante Garden (143272 - Happy Birthday)
Ink: Emerald Envy, Watermelon Wonder, Pacific Point
Paper: Party Animal Designer Series Paper, Silver Glimmer Paper
Card Stock: Emerald Envy, Tangerine Tango, Watermelon Wonder, Pacific Point, Whisper White.
Accessories: Balloon Pop-Up Thinlet Dies #142753, Star Punch from Itty Bitty Accents Punch Pack (R), Banners Framelits #132173, Lots of Labels Thinlet Dies #138281, Emerald Envy Bakers Twine, Dimensionals, Tear N' Tape, Tom Bow Glue, Simply Scored, Trimmer and Big Shot.
Side view of the Gift Folder

The blue tab on the side is for the gift card.  It is tucked into this side-seam.
 
This is the front of the actual gift card holder that I designed and added to the card.  It comes complete with it's own little tab on the side that I cut out with the Balloon Pop-Up Thinlet Dies.  I slid this into the side seam created by the fold in the card stock and it fits snugly inside. 
Here you can see I just created a small pocket on the reverse of the holder that the gift card can just slide into.
I loved the fact that there are all kinds of neat little folds and hiding places on this gift card holder. And, although I basically CASED Diane's design I like adding my own take on a project, such as adding glue on some folds so that the package didn't come apart and I also created a square gift card holder that I could tuck into the side seam. 

Assembly:
Because Diane happily shares her template and fabulous instructions for this Gift Folder, on her blog, I've provided this link so you can check out her post on this topic.  I'm sure you'll be just as eager as I was to create one or maybe several of this fun gift card bag(s).  Whatever you do please acknowledge her and drop her a comment, let her know I sent you.  

Project Three:   Avant Garden Spring Card
With Spring just around the corner and a plethora of birthdays coming up in March and April I decided to make a simple card using the Avant Garden stamp set for my third project.  You can't buy this stamp set, but you can earn it for free during Sale-A-Bration with the purchase of $60.00 CDN from any of the other Stampin' Up! catalogues currently available.  

I stamped three of the bouquet images on a piece of 3 1/2 x 3 1/2" Very Vanilla card stock.  I water coloured the flowers and stems with Sweet Sugarplum and Pear Pizazz inks.  To get the fullness in the image, I restamped three more floral images, painted them and fussy cut them out attaching various bits and pieces to the original stamped flowers with dimensionals.

Well you've come to the end of my projects for this hop and I hope that I've inspired your creative side in some way.  Now it's time to move on to the wonderful Kath Rick's blog so she can wow you with her projects.  Have fun and remember to leave some comments along the way..... we love to hear from you.


Heidi Weaver


Happy Stamping!
Penny Token's Stampin Spot

Wednesday, June 8, 2016

WWC71 Heidi's Tic-Tac-Toe Challenge

It's Wednesday and that means it's time once again for a new Watercooler Wednesday Challenge.  Heidi Weaver has taken the lead on this one and chosen a Tic-Tac-Toe theme.....what fun!
WWC71-Heidi's Tic-Tac-Toe Challenge
Wow, so many decisions!  I wasn't sure which way to go - vertical, horizontal or diagonally across the middle.  In the end, I decided to use the end column and make a Gift Card Holder for Father's Day, using one of my new stamp sets called Bear Hugs and its matching Bear Hugs Framelit Dies.  In the end it turned out this design also worked diagonally.  Who knew!
Here's my card:

This is a quick and easy gift card holder to make. I found the original instructions in a video by Dawn Griffith.   Here are a few more details and views.
The easel on the front of the card can be in either in a raised position or flat (see next picture).  To stop the top portion of the card from sliding forward I cut a scalloped circle from Dapper Denim and layered it with a wood grain piece and a blue button with some rafia tied in a bow.   


The card base was cut from Dapper Denim card stock, one of the new Incolours.  The wood grain panels were stamped on Crumb Cake  card stock and the sentiment panels on Very Vanilla card stock. I wanted the Papa Bear to look like he was in a huge tree trunk so I inked up the Wood Grain embossing folder with Soft Suede ink and my trusty brayer and ran these pieces through the Big Shot.  

This is such a fast and fun technique and clean-up of the embossing folder and brayer are a breeze with warmy soapy water. For the hole in the tree I punched out a 2" circle and put a square of basic black card stock on the back.  I stamped the full image of the bear and tucked him into the opening.  His bottom half is glued to the back of the card front and I placed a dimensional behind his head and paws to make him stand out.
  

The "World's Greatest" and "DAD" sentiments from the Guy Greetings stamp set really work with this card face.  What would we do without this great masculine set? Guy Greetings covers every occasion and is so versatile. 

Look at that Papa Bear, he's soooo cute!  He was stamped in black ink on Crumb Cake card stock and his fur and around the edges were sponged with Soft Suede ink.  I also added a wee bit of Crystal Effects (now retired) to his nose and claws to make them stand out.  That cute bow tie is stamped in the black ink on Dapper Denim and then cut out with the matching Bear Hugs Framelit die.    

These jars started out as honey pots but I wanted them to say "DAD".  I began by stamping the three honey pots in black ink on Very Vanilla card stock.  Before I actually stamped the image, I wiped off the word "honey" with a wet one. Once the pots were stamped I inked up the word "DAD" and added it to the center of each pot. To finish the jars I coloured the lids with a Hello Honey (appropriate) marker and the jars with Sweet Sugarplum, Peek A Boo Peach and Flirty Flamingo markers.  The final touch was some Crystal Effects on the honey.  Voila! 

This view gives you an idea of what's going on inside the card.
The top wood grain panel holds a standard size gift card.  The opening is cut out with the 2 1/2" circle punch. To give it some strength for removing the gift card, I used 1/8" sticky strip instead of glue around the 3 edges

 
I love this cute little bear.  He's stamped with black ink on Crumb Cake and I softened the edges and added a bit of colour with a sponge dauber and Soft Suede ink.  A 3/4" strip of the woodgrain card stock was added about 1/2" from the bottom of this panel.  Don't you just love that bow tie? The sentiment "It's For You" is from the Bear Hugs Stamp Set. 
The Very Vanilla panel was stamped with black ink.  The "Happy Father's Day" sentiment is from Guy Greetings and the "I love you" heart is from Bear Hugs.
Stamping Supplies:
Stamp Sets:  Bear Hugs, Guy Greetings
Ink:  Momento Tuxedo Black, Soft Suede
Markers:  Hello Honey, Sweet Sugarplum, Peek A Boo Peach, Flirty Flamingo
Card Stock:  Dapper Denim, Crumb Cake, Very Vanilla, Basic Black
Accessories:  Big Shot, Trimmer, Woodgrain Texturized Embossing Folder, Bear Hugs Framelit Dies, Scallop Circle Punch, 1 3/8" Circle Punch, 2" Circle Punch, Scissors, Brayer, Button, 8 " Raffia, Crystal Effects (now retired).

Well that's it for my card this week. I hope you like it.   Be sure to check out all the Design Team cards and leave some comments along the way.  

Oh and, how about participating in this challenge?  If you've never done a Tic- Tac-Toe challenge now's the time to try it out, we'd love to have you join us and play along!  You can do it!

Happy Stamping! 
Penny Tokens Stampin' Spot

Tuesday, December 16, 2014

Santa's On His Way ..... Gift Card Holder


Isn't this Santa just the sweetest?  And, he's so easy to make.  What a perfect enclosure for a gift card. I made this Santa Gift Card Holder at one of Cheryl LeFore's recent stamp club evenings. This cutey takes about 10 minutes to make and is simply adorable.   

Supplies:
Stamp Set:   Cheerful Tags #135065 pg. 5 Holiday Catalogue
Classic Ink:  Real Red, Blushing Bride
Cardstock:    Real Red, Whisper White, Blushing Bride, Basic Black
Thinlet:        Gift Card Envelope and Trims Thinlets Dies
Diecut:         Gift Bow Bigz L Die #129977 pg 223 Annual Catalogue
Punches:      1/4" and 3/4" circle punches,  Window Word Punch
Embossing:  Perfect Polka Dots embossing folder #117335 pg 226 Annual     Catalogue
Accessories: Sponge Dauber, Dimensionals, White Pompom, Hot Glue Gun and 2-way Glue Pen Glue Dots, Big Shot Machine, Trimmer, Scissors and Bone Folder.

Here's How I Made It: 

1.  Cut two pieces of Real Red card stock to 6"x6" for the gift card and 3 1/2" x 4 1/2" for the Santa Hat.

2.  Cut the 6" x 6" piece or Real Red card stock with the Gift Card Envelope Die.  Score on the edges to form envelope.  Use glue dots to seal envelop sides.  Set aside.
Gift Card Envelope and Trims Thinlits Die #135854

3.  Use the 3 1/2" x 4 1/2" piece of Real Red card stock for the hat and mark the top center of the card stock at 1 7/8".  Using a ruler draw a line from the top mark to the right and left side forming a triangle.  Trim off the side pieces with scissors to form the triangle.  NOTE: You can also use the large pennant from the Perfect Pennants BIGZ L (retired) die if you have it. Sculpt the top of the hat with a bone folder to curl the point towards Santa's face.  Glue a white pompom on to the tip with the glue gun. 

4.  Cut a 1" x 3" piece of Blushing Bride for the face.  Punch out the nose with the 3/4" circle punch from a scrap of Blushing Bride card stock. Sponge edges of circle with Blushing Bride ink and set aside.

 5.  For the beard and mustache cut a 3 1/2" x 4 1/4" (beard) and two 2" x 4 1/2" (mustache) pieces of Whisper White card.  Place these pieces on the Gift Bow Bigz L Die and run through the Big Shot Machine.  Emboss these cut pieces with the Perfect Polka Dots Embossing Folder to give them some texture. Assemble the bow using glue dots.  
Gift Bow Bigz L Die cuts two sizes of bows - #129977 pg 233 of the annual catalogue. 
6.  Cut a strip of Whisper White card stock measuring 3/8" x 3 1/4" for the brim of the hat.  Use the Window Word Punch to punch out the 3 1/4" strip.  Using two way glue attach this strip to the bottom of the hat for the brim. 
The Window Word Punch is a versatile tool to have in your punch toolbox.  #119857
7.  Using two-way glue or tape runner attach the Santa face to the center back of the hat. There should be about 1/4" of the word window strip showing on either side of the face, to ensure it's centered. 
This is the backside view of the gift envelope once the Santa face is attached.
8.  Attach the bow to the center of the face with a dimensional. Add glue dots under the bow parts of the mustache and attach to the face. Punch out two eyes from the black card stock with the 1/4" punch and center them above the bow center; attach with glue dots.  Glue the nose to the center of the bow.

9.  Attach the Santa face on an angle to the front of the envelope with glue dots or tape runner.  I just added the adhesive to the back of the face and the bottom of the hat.  Glue it down well so the face doesn't fall off.  


10.  Cut a card insert measuring 2 1/3" x 3 3/4" to tuck inside the gift holder envelope.  I stamped "Holiday Cheer" from the Cheerful Tags set in Real Red ink for my greeting.  Add the gift card and you're done!  Easy Peasy! 
 
Cheerful Tags 7 piece Photopolymer Stamp set coordinates with the Note Tag Punch.


Merry Christmas and Happy Stamping
Penny Tokens

Happy St. Patty's Day!

Rainbows, a Pot of Gold, Leprechauns green beer and shenanigans are all part of celebrating St. Patty's Day on March 17th. I have a sma...