Showing posts with label Dawn Griffith. Show all posts

Wednesday, February 22, 2017

Watercooler Wednesday - #107 Penny's Masculine Anything Goes Challenge

Hi stampers!  Welcome back to the Watercooler Wednesday challengeThis week I'm happy to bring you a Masculine Challenge.  The style is an "anything goes" challenge so there aren't really any restrictions other than it has to be a guy card.    
Here's My Card:
I made this masculine birthday card for my dear brother-in-law Ken's February birthday.  Ken's kind of a burly guy but he's not reluctant to say he likes bling and he certainly is a fan of Stampin Up!, so I thought a combo of Bear Hugs and Balloon Adventure would fit the bill for his special day.
This is a Shadow Box card. I've haven't made a Shadow Box card for some time now, but when I saw a recent Dawn Griffiths post on Youtube  using Balloon Adventures and this card style, I knew I wanted to CASe it.  

What a fun card to make! I fell in love with this card style all over again.  For sizing and details on how to make a Shadow Box card just click on Dawn's name above for a direct link to the video.


Supplies:
Stamp Sets: Bear Hugs, Balloon Adventures, Bella and Friends
Card Stock:  Soft Suede, Very Vanilla, Basic Black
DSP:  Gold Glimmer Paper,  Type Style Designer Paper (R)
Ink: Tuxedo Momento Black, Soft Suede, Crumb Cake
Accessories:  Balloon Pop-Up Thinlet Dies, Bunch of Banners Thinlets, Big Shot, Trimmer, Dimensionals, Tom Bow Glue,Glue Dots.
Balloon Pop Up Thinlet Dies

Balloon Adventures part of the Party Animal Suite in the new Occasions 2017 Catalogue.
The sentiment is from Balloon Adventures, the little bear is from Bear Hugs and the small balloon  image is from Bella and Friends. The Very Vanilla panel is 5" x 3 1/2" and is layered on Basic Black.

The layers for my card front are:  5 1/2 x 8 1/2" Soft Suede card base.  1st layer is  5 1/4" x 4" Very Vanilla, 5" x 3 3/4" DSP layer.  For the layers with the bear I cut a 3" x 3 1/2" Soft Suede, 2 3/4" x 3 1/4" Basic Black and a 2 1/2" x 3" Very Vanilla panels.
Here's a side view of the sentiment and balloons.  The "Party On" sentiment is from the Balloon Adventures stamp set. I stamped it in Momento Tuxedo Black ink on a scrap of Very Vanilla card stock and then cut it out with the Bunch of Banners Thinlet Dies.  The edges  were sponged with Soft Suede ink and I used a thumping technique to apply for ink to the banner to give it a mottled appearance.   I used the negative image dots from the die cut balloons as additional trim and applied them with glue dots. 

The Gold Glimmer Paper balloons were perfect for this card.   They add such sparkle to the soft Suede paper.  The large balloon die from Balloon Pop-Up Thinlets fits perfectly on this panel of the card so no extra trimming is required.  I used the "Let's Celebrate" stamp from the Balloon Adventures Stamp Set.
Well that's it for today.  I hope you enjoyed this card and will add this technique to your collection of fancy fold cards. If you haven't already checked out the other Watercooler Wednesday Design Artist's cards make sure you stop by. This challenge is open until 5:00pm MT so if you'd like to link up your masculine card creation, we'd be thrilled to have you join us. 


Happy Stamping!Penny Tokens Stampin' Spot 

Wednesday, June 8, 2016

WWC71 Heidi's Tic-Tac-Toe Challenge

It's Wednesday and that means it's time once again for a new Watercooler Wednesday Challenge.  Heidi Weaver has taken the lead on this one and chosen a Tic-Tac-Toe theme.....what fun!
WWC71-Heidi's Tic-Tac-Toe Challenge
Wow, so many decisions!  I wasn't sure which way to go - vertical, horizontal or diagonally across the middle.  In the end, I decided to use the end column and make a Gift Card Holder for Father's Day, using one of my new stamp sets called Bear Hugs and its matching Bear Hugs Framelit Dies.  In the end it turned out this design also worked diagonally.  Who knew!
Here's my card:

This is a quick and easy gift card holder to make. I found the original instructions in a video by Dawn Griffith.   Here are a few more details and views.
The easel on the front of the card can be in either in a raised position or flat (see next picture).  To stop the top portion of the card from sliding forward I cut a scalloped circle from Dapper Denim and layered it with a wood grain piece and a blue button with some rafia tied in a bow.   


The card base was cut from Dapper Denim card stock, one of the new Incolours.  The wood grain panels were stamped on Crumb Cake  card stock and the sentiment panels on Very Vanilla card stock. I wanted the Papa Bear to look like he was in a huge tree trunk so I inked up the Wood Grain embossing folder with Soft Suede ink and my trusty brayer and ran these pieces through the Big Shot.  

This is such a fast and fun technique and clean-up of the embossing folder and brayer are a breeze with warmy soapy water. For the hole in the tree I punched out a 2" circle and put a square of basic black card stock on the back.  I stamped the full image of the bear and tucked him into the opening.  His bottom half is glued to the back of the card front and I placed a dimensional behind his head and paws to make him stand out.
  

The "World's Greatest" and "DAD" sentiments from the Guy Greetings stamp set really work with this card face.  What would we do without this great masculine set? Guy Greetings covers every occasion and is so versatile. 

Look at that Papa Bear, he's soooo cute!  He was stamped in black ink on Crumb Cake card stock and his fur and around the edges were sponged with Soft Suede ink.  I also added a wee bit of Crystal Effects (now retired) to his nose and claws to make them stand out.  That cute bow tie is stamped in the black ink on Dapper Denim and then cut out with the matching Bear Hugs Framelit die.    

These jars started out as honey pots but I wanted them to say "DAD".  I began by stamping the three honey pots in black ink on Very Vanilla card stock.  Before I actually stamped the image, I wiped off the word "honey" with a wet one. Once the pots were stamped I inked up the word "DAD" and added it to the center of each pot. To finish the jars I coloured the lids with a Hello Honey (appropriate) marker and the jars with Sweet Sugarplum, Peek A Boo Peach and Flirty Flamingo markers.  The final touch was some Crystal Effects on the honey.  Voila! 

This view gives you an idea of what's going on inside the card.
The top wood grain panel holds a standard size gift card.  The opening is cut out with the 2 1/2" circle punch. To give it some strength for removing the gift card, I used 1/8" sticky strip instead of glue around the 3 edges

 
I love this cute little bear.  He's stamped with black ink on Crumb Cake and I softened the edges and added a bit of colour with a sponge dauber and Soft Suede ink.  A 3/4" strip of the woodgrain card stock was added about 1/2" from the bottom of this panel.  Don't you just love that bow tie? The sentiment "It's For You" is from the Bear Hugs Stamp Set. 
The Very Vanilla panel was stamped with black ink.  The "Happy Father's Day" sentiment is from Guy Greetings and the "I love you" heart is from Bear Hugs.
Stamping Supplies:
Stamp Sets:  Bear Hugs, Guy Greetings
Ink:  Momento Tuxedo Black, Soft Suede
Markers:  Hello Honey, Sweet Sugarplum, Peek A Boo Peach, Flirty Flamingo
Card Stock:  Dapper Denim, Crumb Cake, Very Vanilla, Basic Black
Accessories:  Big Shot, Trimmer, Woodgrain Texturized Embossing Folder, Bear Hugs Framelit Dies, Scallop Circle Punch, 1 3/8" Circle Punch, 2" Circle Punch, Scissors, Brayer, Button, 8 " Raffia, Crystal Effects (now retired).

Well that's it for my card this week. I hope you like it.   Be sure to check out all the Design Team cards and leave some comments along the way.  

Oh and, how about participating in this challenge?  If you've never done a Tic- Tac-Toe challenge now's the time to try it out, we'd love to have you join us and play along!  You can do it!

Happy Stamping! 
Penny Tokens Stampin' Spot

Sunday, May 4, 2014

Owl Friendship Cards


Recently some very good friends of ours came for dinner.  They arrived with this absolutely stunning white bouquet, to thank us for our hospitality.  I can't even begin to describe how wonderful a gesture that was.  

For me, there is something so absolutely special about receiving flowers in the first place, but when I get an all white bouquet it simply takes my breath away.  

These beauties lasted for over a week and brought me joy each and every time I walked in the room.  What great friends and how thoughtful!  

During their visit my girlfriend spent some time in the card room with me and she got a big kick out of this owl card I made while CASing one of Dawn Griffiths projects (see original post here).  

She liked it so much in fact, that she asked me to make her five cards to give to her friends.  I changed up a few of the colour details, but basically kept the same design features.  I thought I'd share the cards I made for her, because they are just so darned cute.  

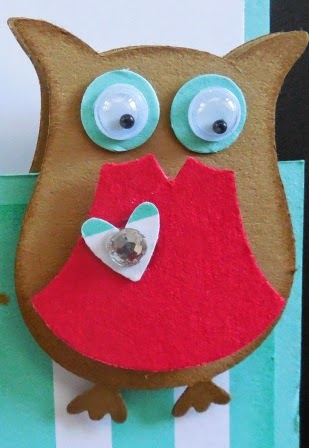
The highlight of this card is the Owl Builder Punch.  This unique punch is a two-step punch that cuts out all of the pieces you need to build an owl. The punch includes an owl body, detailed eyes (not just one circle size but three so you can create dimension), and a small heart. All you have to do to start creating just punch and then layer the pieces.
 
Owl Punch #118074  Price $22.95

The card base is done in Night of Navy with Whisper White and Cherry Cobbler layers.  The Night of Navy DSP is from an old retired DSP pack I had and worked really well on the front of the card.
Here's a view of the inside of the card complete with this dressed up little owl.  Isn't she cute!
 
I've added some google eyes and her dress is cut from beautiful red glimmer paper. The flower was cut from Silver glimmer paper and is topped off with a basic white rhinestone. 

Hope you enjoyed this post.  The owl builder is such a versatile punch.  There's no end to the characters you can make with it.  

Penny

Tuesday, April 29, 2014

Catching Up on Easter - Part Two

Here's another Easter "catch-up" post showing the Easter card I made for my mom.  She was thrilled and I'm sure you'll like it too.  

I watched a video by Dawn Griffith using the Watercolour Stamp Set and Fringed Scissors that inspired me to make this card.  You can check out Dawn's video at this link for measurements and tips on cutting out the half circle on this card. 

For my card I used Pool Party card stock for the base, topped with Whisper White.  Since I loved, loved, loved the egg in the EGGstra Spectacular stamp set I decided to make it the main image showcased by the half circle on the card front.  The addition of the other stamped images, the ribbon and the embossing really made the whole card come together in a pleasing way. 

This next pictures shows off the inside of this great card. I'm going to be adding this technique to my "Fancy Fold" technique classes because it's one everyone should know about. 

The cute little bunny on the inside cover is another of the great stamps from the EGGstra Spectacular stamp set.  The vine and eggs are from  a retired stamp set called Flower-Filled.  It was one of the first stamp sets I ever bought from Stampin' Up! and has seen some serious ink. I think the images really compliment the EGGstra Spectacular set and the theme of this card.


On the right you can see all the stamps in this 9-piece two-step stamp set.  It was always an awesome set.  If you're wondering why I'm showing you the stamped images instead of the wooden blocks, it's because I found in the old Stampin' Up! days, before they added Clear Mounts and changed the packaging for their stamp sets, that it was sometimes difficult to imagine how a stamp image would look before it was stamped. To remedy this and make it easier for me and the folks I stamped with, I began stamping all the stamp images from the set on a piece of cardstock which I glued to the inside of the box lid with glue dots. Voila, you could really see what was in the box!
In this view you can see the front and back of the card. The Pool Party piece measures 4 1/4 x 5 1/2"  and the Whisper White piece measured 5 1/4" x 9 1/2" before it was scored at 2 1/2 and 5 1/2" and folded back on itself. 
 
I stamped the egg in Staz On Black Ink and then used Coastal Cabana, Crisp Cantaloupe and Pistachio Pudding markers to underline the writing.  Small and medium sized basic pearls were glued to the top and bottom of the egg.  This added such a soft feminine touch.  The vine was stamped in Pistachio Pudding and the small eggs were added with dimensionals. 

How do you like the Coastal Cabana Ruffled Stretch ribbon on this card front?  I'm really sad to see this ribbon retiring as it always adds such a delicate fun flair to whatever I'm making and it's so easy to attach with sticky strip.  I like it paired up with the Crisp Cantaloupe Designer Series Paper too.  The final touch for this card front was to emboss just the front panel of this piece with the Perfect Dots embossing folder.  

I wish you could see this card in real life because it is fabulous..........even if I do say so myself.  

Penny

Friday, April 18, 2014

Million & One Flower Shop - CASE

I've been a big fan of Dawn Griffith for several years now and always make a point of checking out what's new on her blog.  Last week I came across a card she made called "A Million And One Flowers".  I liked it so much, I just had to drop everything and CASE it in it's entirety.  I think you'll agree its FABULOUS!
Million & One Stamp Set sentiment............how bold and beautiful is that?

Here's My Card: 
Sample One:  This is the first card I made CASing Dawn's design.  For this one I changed the rhinestones to Basic Pearls, and it gave the card a real "wow" look.
Sample Two:  For this card, I used Basic Rhinestones the same as in Dawn's post.  They look beautiful.  For this card I changed up the Petite Petals flowers by using two different stamp designs, however, I prefer the polka dot petal design in Sample One.
Supplies:

Stamp Sets:  
Flower Shop #130942, Petite Petals #133155 and A Million & One #126377
Flower Shop Stamp Set:  Clear Mount # 130942 $21.95 or Wood Mount #130939 $29.95 Six beautiful floral stamps that coordinate with the Pansy Punch.  
Petite Petals Stamp Set:  Clear Mount # 133155 $11.95 or Wood Mount #133152 $15.95. One beautiful flower, six gorgeous designs--it's the stamp set that keeps on giving! Includes 6 stamps. Coordinates with the Petite Petals Punch. This limited-time set is only available from January 3 through May 31, 2014, so order yours today! Available in both wood- and clear-mount.  Bundle the Petite Petals Stamp Set and the Petite Petals Punch and save 15%: Wood #134821 $24.50 or Clear Mount #134822 $21.25.


Million & One Stamp Set:  Clear Mount #126377 Price: $15.95 or Wood Mount #126375 $20.95 You don't need to say thanks in a million ways if you are sincere about just one. The two sentiments in this set are as sincere as they come. Coordinates with the Simply Fabulous Simply Sent Kit.
 Ink:  Sahara Sand Classic Ink, Staz On Black

DSP:  Sweet Sorbet (Sale-a-bration Designer Series Paper, now retired)

Cardstock:  Whisper White and Sahara Sand 

Accessories: 
Pansy Punch #130698, Petite Petals Punch #133322, Basic Rhinestones #129324, Adhesive and Dimensionals #104430.
Pansy Punch #130698 $21.95
Petite Petals Punch 133322 $12.95  pg33 Occasions Catalogue coordinates with the Petite Petals Stamp Set. Bundle and save 15% off the purchase of the stamp set and punch until May 31, 2014.
Assembly:
Sahara Sand Card stock:  
Cut the base at 4 1/4" x 11".  Place long side of card stock in trimmer to 5 1/2" mark and then move cutter blade down to 2" mark.  Remove card stock, put short side back in trimmer and line up at 2 1/4" then move cutter blade down to 5 1/2". Remove cardstock from trimmer and score across center at 5 1/2".

DSP:  
Cut two 2 " x 5 1/4" pieces from the Sahara Sand DSP paper (looks like fish scales) . Adhere these pieces to the front and inside panel on the front of the card. In sample one I sponged around the DSP with Sahara Sand ink and a sponge dauber.  This technique gives a nice vintage feel to the card.

Whisper White Card stock:  
Cut a piece of Whisper White to measure 5 1/4" x 4".  This is the inside panel of the card.  Stamp "Fabulous is What You Are" sentiment from the One In a Million stamp set in Staz On Black ink.  Adhere panel to the inside of the card.  Adhere Basic Rhinestones to the swirls on the sentiment.

On a scrap piece of Whisper White card stock stamp 4 quilt patterned flowers from the Flower Shop stamp set in Sahara Sand classic ink.  Punch out these flowers with the Pansy Punch. Now, stamp 5 flowers from the Petite Petals Stamp Set in Sahara Sand ink and punch them out with the Petite Petals punch.  Adhere the small flowers to the centers of the larger flowers with dimensionals, and finish them off with a basic rhinestone in the center.

Starting at left edge of the card adhere the flowers with dimensionals along the width of the front panel. Make sure that your dimensionals are low enough on the flower that they don't show on the reverse of the panel.  Attach the fifth Petite Petal flower to the inside of the front panel with a dimensional. 


That's it, you're done and now you have this amazing WOW card!  Thanks Dawn Griffith

Here are some other cards I've made using this design: 

This card features a Daffodil Delight card base.  The polka dot DSP is from the Watercolor Wonder Designer Series Paper in the Occasions catalogue.  The flowers are inked in Crisp Cataloupe and Daffodil Delight.  The sentiment "Celebrate Today is from the Perfectly Penned stamp set. I used Basic Rhinestones for the flower centers and on the curlycews in the sentiment.

In this photo you can see the finishing on the inside of the card.
In this closeup of the card front you can see the sponged detail around the flowers and how it sets off the flowers.  


For this version of the card I used Melon Mambo ink, card stock and Designer Paper.  This card is stunning and bright.  I used Basic Pearls for the details and again the sentiment is from the Perfectly Penned set.  All of the sentiments were stamped in Staz On Black Ink.  


The inside view of the Melon Mambo card.  I love it! So bright and cheery.  Who wouldn't want to receive this card for their special day!

 
Perfectly Penned stamp set

Okay now for something completely different.  This card uses the same framework but I wanted something cute and funny for an anniversary and I think I succeeded. 
 
It looks like these little owls are practically flying off the page, but no fear they are holding on tight with dimensionals.  The sentiment is from the Sale-a-bration stamp set called See Ya Later.  It's retired now, which is really too bad because it's such a great sentiment set.  The sentiment on this card reads "once in a lifetime you meet SOMEONE who changes everything". 


This sweet little owl is constructed with the Owl Builder Punch.  His body is punched out of Baked Brown Sugar in-colour card stock and he has a Real Red vest on.  I had some googlie eyes left over from Halloween and decided to use them for all the owls. The Owl Builder punch not only punches out the owl body but also includes 3 different sized circles for layering the eyes, the heart and the cute little vest.  This is a great punch to have in your collection because it can be used for so much more than "just an owl". 

 
This is a view of the inside front panel of the card.  Hope you get the humour in this.  The striped paper is in Coastal Cabana and is from the Fresh Prints DSP pack in the Occasions Catalogue. 
Here's the full view of the inside of this card.
 Here's a last look at four of the five cards I've made so far with this card design.  This was a lot of fun.  Hope you enjoy this post.  I'd love to hear your comments so let me know if you like them or not.

 Penny

NESTS OF CHRISTMAS PAPER PUMPKIN ALTERNATIVES USING #fms#662

 Here's the latest sketch challenge from Freshly Made Sketches #662 and designed by Jen T.  Make sure you check out the Design Team car...