Showing posts with label tutorial. Show all posts

Tuesday, September 6, 2022

Faux Step Card

In mid-August one of my wonderful stamping friends, Debby Evoy, came for a day visit. What fun we had!  After catching up on our lives, and looking at lots of card samples, Debby showed me a new card technique she learned from one of her stamping groups.  This fancy fold is called a "Faux Step Card".  


This card was made using the Wonderful World bundle of dsp and stamps from the recent Sale-A-Bration promotion in July and August.  OMG after working with this bundle I regret I didn't get it before the sale ended as the floral images are simply stunning and full of detail.


This weekend my dear brother and wife are celebrating their 30th wedding anniversary.  Even though a 30th anniversary is very special all on it's own, it's extra special for them, as my brother has Alzheimer's Disease.  I felt their continuing love story deserved a very special and meaningful card.  

To achieve this I dissected one of the beautiful envelopes from August's Sweet Sunshine Paper Pumpkin kit for the designer paper panels. Generally I'm not fond of bright colours but when I paired Melon Mambo with Evening of Evergreen for the base and mats I was really pleased. These combined colours really were the perfect choice for highlighting this artistic envelope paper. 

I combined a retired stamp set called Embrace Each Moment with a terrific new alphabet/number set called Alphabest for the focal point of the card face.   

Alphabest is a 73 piece Photopolyer Stamp Set that includes, letters, numbers and symbols and come with a coordinating punch called Best Label when you purchase the bundle.  So worth it.  


Because I'm currently working on de-stashing my Christmas supplies my third sample features a retired designer paper called Christmas Time is Here and a Cherry Cobbler base.  I haven't added sentiments to this card yet, as I'm trying to make up my mind 


Measurements: 

Card Step Base: 4-1/4″ x 9″ cardstock scored on the 9″ side at 1-1/4″, 2-1/2″, and 5-3/4″.  Use bone folder to burnish the folds.  Front Mountain, Valley Mountain.

Center Step Panel: 2-1/2″ x 8-1/2″ scored at 5-1/2″, DSP 2-1/4″ x 5-1/4″.  This piece is centered and glued flush at the bottom of the front mountain fold step, and to the back panel.  Glue is applied to the inside. 

DSP on bottom step: 1″ x 4″, 

DSP on bigger step: 3″ x 4″, 

Inside or Outside Back Panel: Whisper White 3″ x 4″

Note:  I used mats on the first and second cards so I adjusted all the mat measurements by an eighth of an inch larger than DSP. 

I hope you enjoyed these cards and thank you for visiting my site.  I'd love to hear your comments and whether you've made the Faux Step Card.

For me the Faux Step Card is a much simpler and faster way of creating a "Two Step or Center Step" card which involves some cutting and measuring.  Before you leave, check out this Nautical Card I created several years ago, and one of my all time favourite card samples.  
Two Step Center Step Card.   Click here to see the directions. 

Happy Stamping!

Penny Tokens Stampin' Spot
Penny Hanuszak, CDN Independent Stampin' Up! Demonstrator

Monday, April 5, 2021

Happy Easter Pop and Flip Cards

Happy Easter weekend! My mom's birthday was yesterday and she would have been 99 years old, but sadly she passed away last June.  Normally our family gathers at my home on Easter Sunday to celebrate her birthday, enjoy a feast and each other's company but this year we were once again in COVID lock down and following the social distancing policies.  


This was my mom last year on her 98th birthday.  Because of COVID we weren't allowed inside her residence and had to sing happy birthday from the other side of the fence.  This was the last time she was allowed outside before she passed away in June.

On Easter Sunday this year, my oldest brother, my sister, my husband and I visited my parent's grave site to bring some flowers and spend some time together and honour my mom's birthday.

My sister planted Snowdrops in the fall and we had a delightful surprise yesterday because they were finally in bloom.  I brought some Forsythia that's growing wild behind our place.  It was one of my mom's favourite Spring flowers so I know she would have been happy with my little bouquet. 


Here Are My Easter Cards:  

Okay, on a lighter note, I made a small selection of cards for friends and family this year using one of my favourite but retired Stampin' Up! Easter stamp sets called Everybunny.  There are some stamp sets, that you just can't part with and this is one of them.  

Pop and Flip cards seem to be all the rage right now, and after watching  Dawn Griffith's Youtube video I decided to try out this fancy fold technique for my Easter cards.  I knew the Everybunny set was perfect in size for making these cards. 


Details and Supplies:

Stamp Sets:  Everybunny (retired), Painted Poppies (retiring soon)

Ink:  Momento Tuxedo Black, Stampin' Blends - Granny Apple Green, Highland Heather, Balmy Blue, Daffodil Delight, So Saffron, Crumb Cake, Cinnamon Cider, Pirouette Pink (retired), Flirty Flamingo, 

Card Base: Whisper White card stock - 8 1/2" x 5 1/2" scored at 4 1/4", plus a
3" x 3" scrap for die cut circle.

DSP Layer: Retired Gingham Designer Series Paper in Granny Apple Green, Highland Heather, Balmy Blue, Grapefruit Grove and Daffodil Delight - measuring 5 1/4" x 4".  Apply glue only around the edges of this layer and adhere to the card base.  

Dies: Stitched Shapes Circle Dies - two largest dies. Largest to cut circle from card base and DSP and Medium die to cut a circle from Whisper White scrap.  Note:  While I used circle dies, you aren't limited to this shape.  You could use any layering dies such as squares, ovals or even rectangles.  Also you could do the same concept on a top fold, side-fold or slim line card base.  

Mechanism: One 3" x 4" piece of cardstock to match the base colour scored at 1", 2" and 3". One 2 1/4" x 3/4" piece of same card stock scored at 1 1/4".


Stitched Shapes Dies #152323 comes with 12 dies with the largest one measuring  3 1/4" x 2 3/8".  For this card I used the 2 dies in center bottom row.


I lined up the largest circle die in the center of the card and cut through both the card base and the designer series paper at the same time.

The large Whisper White circle was used as a base for the bunny image and I set aside the gingham circle for another project.  I cut the medium sized circle from the 3" x 3" Whisper White scrap piece and stamped my image in Momento Black  ink. I used a Sizzix scalloped circle die to cut a layer from Balmy Blue and adhered the circles together.

The adorable little bunnies were so much fun to colour using my Stampin' Blends.  The grass below the bunny was the small splotch from Painted Poppies stamp set, stamped in Granny Apple Green ink.  

For the inside of the cards I stamped the sentiment "Happy Easter everybunny" from the Everybunny stamp set.  I also stamped the "egg flower" pot and coloured it to correspond with the colour of the DSP and the bunny image on the pop up.  


Painted Poppies retiring soon.  The splotches and solid stamps in this set are great for creating backgrounds.

I have to say I had a lot of fun and simply loved making these cards. The card itself has clean simple lines, and those that received it were delighted with the pop up feature.  


On the whole, I found the Pop and Flip fancy fold was quick and easy to create. I didn't need a whole lot of supplies or card stock so it's economical for doing a large batch of cards.  Another plus is that unless you add rhinestones, ribbon or other accessories to your finished Pop and Flip card, it folds flat and extra postage isn't required.  I'm definitely adding the instructions for the Pop and Flip card to my template file. 

I hope you've enjoyed this selection of Easter cards and the Pop and Flip card details.  I loved every single one of these cards.  How about you?  I'd love to hear your thoughts.  

HAPPY STAMPING!
Penny Token's Stampin' Spot 

Penny Hanuszak, Canadian Independent Stampin' Up Demonstrator 
No matter where you are in Canada I'd love to be your demo!  

April Hostess Code:  


Apply my April Hostess Code to your On-line Order if it's under $200 CDN before shipping and handling and I'll send you a gift and thank you card.  

Click here to see the Retiring List While Supplies Last 

Click here to Shop 24/7 in My On-line Store 

Wednesday, January 31, 2018

Watercooler Wednesday WWC#155 - "Anything Goes"

Welcome to this week's Watercooler Wednesday Challenge. Our WWC155 challenge this week is an "Anything Goes". That means that anything you want to share with us is a-okay. It could be a card, a tag, a project, whatever. All you have to do to play along is take pictures of your "anything goes" and post to our Linsky by 5:00pm on Monday February 5th, 2018. Check out our rules and how to play along on our main page.  Kath Ricks is leading the way for our Design Team on this challenge.
Here's My Card:
My "Anything Goes" project features a technique called "Ghosting". Using this technique and the floral image from the "Amazing You" Sale-A-Bration stamp
I made a total of eight thank you cards in a very short time.  Here are some views of my cards: 


Supplies:
Stamp Set: Amazing You SAB 2018, Painted Harvest,One Big Meaning
Ink: Whisper White, Fresh Fig
Card Stock: Crumb Cake, Fresh Fig
Accessories: Trimmer, Tom Bow Glue, Basic Rhinestones, Clear Wink of Stella, Purple Sharpie Marker, Heat Gun.


Details:
1. Card Base - Cut a piece of Crumb Cake 4 1/4" x 11. Score at 5 1/2".
2. 1st Layer - Cut a 5 1/4" x 4 1/8" piece of Fresh Fig and adhere.
3. 2nd layer - 5" x 4 piece of Crumb Cake.

4. Ghosting Technique:
  • Begin by stamping the flower from Amazing You on the 2nd layer with Whisper White Ink.  Set aside so ink dries or use a heat gun. 
  • Once the Whisper White ink has dried begin stamping over the images with Fresh Fig.  Make sure you offset the image slightly to create a shadow. And, that's all there is to this simple yet beautiful technique.


 5. To finish off the card face I stamped the "Thank You" from the One Big Meaning stamp set.  As you'll see later on I added some Wink of Stella and some rhinestones for some glam.

6.  I stamped the inside panel of the card with a sentiment from Painted Harvest and the flower from Amazing You.  I also stamped the back of the card with the flower and my logo stamp.  Another flower was stamped on the matching envelope. 

7.  Because I wanted to mail these cards locally instead of making a special trip to the postal station in town, I kept them very simple.  I added Clear Wink of Stella to the centers of the larger flowers and some of the greenery so there was some sparkle and shine without being weighted down with embellishments such as rhinestones.


I decided to add some Basic Rhinestones that I'd coloured with a purple Sharpie Marker to two of the cards I planned to hand deliver.  I also added some Wink of Stella to the flower centers before setting the rhinestones. 

The great thing about these cards besides, being super simple and fast to make, is that by having minimal to no embellishments added, they are inexpensive to mail. That's right - no extra postage and nothing to get mashed up in the postal machines. 

Thanks for dropping in and visiting my blog this week. I hope you enjoyed my project and that my tips on how it was designed were helpful. I love reading comments so before you go if you can leave me a few words of encouragement you'll make my day. 
 
Don't forget to check out the other Design Team Artist's at the Watercooler Wednesday Main challenge page. To get a closer look at their creations simply click on their name below their sample picture. Until next time..........


Happy Stamping!
Penny Tokens Stampin Spot

Wednesday, January 10, 2018

Watercooler Wednesday #WWC152 - Kath's "All About Occasions" Challenge

Hi Stampers!  How's your week going?   We're getting rain in this part of the world and although sadly needed because of the drought conditions, it's still dull,dismal and wet.  The upside is it'll only last a few days, and maybe, just maybe I can get some stamping time in during the showers.  

We have a new challenge for you today on Watercooler Wednesday, hosted by Kath.  She's challenging us to create something for an "Occasion".  The WWC152 challenge is open to everyone  until Monday January 15th at 5:00pm MST.  So why don't you join us, who knows you could ROCK THE WATERCOOLER!
Here's My Card:
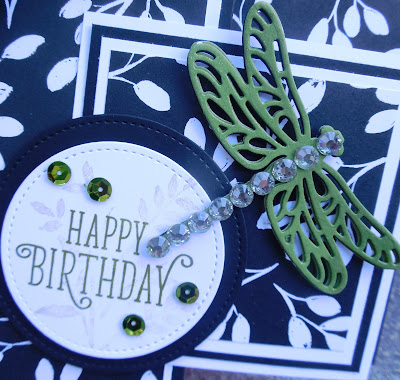
The occasion I'm  celebrating is my friend "M's" upcoming birthday.  I wanted to create a sophisticated and glam card for her and I think I hit it on the mark with this "Double Z Joy Fold Card". 
Here is the Double Z Joy Fold Card opened up.  This is a  5 1/2" x 5 1/2" square card when closed.  I made a special envelope for it with my Envelope Board, but forgot to take a picture for you.  I lined the flap with the green striped paper and stamped a Dragonfly on the front. 
 
Supplies:
Stamp Sets: Dragonfly Dreams and Happy Birthday Gorgeous
Card Stock:  Basic Black, Whisper White, Old Olive
DSP:  Merry Little Occasions
Ink:  Old Olive
Accessories:  Big Shot, Paper Trimmer, Stitched Shapes (Circles) Dies, Detailed Dragonfly Thinlet Dies, Dimensionals, Tom Bow Glue, Sticky Strip, Large Basic Rhinestones, Green Sequins,Wink of Stella.

Details:
The Base Panel is 11' x 5 1/2" Basic Black card stock scored at 2 3/4" and 5 1/2".  Use bone folder to crease score lines in Mountain and Valley folds. 

 For the panel layers cut:
  • Front Panel cut a 2 1/2" x 5 1/4" Whisper White and a 2 1/4" x 5" piece of DSP and adhere.
  • Inside Panel cut a 2 1/2" x 5 1/4" Whisper White and a 2 1/4" x 5" piece of DSP and adhere.
  • For Square panel cut a 5 1/4" x 5 1/4" Whisper White and a 5" x 5" piece of DSP and adhere.  
 The Joy Fold Panel is a 9 1/4" x 3 3/4" Whisper White piece scored at 2 3/4" and 5 1/2". Use bone folder to crease the panels in Valley and Mountain folds.  

For the panel layers cut:
  • For Square Panel cut a 3 1/2" square of Basic Black, a  3 1/4" x 3 1/4" piece of Whisper White and a 3" x 3" piece of DSP and adhere.  
  • For Inside Panel cut a 2 1/2" x 3 1/2" piece of Basic Black, a 2 1/4" x 3 1/4" piece of Whisper White and a 2" x 3" piece of DSP and adhere. 
  • For the Last Panel cut a 2 1/2" x 3 1/2" piece of Basic Black and a 2 1/4" x 3 1/4" piece of Whisper White. Adhere.  Stamp the sentiment "It's Your Day" from Happy Birthday Gorgeous set in Old Olive ink. adhere. 
For Front Circles cut the largest stitched circle from Basic Black.  Cut the next largest circle from Whisper White. Adhere together with dimensionals.  Stamp the floral image after stamping off twice in Old Olive on the white circle.  Stamp the sentiment "Happy Birthday" across the center in Old Olive.

Cut three Dragonflies using the Detailed Dragonfly Thinlets  - 2 from Old Olive and 1 from Basic Black and adhere in a stack.  Add large basic rhinestones down the spine.  I coloured the wings with Wink of Stella to give some luminescence.

To Assemble:
1.  Add Tom Bow Glue to the back of the last panel of  the Joy Fold section.  this will be attached at the midway point on the large square panel. 
Once it's attached, fold up both the the Joy Fold Panel and the Back Panel and add glue to the left edge of the Joy Fold Panel and secure to the Back Panel.  Tip:  Before you add the adhesive check your panel placement to get your best position.  

Once the panels are adhered together attach the circle and Dragonfly to the front panel and add some sequins.


Well that's it for this week's card.  I hoped you enjoyed it and will try this fancy fold.  You'll find it is a quick and easy card to assemble and the sky's the limit in terms of decorating it.  It can be used for any occasion.  I'd be happy if you'd leave me your thoughts on this card.  

If you haven't visited the Watercooler Wednesday main page and checked out the cards by the other Design Team members you can click here to link  back.  You won't be disappointed.  Lots of inspiration this week. 

Happy Stamping!
Penny Tokens Stampin Spot 

Black and White Anniversary - FMS #669

I'm up for another sketch challenge card, how about you?  Narelle Farrugia is the sketch designer for  Freshly Made Sketches #669  this...