Wednesday, June 27, 2012

Masculine Card Birthday Card


I don't know why, but summertime seems to be the time of  year when I need masculine cards the most, and I never seem to have enought on hand.

This year I'm trying to stay ahead of the demand and want to share some of the quick masculine cards I've created.

POCKET CARD:
This first card is a two-pocket birthday card but it would also make a wonderful graduation, retirement or congratulations card for a boy/man. 

An 8 1/2 x 11 sheet of designer series paper is used for the base.  To make the card you simply fold the DSP in half, then open and fold in half in the other direction. 

Now open up the paper and fold the top left corner of the paper over to the center fold and crease the outside edge.  Then turn the paper 90 degrees and repeat this procedure with the opposite corner.  Fold the DSP in half from the bottom then fold again at the center crease.  You will now have a front and an inside pocket.

Once the folds are completed then the front and inside of the card can be decorated with whatever embellishments you want to jazz up the card with to make it occasion appropriate. Nothing could be easier. 

To dress up the front pocket, I cut and adhered a 5 x 4 piece of Cherry Cobber cardstock to the DSP.  Before gluing it down I embossed it using the Perfect Polka Dots Embossing folder.  Since I plan on tucking some scratch and win tickets in this pocket I've left it plain, but you could make a tag for this pocket too.  Before gluing the pocket down, I added a strip of Whisper White that I had punched out with the Scallop Border punch.  I stamped the globe from the Open Sea  stamp set in Midnight Muse on Whisper White card stock and punched out with the 2 1/2" Circle Punch and added a 2 3/4" Circle layer in Cherry Cobbler and a 3" Circle Originals Bigz Die cut layer in Midnight Muse.

For the inside pocket I made a simple pull-out tag for addingby layering Whisper White on Cherry Cobbler.  I stamped the beautiful sailing ship from the set The Open Sea with the new Midnight Muse In Colour and the Happy Birthday sentiment in Cherry Cobbler.  I also stamped the anchor from the On the Sea set on Whisper White and cut it out with the Oval Scallop Punch.  It was adhered on the left side of the card with dimensionals. 

TRI-FOLD CARD:

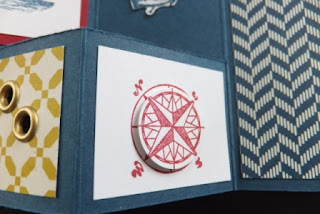
The second card I want to share with you is a simple tri-fold card.  Usually these are made with 12 x 12 card stock but I cut down the dimensions so I could use an 8 1/2 by 11 sheet of cardstock for the base.  Here are the instructions:
 
·         Start with an 8.5 x 11 sheet of cardstock and cut to 8 .5 x 5.5”
·         Score at 1 ¾, 3 ½ , 7’, and 8 ¾”
·         Cut lines horizontally at 1 ½” and 3 ½” from 1st and last score lines
·         Your finished card will measure 3 ½ x 5

I used "Comfort Cafe" DSP #126898 for the DSP and Midnight Muse, Raspberry Ripple and Summer Starfruit cardstock.  Images from the Open Sea stamp set are inked with Raspberry Ripple and Midnight Muse inks.


Additional Non-Stampin' Up Cards:

We recently celebrated our friend Steve's 60th birthday and I wanted to make a special card for him.  My husband asked me to use a non-Stampin' Up! stamp set because this particular set would appeal to Steve. 

So with that in mind I made the following cards for my husband to choose from.  What I want to emphasize here is that these cards are made with Stampin' Up cardstock and inks and could  very easily have been made with SU stamp sets too. 
Made with Pacific Point, Daffodil Delight, Wild Wasabi, Real Red. Basic Black and Whisper White cardstock.  Basic Black ink and Versamark were used to emboss the images and sentiments

View of the inside of the cards


Sunday, June 24, 2012

More Ornament Punch Flowers

Yesterday after I told you how much I loved roses and showed you how easy they were to make, I began thinking of ways to use them.  They could be used in place of bows on gift wrap, on a card front, on the lid of a gift can or box.  They would also make perfect place setting holders for the dining room table.   

With that thought in mind, it occurred to me that I might have some great ideas just lurking around the corner in my china cabinet. 

I have a full set of "Old Country Rose" dishes that I've been collecting since my husband and I married 40+ years ago that are used for special occasions.  Here is one of the beautiful porcelain rose ornaments that I set on the table when I'm having a special tea or luncheon.  Don't you just love the rich colours?

I was inspired to make a yellow rose using our regular "So Saffron" cardstock and Primrose Petals ink.  Here's what I came up with: 

Here's my completed rose. It uses the same method as the one in the tutorial however I've punched the petals from So Saffron Cardstock and inked "both" sides of the petal with Primrose Petals Ink.  I added three leaves that I punched from Wild Wassabi cardstock using the Scallop Oval punch.  I also embossed the leaves with the Dots Embossing Folder to give some texture.  In retrospect I should have sponged the edges ............ oh well next time!


I plan to make these beautiful roses for each place setting and add a decorative label with the guest's name on it.   I know they're going to love this!

Here's the finished rose from a different angle. 
From start to finish this rose took about 10 minutes to make and it was so much fun waiting to see what it would look like when assembled.  Personally I love it and I hope you do too. 

Happy stamping and creating and let me know whether you like this one or not. 

Saturday, June 23, 2012

Ornament Punch Flower Tutorial


I recently saw a sample of a paper rose on Stampin' Ups!  Stampin' Connection, SU's very cool website just for SU Demonstrators.   This free website is a wonderful place for demonstrators  to share their Stampin' Up! tips and creations, have discussions about their businesses and what's new.  It's just one of the great perks of being a Stampin' Up Demonstrator.

When I saw the sample, I was instantly smitten and had to find out how to make these beautiful flowers.  Fortunately there was a very easy to follow video on You Tube posted by Scrappin Mama entitled Magnolia Flowers.  Once I watched the video I thought okay that was easy now to create my own and share with you. 

Supplies I used:
8 1/2 x 11 Glossy White Card Stock ( you can substitute other cardstocks if you wish)
Ornament Punch
1 3/8" Circle Punch
Ink of Your Choice (I used Primrose Petals one of the new In-Colours for 2013)
Sponge Dauber

Punch out 20 ornament shapes using the Ornament Punch and one 1 3/8" Circle shape.

Using the sponge dauber sponge the edges of the circle and ornament shapes.
Use a dowel or paper piercer to add some definition to the petals by rolling them gently towards the center of the petal.

I rolled all my petals before I began but you may want to roll them as needed so they aren't so tight.

Apply Tom Bow Blue or other adhesive to the back of the ornament tab.  Don't use too much. 

Glue the first layer of petals down to the circle in a four-leaf clover type shape. 
The first layer of flower will look like this.  It's easy to line up the tab on the ornament shape with the circle

Add your next layer, gluing the tabs down in between the first layer tabs.

As you add layers you'll need to use the end of your paper piercer or tool to push the tabs down into place.  Keept adding the layers until 19 of the  petals are adhered.  Roll the last petal fairly tightly add glue to its tab and the insert into the center of the flower, pushing down until you're satisfied with the placement.  I cupped the finished flower in my hand until I liked the shape.   

Here's the finished flower.  I might add dew drops with Crystal Effects to give it some added life. 

 Hope you enjoyed this little tutorial today.  I know I'm going to be making more of these flowers as they were so quick to make and look fabulous.  Have fun!

Penny

Monday, June 18, 2012

No More Monkey Business

Sometimes really great things must come to an end.  After today the cute little Monkey badge won't be on my side-bar anymore and I wanted to let you know why.

Tonight I heard that A La Card Monkey Challenges were ending, and I'm really sad.  I liked, no loved this small challenge site for it's friendliness and the great weekly sketches, and fun posts. Over the past two years I've entered many of these challenges and each time it was with enthusiasm and anticipation of the great projects I would see.  

The wonderful design team comprised of Shirley Sumption and Terry Blais (a dynamic duo if ever there was one) and the winners of the Monkey Princess and Monkey Guest Designerhonors, never failed.  And, a couple of times I was even lucky enough to be selected as a Monkey Princess.  That was so cool! 

So this post is dedicated to remembering some of those sketches and some of my entries.  Sorry I couldn't put these into a collage..............have to get another program for that.  Enjoy! 
Loved this sketch, so cute!


This was such a yummy sketch!

Such a great sketch!

Monkey 80, one of my favourites

Monkey 81
 
Awesome Christmas or anytime sketch


Monkey 88

Can't remember the # but this was a fun sketch too!

Monkey 90

86

I hope you've enjoyed this little sentimental tour!  Thanks Shirley and Terry for all fun times!

Tuesday, June 5, 2012

Making the Most of My Digital Studio


It's been a while since I've had an opportunity to use My Digital Studio, but this morning I was visiting the My Digital Studio (MDS) website and read a post on "Making the Most of MDS".  I decided it was time I gave it a whirl again and checked out the latest updates and products for myself and my customers.

Okay so what better way to start than by beginning a project.  As my husband's birthday is coming up in the fall and it's time I started planning some kind of celebration I thought creating a "Save the Date" card would be a good place to begin. 

So, I got to work and here's a look at my first draft which took about 15 minutes to create.  I have limited materials to work with as I haven't transferred my programs to this new computer.  I should have started that first. LOL!  

Now while this page is perfectly good  for a first draft, I'm not going to be finished with it until I've checked out all the new digital products in the new 2012-2013 annual catalogue and upgraded MDS with the FREE In Colour downloads for this new catalogue season.

There are several new My Digital Studio content discs, that are packed with exclusive artwork, stamp brush sets, Designer Series Papers, embellishments, and designer templates.  Click here to see everything you’ll get on Stampin' Ups! exclusive new content discs.  I think you'll agree there's great value there for your money!  You can also check out the DVD Collections on pages 198-199 of the catalog which include: 
While you're checking out all these collections, here's some more information you may not have been aware of.  For instance did you know that you can buy content discs at Stampin’ Up! parties or online?  If you do, you'll save 10 percent versus purchasing individual downloads?  That's right! 

Oh and, it just gets better, because if you host a Stampin’ Up! party with sales of $200 CAN or place an order for $200 CAN (including My Digital Studio professional print products), you will earn the following content discs for FREE:
Check out my event calendar to see which days are available this summer to host a party and you'll be on your way to earning these great freebies! You can find all the information you need to get started by visiting my Stampin' Up Web site.
FREE 30-DAY TRIAL OF MY DIGITAL STUDIO:


If this is the first time you've heard about My Digital Studio, or you haven't tried it out yet there's all kinds of information on the program on my website at http://pennyhanuszak.stampinup.net.  Just go to the Shop Now button and then click on My Digital Studio under the products list.  You can learn more about taking advantage of Stampin' Ups! FREE 30-day Trial.  If you want assistance just click on my contact me button on my website and I'll be happy to assist you. 

Well that's it for now but please come back and visit me again this month as I update this project sample.  I'd love to hear your comments and find out what you think of my samples.  Bye for now.  

Saturday, June 2, 2012

New 2012-2014 In-Colours Are Here!

What's New?


With the arrival of the new catalogue we also herald the departure of the 2010-2011 In Colours (Concord Grape, Pear Pizzazz, Peach Parfait, Blushing Bride and Poppy Parade).  I'm going to really miss them.  I absolutely loved Concord Grape and Poppy Parade.  Sigh........

While those wonderful colours are no longer available, Stampin' Up! has replaced them with some trendy and fresh ones that I know you're going to love.  The new 2012-2014 In Colours are: Gumball Green, Midnight Muse, Primrose Petals, Raspberry Ripple and Summer Starfruit.
Card Stock & Classic Ink Kit
Check out page 150 of the 2012-2013 Idea Book to see the Four Core Colour Collections and the Two In Colour groups.  The graphics really show them off and there's definitely a Colour for Every Idea, Every Mood and Every Inspiration!

Don't forget to add cards to your Color Coach for the 2012-2014 season.  See page 151 for details.

New Firm Foam Ink Pads!


They'll  change your stamping experience for the better. You're going to love
these new Stampin' Pads--just look at all the exciting benefits listed below:
  • Provide better ink coverage for your stamps!
  • Light-tap stamping produces flawless images!  
  • Will create wonderful solid images because the Firm Foam releases more ink onto your rubber stamp than the felt pads. When using the Firm Foam pad, your stamp will get an even, solid covering of ink that you may not have been able to achieve with the felt pads. Please note: if you are using the ink pad frequently you may need to re-ink your Firm Foam pad more often.
  • The new pads have a crisply printed, glossy label on the top of the pad that's easier to read and won't fade or chip off!
  • As a bonus, the new pads come with colour name labels in all four languages (English, Spanish, French, and German).  Just choose your language, peel it off the back of the pad, and add it to the side of the pad for easy identification!
  • These pads use the same patented flip-top case design that stores the inking surface upside down, so the pad surface stays moist!
  • The new pads are available in all colours, including our exclusive In Colours.
Please note: Five of the Collections ink colours have undergone formula changes to improve functionality and colour stability with the new firm foam pads. These colours are: Basic Black, Basic Gray, Marina Mist, Perfect Plum and Tempting Turquoise.

All five colours of these reformulated inks have been fully tested and approved. While using the new ink formula in the old Stampin' Pads is fine, Stampin' Up! doesn't recommend using the old ink formula in the new firm foam pads. Any refills purchased after April 30, 2012, will contain the new formulated ink*.

Friday, June 1, 2012

June 1st What an Exciting Day!

%Blog Banner %Stampin Up Demonstrator %Blog Banners %Twitter Design %Ning Design %Facebook Pages %YouTube Design
June 1st, has finally arrived and it's going to be such an exciting day for Stampin' Up! Demonstrators and customers alike. 


It's a day we've all been waiting for with great anticipation, and now it's here!  I can't wait to share some of that excitement with you.  So, let's begin with what's changed and what's new:


To begin with, check out my right hand side-bar.  It's been updated with new links for easy access to the Stampin' Up! Annual Idea Book and Catalogue, exciting new June Promotions and my Shopping Cart.  

So, if you are looking for:

  • Preferred catalogue prices, then click on my new Shopping Cart and you'll be taken directly to my on-line shopping site.  What could be easier?
  • Don't have your own copy of the new Annual Idea Book and Catalogue for 2012-2013 yet?  Don't worry just click on the Catalogue icon to download a PDF version, for your shopping convenience.   Want your own copy?  Want it for free?  Then contact me for more information.

Latest Promotions?

%Blog Banner %Stampin Up Demonstrator %Blog Banners %Twitter Design %Ning Design %Facebook Pages %YouTube Design
    • We {Heart} Hostesses Promotion- During the months of June and July you can earn extra hostess rewards for a qualifying party.     As if the new catalogue wasn't reason enough to host a party, now you can get $150 in FREE products for hosting a $575 party. Unbelieveable! Wow! Book your new-catalogue parties today, then visit the We {Heart} Hostesses page for the details.

    • %Blog Banner %Stampin Up Demonstrator %Blog Banners %Twitter Design %Ning Design %Facebook Pages %YouTube Design
    • "Take The Cake Recruiting Promotion":  During June, new demonstrators not only get to choose the products for their fully customizable Starter Kit, they'll also get products from the brand-new Patio Party Suite for FREE, including the Make a Cake Set, Patio Party Designer Series Paper, and the Patio Party Digital Collection DVD! that's up to $60 in additional FREE products

OCTOBER IS HERE!

Happy 1st of October!  This tenth month is one of the busiest months' of the year for me and my family.  We start off the with my hubby&...