Friday, May 16, 2025

Masculine Birthday Card for AHSC #629

Welcome to another card sketch challenge by Atlantic Hearts Sketch Challenge #629 created by Michelle Stewart and digitized by Brandi.  

I'm constantly in need of masculine cards, and this sketch seemed just perfect for the card I had in mind.  

Here's My Card:

I used beer steins instead of flowers for the focal on my card.  In reality, although I'm making this with males in mind, this card design could be gender neutral by simply changing up the glasses from beer mugs to wine or cocktail glasses. 

Such a quick and easy card to make especially since the last time I used the Brewed for You set, I had stamped, coloured and die cut at least 20 of the drink glass images and they were ready to just pop onto the card. How cool is that?  I think the hardest decisions I had were in choosing the background designer paper and which glasses to add to the focal point. 

Supplies:

Stamps and Dies:

  • Brewed For You #159087 (R) 
  • Perennial Birthday 

Cardstock and DSP:

  • Basic Beige card base 8 1/2 x 5 1/2" scored at 4 1/4"
  • Pecan Pie Matt x cut two 2 - 4" x 5 14"   
  • He's The Man DSP #159068(R)

Inks and Blends:

  • Memento Basic Black for images 
  • Pecan Pie
  • Crushed Curry

Accessories:

  • Dimensionals
  • Blending Brushes
  • Foursquare Decorative Mask - Stencil #161285d
  • Nuevo Drops - clear for the beer mugs 
Thanks again for stopping by this week and checking out the card I created for the Atlantic Hearts Sketch Challenge #629.  These are such fun challenges, and hopefully in the future you'll also participate and share your talents.  In the meantime let me know what you think of my card design, and have a really good week ahead.  

HAPPY STAMPING!
PENNY TOKENS STAMPIN' SPOT
Penny Hanuszak, CDN Stampin' Up! Demo since 2006 

Click here to visit my 24/7 Online Shop 


Monday, May 12, 2025

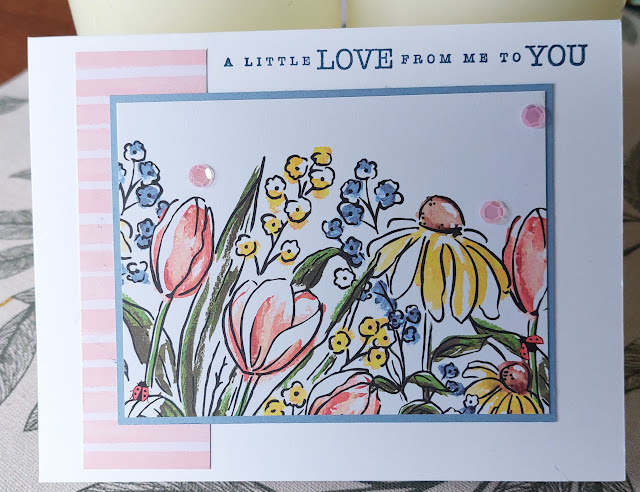
Mixed Media Florals Birthday Card - FMS#685

Spring has arrived and that yearning to get out in the garden has taken over. I've spent lots of  time weeding and planting my flower beds, while my husband was busy pressure washing our two decks.  The bottom one was in pretty rough shape, so he was able to get it painted and the patio furniture set up. We had a great morning visiting local nurseries, picking out baskets and other greenery.  What fun!  Just a little bit more tweaking and we'll be set for enjoying our yard and deck time.


Speaking of fun, I've just checked out the sketch challenge at Freshly Made Sketches, #685 hosted by Linda Callahan.  The Design Team has out done themselves with their designs.  So make sure you check them out, because there's so much inspiration.  Here's the sketch:

Here's My Card:
Following in the garden theme, I chose a combination from the Mixed Florals
Memories and More card pack for the images on my card.  Honestly with this sketch and the predesigned rectangle cards, the most time consuming part was choosing the images and sentiment for the front of the card.  
I was really surprised at how quickly this card came together and I like the placement of the sentiment and the striped paper piece.  I like the length of the sentiment which is from the Sending Love stamp set.  The fonts are lovely.


I cut down a pink striped Memory and More card that coordinated with the strip on the card front to 5"1/4  x 4" and used it as a matte.  A layer of Whisper White measuring 3 3/4" x 5" made up the sentiment layer.  As I often do, I stamped the Perennial Birthday "Happy Birthday" sentiment, this time in Misty Moonlight ink. The flower motif was easy to fussy cut from another memory pack card and some randomly placed sequins really finished the inside of this card. 

Supplies:

Stamps and Dies: 
  • Sending Love #162873 (R) -sentiment "A Little Love from me to You"
  • Perennial Birthday (R) - sentiment "Happy Birthday" inside matte 
Cardstock and DSP:
  • 8 1/2" x 5 1/2" Whisper White card base scored at 4 1/4"
  • Boho Blue Matte for front 3 1/8" x 4 1/8"
  • Whisper White Matte inside 3 3/4" x 5" 
  • Mixed Media 4 x 3 Floral design Memories and More card - front
  • Pink Striped Mixed Media card 1/4" x 4" for front matte
  • Pink Striped Mixed Media card 4" x 5 14" inside matte

Inks and Blends:
  • Misty Moonlight Ink for sentiments 
Accessories:
  • Trimmer
  • Purple Self-adhesive backed sequins #164970

Well that is it for today's Freshly Made Sketch card.  I think I'll make some more cards using the Memories and More Pack.  I have a tendency to forget how easy they are to work with and they take the guesswork out of layering.  Let me know if you have used these card packs and whether you like them.  For $16.00 these packs are a great addition to one's stash.  Have a great week ahead and come back again. 

HAPPY STAMPING!
PENNY TOKENS STAMPIN' SPOT

Penny Hanuszak, CDN Stampin' Up! Demo since 2006


Sunday, May 11, 2025

Daisy Daydream Alternate Cards - Paper Pumpkin March 2025 Kit Part 2


I'm back today to share some more of my Daisy Daydream Alternative cards that I made last week (see original post here).  

Card No 9: 


This card design started out by cutting down one of the beautifully designed white envelopes, to 5 1/4" x 3 3/4".  I left the envelope flap on the panel and the crease line became nearly invisible after embossing it with the Hexagon embossing folder (R).  Before I embossed this panel, I stamped the Happy Birthday sentiment from Perennial Birthday (r) in Mossy Meadow ink.  This matte layer was mounted onto a 4" x 5 1/4" piece of Crushed Curry which in turn was adhered to the card basic white card base. I adhered two daisies and the bee to the flap portion of the envelope piece and added a few gold gems to finish it off.

  Card No 10: 
Card No. 10
Personally this was one of my favourite cards that I made from this kit.  I used the three of the Everyday Arches (#164623) dies to cut arches from Whisper White, Always Artichoke (r), and Crushed Curry card stocks.  Before layering these onto the base I stamped some delicate leaves from the Textured Notes stamp set randomly across the card front.  The sentiment "Thank you for always being there for me" is also from the Textured Notes stamp set.  To decorate this card I added some gold self-adhesive backed sequins, two daisies, some honeycomb and a bee to the white panel.  

Card No. 11: 

This card is made from another one of the envelopes from this kit.  I liked the contrast between the soft grays, the vivid yellow flower centers and comb and the crisp white background of this card.  I started with a Smokey Slate card base and die cut the "thanks" sentiment in the same cardstock.  The Crushed Curry matte was cut out with a 3 7/8" x 5 1/8" decal rectangle die.  The sentiment is from a previous Paper Pumpkin die cut kit.  I cut and layered three of the word images before adhering it to the card front.  It's very bold but it works. One daisy image was popped up in the daisy cluster on the bottom half of the card and the second one was just adhered about the sentiment. 

Card No. 12:

This card began with a standard white card base and then I added a 4 1/8" x 5 3/8" matte of Lost Lagoon cardstock.  The next layer was a 5 1/4" x 4" layer of white followed by the final layer cut down from one of the blue envelopes.  It measured 5" x 3 7/8" and I was careful to cut it so the single daisy stem was placed properly.  I stamped the large honeycomb image in Lost Lagoon ink in three corners of this matte and added one large daisy image.  Once again I stamped the Perennial Birthday sentiment in Lost Lagoon in the center of the card.  The final touch was to add some brass bees both large and minis.  


For the inside I cut a 4" x 5 1/4" matte from the blue card stock in the kit.  I cut a Whisper White layer using the 3 1/2: x 4 1/4" decal rectangle die.  This piece was decorated with a large daisy a sentiment and more honeycomb.  

Card 13:
For card number 13 I used the flap portion of an envelope adhered to a piece of 4" x 5 1/4" Always Artichoke cardstock that I embossed with the Hexagon Embossing folder.  The cardbase is a standard 8 1/2" x 5 12" that's been topped with a Crushed Curry matte measuring 5 3/8" x 4 1/8".  The brass bee on the sentiment is from the original Brass Bee accessories that were available several years ago through Stampin' Up!  I must say I pre-fer this size to the newer mini ones.  At least you can tell it's a bee.  The Happy Birthday sentiment is from the Perennial Birthday stamp set (R) 


I kept the inside pretty simple for this card using an old sentiment stamp that I like and some strips of cardstock left over from some of the cuts.  

Card 14:


Well that's it for this Paper Pumpkin kit series on alternatives.  I've made twenty-two cards so far from the kit and can probably stretch that out to 30, however for the time being I'm moving on.  

I'd love to hear from you about these cards and which are your favourites.  If you have any questions regarding the Paper Pumpkin kits and subscription just send me a note and I'd be happy to go over it with you.  

HAPPY STAMPING!
PENNY TOKENS STAMPIN' SPOT!
Penny Hanuszak, CDN Stampin' Up Demo since 2006


New Stampin' Up! InColors for 2025-2027

Incolours 2025/2026:

With the release of a new catalogue each year we also get five new Incolors, this year is no exception.  Here are the 2025-2027 Incolors: 

What’s the Buzz About the Cloud Cover Ink Pad?

Not Available To Order 

Stampin’ Up! has announced that the Cloud Cover Classic Stampin’ Pad will not be available to customers due to unexpected quality concerns. While the color is absolutely dreamy, a chemical reaction between the ink formula and the firm foam pad caused a color shift that just didn’t meet Stampin’ Up!’s high standards for color consistency.

As we all know, Stampin’ Up! prides itself on perfectly coordinated color. An inconsistent ink pad simply won’t do!  But don’t fret—there’s still a silver (or shall we say Cloud Cover?) lining! Here’s How You Can Still Enjoy Cloud Cover:

  • Stampin’ Spot Assortment Pack -A Cloud Cover Stampin’ Spot is tucked into the Stampin’ Spot Assortment Pack (Item 166716). A perfect way to enjoy that pretty shade in a felt-based spot!​ 

  • DIY It with a Refill - ​The Cloud Cover Ink Refill (Item 165279) works beautifully with Uninked Stampin’ Spots (Item 141822). You’ll get consistent, spot-on color every time—and you’ll love the refill’s versatility for fun inky techniques!​ 
  • Try the Marker Method -  ​Ink up with the Cloud Cover Stampin’ Write Marker, part of the 2025–2027 In Color Marker Collection (Item 165292). A great option, especially for coloring directly onto cling stamps!​

While we’ll miss seeing Cloud Cover in a full-size pad, these creative options still let you play with this oh-so-lovely shade.


HAPPY STAMPING!
PENNY TOKENS STAMPIN' SPOT
Penny Hanuszak, CDN Stampin' Up Demo since 2006

Monochromatic Strawberry Slush Birthday Card

Welcome to my blog. Today I'm showcasing an ultra feminine birthday card that combines both old and new Stampin' Up! products.  The sketch I'm using as the guideline for this card is from Atlantic Hearts Sketch Challenge #628, created by Michelle and digitalized by Brandi.  Here's the sketch:


Here's My Card:

The brush stroke stamp from Season of Chic is pretty large so I decided to make this card horizontally so I could get the spacing more evenly distributed.  I wanted a feminine card with a clean look even though there's a lot going on in the sketch.  


To achieve that I went for a monochromatic colour scheme and used one of the new incolours called Strawberry Slush.  This color was around several years ago, and I always liked it.  To achieve the gradient color swatching I stamped the first brush stroke full strength and then stamped off the second and  the third images.

Supplies:

Stamps and Dies: 

  • Season of Chic #158810 - brush stroke image 
  • Artistically Inked #154542 - Happy Birthday sentiment 
  • Butterfly Gala #148580 - Butterflies 
  • Textured Note Dies #165555

The brushstroke image in the retired Season of Chic stamp set is wonderful for creating backgrounds.

I used a retired stamp set called Butterfly Gala and its coordinating punch to stamp and cut out the butterflies.  
Cardstock:
  • Whisper White 8 1/2" x 5 1/2" scored at 4 1/4" card base
  • Whisper White cut two - front 5" x 3 3/4" and inside mattes
  • Scrap for Textured Notes sentiment strip 3 3/4" x 1"
  • Strawberry Slush cardstock 5 1/4 x 4" cut two for front and inside 
Ink:
  • Strawberry Slush #165286 (NEW 2025/26 Incolor) 
Accessories:
  • Dimensionals
  • Butterfly Punch (R) - coordinates with Butterfly Gala Stamp Set 
  • Basic Rhinestones
  • Self-Adhesive Sequins 

Thanks for dropping by and checking out my sketch challenge  card today.  Make  sure you visit the Atlantic Hearts Sketch Challenge blog and take a look at all the other entries and the design team cards.  Have a great week, and if you like my card leave me a comment, it really makes my day.  

HAPPY STAMPING!
PENNY TOKENS STAMPIN' SPOT 
Penny Hanuszak, CDN Stampin' Up! Demo since 2006

Tuesday, May 6, 2025

 NEW CATALOGUE - NEW YEAR!  

The brand new Stampin' Up! 2025-2026 Catalogue has been released and has some exciting new and carried over products.  

Click here to see the PDF Download 

It's a brand new season for Stampin' Up! and they're starting off with a great sign up offer.  If you're interested in becoming a Stampin' Up! demonstrator between May 6th to 31st, 2025 is the perfect time!

Stampin' Ups! new Starter Kit Special is available for anyone wishing to join up.  The Starter Kit gives new demonstrators $220 worth of products of their choice for just $135.00 CDN.  Wow, that's an extra $85 worth of products!  You'll also get  FREE SHIPPING, bonus business supplies, and a Paper Pumpkin kit along with this limited-time offer!

JOIN MY TEAM:  

On top of the Starter Kit Special, Stampin’ Up! demonstrators receive these perks:

  • Get 20%–25% off all Stampin' Up! products.
  • Exclusive early access to new products.
  • Opportunities to earn modest supplemental income based on your sales.
  • Support through online training resources and a demonstrator-only online community with thousands of project ideas.
  • Access to regular promotions.
  • Learn creative tips and techniques, share ideas, and meet potential new friends and teammates who love paper crafting as much as you do!
  • Opportunities to attend incredible crafting and training events and be part of a creative community that spans the globe.
  • A free Paper Pumpkin kit! (Ask me for more information about this subscription service.)
When you join my team "Penny Tokens Stampers" I'll help you out from the start with guidance on how to start, answering questions, stamp sessions.  Click here to see how to join.

HAPPY STAMPING!
PENNY TOKENS STAMPIN' SPOT 
Penny Hanuszak, CDN Stampin' Up! Demo since 2006 


Monday, May 5, 2025

Celebratory Sips Floral Birthday Card - FMS#684

This week's Freshly Made sketch was hosted by Jen.  Its a very simple layout and quite quick todo.  This would be a great sketch for anyone wanting to try doing a challenge.   

FMS # 684 by Jen

Here's My Card:


I just got some new Stampin' Up Supplies including a 12 x 12 paper called Celebratory Sips that I bought because of the beverage designs.  When I opened the paper package I fell in love with a floral patterned paper that had a straight olive green backing.  This paper was perfect for the card I made.  

Supplies: 

Stamps and Dies:
  • Spotlight on Nature Circle Dies #163579
  • Wanted to Say Dies - Flower #161594
  • Bough Punch #157711
  • Lacy Border Punch
  • Stitched Circle Die 2 1/4"
Cardstock and DSP:
  • 81/2" x 5 1/2" basic white card base 
  • 3 3/4 x 5" basic white matte inside and 3 x 3 scrap for circle die 
  • Blackberry Bliss for mattes 
    • 4" x 5 1/4" inside matte
    • 5 3/8" x 4 1/8"  matte card front 
    • 1" x 5" strip for scalloped edging and scraps for flowers
  • Bubble Bath 3" x 3" scrap for circle and scraps for flowers
  • Celebratory Sips 12 x 12 DSP 4" x 5 1/4" floral pattern for front panel
    • 3 2/4" x 4  7/8
    • 1/2" x 4" for inside strip 
    • 1" by 4 7/8" strip of reverse Old Olive side for front panel 
Inks and Blends:
  • Blackberry Bliss
Accessories:
  • Purple Adhesive Backed Sequins #164970
  • Dimensionals large
  • Tombow Glue 

So that's it for today's card.  I hope that you're inspired to try out this sketch challenge.  Drop me a note and let me know if this is the type of card you would send for a birthday greeting or would like to receive.  

HAPPY STAMPING!
PENNY TOKENS STAMPIN' SPOT 

Penny Hanuszak, CDN Stampin' Up! Demo since 2006 

Sunday, May 4, 2025

Daisy Daydream Alternate Cards - Paper Pumpkin March 2025 Kit Part 1

Welcome to my blog.  Thanks for dropping by to check out what's new.  Today I'm sharing some of the cards that I made using the Daisydream March 2025 Paper Pumpkin kit.   

The Daisy Daydream kit was probably one of the nicest Paper Pumpkin kits I've worked on this year. All the cards and elements are beautiful and easy to work with and they coordinate with other Stampin Up products. 

This kit will make a total of nine cards if you don't make any changes and just follow the outline.  But, I'm a rebel at heart and I like to stretch these kits to the maximum and choose my own path of creativity.  I do that by using basic white card bases and coordinating cardstock for mattes.

So far I've created twenty-two cards by adding my own card bases, mattes and layers and have still got enough leftovers to go for thirty.  

Here are some of the cards I've made:

Card No. 1 

One of the first cards I made with this kit was a standard gatefold flap card.  


For this card I used Smokey Slate for my matte and sentiment pieces.  The embossing on the white matte was done with a Hexagon Embossing Folder that's been longer retired but still in my go-too stash.  

Card No. 2

I absolutely love how this card turned out.  I've doubled matted using an old retired dsp called Always Artichoke and the blue layer is actually one of the cards I cut in half and then embossed with Stampin' Ups! Cute Crochet (R) embossing folder.  Love it!  The Happy Birthday sentiment layer and stamp is from the December 2024 Paper Pumpkin kit called Notes From the Heart. 
Card No. 3

I had some very old ribbon in my stash so I cut a 6" strip and stretched it across the front of the card to divide the floral dsp from the embossed Always Artichoke panel.  It really brought the card to a new level.  The focal below the ribbon is dressed up with some daisies and stamped images from the kit.  on the white circle.  The Three gems are from the Iridescent Foil Gems pack. 

Card No. 4 


I love to dress up the insides of my cards too, and for this one I used stencils and stamps from the kit.  I like the way this inside matte turned out, and think it's so much nicer than a plain white card insert.  


This is one of my favourite card layouts and styles and I've made it many many times.  For the front flap, I embossed a piece of Basic White cardstock with the Basic D embossing folder (cross hatch) after stamping some of the honeycombs in crushed curry ink.  

Card No. 5


One of the panels in the kit has the honeycomb images pre stamped and they have a glossy finish that changes in the light.  I used this panel which already had a circle cut in it, and one of the circle elements (green) that's also included with the kit.  This was one of the easiest of the cards to come together.  The hardest decision is what elements to put on it.  

Card No. 6


For my next card I once again embossed the front card panel with the  Basic D (R) embossing folder and used this single mat to create the focal for the card.  

Card No. 7

For this next card I used one of the beautiful blue envelopes to create the panels and flap cover.  The arch die cut was a fun element to add to this card and the paper cut like butter.  
Card No. 8


If you're interested in getting a subscription to Paper Pumpkin you can check out the join options available on the Stampin' Up! website.  It's easier than every to get started.  

Well that's it for this selection of alternate cards made with the March 2025 Daisy Daydream Pumpkin Kit. I'll be sharing some more cards in the weeks to come.  Hope you enjoyed this selection.  I'd love to hear from you, so let me know if which of these cards is your favourite.  

HAPPY STAMPING!
PENNY TOKENS STAMPIN' SPOT 
Penny Hanuszak, CDN Stampin up Demo since 2006 

Masculine Birthday Card for AHSC #629

Welcome to another card sketch challenge by  Atlantic Hearts Sketch Challenge #629  created by Michelle Stewart and digitized by Brandi.   I...