Saturday, May 31, 2014

Tick Tock................Times Running Out

Just a reminder the new catalogue becomes available tomorrow but Stampin' Up! is still saying goodbye to hundreds of retiring products from the 2013-2014 annual catalogue. 

You might still be able to get your favourite retiring products before they're gone for good!  Check out the weekly deals and the clearance items, because there are still some hot items available.

 
ALL products are only available while supplies last.  From now until June 4, 2014, Stampin' Up! is offering a 25%-50% discount on many of the retiring products. Get them before they're gone!

Retiring Lists
  • Retiring Stamps (Available April 21-June 4, 2014, or while supplies last)
  • Retiring Accessories (Available April 21-June 4, 2014, or while supplies last)

Friday, May 30, 2014

Modern Medley and Scalloped Tag Topper Punch Birthday Cards

A friend recently asked me to make some birthday cards for her with the following specifications:
  • both in black and white only
  • one must include musical notes 
  • one must have a bird  or two
 I designed the following cards to meet her criteria and I'm very pleased with the outcome.  Sometimes it really helps to have specifics, they work like a great sketch to plant the seed for creativity. 

Here are my cards: 

I really enjoy making cards with the Scalloped Tag Topper Punch.  They always have that little "wow" factor going for them.  These cards were no exception.  Sadly, I didn't have any designer paper in black and white so I had to fall back on "winter white" by using Very Vanilla cardstock matched up with Modern Medley DSP.   

For the bird card I used Basic Black for the card base and Very Vanilla for the layers and then I reversed out for the second card using Very Vanilla for the base and basic black for the layers.  The designer paper is from Modern Medley* one of this year's very popular designer paper series. 


The little bird and leaf on this card were punched out of basic black cardstock with the Bird Builder Punch.  I added an extra wing and feathered both with my small scissors, just along the wing edge.  A basic rhinestone was used for the bird's eye.  The closure is made with 3/8" Very Vanilla Taffeta ribbon, one of my absolute all time favourites.  It ties so beautifully, holds it shape and rarely frays.  The "happy BIG day" label is from the Chalk Talk stamp set and was die cut with the coordinating Chalk Talk framelit dies.  I popped it up on the face of the card with dimensionals. 

For the inside of the card I chose the sentiment "Warmest Wishes on your birthday" from the Blooming With Kindness stamp set.  I love this script, it's so beautiful. The three flowers image is from the Punch Potpourri stamp set (a retired hostess set). 

For the Musical Notes card I used Very Vanilla for the card base and then added a piece of designer series paper from the Modern Medley series. 
When I was finished this very quick to assemble card, it took my breath away.  It's clean, simple and yet very elegant and has a definite "wow" factor. 

I stamped the sentiment from the Chalk Talk set in Momento Black on Very Vanilla cardstock.  I used the next size up framelit in the Chalk Talk set to die cut a piece from basic black cardstock to mount the sentiment on.  To tie in the musical notes and take away the plainness of the card front I added three small basic pearls on either side of the label.  It's mounted to the card front with dimensionals.  
I just love the inside of this card.   It's clean and simple.  The basic black layer adds a rich look.   To make sure that the sentiment was hidden behind the ribbon when the ribbon is tied in a bow, I used my Stamp-a-ma-jig to position the sentiment between the two tag punch pieces.   It worked beautifully!
Supplies:
Stamp Sets:  Chalk Talk, Blooming with Kindness, and Punch Potpourri
Ink:  Momento Basic Black, 
Card stock:  Basic Black, Very Vanilla
Designer Series Paper:  Modern Medley* DSP
Accessories:  a 10" piece of Very Vanilla 3/8" Taffeta Ribbon, a 10" piece of Gros Grain Black ribbon, basic pearls, basic rhinestones, Bird Builder Punch, Chalk Talk Framelits, Tag Topper Punch

*The Modern Medley DSP is retiring and will no longer be available past May 31st, 2014.  It is currently reduced in price, so if you want it you'll have to order it today or tomorrow.  Don't be disappointed.  


Measurements can be found in my tutorial here:

I hope you enjoyed today's post and will leave me a comment as to which card you like the best.  I love hearing from you, it simply makes my day and encourages me to keep creating.  

Penny
Happy Stamping!

Thursday, May 29, 2014

Soccer Theme Birthday Cards using PPA205


Earlier this week I planned to work on the Paper Pals Art Sketch Challenge PPA205 and enter it before the closing on May 27th, but guess what?  That's right, I didn't finish in time.  

My friend Sheri and I decided to tackle it anyway during our Tuesday stamping get-together just because this is such a fun sketch. We both thought it had potential as there are just so many possible ways you could use it.  

I wish I'd taken pictures of my stamping table because during our collaboration on the card it was just chaotic.  I think we hauled out most of my stamps before deciding to create our cards using the Great Sport stamp set.  

Supplies:
Stamp Set(s):  Great Sport, Work of Art, Elements of Style 
Ink:  Melon Mambo, Memento Black Ink, Versa Mark Ink
Card Stock:  Basic Black, Melon Mambo and Whisper White
Accessories:  Banner Framelits, 2 1/2" Circle Punch, Starburst Framelits, Black Embossing Powder, 1 3/8" Circle Punch, Basic Rhinestones, dimensionals, Tom Bow adhesive

My motive for this card was creating a birthday card for a teenage girl who's an avid soccer player.  I think I scored on this one!

I made a top fold card and rotated the design so the banners are facing downwards like an award ribbon.  Although the card has a sports theme, I wanted it to be really girly girl in style and that's why I chose to do it in Melon Mambo.
The soccer ball was embossed using Versa Mark Ink and Black Embossing Powder.  It was added to the center of the design with dimensionals.  Three basic rhinestones add a little bling on this part of the card.  I cut out the central design using the Starburst Framelit Dies and mounted this on a basic black circle that was punched out with the 2 1/2" circle punch.

The chevron banners were stamped with the brand new Work of Art Stamp set that will be available in the June 1st catalogue.  They were cut out with the Banner Framelit dies and mounted on Melon Mambo banners.  (Note: the Melon Mambo banners were cut out with the next largest sized banner die but it was too big for these pennants, so I adhered the chevron banner position the "v" over top of the one on the Melon Mambo banner and then hand cut about 1/8" off of each side of the pennant, to achieve this look).

Here is a view of the card and matching envelope.

I made three of these cards in Melon Mambo.

Here's the inside of the card.  I repeated the flourish stamp from Great Sport and topped it with a Happy Birthday sentiment that's mounted on a 1 3/8" circle of basic black. 
 
Great Sport, item #132010 is a six piece stamp set  that comes in Wood Mount for $32.95 or Clear Mount for $24.71.  This set has a little something for ever sports enthusiast -baseball, basketball, football, soccer and can be used to create invitations, tags, or to embellish scrapbook pages for your favorite sports lovers. Use with the 1-1/4" and 1-3/8" Circle Punches and the Bitty Banners Framelits Dies for a coordinated look that hits it out of the park!   It's on the retiring list and will no longer be available after June 1st.

Friday, May 23, 2014

Discounts on Retired List While They Last!!!!

RETIRED LIST BLOWOUT SALE

Get excited! Stampin Up is currently offering a 25%-50% discount on many of the retiring products. 

This announcement went live on May 22, so you'll have to act fast, as this special offer is only available until June 4, 2014. 

If you missed out on a product the first t!ime, this is absolutely your last chance to get it before it's gone for good! 

Check out the Retired Lists here:

PDF Retiring Stamps

PDF Retiring Accessories

Petal Parade Double Time Stamping

Unfortunately I didn't get to play much with the free stamps and products I earned from the Sale-a-bration catalogue this year as we were away.  

One of the stamps I had been eager to use was the Petal Parade set.  I liked the look of the flower and leaf images. 

Now that I'm back home and stamping on Tuesdays, I've had an opportunity to ink up this stamp and I love the results. I think you will too when you see these five cards. 
 
Here Are My Cards:

Card One is a Double Time card stamped on Naturals Ivory cardstock. To achieve the double time effect you center the Natural Ivory layer over top of the card base with repositioning tape and then stamp your images all over the cardstock.  Remove the top layer and adhere it to the Always Artichoke layer.  Add the ribbon to this layer and tie a bow.  Take the Always Artichoke layer and adhere it to the card base matching up the flower images that have over lapped and adhere it with adhesive.  
 Supplies:
Stamp Sets:  Petal Parade (SAB 2014 retired), Perfectly Penned
Ink:  Sahara Sand, So Saffron, Always Artichoke, Early Espresso
Card Stock:  Naturals Ivory measuring 4 1/4" x 11" for card base and scored at 5 1/2". Cut another layer to measure 3 3/8" x 4 7/8".  Always Artichoke layer measures 3 5/8" x 4 7/8".  
Accessories:  Ribbon 10 inches in Daffodil Delight, Adhesive, Trimmer
 
The inside of the card was left blank except for the flowers and leaves.

The Happy Birthday sentiment is from the Perfectly Penned Stamp set.

Perfectly Penned a 4 piece stamp set on page 95 of the Idea Book and Catalogue will retire on May 31st of this year. 
 
Card Two:  This is the same as card one but instead of the Naturals Ivory I've used Whisper White card stock.  All measurements and other materials remain the same.  The images are quite a bit crisper on the Whisper White and it doesn't have the homespun a look as Card number One. 

Here are Cards One and Two together.

Card Three is a side-fold card once again the Petal Parade stamp set stamped in the new Stampin' Up! In Colours - Blackberry Bliss, Lost Lagoon and Hello Honey.  

Supplies and Measurements:

Stamp Sets:  Petal Parade, Work of Art (NEW)

Ink:  Lost Lagoon, Hello Honey and Blackberry Bliss

Card stock:  Whisper White card base measuring 4 1/4" x 11 and scored at 5 1/2".  Whisper White layer measuring 3 3/8" x 4 5/8", Rich Razzleberry layer measuring 3 5/8" x 4 7/8" and a Sage Shadow layer measuring 4 x 5 14" and embossed with the Designer Dots embossing folder.  

Accessories:  Dimensionals, Designer Dots Embossing Folder, Big Shot and Trimme


Card Four is a side fold card that uses the Emboss Resist Technique.  This card uses the same cardstock, ink and measurements as Card Three.  The only additional accessories you'll need are a heat tool, Versa Mark Ink, Clear Embossing Powder, Basic Rhinestones and a sponge dauber. 

I stamped the leaves with Versa Mark Ink randomly across the White Layer, covered with Embossing Powder and then heat set it with the heat tool.  I then did the rest of the stamping on the card.  I stamped off some of the smaller flowers so the images were faded.  Once all the stamping was done I rubbed over the embossed areas with Lost Lagoon ink and the sponge dauber to bring colour to those areas. 

Card Five uses the Resist Embossing Technique too but I've changed up the colours and added a small banner.  This is a top fold card.   

The leaves were embossed using Versa Mark ink and Clear Embossing Powder.  The colour was applied with a sponge dauber once all the stamping was finished on the layer.

The sentiment "Fabulous is what you are" is from the Million and One stamp set and is stamped in Coastal Cabana ink on the inside of the card. 

The sentiment on the banner was stamped in Blackberry Bliss on a piece of Whisper White card stock and then cut out using the small banner from the Chalk Talk framelits set.  I used the next size framelit to cut out a piece of Elegant Eggplant cardstock to use as a mat for the sentiment.  The small flowers were cut out with the Itty Bitty Punch. 
 Stamps:  Petal Parade, Perfect Pennants, Million and One.

Card stock:  Whisper White, Elegant Eggplant, Coastal Cabana.

Ink:  Crumb Cake, Blackberry Bliss, Elegant Eggplant, Coastal Cabana, and Versa Mark 

Accessories:  Chalk Talk Framelits, Itty Bitty Punches, Basic Rhinestones, Clear Embossing Powder, Heat Tool, Adhesive, Dimensionals, and a Sponge Dauber.

Thanks for dropping by and visiting my blog.  Leave me a comment if you think these posts are good and inspiring you to stamp or try a new technique.

Penny 
Happy Stamping! 

Thursday, May 22, 2014

Simple Stems a Versatile Stamp Set

Here's another flower stamp set that I think simply rocks, and I'm sad because it's only going to be available for another two weeks.  
It's called Simple Stems and is in the Occasions Catalogue on page 33.  

Simple Stems is a 7 piece two-step stamp set that offers a lot of versatility as you'll see in the cards I'm posting today.  This set coordinates with the Secret Garden Framelit dies.
Wood Mount #133098 $23.95 or Clear Mount #133101 $17.95
Here Are My Cards:  

Supplies: 
Stamp Sets:  Simple Stems, Express Yourself, Blooming With Kindness
Classic Ink Pads: Real Red, Coastal Cabana
Card stock:  Crumb Cake (for base), Real Red, Whisper White
DSP:  Fresh Prints Designer Series Paper
Accessories:  2 1/2" circle punch, Basic Rhinestone Jewels, Dimensionals, Adhesive.
For the inside of the card I used a sentiment from the Blooming With Kindness stamp set.


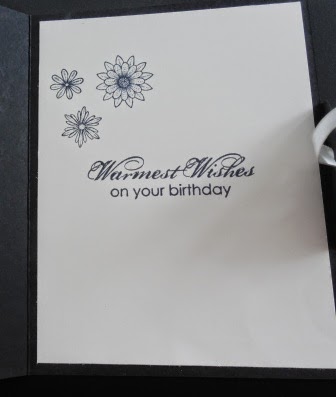
The Blooming With Kindness stamp set includes six wonderful sentiments along with the gorgeous bloom.  I love the script.

To Make This Card:
1.  Cut Crumb Cake card stock for card base to measure 5 1/2" x 8 1/2" and score at 4 1/4".
2.  Cut Whisper White card stock to 3 3/4" x 5" for the inside of the card.  Stamp with sentiment and one of the flowers.  For the "happy birthday"
sentiment on the card front, cut a piece of Whisper White to measure 1/2" x 3 1/2" and stamp your sentiment in Real Red ink. Cut ends like banners and attach this piece last to the card front.
3.  For the DSP Layer cut 3 coordinating patterns of DSP from the Fresh Print Paper stack measuring:  First - cut DSP to measure 1 1/2 by 5 1/2" and cut in half lengthwise.  Second piece - cut piece to measure 1 1/8" x 5 1/2" and for the Third piece cut it to measure 1/2" x 4 1/4".
4.  Adhere DSP pieces to the face of the card by laying one of the first pieces on the left of the card center, then the second piece and finally the second of the First pieces.
5.  Punch out a 2 1/2" circle of Real Red card stock and attach with dimensionals to card front, overlapping the DSP strips.
6. Adhere the "third" piece of DSP over top of the red circle.  Attach with glue dots and dimensionals. 
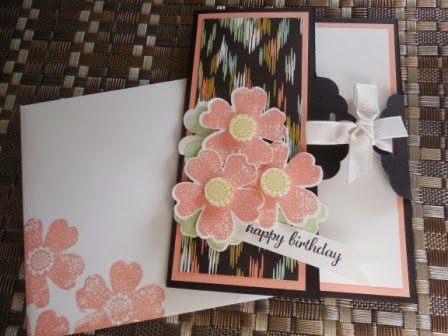
6.  Stamp two flowers - one in Real Red and one in Coastal Cabana.  Fussy cut around the edges of each flower and attach at the top end of the circle with dimensionals.  
7.  Add the sentiment banner beneath the flowers, and place basic rhinestone jewels in each of the quarters on the circle, and in the corner of the white banner . 

Another Variation on this Card: All the measurements given above still apply to this second card I made using the Petal Parade stamp set.  I did however  changed up the ink colours to Cranberry Crisp, Coastal Cabana and Delightful Daffodil.  I also eliminated the "third" strip of DSP for this example.  The paper is "Sweet Sorbet" from the SAB catalogue.
Cut the 2/12" circle from Basic Black Cardstock. Stamp the three flowers in Cranberry Crisp, Coastal Cabana, and Daffodil Delight and fussy cut around the outline of each flower.  Adhere to the front of the black circle, just overlapping the top right hand side.  Add basic rhinestone jewels around the bottom edge of the circle.
The sentiment for these cards is from the Chalk Talk stamp set and is cut out with the Chalk Talk framelits. These are still available as a bundle in the Idea Book and Catalogue but only until May 31st. 


Kids Birthday Card Using Simple Stems:

I also made these really cute kid's birthday cards using Bold Brights (Daffodil Delight, Pacific Point and Real Red) card stocks and inks, after seeing a similar layout on Pinterest using this same layout.  It was so cute I just had to make one, which led to more.  

Who would have thought these little mop heads could be made from a "flower" head.  Cute, cute, cute!!!  I'll be looking at my stamps a little more closely from now on. 
Here's the inside of the card.  I kept it pretty simple. Tip:  If you want to keep this card flat for mailing or don't have store bought google eyes on hand, you can get almost the same look using the punch outs from the Owl Builder Punch. 

As you can see I couldn't stop at just one card I made a bunch of them.  It never hurts to have kids cards on hand.  Any combination of these "mop heads" would work for example this could be for a three year old (3) or you could have four for a four year old.  Use your imagination. 
Hope you liked these cards.  I really wanted to show you the versatility of this set and although I didn't use every flower in it,  I'm sure you get the picture.  Happy Stamping and leave me a comment if you liked this post. 

Penny

Happy St. Patty's Day!

Rainbows, a Pot of Gold, Leprechauns green beer and shenanigans are all part of celebrating St. Patty's Day on March 17th. I have a sma...