A friend recently asked me to make some birthday cards for her with the following specifications:
I designed the following cards to meet her criteria and I'm very pleased with the outcome. Sometimes it really helps to have specifics, they work like a great sketch to plant the seed for creativity.
Here are my cards:
I really enjoy making cards with the Scalloped Tag Topper Punch. They always have that little "wow" factor going for them. These cards were no exception. Sadly, I didn't have any designer paper in black and white so I had to fall back on "winter white" by using Very Vanilla cardstock matched up with Modern Medley DSP.
For the bird card I used Basic Black for the card base and Very Vanilla for the layers and then I reversed out for the second card using Very Vanilla for the base and basic black for the layers. The designer paper is from Modern Medley* one of this year's very popular designer paper series.
For the Musical Notes card I used Very Vanilla for the card base and then added a piece of designer series paper from the Modern Medley series.
Supplies:
Stamp Sets: Chalk Talk, Blooming with Kindness, and Punch Potpourri
Ink: Momento Basic Black,
Card stock: Basic Black, Very Vanilla
Designer Series Paper: Modern Medley* DSP
Accessories: a 10" piece of Very Vanilla 3/8" Taffeta Ribbon, a 10" piece of Gros Grain Black ribbon, basic pearls, basic rhinestones, Bird Builder Punch, Chalk Talk Framelits, Tag Topper Punch
*The Modern Medley DSP is retiring and will no longer be available past May 31st, 2014. It is currently reduced in price, so if you want it you'll have to order it today or tomorrow. Don't be disappointed.
Measurements can be found in my tutorial here:
I hope you enjoyed today's post and will leave me a comment as to which card you like the best. I love hearing from you, it simply makes my day and encourages me to keep creating.
Penny
Happy Stamping!
- both in black and white only
- one must include musical notes
- one must have a bird or two
Here are my cards:
I really enjoy making cards with the Scalloped Tag Topper Punch. They always have that little "wow" factor going for them. These cards were no exception. Sadly, I didn't have any designer paper in black and white so I had to fall back on "winter white" by using Very Vanilla cardstock matched up with Modern Medley DSP.
For the bird card I used Basic Black for the card base and Very Vanilla for the layers and then I reversed out for the second card using Very Vanilla for the base and basic black for the layers. The designer paper is from Modern Medley* one of this year's very popular designer paper series.
 |
| The little bird and leaf on this card were punched out of basic black cardstock with the Bird Builder Punch. I added an extra wing and feathered both with my small scissors, just along the wing edge. A basic rhinestone was used for the bird's eye. The closure is made with 3/8" Very Vanilla Taffeta ribbon, one of my absolute all time favourites. It ties so beautifully, holds it shape and rarely frays. The "happy BIG day" label is from the Chalk Talk stamp set and was die cut with the coordinating Chalk Talk framelit dies. I popped it up on the face of the card with dimensionals. |
 |
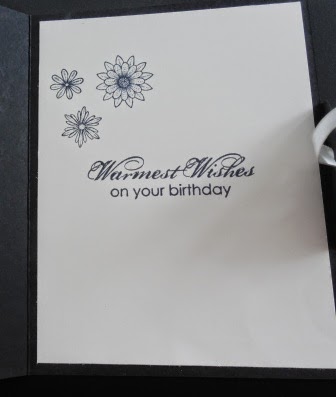
| For the inside of the card I chose the sentiment "Warmest Wishes on your birthday" from the Blooming With Kindness stamp set. I love this script, it's so beautiful. The three flowers image is from the Punch Potpourri stamp set (a retired hostess set). |
For the Musical Notes card I used Very Vanilla for the card base and then added a piece of designer series paper from the Modern Medley series.
 |
| When I was finished this very quick to assemble card, it took my breath away. It's clean, simple and yet very elegant and has a definite "wow" factor. |
Stamp Sets: Chalk Talk, Blooming with Kindness, and Punch Potpourri
Ink: Momento Basic Black,
Card stock: Basic Black, Very Vanilla
Designer Series Paper: Modern Medley* DSP
Accessories: a 10" piece of Very Vanilla 3/8" Taffeta Ribbon, a 10" piece of Gros Grain Black ribbon, basic pearls, basic rhinestones, Bird Builder Punch, Chalk Talk Framelits, Tag Topper Punch
*The Modern Medley DSP is retiring and will no longer be available past May 31st, 2014. It is currently reduced in price, so if you want it you'll have to order it today or tomorrow. Don't be disappointed.
Measurements can be found in my tutorial here:
I hope you enjoyed today's post and will leave me a comment as to which card you like the best. I love hearing from you, it simply makes my day and encourages me to keep creating.
Penny
Happy Stamping!


