Sunday, November 22, 2015

Countdown to Midnight..............On Line Extravaganza Sale!

Just a note to see if you're ready for Stampin' Up!s yearly On Line Extravaganza???  The clock is ticking and it's only hours away now. 

In my opinion this is probably by far one of Stampin' Up!s biggest and best sales of the year.  So don't miss out it starts at midnight tonight!

Here's What You Need to know:

  • The On Line Extravaganza runs from November 23-30, 2015.
  • You can save up to 50 percent on select products during this super week-long sales event!
  • To make it even better, there will be flash sales that last 24 hours on November 23 and November 30, the first and last days of Online Extravaganza. 
  • Online Extravaganza savings are only available while supplies last, so get them while you can!
See the Savings Now!  Click on this link to view the items on sale:
Check out the savings on this PDF then get your list ready so you can log on and put those orders in before they are sold out.

Shop Online - Click Here then click on the Shopping Button to go to my on-line store, to place your order. 


Want to know what's on my wish list:
  •  Buy 3 select Designer Series Paper, and Get 1 Free ....... yippee!!!!
      • 138445 Everyday Chic DSP
      • 138446 Bohemian DSP
      • English Garden DSP
      • Farmer's Market DSP
      • Sweet Li'l Things DSP
      • Merry Moments DSP
      • Timeless Elegance DSP
      • Schoolhouse DSP 
Happy Stamping!  
Penny Tokens Stamping Spot

Thursday, October 15, 2015

The Wacky Watercooler October Holiday Round-Up


Here we go again! Last month's Wacky Watercooler Stamping blog hop "Let's Mix It Up", was such a super success, we’ve  decided to do it again with our October Holiday Round-up.   What fun..... it's a "free for all".  Holidays, Holidays, Holidays!  

This blog hop which lasts from tonight through Saturday night, will feature products from both the Holiday and Annual catalogues.  You're bound to see lots of Thanksgiving (US), Halloween, and Christmas Holiday projects, so grab a cup of coffee or whatever's your pleasure, and make sure you visit all the sites on the hop.

If you started at the beginning of the blog hop you'll have arrived here from the very talented Jean Fitch's blog.  Aren't her projects awesome?  I always love reading her posts as they are so funny and informative. 


For your entertainment this month, I've completed two spooky Halloween Projects and a Christmas card project with a twist, which I hope you'll enjoy.  

My First Project:
My first project is a spooky OWL Halloween card that was inspired by this poem:


A great big OWL
in a great big TREE
on a night so DARK
you could hardly SEE
was watching the LIGHTS
in the deep RAVINE
where the WITCHES danced
on HALLOWEEN 
Okay, so I know there isn't a ravine or any witches in my card, but you have to admit that OWL with the great big eyes is pretty spooky
I saw a card made with a double window frame die cut on either Pinterest or Youtube and that inspiration, was the beginning of this card.  With a little bit of trial and error I was able to place the cutting mats just so and run the Hearth and Home framelit through the Big Shot twice to create this enlarged window frame.  Then, I turned the window frame on it's side and adhered it with dimensionals to the card front. 
 
Can't you just hear those wings batting against the window pane and the WHOO!  WHOO! of the owl as he struggles to see what's going on inside the haunted house? 

Supplies:
 
Stamp Sets:  Howl-o-ween Treat
Card Stock:
Tangelo Twist, Very Vanilla, Happy Haunting DSP
Ink:
Rich Razzleberry
Accessories:
Hearth and Home Thinlet Dies, Boo To You Framelit Dies, Dazzling Details, Basic Big Shot, Trimmer, Large Google Eyes (Non- SU)


My Second Project:


Halloween is such a great holiday occasion! Even though our years of having lots of trick or treaters, making costumes, going to Halloween parties have dwindled away, I still get caught up in the spookiness of the season.  I love hauling out my precious collection of Halloween decor to set the stage for that special night. 

I've wanted to make a Halloween Banner for my fireplace for some time now, so when I saw the Howl-o-Ween Treat stamp set, I knew a banner was in the making!  I had so much fun pulling this together, and hope you enjoy it too.  
Unfortunately I couldn't get an adequate picture showing how great this banner really looks strung out across the mantle.  I think I've reached the point where i need to replace my camera with one that captures a panorama view.


The banner consists of these four elements repeating across the length of the banner.  It measured 5 feet in length.
I absolutely love the Howl-o-ween Treat Stamp set.  It's one of the best Halloween sets I've ever owned.
This is the reverse side of the banner. I finish it off with strips of cardstock laid over the string and secured with the hot glue gun.  This ensures the individual banners will not droop or fall off. 

Supplies:
Stamp Sets:  Howl-o-ween Treat, Dictionary Background Stamp
Card Stock: Tangelo Twist, Very Vanilla, Crushed Curry, Happy Haunting DSP

Black Glimmer Paper
Ink: Rich Razzleberry, Momento Tuxedo Black, 

Accessories:Trimmer, Big Shot, Crop-o-dile and Large Silver Eyelets, Boo To You Framelit Dies, Lots of Layers Framelit Dies, Dazzling Details, Basic Rhinestones, Spider Web TIEF (R), Large Polka Dot TIEF, SERIF Essentials Alphabet Dies (R), Glue Gun, Dazzling Details

My Third Project:
I'm not a big scrapbooker, but I have been making great use of the Project Life Card Collections, so for my third and final project, I wanted to share an alternative way to use the Project Life Hello December 2015 Photopolymer Bundle   If you are pressed for time this kit is a perfect option for getting all your Christmas cards, tags or scrapbook pages finished in a jiffy.  

I'm always looking for small hostess gifts so when I saw the Card Pouch tutorial by Cindy Lawrence on Split Coast Stampers, I was inspired to make one of my own.  I changed up Cindy's measurements and will be doing a tutorial on this project with all the details later this month.

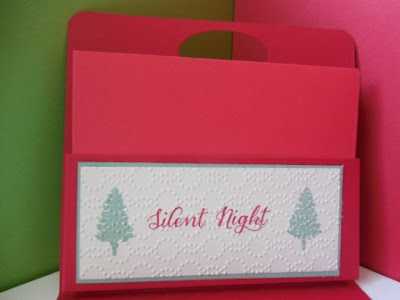
Here is the front of the cad pouch.  I used a full sized card from the Project Life set and cut it down to size for the front of the holder. 
This is the inside of the pouch

This side of the pouch holds the 4 note cards.  The note cards are blank on the inside so they can be used for a thank you or just a note.

This side of the pouch holds the envelopes.  Although I haven't included a picture here, I made the individual envelopes with my Envelope Punch board and the Real Red Envelope Paper.
 
These cards are so simple to make.  For these four I used the smallest cards from the Project Life Card Collection and matched the colouring and pictures for a set.  They are mounted on layers of Mint Macaron and Real Red cardstock and the card base is Very Vanilla.  I used dazzling diamonds on the pine bows and trees to add just a hint of sparkle.


Supplies:
Stamp Sets:  Wonderland, Project Life Hello December 2015 Photopolymer
Card Stock:  Mint Macaron, Real Red, Very Vanilla, Real Red Envelope Paper
Ink:  Real Red, Mint Macaron
Accessories:  Project Life Hello December 2015Card Collection (from the Photopolymer Bundle), Dazzling Details, Trimmer, Big Shot, Real Red Ribbon, Envelope Punch Board

The End:
I hope you're having fun on the blog hop today and that my creations have been an inspiration for you.  Let me know if you have any questions about the projects I made, I'd be happy to respond.

Now it's time to jump over to Debbie Spano's amazing blog where I know she'll enchant you with her great creations.  You can either click on her name or on the Next button below to connect with her. 

http://www.ddstampin.com/


https://jlfstudio.wordpress.com/2015/10/15/wacky-watercooler-blog-hop-october-holiday-round-up/


http://wackywatercoolerstamping.blogspot.ca/2015/10/the-wacky-watercooler-october-holiday.html

 Happy Stamping!
Penny Tokens Stamping Spot 

Monday, October 5, 2015

WWC36 -- Special 3-D Challenge

The challenge over at the Watercooler Wednesday challenge site this week is all about 3-D.  I hope you'll take some time to go and check out all the entries from the design team and participants because they are simply awesome! 

We were meeting our nephew and his new bride for lunch today and I needed to make a card and gift holder for the cheque we were giving them.  

With the 3-D challenge in mind, I decided to make a floral gift bag using the Mini Treat Bag Thinlet Dies and a matching card.  

Here is what I made:

This is the Mini Treat Bag and the reverse side of the insert card. Unfortunately because of the black surface I took the pictures on, you can't see the outline of the insert card, but trust me it's there. 

I had to slip a piece of cardstock over the middle of this note card as I'd already written on it prior to remembering to take a picture.  The Whisper White note card measures 3 3/4 by 4 and is attached to a piece of basic black cardstock measuring 4" x 4 1/4.  When you turn this card over to the black side I've  attached a  3"x3"' envelope to hold the cheque (see above pictures).  

Although it's difficult to see in the above picture, I've layered tulle in between the DSP flower layers for some added sparkle.  The "for you" was cut out in Black Glimmer paper.  The mini treat bag and leaves were run through the Big Shot with the Lovely and Lacy TIEF for some dimension. 

Here is the matching card that went with this gift:


Supplies:
Stamp Sets:  Teeny Tiny Wishes, For The New Two Clear-Mount Stamp Set
Ink:  Momento Tuxedo Black
Card Stock:  Basic Black, Whisper White, Always Artichoke, Black Glimmer Paper, Retired SU DSP
Accessories:  Trimmer, Big Shot, Glue Gun, White Sparkly Tulle, Silver Sequins, Tom Bow Glue, Silver Accent piece.  Flower Frenzy Bigz Die (R)
Happy Stamping!
Penny Tokens Stampin Spot 

Monday, September 28, 2015

WWC35 - Marsha's Anything Goes Challenge


It's time for this week's Watercooler Wednesday Challenge,
and Marsha Reed, another of the uber talented design team has chosen to do an "anything goes" challenge.  

What does that mean?    Simply put, it is whatever you want it to be.  Share a new technique or an old one.  Share a 3-D project.  Share a mixed media project.  Share a card, a scrapbook page, new wall decor.  Make it totally your own without a sketch direction, a color direction or a theme/inspiration direction.  You want to do a birthday, anniversary, sympathy card, etc?  The possibilities are without end.

The leaves are beginning to change colour now and you can definitely feel a coolness in the air now as we approach the end of September.  In another two weeks we'll be celebrating our Canadian Thanksgiving, so it's time to start putting up some fall decorations and getting ready for what I think is the most wonderful season of the year. 

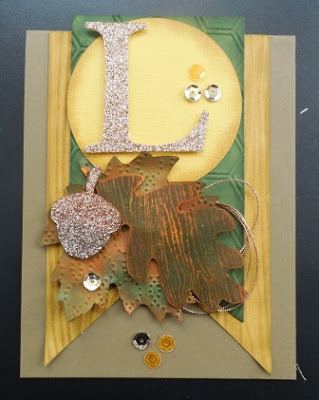
My "anything goes" project is a "Fall" mantle display.   Here it is:


Supplies:
Stamp Sets:  Wonderfall
Ink:  Delightful Dijon, Tangerine Tango, Mossy Meadow, Tip Top Taupe
Card Stock:  Soft Suede, Delightful Dijon, Crushed Curry, Tangerine Tango, Mossy Meadow, Tip Top Taupe and Gold Glimmer Paper.  
Accessories:  Big Shot Machine, Trimmer, Woodgrain TIEF, Honeycomb TIEF, Elegant Dots TIEF, Autumn Accents Die (R), Gold Thread, Gold Sequins, Serif Essentials Alphabet Dies (R), dimensionals, Tom Bow glue.

Monday, September 21, 2015

Jean's Ombre Effect Technique Challenge WWC34

I love how the Watercooler Wednesday challenges have changed their schedule to a weekly format and that each week is a different theme or format.  This week Jean from the design team has chosen a wonderful  colour format called "Ombre".  Here's her WWC34 Ombre Effect Technique Challenge :

After I was rocked by the sudden loss of my dear friend Gwen earlier this week, I've been preparing some sympathy cards to send off to the family and mutual friends affected by her passing.  But for one friend who lives very far away and is not in touch with everyone, I felt I needed more than a sympathy card.  I decided to make her a friendship card, to let her know I was really thinking of her as she deals with Gwen's passing. This card is dedicated to Gwen and my Aussie friend, Cher.  My thoughts are with you!

Here's My Card: 
Before I began I looked up the definition for "ombre" to make sure I was on the right track and here's what it said:  Ombre: n. A French term meaning "shaded". Usually a multi colored stripe, with colors graduating from light to dark.  

To achieve this graduated tone effect for my card I used a new toy in my tool arsenal called Happy Patterns Decorative Masks.  What fun to use and the visual effect is sheer delight.  From start to finish this is a ten minute card.  The hardest part was choosing the colours. 


Supplies:
Stamp Sets:  Perfect Pennants and Loving Thoughts (R)
Ink: Soft Sky, Pool Party, Mint Macaroon, Lost Lagoon
Card Stock:  Lost Lagoon, Mint Macaroon, Whisper White
Accessories:  Butterflies Thinlet Dies, Happy Patterns Decorative Masks (138313), Sponge Daubers, Basic Rhinestones, Detail Scissors, Trimmer, Big Shot, Elegant Dots Embossing Folder

If you enjoyed this card I hope you'll leave me a comment.  
 Happy Stamping!
Penny Tokens Stampin Spot

Thursday, September 17, 2015

September Mixup - Wacky Watercooler Blog Hop


September 2015 Blog Hop photo September 2015 Banner.jpg


What signals one of my most favourite times of the year? Well, for me the first signs are the leaves starting to turn, the weather's getting a bit chillier at night, and the kids are back in school.  Yep, FALL is officially here and it's time to start thinking about all the seasonal celebrations ahead.  

This weekend I've joined the Wacky Watercooler Blog Hop design team to  celebrate a "September Mixup".  Our hop is running from tonight through  the 19th of September and is offering some really creative ways of using products from both the new and annual catalogues. 

We have 15 terrific gals participating and showing off their talents so be sure to follow the hop and leave some love along the way! The Wacky Watercooler Blog Hop runs in a circular fashion, so no matter where in the list of participants you begin, inevitably you'll wind up in the exact same place again if you keep going to the "next".  

If you started at the beginning of the hop you've just arrived from Marsha Reed's fabulous blog.  Wasn't her project awesome?  Okay now it's time to see what I came up with...........

Halloween Gift Bags - Howl-o-ween Good Times!
We don't get many kids on Halloween night anymore, so for those 5 or 6 that brave the elements to haunt my front door, I love to have some special treat bags on hand.  
Supplies:
Stamp Sets: Howl-o-ween Treat* Six Sayings Hostess Set Holiday Catalogue
Ink: Blackberry Bliss, Hello Honey Marker. Momento Tuxedo Black Ink, Tangello Twist Re-Inker
Card stock: Tangello Twist, Gold and Black Glimmer Paper, Happy Haunting Designer Series Paper
Accessories: Lots of Labels Framelit Dies, Boo To You Framelit Dies, Spider Web (R) and BoHo Chic Embossing Folders, Bat punch(R), Google Eyes (non-SU), Dazzling Details, Pumpkin Pie and Blackberry Bliss ribbons, Word Window and Large Oval punches, Basic Rhinestones, Dimensionals, Tom Bow Glue, Big Shot and Trimmer. 

The Howl-o-ween Treat Stamp Set which comes in wood or clear mount and the Boo to You Framelit Dies are featured on page 49 of the catalogue.  They can be bought individually or you can save 15% by purchasing them as a bundle. 
I love this cute little 4" x 1 1/2" gift bag.  It's simple, very quick to make and decorates easily.  For this bag I started with a 12 x 6" piece of the Happy Haunting Designer Series Paper. If you love Halloween Paper, this set of design papers is a real winner.  Each design and the colour mix are very special.
I used a Hello Honey marker for the owl's nose and a Blackberry Bliss Marker to enhance some of the feather details on the owl's body. I punched out two small circles with the Itty Bitty Punch set from Black Glimmer paper to mount the google eyes on.  Although they don't show up very well in this photo, the wavy feathers on the owl's chest were coloured with dazzling details that I added a bit of Tangello Twist re-inker to. I used two of the Label Framelits from lots of Labels to die cut the two label tags that the owl is mounted on.  I embossed the smaller label with the Bo Ho Chic embossing folder and the larger one is cut from Gold Glimmer paper.  They are mounted to the bag with dimensionals.
 My Second Bag:
Here is the second bag which showcases the Skull and Crossbones from the Howl-oween Treat stamp set.  I layered the stamped images on two labels cut out with the Lots of Labels Framelit Dies.  The Blackberry Bliss label was embossed with the now retired "Spider Web" TIEF.  The other label was cut from Gold Glimmer Paper.  I stamped the super cute little spider from this stamp set in  Tuxedo Black ink and then punched out a piece of Black Glimmer paper with the circle punch from the Itty Bitty Accents punch set and glued it onto its back with a dimensional.  Two rhinestones coloured with a black sharpie were added to the skull's eye sockets.  The "FaBOOlous" sentiment is from the Six Sayings Hostess stamp set.  I fussy cut out the wording and added dazzling details to make it glimmer. 
 Directions for the Bag:
1.  Cut 12 x 6" piece of Designer Series Paper or Card Stock of choice.
2.  Score on long side at 4", 5 1/2", 9 1/2", and 11"
3.  Turn DSP to short side and score at 4 1/2".
4.  Cut from the bottom along score lines to the 4 1/2" score line.  Fold on score lines and trim off small rectangle in bottom right hand corner of bag.
5.  Assemble bag with Sticky Strip.  Fold so small tabs are on the inside of the bag bottom and there is a large tab on the bottom.  You only need to apply sticky strip or glue to the side seam and the bottom of the bag.  
6.  Pinch the sides of the bag together towards the top, like a lunch sack.  
7.  Make a handle area by punch through both thicknesses with either a Word Window or a large oval punch.
 
Embellished Ornament:
Do you ever look at a stamp set or dies in a magazine or catalogue and it sucks the breath right out of you?  Well that's what happened to me when I turned to page 15 in the Holiday Catalogue and saw the Embellished Ornament stamp set and coordinating Delicate Ornament Thinlet Dies.  I fell in love with them, and they quickly went to the top of my wish list.  Here's what I've made with them so far:

I pride myself on finishing the insides of my cards to mirror the exterior.  When I finished this card, I laughed because the inside could actually be the outside it turned out so pretty. I owe that to the Delicate Ornament Thinlet die that I used to cut out this precious bauble.  These are pretty intricate dies but I use a cardboard and wax paper shim when I run these dies through my big shot and I find they cut like butter on card stock, glimmer and foil papers.  
I stamped two additional ornament images and fussy cut the flower from the center of both.  These were mounted with dimensionals on the original ornament and a basic rhinestone was added to the center.  You might think that the shiny circles on the ornament were achieved with rhinestones, but think again.  I actually cut the 1/8" circles from Dazzling Diamonds glimmer paper using a punch and then glued them on to each of the spots on the ornament.  I cut the point off a toothpick and used that to apply the glue to the back of the dots and then add them to the ornament. 
Supplies:
Stamp Set: Embellished Ornaments

Card Stock:  Smokey Slate, Whisper White and Blackberry Bliss, Silver Foil and Dazzling Diamonds Glimmer paper
Ink: Blackberry Bliss
Accessories:  Softly Falling TIEF, Big Shot, Delicate Ornament Thinlet Dies, Basic Rhinestones, detail scissors, dimensionals, Tom Bow adhesive.   1/8" circle punch

You can bundle and save 15% on the Embellished Ornament and Delicate Ornament Thinlet Dies through January 4, 2016.  


Usually I do three projects for these hops, and although I have one in the works I unfortunately didn't get the time I'd anticipated to finish it.  But don't worry, rather than rush and botch the project I'm going to finish it later this week and then I'll share it with you under a separate post. So please make sure you come back and check it out.

Now that I'm done I'm passing you along to our next talented designer, Bev, who is sure to delight you with her projects. Make sure you click  on her name here or on the "Next" watercooler icon below.  


Wacky Watercooler September Mixup
Happy Stamping Everyone!
Penny Tokens Stampin Spot

Happy St. Patty's Day!

Rainbows, a Pot of Gold, Leprechauns green beer and shenanigans are all part of celebrating St. Patty's Day on March 17th. I have a sma...