Friday, December 30, 2022

END OF YEAR REVIEW - HAPPY NEW YEARS!


Was December a busy time for you?  I can certainly say it was around our home.  It was a month of commitments and too little time for stamping and preparing for the holiday season this year, and it left me feeling rushed and in a bit of a tizzy.  

I usually have all my cards made, envelopes stamped and addressed and ready for mailing by November 1st, but not this year.  Being behind really put the pressure on, but I'm happy to say that I kept persevering and finished 140 cards to send and give out. 

Here are some of the cards that I made using products from the Holiday Mini which retires in a few days.  If you still need bundles or products make sure you get your order in so you don't miss out and check out the Last Chance List for specials.  Sale ends January 4th, 2023:


All Bundled Up #159824:

The dots on the Racoon's hat and scarf and the Bunny's sweater are made with Stampin' Ups! White Chalk Pen.  This is a simple colouring trick to add soft texture and interest to your images.   The window frame which isn't elevated, simply adhered to the DSP also adds a different element The animal images and Merry Christmas sentiment were elevated with Dimensionals. 
   

Teeny tiny pearls add some unexpected texture to the snowflakes on this card. I loved adding the pop of Real Red on the bird's scarf and boots.  I love both the images in this card and went on to do make additional cards with non-traditional colours, like this one I made for a Freshly Made Sketches challenge.  


This is the first Moose Christmas card I made using this bundle which I'd borrowed from my sister. I used blends for the colouring and added some silver stickles to the snowflakes and ground. Even though the stamping and colouring in this card were very basic, I loved how it turned out, and wound up buying the set myself because I wanted to explore what more I could do with it.


After seeing this card, a friend asked me to make her a set of these cards but change the background DSP and card stock to red, green and gold for a more traditional Christmas look. At her suggestion, I also coloured the moose darker with Soft Suede and Crumb Cake blends and texturized the coat with a White Chalk Marker. Another change was applying Nuvo Drops to the antlers and hooves for a pop of shine.  What fun and the cards turned out great. 

The Christmas Barn and Barn Dies Bundle #159747: 

This is another favourite set of mine this season and I made many variations of this card by changing up up the barn and silo colours, the tree shapes and  colours, added a few more details to the background and so on.  Here are some later versions. 


Window Wishes #159751:
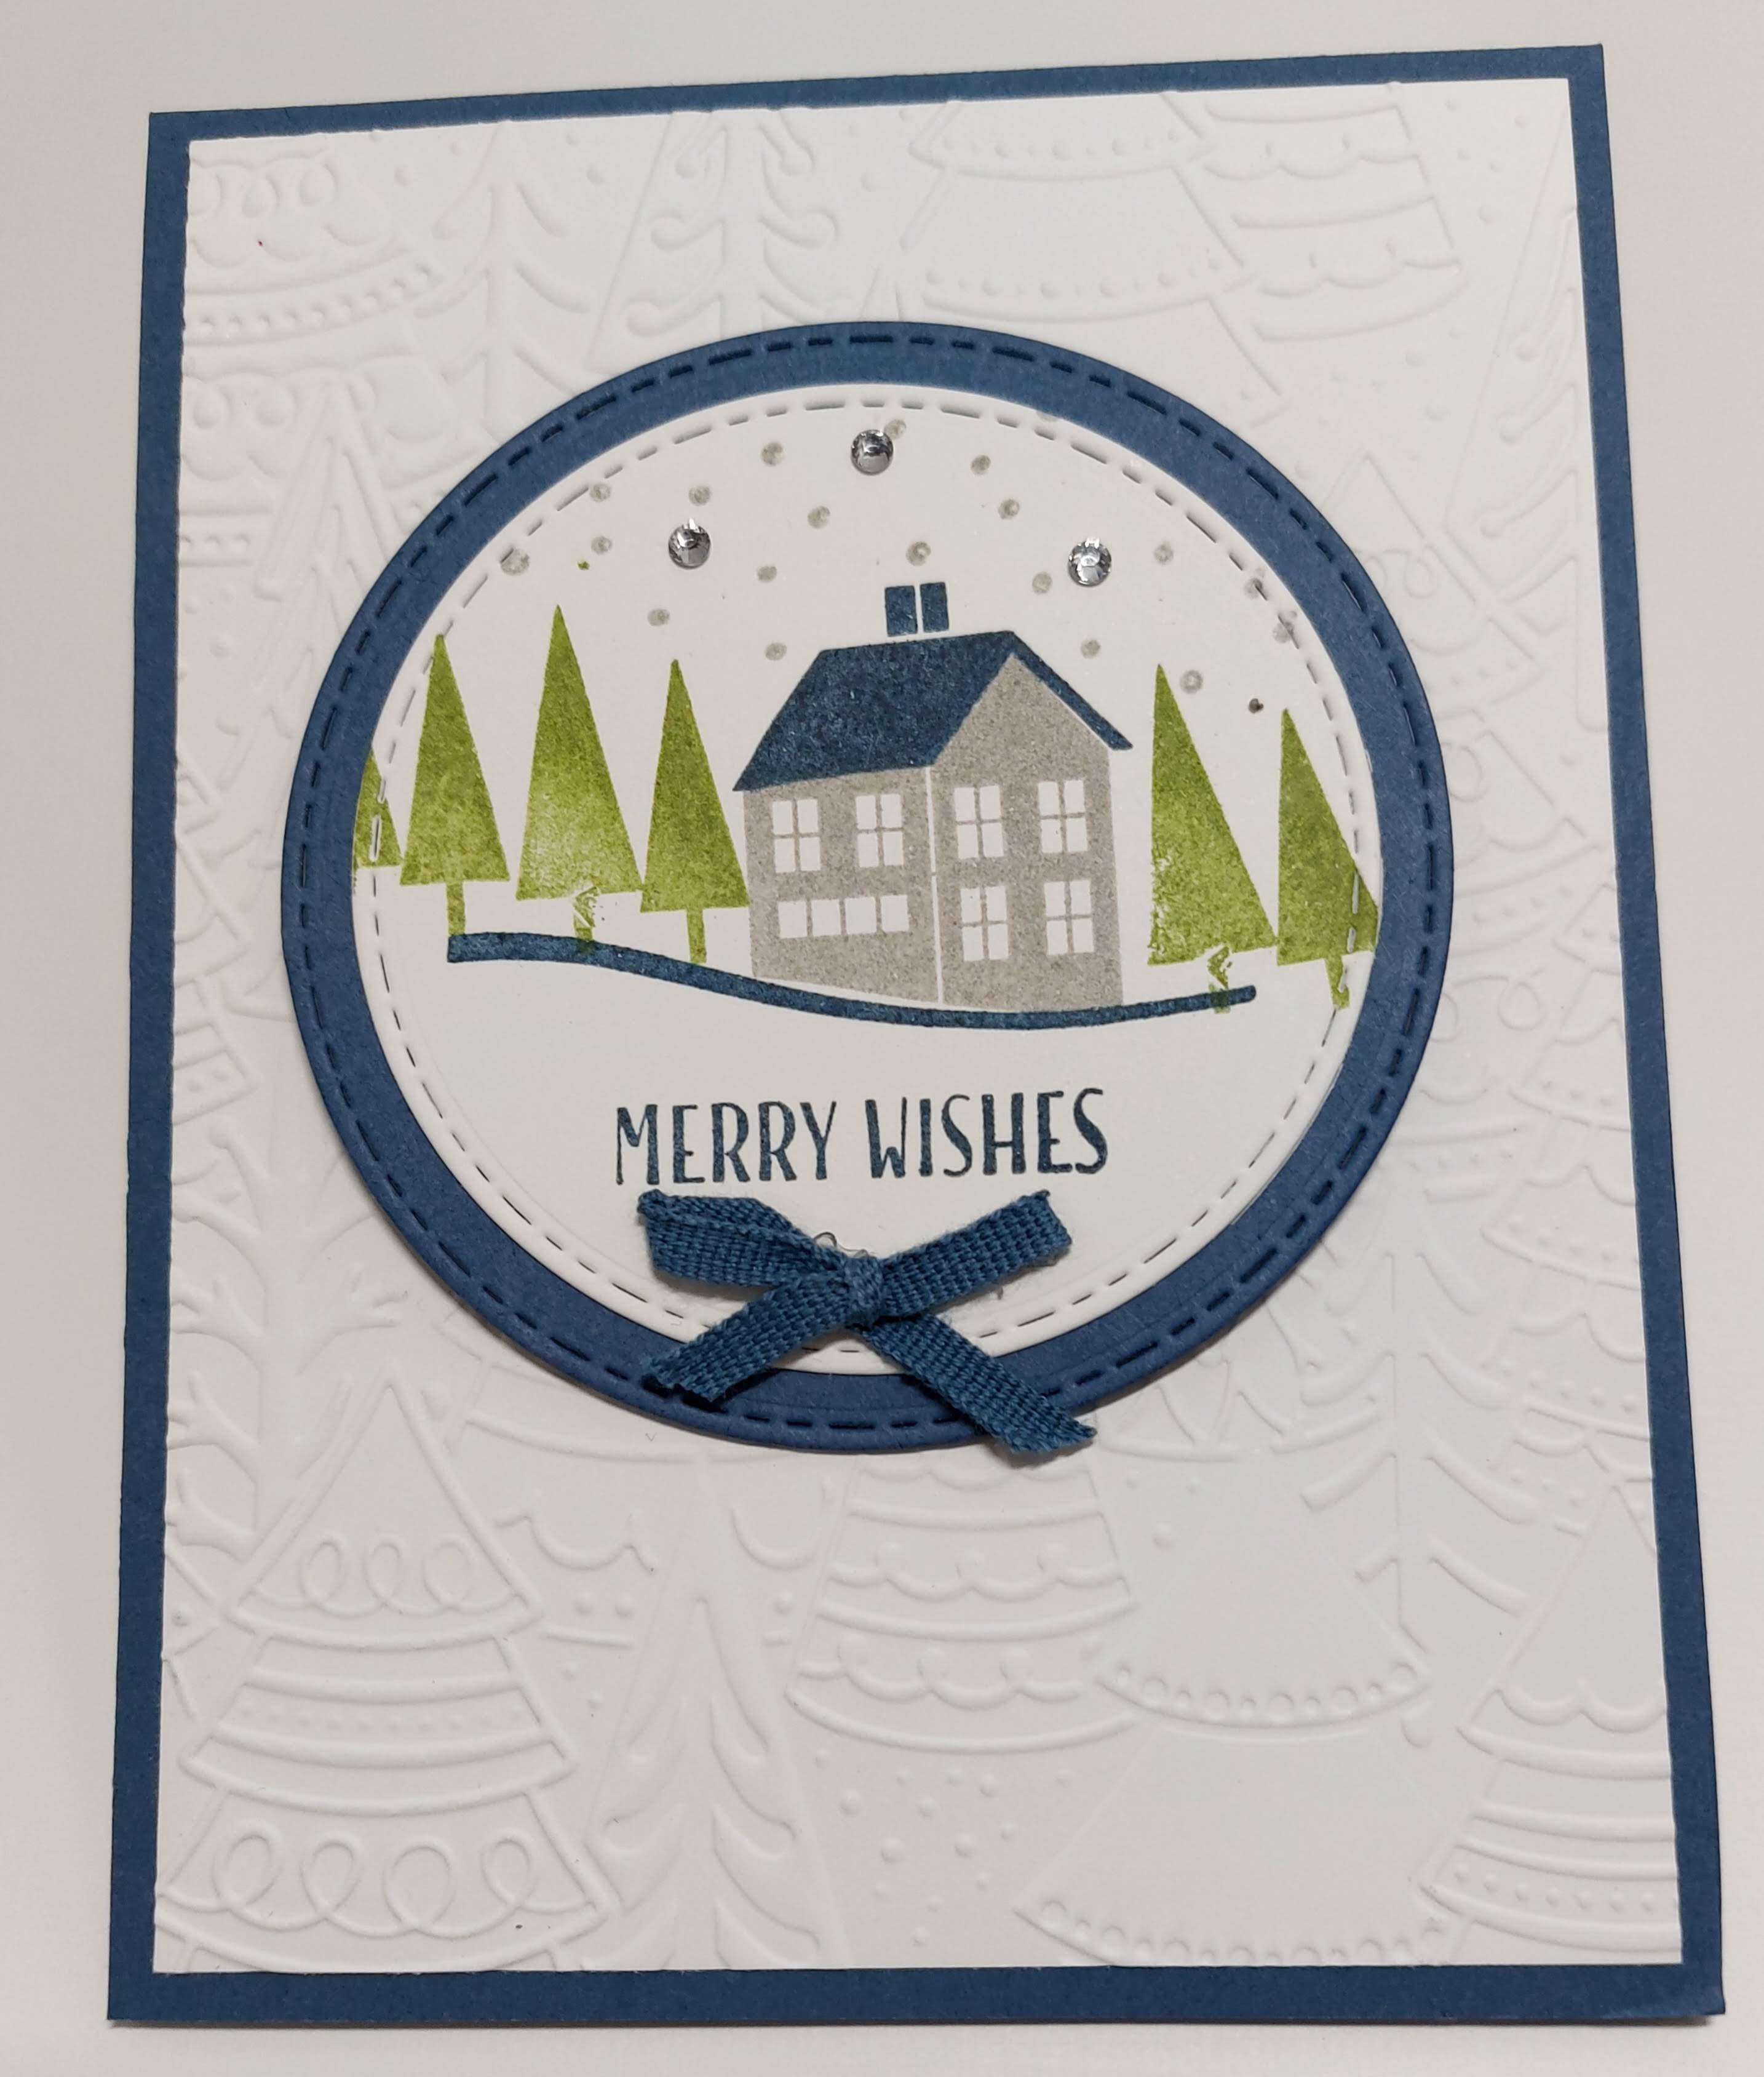
Another big favourite for me was the Window Wishes bundle.  I actually purchased this set by mistake but I'm glad I did. This is a very versatile stamp and die set.  I was able to make several cards featuring the house and tree design, and still have lots of ideas for using the window frame dies for future cards. 


This card features the window frame dies from this bundle.  They're easy to use and these frames can be used for much more than just Christmas themed cards.  I know I'll be putting them to good use throughout the year. 

Here's one for the golfer's on my Christmas card list featuring the window frames from the Window Wishes Bundle.  What fun and very popular.  


 Christmas Scottie #159740 
I made so many wonderful cards with this stamp set and coordinating punch.  What fun.  You can check out my easel card using this set by clicking here.
Here are just a few of the 25 or more cards I made using the Christmas Scottie.  Very enjoyable!


Family and Friends Stamp Set #159779:
Although I didn't use this set that much, I really love the images and plan to incorporate it into some future cards.  Here are two samples of cards I made, one for an anniversary and the other for a sketch challenge which you can check out here. 


This was a custom made anniversary card, and I designed a tunnel card with many layers of dsp and tree images along with the couple.  I paper pieced the Santa hat, and sweaters to give it a more realistic look and was well pleased with the end results.  

This card was made for a Freshly Made Sketch Challenge and featured the Family and Friends stamp set along with the Trees for Sale stamp set.  I loved the colours and the way it turned out.  


Paper Pumpkin October 2022: 

Another 18 cards were made featuring the October Paper Pumpkin kit.  I had a lot of fun making these and was extremely happy with the kit.  I'm glad I have a subscription as it gives me additional cards for various occasions throughout the year.  

Although I made many, many more cards and used up a lot of my Christmas stash I'm thinking you're probably getting tired of scrolling by now.  So, I'm going to end this year with best wishes for a Happy New Year and keep on Stamping!  All the best to my family, friends and faithful customers and followers.  I'm truly blessed.  I hope to continue to share my projects with you with a little more consistency in 2023.  See you in 2023!

HAPPY STAMPING
PENNY TOKENS STAMPIN' SPOT
Penny Hanuszak, Independent CDN Stampin' Up! Demo 

Masculine Birthdays - Oh Ale Yes!


I often hear stampers say "making a guy card is the hardest" thing to do.  
I use to agree with this statement but fortunately Stampin' Up! has been listening to demonstrator input and has been coming up with some great "guy" orientated stamp, paper and die sets over the past few years.  

When the 2022 Annual Catalogue was released in June 2022, I was super excited to flip to the Hobbies and Recreation section (pages 78 to 89) and see such a great variety of masculine products.  

One of them called the "Brewed For You"  bundle instantly hit my "favs" list, and honestly I can't say enough about this great bundle.   This set has both guy and gal appeal and is easy and fun to use when creating cards or scrap book pages.


Here's A Brewed For You Card I made: 

I used this set to create a birthday card for a guy friend.  I wanted it to be extra special as his birthday falls the day after Boxing Day, so he has missed out on cards and birthday celebrations over the years.  


This card features a pop up front panel in the front and a pop up box on the inside seam.  It's one of those cards that initially has some cutting and scoring but once you've got all the bits and pieces done, it comes together quickly and cleanly.  See video on Split Coast Stampers by Kim Peck 

For the inside of the card I just stamped the glassware outlines in Momento Ink and then I used the filler stamps in Cinnamon Cider and Crushed Curry to give the appearance the drinks were full.  Once they were coloured and the foam pieces had been adhered to the tops, I filled the coloured portion with Nuvo drops and let them dry to a brilliant shiny finish.  

Here's a side view showing the opening on the front of the card and how the pop up fits through the hole.  For my card I used the Stitched Ovals dies and used the largest one for the card front. I cut another oval the next size from a piece of wood grain dsp and used that as a layer for the drinks to sit on.  The drinks are mounted with dimensionals to this piece.  It's important to make sure before you permanently affix your images to the ovals that they don't catch in the oval when the card is being opened and closed.
   

Isn't this the coolest masculine card?  I think so, and so did my friend when he received it.  I'm working on a few more of these for January birthdays so will probably change up the dsp and the layout, but for the most part I'll use the same pop up design.  


Please let me know if you like these kind of fancy fold cards, and any tricks you have for making masculine card making simpler.  Or call me if you want to know more about this stamp bundle.  Cheers! 

Happy Stamping!
Penny Tokens Stampin' Spot 
Penny Hanuszak, Independent CDN Stampin' Up Demonstrator.  

Wednesday, December 14, 2022

FREE SHIPPING ON DECEMBER 15, 2022


We all love free shipping and it happens for the last time this year on 
Thursday Dec 15, 2022 from 12:01AM - 11:59PM.  

Time for you to stock up and save on your favorite Stampin’ Up! products!
Stampin' Up! is offering FREE shipping on orders subtotalling $100 CAD or more!
This incredible deal will last for 24 hours only, so get your orders ready for Thursday and SAVE SAVE SAVE!

Don't forget that our LAST CHANCE SALE is going on too, so this is a great time to get your favourite retiring products and combine your order with FREE SHIPPING too! Remember, these items are available while supplies last, some are already gone and some are on low inventory.


Important Stuff:
  • Due to increased shipping times during December, there is no guarantee that your order will arrive before Christmas.
  • All types of orders qualify 
  • Add my December Hostess Code to orders less than $199 before s&h & tax to get free package of Black Dimensionals and Thank you Card.

  • The minimum qualifying order is $100 CDN before taxes and shipping workshops, and/or customer. 
  • All products qualify with the exception of the month-to-month Paper Pumpkin. Start a prepaid subscription: 3, 6 or 12 month subscriptions qualify.
Happy Stamping!

Penny Tokens Stampin' Spot 
Penny Hanuszak, CDN Independent Stampin' Up Demo


Thursday, December 1, 2022

End of the Season - Last Chance Products Sale - Don't Miss Out!

It's December 1st and exciting things are happening at Stampin' Up!  As they transition towards the new year and a new exciting sales period, it's time for the July to December Mini catalogue "LAST CHANCE SALE". 


Last Chance List PDF: Click here to see the Last Chance List.  

Stock up on your favorite products before they’re gone for good! Save up to 60% on essential craft supplies. What are you waiting for? Start shopping! After all, this selection of Last Chance Products is only available while supplies last.  Also remember if you have your heart set on a product  bundle this may be your last chance to buy it and save 15% off or more.  

Carry Over List: PDF: Click here to see the Carry Over List 

Whenever a catalogue retires, there's always a chance that some favourite products will be carried over to the next annual catalogue, and that's also happening today with the release of the Carry Over List.  

Clearance Rack Refresh:  Click here to go to the Clearance Rack

And as if that wasn't enough great deals and sales, the Clearance Rack has been refreshed again.  There's lots of great products on for awesome prices.  

Happy Stamping!

Penny Tokens Stampin Spot

Penny Hanuszak, Independent CDN Stampin' Up! Demo
https://pennyhanuszak.stampinup.net


WELCOME TO DECEMBER AND 

A BRAND NEW HOSTESS CODE:76VTGHWK 

Anyone placing an on-line order with me during the month of December valued between $50.00 to $199.00 before shipping and handling, and applies my December Hostess Code #76VTGHWK at the end of the order will receive a stamping reward from me.

Not only will you receive a hand made thank you card for placing the order, but for applying my December HOSTESS CODE at the checkout you'll also receive: 

A package of Black Stampin' Dimensionals Combo Pack #150893 

Black Stampin' Dimensionals work great with darker-coloured projects and make sticking even easier while adding extra depth and dimension. Stampin' Dimensionals are double-sided adhesive foam dots.


Note:  Anyone placing an order of $200 and more, will automatically receive stamping up rewards and won't be eligible for my free offer. 


HAPPY STAMPING!

PENNY TOKENS STAMPIN SPOT 

Penny Hanuszak

Independent CDN Stampin Up Demo

https://pennyhanuszak.stampinup.net

Monday, November 14, 2022

Seasonal Sale November 15 to 18, 2022

Happy Monday and welcome to the start of a new week!  

If you've been waiting for the Seasonal Sale it's finally here.  You can create more by spending less during the Seasonal Sale

Save on select stamp sets, dies, punches and dsp starting tomorrow November 15th and running until November 18, 2022 you can shop for select products from the 2022–2023 Annual Catalog and get the following discounts:

  • 10% off all punches
  • 15% of all stamps (Host stamp sets are not included in this sale) 
  • 20% off all dies
  • 20% off all embossing folders
  • 20% off all non-specialty Designer Series Paper

With the season of giving upon us, this is a great opportunity to buy gifts for your fellow crafting enthusiasts, or to stock up on supplies for all your upcoming handmade projects. Remember, this sale is for four days only! Don’t miss out!

ORDER DEADLINES

  • By Phone: 18 November 2022, 6:59 p.m. (MT) 
  • Online: 18 November 2022, 11:59 p.m. (MT)


PDF Copy of Sale Flyer: 


HAPPY STAMPING!
PENNY TOKENS STAMPIN SPOT

Penny Hanuszak, CDN Independent Stampin' Up! Demo 


Sunday, November 13, 2022

Cut, Stack and Shuffle Swap Cards for #OnStage 2022

I'm so fortunate to live on the West Coast and to be able to participate in this year's On Stage Presentation that was held at the Pacific National Exhibition Forum on November 12th, 2022 in Vancouver, British Columbia.  

Our trip from the Fraser Valley into Vancouver was filled with chatter and excitement as we anticipated all things Stampin' Up! and we weren't disappointed.  What a wonderful day and opportunity to get together with Stampin' Up! friends, old and new! 

Kathleen Nessel, Ethel Detemple, Debby Evoy, Me and Carmen Smith

Four at our table were celebrating milestone years with Stampin' Up! so we loved the walk across the stage and sharing our stories.  Two of our new Stampin' Up!
Demos were celebrating Quick Start and becoming new demos!  Yeah! 

New demo friends Carmen and Heather who recently joined Debby Evoy's team in the Okanagan. We were so excited and happy to welcome them to their first Stampin' Up! OnStage event.

My walk of pride for 15 years with Stampin' Up! 

One of the best parts of becoming a Stampin' Up! demonstrator has been the enduring friendships and the camaraderie I share not only with demos who live in my area but with those who live across the world.  Stampin' Up! really has done a lot by hosting these type of gatherings to bring us together with common goals, sharing and caring and lasting friendships.   

Here is a look at my swap cards:
Swapping cards with other demos is an old tradition that brings great joy and anticipation.  In past years I've made as many as 80 swap cards and participated in several different sways.  However because of time constraints, I was only able to make seventeen, but I put a lot of love and attention to detail in those cards and I hope they'll bring a spark of creativity to those who received them.  

Most demonstrators make just 5 1/4" x 4" card fronts for their swaps.  Because I was making so few swaps I decided to make mine extra special and included a full card and envelope in the swap package.

The purpose of my swap cards was to highlight the Cut, Stack and Shuffle technique, and feature products from the Tea Boutique Collection on pages 12 and 13 of the Annual Catalogue.

How I made my cards: 

How to Stack, Cut, and Shuffle to make four separate cards. 

Card Bases: 
I began with the Tea Boutique Cards and Envelopes for my  my card base.  
You get twenty 4 1/4" x 5 1/2" card bases and matching envelopes in this beautifully coordinated set.  Adhere mats #1 and #2 to the card base following the  

Layering Mat #1:  Cut four mats in coordinating colours with the DSP to 4 x 5  1/4" set aside. 

Layering Mat (Mat #2 in the picture):  Cut four 3 3/4" x 5" Whisper White Mats and set aside until shuffle step. 
Stack:
Begin by selecting 4 coordinating patterns of DSP. Pay attention to whether the pattern on the selected DSP are all running in the same direction, and then make your cuts to work with the pattern. Remember that the finished layer can be adhered to your card either horizontally or vertically, so pay attention to whether the pattern on your dsp selection is running in the same direction before making any cuts.  Once your designs are chosen stack them with the patterns running in the same direction.  


Cut:
  • Take your stack of papers and begin trimming all 4 layers at one time. 
  • Start on the long side of the stack and cut in half at 3".  You'll now have a stack of top and bottom pieces.  
  • Take the top portion of the stack and on the short side cut at 1 3/4".  You will now have 2 stacks each measuring 1 3/4" x 3".  Set those beside each other.  
  • Cut the remaining bottom stack into two pieces beginning at 2 1/2" on the short side.  Your two bottom stacks will measure 2 1/2" x 1 3/4" and 1" x 1 3/4".  Group these two stacks below the top ones. 
  • Starting at the left side of the top layer of dsp pieces of think of them as being numbered 1,2, 3 and 4.
Shuffle:
Place the Whisper White mat layers beside your DSP stack and begin the shuffle:
  • Move piece #1 onto the top left hand side of the top mat. 
  • Move the top of stack #2 to the bottom of the stack and take the new #2 piece and position it on the white mat.  
  • Move the top two pieces of stack #4 to the bottom of that stack and take the new top piece and move it to its position on the white mat. 
  • To finish move the  top piece of stack #3 and the next two layers below it and move them to the bottom of stack #3.  Move the new top of stack #3 to the white mat.  
  • You have now completed the first shuffle and can adhere these dsp pieces to the white layer. 
  • For the 2nd, 3rd and 4th card mats you simply move your dsp pieces to the mat layers, they do not need reshuffling because they're already sorted into different patterns. 
  • Finish your cards by deciding if you're going to make horizontal or vertical cards, and then adhere the mats accordingly.  
If my instructions are confusing, you may want to search on Google or Youtube for a Stack, Cut and Shuffle technique video.  When you find one, please note that the size of paper and the measurements for the cuts may be different to what I've noted above, however the shuffle technique will always be the same as my instructions.  

Embellishing:
For the decorative images and sentiment I used the Cup of Tea stamp set and Teacup die bundle.  

Each card was made exactly the same with only the colours changed for the tea cup, the sentiment and the little flowers and time for tea tags.  The leaves were stamped with Garden Green, Old Olive and Parakeet Party inks.  


I hope you enjoyed this post and that my details on how to do the Cut, Stack and Shuffle technique were helpful.  If you live in Canada and want to become a Stampin' Up! demonstrator why not join my team, I'd love to have you.  

Until next time..........

Happy Stamping! 
Penny Tokens Stampin' Spot 

Penny Hanuszak, CDN Independent Stampin' Up! Demo

Paper Pumpkin Alternatives April 2024 and Sketch Challenges

The past week was so busy that time literally flew by.  I have a number of projects on the go, including working on my April 2024 Paper Pump...