Showing posts with label #pennytokensstampinspot. Show all posts

Friday, December 30, 2022

Masculine Birthdays - Oh Ale Yes!


I often hear stampers say "making a guy card is the hardest" thing to do.  
I use to agree with this statement but fortunately Stampin' Up! has been listening to demonstrator input and has been coming up with some great "guy" orientated stamp, paper and die sets over the past few years.  

When the 2022 Annual Catalogue was released in June 2022, I was super excited to flip to the Hobbies and Recreation section (pages 78 to 89) and see such a great variety of masculine products.  

One of them called the "Brewed For You"  bundle instantly hit my "favs" list, and honestly I can't say enough about this great bundle.   This set has both guy and gal appeal and is easy and fun to use when creating cards or scrap book pages.


Here's A Brewed For You Card I made: 

I used this set to create a birthday card for a guy friend.  I wanted it to be extra special as his birthday falls the day after Boxing Day, so he has missed out on cards and birthday celebrations over the years.  


This card features a pop up front panel in the front and a pop up box on the inside seam.  It's one of those cards that initially has some cutting and scoring but once you've got all the bits and pieces done, it comes together quickly and cleanly.  See video on Split Coast Stampers by Kim Peck 

For the inside of the card I just stamped the glassware outlines in Momento Ink and then I used the filler stamps in Cinnamon Cider and Crushed Curry to give the appearance the drinks were full.  Once they were coloured and the foam pieces had been adhered to the tops, I filled the coloured portion with Nuvo drops and let them dry to a brilliant shiny finish.  

Here's a side view showing the opening on the front of the card and how the pop up fits through the hole.  For my card I used the Stitched Ovals dies and used the largest one for the card front. I cut another oval the next size from a piece of wood grain dsp and used that as a layer for the drinks to sit on.  The drinks are mounted with dimensionals to this piece.  It's important to make sure before you permanently affix your images to the ovals that they don't catch in the oval when the card is being opened and closed.
   

Isn't this the coolest masculine card?  I think so, and so did my friend when he received it.  I'm working on a few more of these for January birthdays so will probably change up the dsp and the layout, but for the most part I'll use the same pop up design.  


Please let me know if you like these kind of fancy fold cards, and any tricks you have for making masculine card making simpler.  Or call me if you want to know more about this stamp bundle.  Cheers! 

Happy Stamping!
Penny Tokens Stampin' Spot 
Penny Hanuszak, Independent CDN Stampin' Up Demonstrator.  

Wednesday, June 6, 2018

WWC173 - Tenia's Feminine "Anything Goes" Challenge

This week our WWC Design Team Host is the wonderful Tenia Nelson.  If you've never visited Tenia's blog before, I hope you'll click on her link  and check out her many colourful and unique card designs and projects.  She has such a modern and fresh take on her sketches.

Here Is My Card: 
My Feminine Project for this week features the Abstract Impressions stamp set just released in the new catalogue.  This is a two-step photopolymer stamp set that is part of the "Garden Impressions Suite".  I had fun making this birthday card, and just couldn't wait to share this card with you.  I hope you'll enjoy it too.
I've combined the Basketweave Embossing Folder, new Designer InColour Paper, Granny Apple Green cardstock and the beautiful two-step rose from the Abstract Impressions stamp set to create this card front.  Luv, Luv, Luv it!

The inside of my card features more stamping with the Abstract Impressions floral stamps and the Happy Birthday sentiment is from the recently retired Stylized Birthday.  It's a very bright and cheery card.  
I love the new 6 x 6 Designer Series InColor Paper.   The designs are tiny which is a nice change and the papers appear really vibrant. The banner is in the Grapefruit Grove dsp and I paired it with the new Granny Apple Green card stock from the Brights Color Collection to make this happy card.  
This  banner sentiment from the Birthday Wishes for You stamp set that carried over from the Spring Occasions catalogue is fast becoming one of my favourite "to go to" stamped images.  I've stamped it on Basic Black and heat embossed it with White Embossing Powder.  There's just no mistaking the sentiment when it's contrasted like this.  Luv it!  
Supplies:
Stamp Sets:  Abstract Impressions, Birthday Wishes, & Stylized Birthday

Card Stock:  Whisper White (Base 4 1/4" x 11" scored at 5 1/2", and 3 1/4" x 2 5/8" white oval), Granny Apple Green (5 1/2" x 3" panel  and3 1/2" x 2 5/8" oval), Calypso Coral Oval (3" x 4") and 1/2" x 2 1/4" scrap of Basic Black

Designer Series Paper:  3 3/4" x 4 3/4" piece of Grapefruit Grove DSP cut with large banner die.

Ink:  Grapefruit Grove, Calypso Coral, Granny Apple Green, Versa Mark 

Accessories: Big Shot, Paper Trimmer, Stitched Shapes Oval Dies, Banner Dies(R), Oval Dies (R), Basketweave Embossing Folder, Detailed Cutting Scissors, Dimensionals, Heat Gun, Embossing Buddy,  and Tom Bow Adhesive. 

For challenge details and to share your project, visit the Watercooler Wednesday Challenge by clicking the image below.  We’d love to have you join us.  You have until Monday, June 4th at 5:00 p.m. Mountain Time to link up your project.
Click here to return to Watercooler Wednesday
Well that's it for this week.  Hope you enjoyed your visit and that my card has inspired you to stamp and or participate in this Watercooler Challenge.  I'd love to hear your comments on the new Stampin' Up!  Catalogue or the new stamp images I've used.

Happy Stamping!
Penny Tokens Stampin' Spot! 

Wednesday, May 30, 2018

WWC172 - Anything Goes Challenge

Hi stampers.  May is a five week month so that means we get to do a no host "Anything Goes" challenge at Watercooler Wednesday this week.  Are you up for the challenge.
This challenge runs until 5:00pm Mountain Time on Monday June 4th, 2018.  Check out the rules and the linky here. Hope you'll join in and have some fun!

For my project today I'd like to share a "Get Well" card that I've been working on which features one of the new Hostess sets for the upcoming catalogue year, called Hand Delivered.  I think you're going to like it.

Here's My Card:
I pulled my colour scheme for this card from the absolutely stunning new designer paper called "Tranquil Textures".  Although you're going to see this designer paper as the focus in many nautical themed projects, it also works well with other themes.  The designs are so beautiful and the colour mix is so soothing.  
The inside features more of the Tranquil Textures paper and a beautiful samp set called "Sorry For Everything".  
Supplies:

Stamp Sets:
Hand Delivered #146808 and Sorry For Everything #143820

Card Stock and Designer Paper:
Whisper White, Mint Macaron, Night of Navy and Tranquil Textures DSP #146331

Ink:  
Mint Macaron, Pineapple Punch, Night of Navy, Momento Tuxedo Black

Accessories:
Sizzix Rectangular Pin Point Frames (Non-SU), Big Shot, Paper Trimmer, Aqua Painter, Dimensionals, Tom Bow Glue, Misti

Details:


1.  This is an A2 card with a top fold.  The card base is a 4 1/4" x 11" piece of Whisper White that is scored and folded at 5 1/2".  

2. The first layer is a 5 1/4" x 4" piece of Tranquil Textures designer series paper. Because I never like to waste anything, I stamped the girl's skirt in the center of this panel and cut it out before adhering the DSP to the card base.

 3. I used Sizzix Rectangle Pinpoint Dies to cut a 3" x 4" Whisper White panel and a 3 3/8" x 4 3/4" Mint Macaron panel. The Night of Navy panel measures 3 1/8" x 4 1/8" and was cut out with my paper trimmer. All three panels were glued together with Tom Bow glue and then attached to the center of the card with Tear N' Tape. 
The Pinpoint Rectangles add a nice finished touch to these layers.

4.  The image of the girl's skirt and legs was stamped on a scrap of Whisper White with Momento Tuxedo Black ink and cut out with detail scissors.   As noted above I also stamped this image on the center of the DSP layer and fussy cut out just the skirt, which was glued to the Whisper White skirt/legs image. I lightly coloured around the DSP design on the skirt with my aqua painter and Pineapple Punch ink.  The girls legs were coloured with a skin toned blender pen.

5.  To get the mottled effect on the Whisper White layer I applied Mint Macaron ink to an Acryllic Block and stamped it straight onto the card stock.  I stamped the small cluster of dots randomly in Night of Navy ink and then stamped the flowers and coloured them with the Aqua Painter. 

6.  The sign the girl is holding was created by stamping the  image on Whisper White card stock and cutting it out with detail scissors.  I added Dimensionals to the back of this piece and it was attached above the waist band on the girl's skirt.  The sentiment "Hope You Feel Better Soon" was stamped in Night of Navy Ink on Mint Macaron.  This piece was punched out with a 1" square punch and adhered to a 1 1/8" x 1 1/8" layer of Night of Navy cardstock.  These layers were adhered to the center of the sign.  The girls fingers were coloured with a skin toned blender pen. 

7.  For the inside panel I cut a 5 1/4" x 4" panel of Whisper White Card stock and stamped the sentiment "Sorry" in Mint Macaron ink.  The "to hear you're not feeling well" sentiment was stamped in Night of Navy ink.  Two groupings of flowers were stamped in Momento Tuxedo Black ink and coloured with an aqua painter.  A 1" x 4" strip of the Tranquil Textures DSP was adhered to the bottom of the panel.  

On June 1st Stampin' Ups! new Annual catalogue will be available and you'll be able to check out all the images for the stamps and papers used in this card.  In the meantime I hope you've enjoyed this new product sneak peak and my card design.  

If you haven't had a chance to check out all the wonderful cards from the other Watercooler Wednesday Design Team you can click here.  Have fun and please come back for another visit.  

Happy Stamping!
Penny Tokens Stampin' Spot  

<a href="https://www.bloglovin.com/blog/2199104/?claim=7kgqrg74q3x">Follow my blog with Bloglovin</a>
Blogger link

Wednesday, May 23, 2018

WWC171 - Heidi's "All About Christmas" Challenge


This week the wonderfully talented Heidi Weaver is our hostess for the "All About Christmas" challenge at Watercooler Wednesday.  

I personally love these seasonal challenges as they really help me get an early start on my Christmas cards.  How about you?  Would you like to join us in making a Christmas themed project or card?  If so check out all the information on our home page.  This challenge is open until 5:00pm Mountain time on Monday May 28th, 2018.

Here's My Card:
I had so much fun making this Christmas card today and I'm delighted to share it with you.  

As you're probably aware by now, Stampin' Up! has revamped it's colour families and the new colours will be available in the release of the new Annual Catalogue on June 1st, 2018.  I can't wait that long however, so I though I'd give you a sneak peak at one of my favourites from the newly revamped "Brights Collection".  It's called "Gorgeous Grape".

I'm a big lover of purple and honestly I haven't felt this giddy about using purple in my Christmas card making since Stampin' Up! retired Concord Crush several years ago.  Check out these two favourites: November Christmas Card Class and Monkey86: Holidays & Sketch Challenge

So here's my Walking in the Winter Woods:


Just imagine it's around supper time in late November, and the sun is disappearing over the hillside as you finish your walk in the woods.  Snow is softly falling and the light is reflecting those last rays............


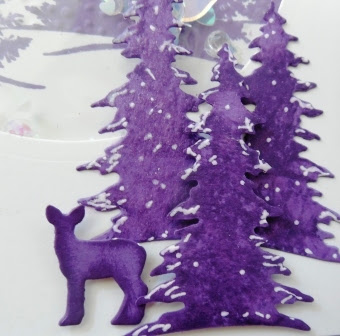
These beautiful trees and deer were die cut using the recently retired Card Front Builder Die set. These die cuts were perfect for adding an upclose scene to the bottom of the card.  I glued two trees to the card front and acetate window panel and then attached the deer and single tree with Dimensionals.  Before attaching these elements, I ran the Scenic Seasons tree stamp and Gorgeous Grape ink over the die cut tree to give the illusion of branches, and coloured around the edges with a sponge dauber. I also dabbled White Gel Pen around the tips of the trees and painted on a generous coating of Clear Wink of Stella.  These trees really shimmer and look like they have a fresh coating of snow.   


Supplies:
Stamp Up Stamp Sets:
Carols of Christmas (R), Christmas Bliss (R), Scenic Season (R)
Card Stock and Designer Papers:
Gorgeous Grape (New), Whisper White and Window Acetate 3 x 3 Sheet
Inks:  
Gorgeous Grape (New), Versa Mark
Accessories:
Big Shot, Paper Trimmer, Card Front Builder Die (R), Circle Thinlet Dies (R), Stitched Shapes Circle Dies, Wink of Stella, White Gel Pen, Sparkle Blends - Fairy Dust from Doodles Paper, Modern Label Punch, Softly Falling Embossing Folder, Heat Gun, White Embossing Powder, Adhesive Strips, Tom Bow Adhesive and Dimensionals.

Details:
1.  The card is an A2 Shaker Card with a top fold.  The base measured 4 1/4 x 11 and is scored at 5 1/2".  

2.  A 5 1/4" x 4" layer was cut from Gorgeous Grape card stock.  Before adhering this layer to the base I die cut the trees and deer from  the center of the card stock.

3.  The next panel is 5 1/8" x 3 7/8" and I cut a 3 1/4" circle in the top half.  

4.  For the window cover I cut a 3 1/2 x 3 1/2" piece of Window Acetate and adhered to the back of the panel in step 3.  Before adhering I wiped the Acetate Window sheet with my Stamping Buddy to remove any static electricity. To build the shaker wall I built a circle shape using adhesive strips and the cut circle as a guide.  

5.  The next layer is a 4" x 4" Whisper White panel that adheres to the back of the shaker outline.  I stamped the tree scene from Scenic Seasons in Gorgeous Grape and embossed to the bottom of the tree line with the Softly Falling Embossing Folder.  The dots from the embossing folder on the tree were gently sanded so it looked like fresh fallen snow.  

6.  I added Sparkle Blends Fairy Dust from Doodles Paper Playground to the inside of the shaker circle before adding the layer from step 5.  I added additional Adhesive Strips to this layer and mounted it to the card front.  

7.  I stamped the sentiment "Seasons Greetings and A Happy New Year" in Versa Mark ink on a scrap of Gorgeous Grape card stock and then heat set it.  I used the old Modern Label punch to cut out this sentiment and attached it to the top of the Acetate circle on the card front with Dimensionals.  

8.  Details related to the tree and deer scene at the bottom of the card are noted above in the photos. 

7.  I stamped the Peace on Earth sentiment from Carols of Christmas in Gorgeous Grape on a scrap of Whisper White and then cut it out with the 3" circle from Stitched Shapes dies.  This was mounted on a 3 1/4" circle of Gorgeous Grape cardstock and mounted to the inside of the card.  

I hope you enjoyed my Christmas card today.  Although it's not considered a traditional Christmas colour I think the Gorgeous Grape is very regal and works perfectly in creating this scene.  I'd love to hear your thoughts and suggestions for stamping with non-traditional colours in your creations.  

If you haven't already visited the other Design Team Artists I hope you'll revist the links before moving on.  Click here to return to the home page. 

Happy Stamping!
Penny Tokens Stampin' Spot 

Wednesday, May 16, 2018

WWC170 - Penny's Masculine "Anything Goes" Challenge

I'm happy to be the host for this week's Watercooler Wednesday and I'm challenging you to make a card or project with a "Masculine" Theme.  Father's Day is only a month away, so why don't you take my "cue" and make a Father's Day project. 


Our challenge is open until 5:00pm Mountain Time on Monday May 21st. If you are entering other challenges remember our rule about only entering a maximum of 8 challenges including ours, so you're not disqualified from winning our Rock Star and or as a runner up Rockers  All the rules and details are on our home page Watercooler Wednesday Challenges.

Before we get to my card I'd like to welcome our Guest Designer Stephanie Lanzalotto, who is filling in for Gail Allen on this weeks challenge.  Stephanie has designed an awesome card, so I hope you'll check it out.  

Here's My Card:
I've been busy getting cards ready for a Father's Day class that I'm doing towards the end of May.  This is the first of four masculine cards for that event. 


Supplies:
Stamp Set: Truly Tailored #145735 SU
Card Stock:  Night of Navy, Very Vanilla and Crushed Curry
DSP: True Gentleman Designer Series Paper 
Ink:  Night of Navy 
Accessories:  Big Shot, Alphabet Dies (Cutter Bee 54-80032), Tailored Tag Punch, Star Embellishments (Urban Underground), Dimensionals, Tom Bow Adhesive.  

Details:
1.  This is an A2 card.  The card base is cut from Night of Navy card stock and measures 8 1/2" x 5 1/2" and is a top fold scored at 4 1/4".

2.  The first layer on the card front is a 5 1/4" x 4" piece of Crushed Curry.

3.  The top layer is a piece of plaid designer series paper from the True Gentleman paper collection.  It measures 5 x 3 3/4".

4.  The lettering was cut from Night of Navy and Crushed Curry card stock with the Cutter Bee Alphabet dies.  I cut two of each colour, layered and glued them together ending with a Crushed Curry piece.  I used a sponge dauber and sponged around the top edges of the letters.  The individual letters were spaced across the center of the card and adhered with Tom Bow glue. 

 5.  I stamped the "To A Classy Kind of Guy" image from the Truly Tailored stamp set onto a scrap of Very Vanilla and fussy cut it out.  Then, I punched out a tag from Night of Navy and glued the two tags together and mounted it with Dimensionals in the bottom left corner beneath the letters. I really like that Tailored Tag punch.


6.  The metal star embellishments in the top right hand side of the card were left over from last year's Urban Underground suite.  I think they add a masculine feel and just the right balance to this card.

7.  The inside of the card started with a 5 1/4" x 4" piece of Very Vanilla card Stock.  The sentiment "Wishing You a Dapper Day" and the corner images are from the Truly Tailored stamp set and were stamped in Night of Navy ink.  I added a 1" x 4" piece of the plaid paper to the bottom of this panel to tie it in to the front of the card.  

Well, that's it for today's card.  I hope you liked it and it will inspire you to create your own Masculine cards.  I really liked the clean crisp look of this card.  The plaid paper really adds a masculine feel as do the bold letters.  

If you haven't already stopped by the home page for the Watercooler Wednesday challenges, go have a look.  The rest of the Design Team have added some really awesome cards that I know you'll love.  Thanks to all of you who participate in our challenges it's really appreciated and we love seeing all the talent that you bring to our site.  Wow, you're all amazing.  

Until next week........................

Happy Stamping
Penny Tokens Stampin' Spot 

Wednesday, October 4, 2017

Creative Circle Design Team Blog October Hop - "Haunted Halloween"

September was a complete blur for me with frenzied card making sessions, garage sales and other events so it's hard to think that the month has gone and Halloween is just around the corner. Quite truthfully I've been so focused on getting my Christmas projects finished, I hadn't given too much thought to Thanksgiving or Halloween. Yikes! What was I thinking!

Well, no worries. I'm happy to say that the Creative Circle Design Team (CCDT) led by the wonderful Liz Holloway, hasn't lost it's direction or focus and our very creative and uber talented crew of international stampers is here to dazzle you with a "Haunted Halloween" October hop.

But, before we begin, I'd like to welcome our newest CCDT team members, Jay Soriano of Mitosus Crafts and Stesha Bloodhart of Stampin Hoot. I've been so looking forward to seeing their creations on this hop and it's so awesome to have their collective talents join us this month.

 
Jay Soriano
Stesha Bloodhart


Here's My "Haunted Halloween" Art Decor
Halloween is always such a fun time of the year and  I so look forward to seeing what Trick or Treats Stampin' Up! has in store for us in the Holiday Catalogue.  Well I must say I wasn't disappointed this year!  In fact, the Spooky Night Suite on pages 52 through 55 were the inspiration for me to make this  Halloween Sampler. 

Supplies From the Spooky Night Suite:
Card Stock: Basic Black, Very Vanilla, Cajun Craze, Orange Glimmer Paper, Silver Foil
DSP:  Spooky Night
Ink: Pumpkin Pie, Momento Tuxedo Black, Versa Mark, Smokey Slate
Accessories:  Cat Punch #144666, Black Rhinestone Jewels, Detailed Gate Thinlet Dies, 1", 11/4", 1 3/8" Circle Punches, Bunch of Labels Thinlets, Wink of Stella Clear, Big Shot, Paper Trimmer, Tom Bow Adhesive, Foam Adhesive Strips, Dimensionals.  
Spooky Cat Bundle -18 Photopolymer Stamps are included in the Spooky Cat stamp set.  It includes tattooed cats, witches' hats, growling owls, bubbly potions, and a rat—who needs "the Scottish play" when you can have this!  The cat punch is a no-brainer for punching out beautiful cat silhouettes that can be used at any time of the year and for any occasion.
The Graveyard Gate Bundle is a spooky collection of  graveyard head stones gates and sentiments for creating a spooky setting.  I absolutely love the Detailed Gate Thinlet Dies which are part of the bundle.  These dies can be used for other occasions besides Halloween, such as Sympathy and Wedding cards.

Details:


Picture Frame: I started out with a 13 1/2" x 11" glass picture frame from the Dollar Store. I used a full sheet of DSP from the Spooky Night DSP pack to line the inside of the frame. I added two 1" by 11" strips of Cajun Craze card stock on either side of the DSP to cover the expanse of the frame. 

Sampler Base: For the base of the sampler I used an 8 1/2" x 10 5/8"" piece of Basic Black card stock. The next layer was a 9 3/4" x 7 7/8" piece of DSP.
Potions, pumpkins, witches' hats, cats, and eerie trees; this Halloween-themed Designer Series Paper has it all and it coordinates with Basic Black, Cajun Craze, Pumpkin Pie and Very Vanilla. Product #144610 Spooky Night DSP

Panels: I decided on a layout for my sampler and then measured out the panels I would need to cut. I needed the following: 
1.  Top and Bottom Center Panels:  I cut two 4" x 1" pieces of Basic Black and two 3/4" x 4" pieces of DSP with the science bottles.  These panels frame the center panel on the top and bottom.  I sponged the edges of the DSP with Basic Black ink before adhering them to the card stock. 
This is the center top panel.  I  stamped the mysterious beakers from the Spooky Cat stamp set on a piece of Whisper White card stock and then cut it out with a 1" circle punch.  It was layered on a 11/4" basic black circle layer and added to the panel with Dimensionals.
This is the bottom center panel.  I stamped the black rats from the Spooky Cat stamp set on this panel.
2.  Center Panel: The center panel began with a 4" x 5 1/2" piece of Basic Black card stock.  The next layer was a 3 7/8" x 5 1/4" piece of Orange Glimmer Paper left over from last year's Halloween stash.  I cut out the bottom center of this paper so it wouldn't be wasted and later on cut out the numerals "31".  The next layer was a 3 3/4" x 5 1/8" piece of Very Vanilla card stock.
Lots of detail went into creating this graveyard scene.  I began by cutting out the stars and moon on the top of the panel with the Card Front Builder Die Cuts.  


Next I stamped a variety of head stones in the lower part of the panel with Momento Tuxedo Black ink.  I used masks and stamped some of the tomb stone images off at least 2 times to give a misty impression and some additional depth.  This panel has a real spooky feel going on!

I cut out the filigree gate which is totally awesome with the Detailed Gate Thinlet Die and Basic Black card stock. I used Adhesive Foam strips on the back of the gate and attached it over the stamped tomb stones.    I stamped the two brick columns using stamps from the Graveyard Gate stamp set and mounted them with Dimensionals on either side of the gate, matching up the outer edges so they didn't overlap the panel.  

To finish off the gate I stamped the sentiment "Open if You Dare" on Very Vanilla Card Stock and cut it out with the 1 1/4" circle punch and then layered it on a 1 3/8" Orange Glimmer circle.  The edges were sponged with black ink before it was adhered with Dimensionals.  I die cut the lock and key from Silver Foil. 
For the Gate sign I stamped the "You're Invited" image from the Graveyard Gate stamp set in Versa Mark ink and embossed it with Black Embossing Powder. I cut it out and mounted it in position with Dimensionals.  To make it even more spookier I stamped a bunch of bats around it.  Some of the bats were fussy cut out with my detail scissors and added with Mini Dimensionals. 
3.  Right Panels:
The top right panel began with a 2 1/2" x 5 1/2" piece of Basic Black card stock followed by a Cajun Craze piece that measured 2 1/4 x 5 1/4 and a 2 1/8 x 5 1/8" piece of dotted DSP.  The Trick or Treat sentiment was stamped on Pumpkin Pie and cut out with a banner from the Bunch of Banners Thinlet Dies.  A couple of Basic Black Rhinestones were added on the edges.  

The sparkly date numerals were cut from the center Orange Glimmer Panel and DSP using the Large Number Framelit Dies and mounted with the Eclipse technique and they're mounted with Foam Adhesive Tape.  The "Eat at Your Own Risk" sentiment was stamped on Very Vanilla card stock and cut out with the 1" circle punch and mounted on a 1 1/4" piece of Pumpkin Pie.  

The Large Numbers Thinlet  dies are a great investment and can be used for many occasions.  They cut out the numbers from Glimmer and Foil papers with ease. 

The bottom right panel began with a 2 1/2" x 2 1/8 piece of Basic Black card stock, layered with a 2 3/8 x 2" piece of DSP with the witches hats design.  The edges were sponged with Tuxedo Black Ink.  I stamped a witches hat and fussy cut it out and mounted it with Dimensionals.  Although you can't see it in the picture I coloured the buckle with Crushed Curry and then added Wink of Stella to make it sparkle. 
 

4. Left Panels:
The top panel began with a 3 1/4 " x 2 3/4" piece of Basic Black card stock topped with the DSP that has all the pictures of the tree limbs and the moons. I stamped the owl in Tuxedo Black ink onto the limb and then re-stamped it on Very Vanilla card stock using Versa Mark ink. I embossed with Black Embossing powder and then fussy cut out this image and adhered it with dimensionals. Loved this panel!


The center panel measures 1 1/4" x 2 3/4" and I've added the DSP with the writing on it.  

The bottom panel is 2 3/4" x 2 7/8" piece of Basic Black card stock topped with a piece of DSP that has the cats on it. I punched out one of the black cats from this paper and mounted it with Dimensionals.  I coloured the cat with Wink of Stella to give it some shine. 
 
I hope you liked my Halloween Sample and that it's inspired you to make some Halloween creations of your own.  Whether you set aside time just for yourself, stamp with your girlfriends or have a family night you'll be making memories for seasons and years to come, and having a whole lot of fun in the process!
 
Your next stop on this hop is the incredibly talented Liz Holloway's blog.  Wow I know she has some amazing tricks and treats for you and you're going to be scary thrilled to see what she's designed. 

Happy Stamping!
Penny Tokens Stampin' Spot

Thanks for stopping by and Happy Haunted Halloween!


Last Free Shipping of the Year - December 9, 10 11, 2024

Heads up, it's time for the last FREE SHIPPING promo of the year! From December 9–11, you can shop and save on all qualifying orders of...