Showing posts with label Christmas Cards. Show all posts

Friday, October 21, 2022

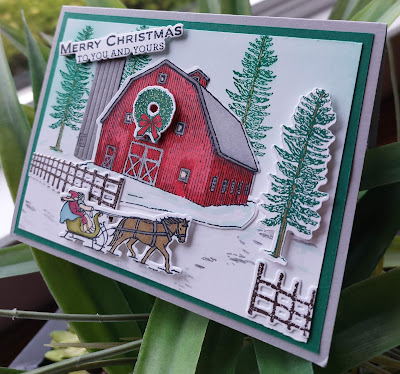
Christmas Barn by Stampin' Up!

Before I made my own Christmas cards I used to purchase ones that featured winter snow scenes.  I think that had a lot to do with my delight when I first saw the Christmas Barn stamp set and dies in Stampin' Ups! Holiday mini catalogue. 

Although this bundle which includes the Christmas Barn Stamp Set and Barn Dies has become a wonderful addition to my Christmas Occasion stamps it could just as easily be used at other times of the year.  


There are nine photopolymer stamps including a rustic barn, a traditional wooden fence, a horse-drawn sleigh, a wreath and tree plus three three wonderful holiday sentiment stamps. And, the 14 barn dies making creating the scene even easier. The 14 piece Barn Dies include a barn, silo, frozen lake/pond, snow flakes and a sign post as well as dies that give a fussy cut look to some of the sentiments.

Here is my card: 
Even though I'm not an artist I felt like one while I was creating this peaceful and nostalgic winter scene.   I began by layering a 5 1/4" x 4" piece of Shaded Spruce card stock over a standard size Smokey Slate card base.  The stamped layer is a 5" x 3 3/4" piece of Whisper White card stock.  I used scraps from my Whisper White collection to stamp the barn, tree, fence and sled and coloured the images with Stampin' Blends before die cutting them with the coordinating Barn Dies.  

I used Pool Party ink for the sky portion of this layer.  I made the mistake of adding the sky colouring after I had stamped the trees and the Shaded Spruce ink blurred a bit.  Next time I'll do the sky first.  The silo was die cut from a scrap of Smokey Slate card stock and I used a Smokey Slate blend to give it a bit of texture and shadow.  I also used Smokey Slate Blends in light and dark to colour the roof, window and door details on the barn.  

I purposefully kept the inside of the card clean and simple.  The next time I stamp with this photopolymer sentiment I'll make sure to line it up a bit better.  With photopolymers it's always good to lay them out on a grid just in case they have a bit of a curl to them. The whisper white layer measures 5 1/4 x 4" and I stamped the images with Shaded Spruce ink. 


The "Merry Christmas To You and Yours" was cut with its coordinating die and I love how it turned out.  It was a little tricky lining up the stamped image with the die cut so I think the next time I want to use this sentiment I will start by making a template to use in my Stamperatus rather than stamping with the Acrylic block and lining up the die cut.  It's easier to make multiples that way.  

There is a small stamp that looks like tracks in the snow.  I stamped a little path going up towards the side of the barn and a few beneath the horse and sleigh in full strength Smokey Slate ink.  

The die cut for the fence is very detailed. I stamped the fence in Early Expresso ink on Whisper White card stock before die cutting it.  The white edges around the die cut image almost look like snow so I was happy with that.  I attached small strips of Dimensionals behind the fence rails to give the fence depth and full sized Dimensionals behind the sled, the single stamped tree, and wreath on the barn front for the same effect.  

Real barns rarely have beautifully even colouring and lean more towards mottled dark and lighter hues from all the layers of paint that have been applied over the years.  So when I began colouring this barn in light and dark Real Red Stampin' Blends, I kept that in mind.  I began by outlining all the doors and windows in the darker red before colouring in the larger red areas and shading in around the eaves and base of the barn. This made the colouring go much faster, especially the shading and I think it stopped the inevitable bleed you get with alcohol markers and dark inks.  

I originally was going to adhere the wreath over the top window on the barn, but I read in someone else's post that it worked better when it was spaced between the three windows.  I'm glad I made the change as it really did look better.  I added a little bit of Daffodil delight to the windows for a cozy glow.  

Well that's it for today's post, I'm dying to get back to my craft room and make some more cards with this stamp and die set.  I'm loving it!  Leave me a note to let me know if you like this card and if you like creating scenes too.  

Cheers and as always 


Happy Stamping!
Penny Tokens Stampin' Spot

Penny Hanuszak, CDN Independent Stampin' Up! Demo


Monday, September 12, 2022

Friends & Family Christmas Wish

I haven't had much stamping time this past week, and I'm falling behind on my Christmas card making so I decided to get my creative juices going by doing a sketch challenge. 

I found a sketch on the Freshly Made Sketches site that was a bit of a challenge for me, as I'm not into layered pieces that much.  Once I got busy with the design, my card came together pretty quickly.  

 Freshly Made Sketches challenge #552

Here's My Card:

 
Use your imagination and create a scene when you're working on a sketch.  It will give the card more life and meaning.  For this one I was imagining a couple spending time together at a winter lodge or some other family gathering place like a cabin in the woods. Their children or grandchildren are ice skating, and they are watching from a bench or wall and enjoying the family time and creating memories.


I stamped the image of the family holding hands in Smokey Slate and then stamped the sentiment Family & Friends in Poppy Parade.  I had a left over piece of the Poppy Parade DSP so added it to the bottom of the card layer.  The Whisper White layer measures 4" x 5 1/4".  

The garland around the die cut is from the Window Wishes Stamp set and is stamped in Mint Macaroon and highlighted with Shady Spruce. The trees are from Trees for Sale and stamped in the same colours. The outfits on the man and woman were coloured with Stampin Blends and the Balmy Blue sky was applied with a blending brush. The beautiful little bow is a die cut from the Window Wishes Dies. I stamped and coloured the couple on a scrap of Whisper White card stock and then fussy cut the image before mounting it with dimensionals at the bottom of the die cut. The sentiment from Family & Friends was stamped with Versa Mark on a scrap of Poppy Parade cardstock and then heat embossed with White Embossing Powder.

Materials Used:

Stamp Sets: Family & Friends and Trees for Sale, Window Wishes 

Family & Friends - Red Cling Rubber Stamp Set 

Window Wishes Stamp and Die Bundle 

Trees for Sale 

Card Stock:  Whisper White for A2 card base, 4 x 3 piece for die cut, and 4 x 5 1/4" for inside layer; Mint Macaroon 4 x 5 1/4 for mat; scrap of Poppy Parade for Bow

Designer Paper:  Poppy Parade DSP, 4 x 3 piece of plaid from Sale-A-Bration Rings of Love DSP.

Blends:  Smokey Slate, Mint Macaroon, Shady Spruce, Poppy Parade, So Saffron, Crumb Cake

Ink:  Mint Macaroon, Shady Spruce, Versa Mark, Balmy Blue, Smokey Slate

Accessories:  Stamp Cut & Emboss machine, Window wishes Dies (bow), Basic Rhinestones, Red Rhinestone, White Embossing Powder, Blending Brush and Dimensionals.

Well that's another Christmas card finished, and although it wasn't my typical card style I enjoyed doing something different.  I'm looking forward to making a few more cards with the Family & Friends stamp set, and mixing it again with the Trees for Sale set. 

I hope you enjoyed today's card and my interpretation of the Freshly Made Sketch #552.  I'd love to hear your comments, so drop me a note and make my day!  Cheers.


HAPPY STAMPING!
PENNY TOKENS STAMPIN' SPOT

Penny Hanuszak, CDN Independent Stampin' Up! Demonstrator

Thursday, August 11, 2022

Christmas Scottie - sooooooooo cute!

I hate to say it but it won't be long until Christmas.  Every year I try to make as many Christmas cards as I can during the summer months in an attempt to be ready for November mailing.  No matter how many I make I always seem to need more.  

When I placed my first order from the July- December Holiday Mini catalogue, the first thing on my "must have list" was the "Christmas Scottie" bundle.  Wow, this set doesn't disappoint and it's good value for the money.   

Christmas Scottie 

Here are some of the cards I've made using this set:


For this card's focal element I combined two of the tags from the Taylor Made Tag Die set.    In the back ground I've made a mat with scraps of designer paper mounted onto a 3 3/4" x 5" piece of Whisper White card Stock.  Love the design!


Since I'm trying to use up paper supplies, these cards feature a lot of retired Stampin' Up! DSP as well as some from other sources.  To get started with these Christmas Scottie cards I began by gathering up all my dsp, coordinating card stock for mats and card bases, pre-cut tags, stitched circles and other accessories and put them on my desk top in handy reach.  

Next I stamped at least 40 of the Scottie dogs - each of the three images and either punched or fussy cut them.  The shape of the Scottie Dogs lends itself well to fussy cutting as there aren't too many tight spaces.   See my tip below about getting the best image.  All my Scotties were stamped at least 4-5 times on my Stamperatus before I began fussy cutting them.  

Once the Scotties were stamped and cut out, I stamped bows and boxes and punched or cut them out.  I used Stampin' Blends to colour the small items like holly leaves, boxes and bows.  

I also decorated the insides of the cards to coordinate with the card fronts.  Here are some inside samples.  


Some Tips for Getting the Most out of this Bundle:

1.  Only the Scottie in the bottom right corner of the stamp set can be cut out with the punch, but you can make mirror images with the cutout.  

2.  To get the best image when stamping the Scottie try using a stamp platform such as the Stamperatus.  I inked, stamped the image, and repeated 4 times to get the really black look I was trying to achieve.  Believe me it's worth it.  If you don't have a Stamperatus, make sure your ink pad is very juicy and hold your ink block down against your card stock for a second or two to allow the ink to transfer.

3.  The stamp that's just two lines is actually a box or present and the bow that is standing up fits in the middle (see picture) 


I found the best way to layer the images was to stamp the bow first and then stamp the box over top of it lining up the stem of the bow in the opening.  

I used the retired Stitched Circle Dies to cut my red circles and a layering circle for the black ones.  I think they provide a great focal point for the card and by pre-cutting a bunch of them ahead of time, assembly of your card is quick and easy.    

I fussy cut dozens of these little present boxes while I was watching tv, so I could add as many as I wanted to my cards.  A little red rhinestone placed below the bow adds some colourful sparkle.  The mini dimensionals fit perfectly on the back of these tiny boxes, so they really pop when they're adhered to the card. 

4.  For a plaid Scottie you can use the "kissing technique".  Simply ink up the plaid image in your favourite colour and then press the image of the Scottie you want to stamp into the plaid image.  The ink will transfer the plaid design to your Scottie stamp image.  

This card features the "kissing technique" see #4 above for explanation.  The background papers are Non-Stampin Up!.  

Let me know if you have a favourite from these cards.  I love them all! 

To add to my Christmas Card making inspiration I've entered my first card in the Krafty Chicks Christmas Card Challenge #624  Make sure you check out all the great cards for this challenge.  

https://kraftychickschallenge.blogspot.com/

Happy Stamping!
Penny Tokens Stampin' Spot!

Penny Hanuszak, CDN Independent Stampin' Up! Demonstrator

Monday, November 30, 2020

Using Up Paper Scraps - What About Those Strips?

For this week's sketch challenge at Freshly Made Sketches I'm going to be looking at using up some of the scrap strips I have been hanging on to.  You know the ones you didn't get around to using on the inside of a card, or for other projects.  

Here's the sketch:

What do you do with all your left over strips of card stock when you finish making cards for the day?  I don't throw mine out, I simple store them in a tall glass by my trimmer.  My scrap strips vary in length and width, and usually range anywhere from a 1/4" to 1" wide.  Most of these strips are a minimum of 6" long sometimes a bit shorter.  I use these strips for decorating the inside of my cards and or stamping sentiments on. Having them out on my table where I can see them means they get used up and I'm not always cutting strips from my larger papers.  

For today's card I needed three short narrow strips of card stock in Highland Heather, Gorgeous Grape and Pool Party. It turns out I had all three colours in 1/2" x 5 1/2" strips and I only had to trim them down on the ends.  Made my day!  

Here's My Card Using The Strips & the Warm & Toasty Stamp Set:

I'm so happy with the way this design turned out.  It's a great sketch and came together very quickly.  

I started with an 8 12" x 5 1/2" piece of Highland Heather card stock and scored it at 4 1/4" for the card base. Next I added a 4" x 5 1/4" piece of Gorgeous Grape card stock, followed by a 5" x 3 3/4" piece of the beautiful Snowflake Splendor Designer Series Paper(dsp).  

I embossed the dsp with the Winter Snow Embossing Folder and sponged the edges with Highland Heather ink and a sponge dauber, before adhering it to the first layer.  Love it!  

The snowflakes in the Winter Snow EF are beautifully designed to give a soft background yet dense enough that you can see each beautiful design.   This embossing folder is featured in the Holiday Catalogue until January 4th, 2021. 

I can't say enough about the Snowflake Splendor dsp, it pairs beautifully with Balmy Blue, Coastal Cabana, Highland Heather, Misty Moonlight, Night of Navy, Pacific Point, Pool Party and Whisper White.   The piece I chose for my background coordinated really well with the Highland Heather, Gorgeous Grape and Pool Party card stocks I chose.  

I was able to shape the tops of these strips with my Lovely Labels Pick a Punch #152883. I used a sponge dauber and the corresponding inks to give each strip some definition and for fun I stamped the "just for you" sentiment from Warmy & Toasty on the ends of the strips. 

Create six unique labels using the Lovely Labels Pick a Punch. You get two designs in three widths--1" (2.5 cm), 3/4" (1.9 cm), and 1/2" (1.2 cm). Just cut a strip of paper to the desired width (any length), then slide it in, punch, and get a perfect label.  Item # 152883 in the Annual Catalogue.


I stamped the Polar Bear on a scrap of Whisper White and fussy cut out his image. Isn't he cute?  I really love his sweet little face and his cute little tush.

I coloured his scarf and toque with Highland Heather Light and Dark Stampin' Blends.  I drew a very thin line around the inside of the bear's image with a Light Smokey Slate Stampin' Blend.  His skates and nose were first coloured with a Dark Black Stampin' Blend and then I added some shine with Crystal Clear Nuvo Drops.

To provide a base for the polar bear, I cut out an oval using the Stitched Shapes dies from some old silver glimmer paper.   "Here's to a Cool Yule" was stamped in Gorgeous Grape ink on a scrap of Whisper White and then cut out using the tab die from the Tasteful Labels Die cuts. Some Basic Rhinestones were added to the tab and the three strips to give a little interest.  

For the inside of the card I cut a 4" x 5 14" layer of Gorgeous Grape followed by a 5" x 3 3/4" piece of Whisper White.  I added a small 1/4" strip of the DSP to the right of the Whisper White layer and stamped the sentiment "warm & toasty wishes to you" and a small snowflake in Gorgeous Grape.  

And that is my card for today.  I hope you liked it.  I'm working on a second one that will be in Coastal Cabana, Pool Party and Shaded Spruce, so come back tomorrow to see that version.  

HAPPY STAMPING!

PENNY TOKENS STAMPIN' SPOT 

Penny Hanuszak, Independent Stampin' Up! Demonstrator 


LAST DAY FOR NOVEMBER 

HOSTESS CODE: ZZ49FQKS

If you are placing an order today and it is under $200 CDN before S&H, apply my November Hostess Code and you'll be eligible to receive a gift from me.  If you're placing an order valued at over $200 CDN you will automatically receive Stampin' Rewards based on the total value of your order before S&H.  


Click here to shop in my 24/7 Online Shop


Tuesday, November 17, 2020

Using Up Paper Scraps - Curvy Christmas Cards

Hi and welcome to today's post which features more of the winter cards I've been making with the fabulous Curvy Christmas stamp set and dies which are currently on special promotion during the month of November.  

I thought I'd share a little video from Stampin Up showing just how creative you can get with these dies.

Well what do you think?  Pretty impressive right?  I enjoyed watching her put these cards together, in such a quick fashion.  And, I loved how she used her Stamperatus for positioning an stamping.  I have to try that more often.  

Here is my card: 


For this card I chose a monochromatic colour scheme. The beautiful designs in the Classic Christmas designer paper, really are stand alone and don't need a lot of other colours or specialty papers added.  For this design I've combined the Curvy Christmas and the Christmas Gleaming stamp sets. I love the mix, how about you?
The Christmas Gleaming Red Rubber Cling Set coordinates with the Decorative punches so cutting out the ornaments is a breeze.  You can find this stamp set and the coordinating punches in the Stampin' Up! Annual Catalogue.


Gleaming Ornaments Punch Pack 

Here's the Inside of the Card:
 
I kept the inside of the card clean looking by only stamping the "Merry Christmas" sentiment and the pine bough stamps from Curvy Christmas in Cherry Cobbler ink.  I added  a 1" x 5 1/4" piece of the coordinating designer series paper at the bottom of the layer.  

For the layers on this card I used two dies from the Curvy Celebrations Die set and basically I just played with them to see how they would position. These dies are available as part of the Curvy Celebrations Bundle and they will be in the new catalogue release in January.  I find that using the dies on  2" by 6" strips of paper works the best then you can trim off any excess before layering on your card.

One of the white layers is cut from a piece of Whisper White card stock that's been embossed with the beautiful Winter Snow embossing folder.  The sentiment "May Your Days be Merry and Bright" is from the Curvy Christmas stamp set and works really well along the curve line, due to the fact this stamp set is made from Photopolymer and it has flexibility you don't get with a red rubber stamp.  

The detail in the snowflakes in the Winter Snow Embossing folder #153577 is really intense and yet the snowflake details are very delicate.  I hesitated about getting this folder as I have an older one, but the difference in the detail really sold me on it.  This embossing folder is only available until Jan 4 2021 or while supplies last.  

Supplies:
Stamp Sets:  Curvy Christmas and Christmas Gleaming
Card Stock:  Whisper White 5 1/4" x 4" for layer on card front, 5 1/2"x 41/4  for front strips, 4" x 5 1/4 for the inside and scraps for the Christmas decorations.  Cherry Cobbler 8 1/2" x 5 1/2" for base and scrap for strip. 
Ink:  Cherry Cobbler 
DSP:  Classic Christmas Designer Paper (only available in December 2020) 
Embellishments:  Red Rhinestones 
Accessories: Gleaming Ornament Punches, Winter Snow Embossing folder

Here are Two More Cards featuring this card style:

This card in Shaded Spruce turned out so well I wish I had plan to make a few more.  The ornaments stand out really nicely in the darker ink and I added some of the coloured rhinestones to them for some sparkle.  I decided to only go with one sweep of Whisper White across the center of this card and I think I really like this cleaner and simpler look. 
 
The inside of the card is very simple with just the sentiment and pine bough for decoration.  The strip of designer paper across the bottom of the card is 1" x 5 1/4".  


For the Sahara Sand Version.  I used basic rhinestones in the centers of the five ornaments.  The top four were adhered with Dimensionals.  I normally would only have three ornaments, however I made an ink boo boo, so needed more to cover up my mistake.      

The inside of the card is wonderful.  I stamped the Merry Christmas across the pine bough and added some Classic Christmas paper but in a different design.


Well that's all for today. I hope you enjoyed these three card samples using the Curvy Christmas stamp and die set. I'd love to hear which card you like the best.


Happy Stamping!
Penny Tokens Stampin' Spot 
Penny Hanuszak Independent Stampin' Up! Demonstrator 

November Hostess Code:  ZZ49FQKS
If you're placing an order under $200 before s&h, apply my November Hostess Code at the end of your order and I'll send you a free gift.  If your order is over $200 before s&h don't apply this code, you'll receive your own Stampin' Rewards.  

Click Here to Shop in my 24/7 Online Shop 


Last Free Shipping of the Year - December 9, 10 11, 2024

Heads up, it's time for the last FREE SHIPPING promo of the year! From December 9–11, you can shop and save on all qualifying orders of...