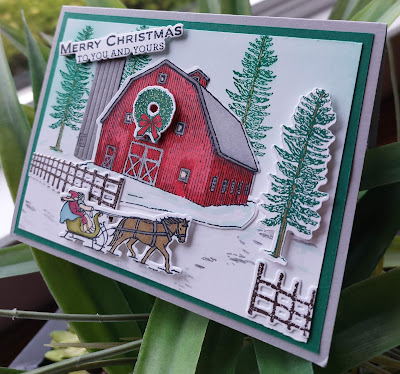
Before I made my own Christmas cards I used to purchase ones that featured winter snow scenes. I think that had a lot to do with my delight when I first saw the Christmas Barn stamp set and dies in Stampin' Ups! Holiday mini catalogue.
Although this bundle which includes the Christmas Barn Stamp Set and Barn Dies has become a wonderful addition to my Christmas Occasion stamps it could just as easily be used at other times of the year.
I used Pool Party ink for the sky portion of this layer. I made the mistake of adding the sky colouring after I had stamped the trees and the Shaded Spruce ink blurred a bit. Next time I'll do the sky first. The silo was die cut from a scrap of Smokey Slate card stock and I used a Smokey Slate blend to give it a bit of texture and shadow. I also used Smokey Slate Blends in light and dark to colour the roof, window and door details on the barn.
There is a small stamp that looks like tracks in the snow. I stamped a little path going up towards the side of the barn and a few beneath the horse and sleigh in full strength Smokey Slate ink.
The die cut for the fence is very detailed. I stamped the fence in Early Expresso ink on Whisper White card stock before die cutting it. The white edges around the die cut image almost look like snow so I was happy with that. I attached small strips of Dimensionals behind the fence rails to give the fence depth and full sized Dimensionals behind the sled, the single stamped tree, and wreath on the barn front for the same effect.
Real barns rarely have beautifully even colouring and lean more towards mottled dark and lighter hues from all the layers of paint that have been applied over the years. So when I began colouring this barn in light and dark Real Red Stampin' Blends, I kept that in mind. I began by outlining all the doors and windows in the darker red before colouring in the larger red areas and shading in around the eaves and base of the barn. This made the colouring go much faster, especially the shading and I think it stopped the inevitable bleed you get with alcohol markers and dark inks.
I originally was going to adhere the wreath over the top window on the barn, but I read in someone else's post that it worked better when it was spaced between the three windows. I'm glad I made the change as it really did look better. I added a little bit of Daffodil delight to the windows for a cozy glow.
Well that's it for today's post, I'm dying to get back to my craft room and make some more cards with this stamp and die set. I'm loving it! Leave me a note to let me know if you like this card and if you like creating scenes too.Cheers and as always
Happy Stamping!
Penny Tokens Stampin' Spot
Penny Hanuszak, CDN Independent Stampin' Up! Demo


