Sunday, August 31, 2014

Freshly Made Sketches Challenge #151

It's Labour Day weekend and, as usually happens on a long weekend, we've had a mixed bag of weather, with cooling temperatures and some rain.  I feel sad that the beautiful warm weather we'd been having didn't hold for all those families trying to get in one last camping trip or day at the beach before the bustle of September and back to school starts. Oh well, it's the prelude to fall. 

Today I've made a Sympathy card based on a sketch from Freshly Made Sketches Challenge #151.  I liked the simplicity of this sketch designed by Kim Singdalsen the Freshly Made Sketches August Guest Designer.  It was her first ever sketch, and she's done an awesome job!  Check out all Kim's other great cards on her blog Joyful Creations With Kim.  
Here's Kim's Sketch:


Here's My Card:

Supplies:
Stamp Sets: 
  • Four Frames
  • Teeny Tiny Wishes 
  • Friend to Friend (R)
  • Gorgeous Grunge
  • Papillion Potpourri
  • Stippled Blossoms
Card stock:  
  • Crumb cake for the 8 1/2 x 5 1/2" base, the 3 1/4" x 3 1/4" layer and the 1/2" x 3 1/8" banner.
  • Soft Sky for 3 x 3" layer and scrap for the Decorative Label layers
  • Very Vanilla 5 x 3 3/4" for first layer, 2 7/8" x 2 7/8" for stamped layer and a scrap for the Decorative layer and butterfly.
Ink:  Crumb Cake, Early Espresso and Soft Sky

Accessories:   
  • Decorative Label Punch
  • Bitty Butterfly Punch
  • Square Lattice Embossing Folder (R)
  • Honeycomb Embossing Folder 
  • Aqua Painter
  • Basic Pearls
  • Dimensionals, Glue Dots, Adhesive Strips
 
The Very Vanilla layer measuring 5" x 3 3/4" was embossed with the Honeycomb Embossing Folder and then randomly and lightly stamped with the speckled stamp from the Gorgeous Grunge set and Soft Sky Ink.

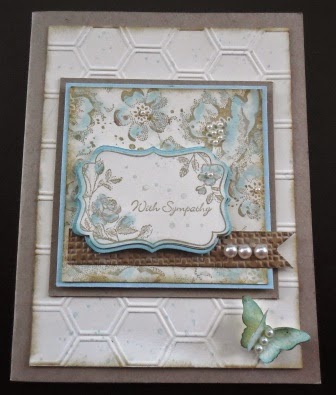
The banner strip was cut from Crumb Cake card stock and embossed with the now retired Square Lattice Embossing Folder.  Three medium sized basic pearls were added for some interest.

For the 3rd layer on the card I stamped the floral image from the Four Frames stamp set in Crumb Cake on a piece of Very Vanilla card stock.  Details on the flowers were touched up with Soft Sky ink and an Aqua Painter.  One small basic pearl was added to the top flower to tie it in with the flowers on the 2nd layer.  This piece was punched out with the Decorative Label punch and a border was added in Soft Sky card stock.  Some small sprinkles were added in Soft Sky with the Gorgeous Grunge stamp.
 
Decorative Label Punch coordinates with the Four Frames Stamp Set.


Four Frames Stamp set - a very stylish stamp set.

I started the design on the 2nd layer of Very Vanilla card stock by randomly stamping the sprinkle image from Gorgeous Grunge in Crumb Cake ink.  The large rose and smaller detailed petal roses from the Stippled Blossoms stamp set, were then stamped randomly in Crumb Cake  ink. I used an Aqua painter and Soft Sky ink to add shadows and hints of colour to the roses and then finished off this layer with a smattering of tiny basic pearls in the flower centers. 

I
 I wanted to keep the inside of the card simple with lots of "white space".  A 5 x 3 3/4" piece of Soft Sky was added to the inside of the card and topped with a piece of Very Vanilla cardstock measuring 3 1/2" x 4 3/4".  The sentiment "Thinking of You" from the retired Friend to Friend set was stamped in Early Espresso and the large flower image from Stippled Blossoms was stamped in the bottom corner in Soft Sky.

The beautiful little butterfly was stamped twice in Soft Sky ink on Very Vanilla cardstock and then punched out with the Bitty Butterfly punch.  The edges of the butterfly were sponged with Soft Sky and Crumb Cake inks.  The butterflies were nested with a Glue Dot and then added to the card with a dimensional.  The wings were fluffed up with the bone folder to give an appearance of flight and finally a small band of pearls was added for the body. 

Here's the finished card.  I'm pleased with how it turned out. 


Well that's it for today folks.  I hope you'll take the time to go and check out all the other entries and guest designer cards for this sketch on the Freshly Made Sketches blog site.  There is so much creativeness and awesome ideas there. 

Happy Stamping!
Penny Tokens

Thursday, August 28, 2014

Host a Party and get "Good Greetings

Now's your chance to get the "Good Greetings" stamp set for FREE along with all the other freebies you'll earn when you host a home party with $325 in sales before S&H and tax. 

This special offer is only available between now and October 31st, 2014. So don't delay.  I've marked some dates that are now available on my event calendar, so call me now to choose one. 

The Good Greeting's Stamp Set comes with 19 clear or wood mount stamps and is perfect for all occasions.  

Did you know that Stampin' Up! Party's and workshops come in all different shapes and sizes? It doesn't matter how you get together with your friends and family to share your love of stamping, they're all fun, so pick one that works for you and your friends.  Here are some fun ideas to get you started:

*Host a party in your home with friends and family
*Host a fundraiser
*Host a Stamp Night in your home with friends and family
*Host a workshop or class in my home and bring your friends and family
*Hold a catalogue party- virtual or over a cup of coffee
*Host a  "Coffee and Chocolate" stamping party in your favourite bistro

Call me for more information on hosting a party and all the hostess benefits.  

Happy Stamping!
Penny Tokens

New Holiday Catalogue Goes Live Today!!!

August 28th is finally here, and it marks the official start of the new "Make It Fun, Make it Together" Holiday Catalogue.

I've just added the PDF version of this catalogue to my right side-bar under Current Catalogues, so you'll have easy access to it when you visit my blog.

I can't wait for you to view this Holiday Catalogue, there are so many exciting new features like - fun kits, framelits and coordinating stamps, ribbons and seasonal designer papers.  So whether your thing is Fall, Halloween, Christmas, you'll find it all here in this one catalogue.  This catalogue is available until January 5, 2014.

Happy Stamping!
Penny Tokens

Tuesday, August 26, 2014

Paper Craft Crew Sketch Challenge #106

Today was my Stampin' on Tuesday fun day and I was joined by my two stampin' buddies, Sheri and Debby. 

Sheri and I started the morning with a 2 mile walk.  We're trying to combine some exercise with our weekly stamping routine.  Debby joined us for salad and chicken quesadillas and then we did some stamping.  Such a great day when you can share it with your friends!

My project for today is a sketch by the Paper Craft Card Crew Sketch #106 PCCCS06.   Here is the sketch outline:

 
Isn't this a great sketch.  There's a lot going on  with all the different elements so I really had to put my thinking cap on.  Make sure you check out all the great entries from the Paper Craft Crew Design Team and from the participants.  You can vote for your favourites later tonight and voting is open until September 2nd.  You can also check out PCCC on Facebook or on Pinterest.

Here's My Card:
I took my colour inspiration from the beautiful All Abloom Designer Series Paper pack.  I chose a design with flowers in soft sherbet colours that reminded me of chenille housecoats and soft slippers.  A real throwback in colour, and I think that's what's so great about these little designer paper packs.  

The All Abloom stack is like going back in time, mostly old fashioned prints and designs and soft colours - Blushing Bride, Daffodil Delight, Island Indigo, Lost Lagoon, Mossy Meadow, Pistachio Pudding, Strawberry Slush, Whisper White.  With each paper pack you get 48 sheets of 4 12 x 6 1/2" designer paper, including 4 each of 12 double sided designs.  The colours and the patterns all mix and match.  Who can go wrong!

The card base is an 8 1/2 x 5 1/2" piece of Strawberry Slush In Colour cardstock scored at 4 1/2".  I've added a layer of Pistachio Pudding measuring 5 1/4" x 4" followed by a Whisper White layer measuring 5 x 3 3/4".  Unfortunately you can just barely see the spots on the Whisper White layer but they were made with Daffodil Delight and Pistachio Pudding Ink and the spotted image from Gorgeous Grunge, a retired stamp set.

I kept the inside of the card plain and simple just adding some small punched flowers and a sentiment from the Chalk Talk stamp set. 
Supplies:
Stamp Set:  Chalk Talk, Gorgeous Grunge
Card Stock:  Strawberry Slush, Pistachio Pudding, Whisper White and Daffodil Delight and All Abloom Designer Series Paper Pack
Ink:  Pistachio Pudding, Strawberry Slush, Daffodil Delight
Accessories:  Chalk Talk Framelits, Basic Rhinestones, Delightful Designs Embossing Folder, 1/4", 1 1/4" and 1 3/8" circle punches, Itty Bitty Punch Pack flower punch, dimensionals, trimmer, big shot machine.


Happy Stampin'!
Penny Tokens

September 3, 2014 Post Script:  Just a note to let you know this card was one of the Featured Artisans for the Paper Craft Crew Challenges today.  What an honour.  Thanks so much Paper Craft Crew. http://www.papercraftcrew.com/pcccs-106-featured-artisans/

Monday, August 25, 2014

You Make Me Happy - PPA216

What a beautiful summer we've been so fortunate to have!  Our weather's held for the past few weeks in the mid-20's giving us just the perfect summer.  

Today I'm starting off the week with a bit of a twist.  I created a card using the Paper Pals Art CAS sketch designed by Margaret Moody.  

While choosing my card stock and designer series paper, I decided to go with a Mossey Meadow print from the paper stack and use the paper colour for a monochromatic scheme.  

I made my card and I really liked it but then, and here's the twist, I decided to remake the card using the colour challenge from Just Add Ink, and I did it not once, but twice!  

Here's the Sketch and Colour Challenge:


Here Are My Cards:

For my Monochromatic card, I used a Whisper White card base with a layer of Mossey Meadow and then a second layer of Whisper White card stock.  I used 31/2" tags made with the Scallop Tag Topper Punch instead of panels for my card.  

I also used the Scalloped Tag Topper punch to create a panel measuring 4 1/2" x 1 3/4".  I stamped this with leaves from the the Blooming with Hope stamp set, before adding the "You Make Me Happy" tag from the Perfect Pennants stamp set.  This was cut out with the Banner's Framelits. 

I stamped  9 floral images from the Petite Petals stamp set and cut them out with the co-ordinating Petals punch and adhered them to the front and inside of the card.  Some basic rhinestones finished off the card. 

My monochromatic card for the Paper Pals Challenge/218.

Here is my card for the Just Add Ink colour challenge.  It features Blackberry Bliss, Calypso Coral and Mossey Meadow.
This is the third card I made, also using the Just Add Ink colour combo challenge.   I switched out the banner and the flower colours and flipped the two tags to change this card up a bit.  Also did the inside panel a bit different. 
Each of the cards has a slightly different set up for the panel in terms of the positioning of the border stamps and the flowers.  

Inside the Blackberry Bliss card

Inside the Monochromatic card. 
Here are the three cards together. 


Hope you enjoyed this challenge and will visit both Paper Pals and Just Add Ink to see all the other great cards by the designers and participants.

Before I go just a reminder don't forget about the Short and Sweet Starter Kit promotions! Only four more days until this great promo ends on August 28th.  As a new demonstrator you'll receive $190 worth of products in your Starter Kit for just $125! Click Here for details!

Happy Stamping!
Penny Tokens

Thursday, August 21, 2014

Short and Sweet - Sign Up Today!


If you've been waiting to join Stampin' Up!, wait no longer, because they have a "short and sweet" offer for you!

No matter whether you want a business of your own, or if you just want to save 20% on your stamping supplies, becoming a Stampin' Up! demonstrator is a great deal!


Between August 21-28, anyone who signs up as a new demonstrator will receive $190 CAD worth of product in their starter kits, for just $125 CAD! That means you get $65.00 more in free product.   Whoo Hoo!!!

Now that's a sweet deal! Contact me today to learn how you can get in on this great deal, and join my team.  But hurry, this offer is only here for a short time!

Happy Stampin!
Penny Tokens 

Wednesday, August 20, 2014

Try Stampin' On Tuesday #181

Try Stampin' On Tuesday posted another great sketch yesterday with the theme "Whatever Makes You Happy". 

I decided to combine this sketch with the Paper Player's  CAS challenge #209 to make a clean and simple child's birthday card. 

Clean and simple means limiting the layers and embellishments, and not having anything overly fussy.  This presents a real challenge for me, because I usually like having lots of layers.  


Here's My Card:   
I don't have many stamps that are geared towards children, so this presented a problem for me, but in the end I decided to go with a circus theme and chose the elephant from the "You're Amazing" stamp set to take center stage on my card.

I chose primary colours for my card and tried to keep as much white space as possible to keep it "clean". 

This is the inside of the card. 

I used my Stamp-a-ma-jig to line up the words "it's your day" in rows on the Whisper White card stock.  Once I had six rows stamped, I ran the piece through the Big Shot with the Scallops Embossing Folder.  A banner with some retired DSP is mounted on Daffodil Delight card stock.

The elephant is stamped in Basic Gray on Whisper White card stock.  The only colour I've applied is a red marker and three pearls that have been coloured with markers.  Did you know that you can colour rhinestones and pearls with Stampin' Ups! new Blendability markers?  They do an awesome job and because they're alcohol based, the colour holds.


Supplies: 
Stamp Sets:  You're Amazing (retired), Happiest Birthday Wishes (Retired Hostess set)
Card Stock:  Whisper White, Real Red, Pacific Point, Daffodil Delight
Ink:  Basic Gray, Real Red, Pacific Point, Daffodil Delight
Accessories:  Big Shot, Trimmer, Circle Collection Framelits, 2" circle punch, Basic Pearls, Sharpie Markers

Well that's it for today, hope you'll come back and visit again soon! 

Happy Stampin'!
Penny Tokens

Retro Sketch # 128


"I can't believe it's Tuesday" seems to be a common phrase in our house this summer. The week's have been flying by, and summer sadly, is on the wane.  

Tuesday is my one day that I set aside each week for stamping and having fun.  My husband's  golfing with his buddies, the house is quiet and it's my day, and my day only (although I do share with my stamping bestie).  Selfish I know, but that's the only way I work in a little leisure time for myself amidst all the other demands of one's life.  

So, Tuesday it is and today Sheri and I've been working on a sketch challenge prepared by Erica Rose for the Retro Sketches site.  Here's the sketch:
Here's My Card:   
Wow this sketch has a lot of detail.  I wasn't sure I'd be able to fit it all in on my card, but I rolled up my sleeves and gave it the college try and made this Anniversary card.  
What do you think?  I'd been dying to do a black and white card for a while now and use some of the Back to Black Designer Series Paper I've been salivating over.  I also got to use a couple of new stamp sets, Bloom With Hope, one of the awesome new Hostess sets and Good Greetings which will be available at the end of August.  
 
The Bloom With Hope Stamp Set is an 11 piece hostess set and can be earned for FREE when you host a party or as a hostess gift when you order $200 or more of Stampin' Up! products. 

I've used several layers of black and white card stock that decrease in size by 1/8".  I embossed the top Whisper White layer with the Houndstooth Embossing Folder, and originally planned to layer it on to a Whisper White card base.  It really didn't look good with just White on White layers, so I added a basic black layer. 

The card was almost finished and looking pretty good and then I made a huge mistake.  When I was adding the basic black layer beneath the card front, I  discovered I'd put it on upside down.  To remedy this I had to do some cutting and add a layer with a basic black card stock base.   This error just proves to me just how relaxed I get when I'm stamping, and, that I can't stamp and talk at the same time.  LOL! 

Supplies: Stamp Sets:  Good Greetings, Bloom With Hope
Card Stock:  Whisper White, Basic Black
Ink:  Tuxedo Black Memento Ink
DSP:  Back to Black DSP and Silver Glimmer Paper
Accessories:  Modern Label Punch, 1 3/8" Circle Punch, Scallop Trim Border Punch (R), Delicate Doilies Sizzlets (R), Houndstooth Embossing Folder, Large Basic Rhinestone, Whisper White Taffeta Ribbon (R), Trimmer and Big Shot Machine.  

Here's a view of the inside of the card. The card base is Basic Black, so it needs a liner.  This one measures 5 x 3 3/4".   I added a small strip of the DSP along the bottom of the card, stamped a sentiment from one of my retired stamp sets and a small flower in the top corner. 
The rectangles on the card front measure 3 x 3 1/2".  The bottom one which you can barely see is from Basic Black cardstock and the top layer is from the Back to Black Designer Series Paper.  The other details include a 4 /14" x 1/2" strip of Basic Black that was cut out with the Scalloped Edge Border Trim Punch (Retired), and a 1/8" strip of Silver Glimmer Paper.  The banner on the bottom is a strip of DSP in a black and white floral print that measures 1 x 3 1/2".  I added a sentiment "hugs and kisses" from Good Greetings that was stamped on Whisper White and cut out with the Modern Label Punch. The final touch was a small bow made from Whisper White 3/8" Taffeta Ribbon (retired). 
 
I wanted to add some dimension to the small flower from the Bloom With Hope stamp set that resembles an Aster, so I stamped it twice in Tuxedo Black Memento Ink on Whisper White card stock and cut out the flowers.  

To bring the dimension to the flower I fussy cut each of the petals on both flower images, and used a bone folder to shape the petals upwards.  Before gluing the two flowers together, I punched out the center of one of them and adhered it to the center of the top flower image with a dimensional.  I also sponged around the edges of all the layers. To finish off the flower I added a large basic rhinestone to the center.   

The flower on it's own looked okay, but it needed a little more detail to give it a WOW look.  I cut out the medium sized doily with the Delicate Doilies Sizzlet Die (retired) and poked out all the little holes around the center.  By adding a 1/38" circle of Silver Glimmer paper behind the doily, I got the look I wanted........subtle glam.  You can just see the silver glimmering through the holes in the doily and around the base of the flower.  Perfect!  

Tip:  If you've never worked with Glimmer Paper before there are two things you need to know.  First, when cutting the glimmer paper in your trimmer it works better if you flip the glimmer paper over and cut on the paper backing side.  And second, Glimmer Paper doesn't stick well to other card stocks or surfaces with normal glue or sticky strip.  It adheres better when you use glue dots.
 

Well that's it for today's post.  I hope you liked it and found the instructions easy to follow.  I'd love to hear if you've every made a blunder when making a card or project and how you remedied it.  Leave me a comment if you can, it really makes my day!

Happy Stampin'
Penny Tokens

Happy St. Patty's Day!

Rainbows, a Pot of Gold, Leprechauns green beer and shenanigans are all part of celebrating St. Patty's Day on March 17th. I have a sma...