Showing posts with label Anniversary Card. Show all posts

Wednesday, January 18, 2017

WWC102 - Libby's Clean and Simple Challenge

Hi Stampers!  Christmas is over and the month of January is zipping by.  If you're like me you're thinking of making some Valentine's cards in time for this next big occasion, but haven't quite started. 

If so,  Libby's Clean and Simple Challenge WWC102 at Watercooler Wednesday may give you some added inspiration and fire up your creative juices. Her clean and simple theme is LOVE in Red and White.


Here's how to play along with the Watercooler Wednesday Clean & Simple Challenge. Our rules have just been updated, but they're simple to follow.
  • Show lots of open space
  • Use minimal layers
  • Use minimal die cuts
  • Use minimal embellishments.  
  • If you're not sure what to make, look at the samples created by the Watercooler Artists, they're sure to give you some clues and inspiration. Make sure you link your card or project up by Monday January 23rd, 5:00pm Mountain Time.   And, above all else, have fun stamping and creating!

Here's My Card:
Initially when I pulled out my Cherry Cobbler and Whisper White card stocks I was planning to make a Valentine's Day card for this challenge.  However,  I also needed an anniversary card for a wonderful couple who were married on Valentine's day so changed up my plans and instead created an Anniversary   card:

Instead of using heart images for this card I decided to incorporate the flowers from the Oh So Succulent Stamp set, and I think this was a good choice.  The flower shapes are beautiful and look good as single stamped images instead of two-stepped stamping.  All in all I'm happy with how this card turned out. Here's a view of the inside of the card:
Supplies:
Stamp Sets:  Oh So Succulent, Jar of Love
Ink: Cherry Cobbler
Card Stock: Whisper White and Cherry Cobbler
Accessories: Trimmer, Corner Rounder punch, Basic Rhinestones, Dimensionals, Adhesive
#142992 Oh So Succulent Stamp set
I really like how these flowers turned outSometimes  you really have to look at the stamps in a set and think of other ways of using them.  In this case I liked the large flower images and can visualize them in different colours, not just in the colours of succulents.  

I also really like the Jar of Love stamp set, which is where this "love" sentiment comes from.  The bold script captures your attention right away and ties in with the more delicate flowers.  
#141587 Jar of Love 37 Photopolymer stamps

Just a thought, but an alternative way of creating this card front, if you wanted to step it up would be to stamp the panel of flowers on vellum instead of the Whisper White card stock.  You could also  add more of a pop of colour by using a sponge dauber to colour in the flowers on the reverse of the vellum, and then adhering the floral panel to the card front. 

Thanks for dropping by.  I'd love to hear what you think of this anniversary card and how I've used the Oh So Succulent stamp set.  Remember there are lots of ideas on the WWC102 - Libby's Clean and Simple Color Challenge for even more inspiration. 

Happy Stamping!
Penny Tokens Stampin Spot

Thursday, September 3, 2015

Connie & Mary Colour Challenge - CCM370 Too Late!

I was stamping with my bestie last Tuesday and she suggested we make some cards using Connie and Mary's Colour Challenge.  Their combination of Pool Party, Watermelon Wonder and Black, sounded awesome. 

Here's their challenge:  


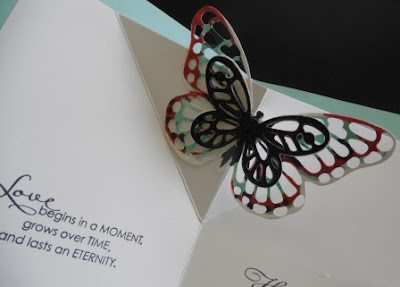
I really liked the card I made last week using the Butterfly Pop Up Diagonal Fancy fold, so I decided to use a similar layout for an anniversary card I was putting together.

All went well until I started trying to fine tune some of the details like how I would combine the colours.  While Sheri surged ahead and made the cut off time, I simply took too long deciding what sentiments to use and how I would use them and the next thing you know I missed the cut off for the challenge.

Oh well I'm sure that's happened to some of you too.  Since I was happy with the card I eventually made, I decided I would go ahead and share it even if it didn't make the challenge.   

Here's My Finished Card:


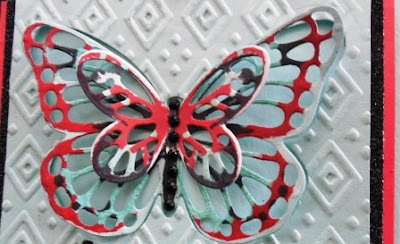
I finally decided to use the CELEBRATE sentiment from the Celebrate Today stamp set.  I stamped the image with Versa Mark Ink and Momento Tuxedo Black ink and heat set it with Black Embossing powder.  I couldn't find a framelit or punch that work with this image so wound up fussy cutting around the words.  I mounted it between the butterflies with dimensionals. 

Here's a view of the inside of the card.  I used the "Love begins in a MOMENT grows over TIME and lasts an ETERNITY" image from one of my favourite retired stamp sets called Occasional Quotes.  I simply love that verse.  The "Happy Anniversary" which you can barely see is from another retired stamp set called Something to Celebrate stamp.

Supplies Used:
Stamp Sets:  Watercolour Wings, Something to Celebrate (R), Celebrate Today
Ink:  Momento Tuxedo Black, Pool Party, Watermelon Wonder, Versa Mark 
Card Stock:  Pool Party, Watermelon Wonder, Black Glimmer Paper, and Whisper White 
Accessories:  Trimmer, Big Shot, Bold Butterfly Framelits and Butterflies Thinlet Dies, Basic Rhinestones, Black Sharpie Alcohol Marker, Tom Bow Adhesive, Dimensionals.  

I hope you like this card and are inspired to post your card samples even if you missed a challenge cut-off like I did. 

Happy Stamping!
Penny Tokens  

Wednesday, September 24, 2014

Stamp Etching Anniversary - CAS #92

Some colour combos just instantly appeal to you, while others leave you cold and wondering what you would do with them.  I found the "instant appeal" when I tuned in for last week's CAS Colours and Sketches #92 challenge and was instantly engaged and excited to create something. 

For me, the rich mixture of the two neutrals and the blast of Hello Honey got my thought processes in motion and just opened up a whole world of possibilities for me.

Here's My Card:
Ever since I purchased my Blended Bloom single wood stamp this summer I've been dying to try out Lydia Fiedler's stamp etching technique and I knew now was the perfect time.  Here's my card:

Supplies:
Stamp Sets:  Blended Bloom, Teeny Tiny Wishes
Card Stock:  Hello Honey, Basic Black, Whisper White
DSP:  Back to Black Designer Series Paper 
Ink:  Hello Honey, Momento Tuxedo Black  
Accessories:  Scissors, 2 1/2" circle punch, paper trimmer, 
Chevron Embossing Folder, Big Shot, Black  Rhinestones, Crystal Effects, Dimensionals, Modern Label Punch

How'd I Do That:
1.  The card base measures 8 1/2 x 5 1/2" and is scored at 4 1/4. Tip: Did you know that you can create a stack of cards in no time, using Stampin' Up!s Cut and Ready Card Bases?   These pre-cut cards are perfect for making multiples, like holiday cards and party invitations because you get 20 pre-scored, pre-cut cards (4 ea. in 5 colors).  The best part is there's no waste.  Finished card size: 4-1/4" x 5-1/2".  2014-2016 In Color Cut & Ready Card Bases 136661  Price: $5.95

2.The first layer on this is a piece of Whisper White card stock  measuring 5 x 3 3/4".  This piece was mounted to the card base with dimensionals.

3.  The second layer is a piece of Basic Black cardstock measuring 4 7/8 by 3 5/8".  This layer was embossed with the Chevron Embossing Folder and then using the 2 1/2" circle punch I punched out a circle on the right hand side approximately 1/4" from the top, bottom and side edges .


3. To fill in the area left by the circle punch, I cut a 2 3/4 x 2 3/4" square of Back to Black DSP and glued this to the back of the black layer, making sure all the edges were firmly in place.  Once finished, this layer was glued to the   Whisper White layer leaving a very small margin on all sides.

4.  The flower was created by stamping the Blended Bloom   image three times on a piece of Hello Honey card stock.  I stamped one full image and then two partial images with just the center parts stamped.  All three pieces were fussy cut with scissors.
Blended Bloom is a single image line stamp that comes in wood mount only.  Priced at only $14.95, this is a perfect set to add to your collection.  It is the perfect stamp for trying out blendabilities and water colour techniques.

5.  Once the ink had dried on the flower images, I took my black Stampin' Up! marker and using the fine tip, followed Lydia's example, and etched around the edges of the petals to give them some depth and dimension.  I coloured in the grooves above some of the petals with the wider tip on the marker.  Once all the etching was done and the flower was assembled with dimensionals, I went over the darker areas with Crystal Effects to add some shine.
Hopefully you can see the layers more clearly in this photo. A grouping of  basic black rhinestones completes the flower center.
5.  The "Happy Anniversary" sentiment from the Teeny Tiny Wishes stamp set was stamped in Momento Tuxedo Black ink on a scrap of Whisper White card stock.  I stamped a small floral flourish from a retired stamp set in Hello Honey ink over top of the sentiment and then sponged the edges with Hello Honey.

To pop up the sentiment and give it more focus I punched it out with the Modern Label punch.  To complete the background for the sentiment I punched out two labels in Basic Black cardstock.  I offset and adhered one black label behind the sentiment so that the fluted ends were layered.  I cut the second black label in half and adhered those pieces to the sides of the sentiment.  For a final decorative touch, I added some small jet black rhinestones.  

Tip:  Did you know that if you don't have coloured rhinestones to match your project you can colour them with alcohol ink markers?  That's right, easy peasy just use your Blendability or Sharpie markers. 


To keep the inside of the card clean and simple, I re-stamped the floral image in Tuxedo Black ink and added a 1/4" x 5 1/2" strip of basic black card stock.


As a side note, I realized after I looking at the photographs of the flower that I hadn't finished all the etching on the petals so I went back and finished that.  Here's a last look at the card with the additional etching. 
 
This closeup shows the missing strokes that come from the base of the flower petals.  You create these strokes with a a small flicking movement, which Lynda details in her video.  This is a super easy and fun way to add some life to a line image.
And finally, here is my finished card:
 
 I hope you enjoyed this post and will take the time to leave me a comment.  I'd like to know if you've ever tried the etching technique and if so on what stamped image did you use it on.  

Happy Stampin!
Penny Tokens

Wednesday, September 10, 2014

Happy Anniversary............. CCMC319

Another beautiful Tuesday and my stamping friend Sheri and I spent some great quality time together this morning, starting with a walk in the sunshine.  We returned all revved up and ready to stamp.  

Earlier in the day I'd printed off some of this past week's sketch and colour challenges, so we spent some time looking at various ones before deciding to do the Create With Connie and Mary CCMC319 challenge.   

Although we both worked on the same sketch you'll see that our cards are totally different, and that's the whole point of doing a challenge.  To check out Sheri's card click here.   I hope you'll also check out the wonderful cards from the CCM design team and other submissions and leave them some comments.  
Here's the Sketch: 


Here's My Card:


Supplies:
Stamp Sets:  Kinda Eclectic, Teeny Tiny Wishes, Full of Life (R)
Ink:  Momento Tuxedo Black, Smokey Slate
Card Stock:  Pink Pirouette, Smokey Slate, Basic Gray, Whisper White, Silver Glimmer Paper  
Accessories:  Beautiful Baroque Embossing Folder, Beautiful Wings Embosslit, Oval Framelits, Bitty Banner Framelits, Elegant Butterfly Punch, Basic Rhinestones, Trimmer, Glue Dots, Dimensionals, Sticky Strip.

How I Assembled It: 

1.  The card base was cut from Basic Gray card stock measuring 8 1/2" x 5 1/2" and folded at 4 1/4".

2.  The Pink Pirouette layer measures 3 1/2" x 5 1/2" and was embossed with the Beautiful Baroque Embossing Folder.  Before adhering this piece to the card base, I put sticky strip down each long edge of the layer and adhered strips of Silver Glimmer paper that measured 1/2" x 5 1/2".  I attached this whole layer to the card base with sticky strip.

3.  The oval layers were made by cutting out two ovals, one in Smokey Slate and one in Silver Glimmer paper, with the #2 framelit from the Ovals Collection Framelits (see picture below).  Using the #3 size framelit I cut out a Basic Gray oval.  The smaller Smokey Slate and Silver Glimmer Ovals were offset so that the glimmer one only slightly shows on the left side of the Smokey Slate oval.  I used Glue Dots to adhere the glimmer paper to the cardstock, and then dimensionals were added to the back.  Once this piece was attached to the larger oval then the entire element was mounted to the bottom left of the card with sticky strip.


4.  The butterfly from Kinda Eclectic was stamped in Smokey Slate ink on Smokey Slate card stock and then punched out with the Elegant Butterfly Punch.  I punched out butterflies in Basic Gray and Pink Pirouette using the Beautiful Wings Embosslit and then adhered them below and above the stamped butterfly image.  

Beautiful Wings Embosslit is one of my favourite die cuts.  Just look at all those cute little butterflies
Basic Rhinestones were added to the smallest butterfly image.  The butterfly embellishment was then attached to the oval embellishment with dimensionals and glue dots.  I usually cut the dimensionals into smaller pieces and strategically place them on the underside of the butterfly to make it look like it's in flight.
 
Kinda Eclectic is a 6 piece stamp set that comes in clear and wood mount styles. 

5.  The sentiment Happy Anniversary from the Teeny Tiny Wishes stamp set was stamped in Momento Tuxedo Black ink on a small strip of Pink Pirouette card stock.  This piece was then cut out with the Bitty Banners Framelits and adhered to the Oval with glue dots and dimensionals. 
The Bitty Banner Framelits are ideal for making small framelits.  They match the Itty Bitty Sentiments stamp and can be purchased for 15% off as a bundle. 
Teeny Tiny wishes is an ideal 24-piece sentiment stamp to have in your collection.  It covers almost every occasion.  This set comes in wood, clear and brush stroke versions (MDS).

6.  For the inside of the card I used a 3 3/4" x 5 " piece of Whisper White card stock with a stamped  sentiment from the retired Full of Life stamp set.  The sentiment I'd chosen was a love theme, however I have to confess that somehow I grabbed the wrong stamp and didn't realize it until I added the pictures to this post.  Can you see my red face?  It's glowing with embarrassment.   

Don't worry before I give this to the lucky couple that are celebrating their anniversary, I'll be redoing the inside of the card.  Lol!  That's a new one on me!

Okay here's one last look at this card.  Hope you'll leave me some comments and let me know what kind of goof ups you've made that have left you with a red face.  I'd love to hear about it, and will reward the funniest story with some card candy.  

Happy Stamping!
Penny Tokens  

Wednesday, August 20, 2014

Retro Sketch # 128


"I can't believe it's Tuesday" seems to be a common phrase in our house this summer. The week's have been flying by, and summer sadly, is on the wane.  

Tuesday is my one day that I set aside each week for stamping and having fun.  My husband's  golfing with his buddies, the house is quiet and it's my day, and my day only (although I do share with my stamping bestie).  Selfish I know, but that's the only way I work in a little leisure time for myself amidst all the other demands of one's life.  

So, Tuesday it is and today Sheri and I've been working on a sketch challenge prepared by Erica Rose for the Retro Sketches site.  Here's the sketch:
Here's My Card:   
Wow this sketch has a lot of detail.  I wasn't sure I'd be able to fit it all in on my card, but I rolled up my sleeves and gave it the college try and made this Anniversary card.  
What do you think?  I'd been dying to do a black and white card for a while now and use some of the Back to Black Designer Series Paper I've been salivating over.  I also got to use a couple of new stamp sets, Bloom With Hope, one of the awesome new Hostess sets and Good Greetings which will be available at the end of August.  
 
The Bloom With Hope Stamp Set is an 11 piece hostess set and can be earned for FREE when you host a party or as a hostess gift when you order $200 or more of Stampin' Up! products. 

I've used several layers of black and white card stock that decrease in size by 1/8".  I embossed the top Whisper White layer with the Houndstooth Embossing Folder, and originally planned to layer it on to a Whisper White card base.  It really didn't look good with just White on White layers, so I added a basic black layer. 

The card was almost finished and looking pretty good and then I made a huge mistake.  When I was adding the basic black layer beneath the card front, I  discovered I'd put it on upside down.  To remedy this I had to do some cutting and add a layer with a basic black card stock base.   This error just proves to me just how relaxed I get when I'm stamping, and, that I can't stamp and talk at the same time.  LOL! 

Supplies: Stamp Sets:  Good Greetings, Bloom With Hope
Card Stock:  Whisper White, Basic Black
Ink:  Tuxedo Black Memento Ink
DSP:  Back to Black DSP and Silver Glimmer Paper
Accessories:  Modern Label Punch, 1 3/8" Circle Punch, Scallop Trim Border Punch (R), Delicate Doilies Sizzlets (R), Houndstooth Embossing Folder, Large Basic Rhinestone, Whisper White Taffeta Ribbon (R), Trimmer and Big Shot Machine.  

Here's a view of the inside of the card. The card base is Basic Black, so it needs a liner.  This one measures 5 x 3 3/4".   I added a small strip of the DSP along the bottom of the card, stamped a sentiment from one of my retired stamp sets and a small flower in the top corner. 
The rectangles on the card front measure 3 x 3 1/2".  The bottom one which you can barely see is from Basic Black cardstock and the top layer is from the Back to Black Designer Series Paper.  The other details include a 4 /14" x 1/2" strip of Basic Black that was cut out with the Scalloped Edge Border Trim Punch (Retired), and a 1/8" strip of Silver Glimmer Paper.  The banner on the bottom is a strip of DSP in a black and white floral print that measures 1 x 3 1/2".  I added a sentiment "hugs and kisses" from Good Greetings that was stamped on Whisper White and cut out with the Modern Label Punch. The final touch was a small bow made from Whisper White 3/8" Taffeta Ribbon (retired). 
 
I wanted to add some dimension to the small flower from the Bloom With Hope stamp set that resembles an Aster, so I stamped it twice in Tuxedo Black Memento Ink on Whisper White card stock and cut out the flowers.  

To bring the dimension to the flower I fussy cut each of the petals on both flower images, and used a bone folder to shape the petals upwards.  Before gluing the two flowers together, I punched out the center of one of them and adhered it to the center of the top flower image with a dimensional.  I also sponged around the edges of all the layers. To finish off the flower I added a large basic rhinestone to the center.   

The flower on it's own looked okay, but it needed a little more detail to give it a WOW look.  I cut out the medium sized doily with the Delicate Doilies Sizzlet Die (retired) and poked out all the little holes around the center.  By adding a 1/38" circle of Silver Glimmer paper behind the doily, I got the look I wanted........subtle glam.  You can just see the silver glimmering through the holes in the doily and around the base of the flower.  Perfect!  

Tip:  If you've never worked with Glimmer Paper before there are two things you need to know.  First, when cutting the glimmer paper in your trimmer it works better if you flip the glimmer paper over and cut on the paper backing side.  And second, Glimmer Paper doesn't stick well to other card stocks or surfaces with normal glue or sticky strip.  It adheres better when you use glue dots.
 

Well that's it for today's post.  I hope you liked it and found the instructions easy to follow.  I'd love to hear if you've every made a blunder when making a card or project and how you remedied it.  Leave me a comment if you can, it really makes my day!

Happy Stampin'
Penny Tokens

Black and White Anniversary - FMS #669

I'm up for another sketch challenge card, how about you?  Narelle Farrugia is the sketch designer for  Freshly Made Sketches #669  this...