Showing posts with label Freshly Made Sketches. Show all posts

Sunday, June 16, 2024

Father's Day Card - FMS#640

This week's Freshly Made Sketch #640 by Judy, features three circles. If you're just starting out doing sketch challenges or you're looking for a simple design this challenge is great.  Remember when playing along with a sketch challenge that your able to make it your own by altering the suggested images.  These three circles could be any shape or design, you just have to have three of them.  So what are you waiting for join in the fun.  This sketch runs from June 12th to June 17th, 2024.  Why don't you join me and play along.  

HERE'S THE SKETCH: 

Click here to see the Design Team samples.

HERE'S MY CARD: 
Today I've created a masculine card for Father's Day, but this design could just as easily be used as a gesture of appreciation for a husband or male friend.  My design features images from the Adventurous Sky stamp set which is fast becoming one of my favourite sets from Stampin'  Up!s Annual Catalogue. 


I decided to follow the sketch by using circles for my card design and began by adding graduated layers of cardstock and paper to the card front.  Here are  the measurements: 
  • 5 3/8" x 4 1/8" piece of Copper Clay cardstock, 
  • 5 1/4 x 4" piece of Misty Moonlight
  • 5 1/8" x 3 7/8" piece of designer series paper featuring bi-planes
  • 5" x 3 3/4" piece of Whisper White cardstock, embossed with a hatched design from the Online Exclusives called Basics 3-D Embossing Folder.  I die cut 3 circles using a set of nested circles and added foam tape to the backside before positioning it over the designer series paper.

I stamped off one of the cloud images from the Adventurous Sky stamp set onto the circle I'd cut from the Whisper White layer.  I then stamped the sentiment "You Always Life Me Up" over top of the cloud in Misty Moonlight ink and popped on a few copper coloured sequins.

For the inside of the card I stamped images of the bi-plane and riveting in Misty Moonlight ink and the sentiment in Copper Clay ink.  The blue layer is a piece of 5 1/4" x 4" designer series paper from the Take to the Sky designer paper.  

Supplies: 

Stamp Set: 

  • Adventurous Sky #163439

Card Stock:
  • Misty Moonlight
  • Copper Clay
  • Whisper White 

DSP:

  • Take to the Sky #16343
Ink:

  • Misty Moonlight - Neutral
  • Copper Clay - Incolour 2023-2025
Embellishments: 

  • Neutrals Adhesive Backed Sequins #161627 in Copper Clay
  • Basics 3-D Embossing Folder #161598 - hatched design

I hope you enjoyed today's card and that you'll come back and visit again. I'd love to hear if you took the challenge and what type of card you made.  

HAPPY STAMPING!
PENNY TOKEN'S STAMPING SPOT 
Penny Hanuszak, CDN Stampin' Up! Demo since 2006

Sunday, May 26, 2024

Taco Fiesta with FMS#637

I was inspired by the little squares on this week's Freshly Made Sketches challenge to design a card using my Taco Fiesta stamp set.  What fun!  This stamp set has a such a cute assortment of toppings and fun sentiments it was easy to fill the squares and come up with a card that made me smile.  

Here's the Sketch: 

Card Sketch by Karren Card Sketch by Karren 

Here's My Card:


I have to confess I really goofed up when I was making this card front.  Somehow I managed to flip the layers when I was adhering the stack to the card base, and wound up with the squares on the left rather than the right side of the card. OOPs!  Since the design on the Day at the Farm DSP was multi-directional, it didn't really make a difference, so I left things as is.  


I had so much fun stamping and colouring these images.  You can't really see because of the camera angle but I wanted all the red bits to be shiny so I topped them with a layer of Nuvo drops to bring on the shine.  

SUPPLIES USED:

Stamp Set:  
Taco Fiesta #160732 - Stampin' Up! (R) 
Inside sentiment from an old retired Stampin' Up! set.

Card Stock:
Daffodil Delight:
One piece of 8 1/2 x 5 1/2" scored at 4 1/4" for base.  
Cherry Cobbler 
One piece of 4" x 5 1/4" for mat and 3 scraps the square mats measuring 
1 1/2" x 1 1/2" 
Basic White
Two 4" x 5 1/4" for front and inside layers and scraps for 3 mats measuring 1 1/4" x 1 1/4" for card front.  Scraps for stamping images. 

Designer Paper:  
Day at the Farm 12 x 12 Stampin' Up! (R) 

Ink:  
Momento Basic Black for Images and sentiments
Cajan Craze, Poppy Parade, Real Red, Granny Apple Green, Daffodil Delight, Crumb Cake, Parakeet Party Stampin Blends for coloured images. 

HAPPY STAMPING!
PENNY TOKENS' STAMPIN' SPOT

Penny Hanuszak, CDN Stampin' Up! Demo since 2006 
Shop in My Online Store 24/7


Join now for special offer! 


Sunday, May 12, 2024

Rock Star Masculine Birthday Card

We finally have some good weather and have spent the week tidying up in the garden and the garage.  Visits to the recycling plant to get rid of an accumulation of winter's junk and trips to local nurseries have been very rewarding.  

My husband and I are such creatures of habit always going to get our plants at Costco or Devans, but this week we surprised ourselves by checking out three new nurseries in the area.  Now our patios are looking inviting and we can't wait to entertain and use them again.   

This week's Freshly Made Sketch was designed by Jen B 

Click Here to See the FMS Blog Link and Design Team 

Here's My Card: 


I used this simple sketch to design my "Rock Star" birthday card for a friend's son who is really into guitars and music. The card came together so easily using the Rock Legend Kit which can be purchased from the Online Exclusive kits available through Stampin' Up!.


This kit comes with everything you need to make eight cards.  I started my card with a basic black cardstock base that measured 8 1/2" x 5 1/2" and scored at 4 1/4".  On the right hand side of the card front I cut a 1" by 5 1/2" strip off so that the inside of the card was exposed.

For the front mat I cut one of the Crushed Curry card bases from the Rock Legend Kit down to 3"  x 5 3/8" and adhered it to the front of the card. For the rest of the front panel detail I layered a Velum Star with the guitar and Happy Birthday sentiment, both of which were adhered with dimensionals. Next I adhered five of the red plastic stars to fill up the white space on the star.  Voila, almost done!  

The inside of the card also came together very quickly.  I added a 1" x 5 3/8" strip from the reverse side of the card base that I'd used on the card front.  This Crushed Curry strip had no pattern.  I also cut a panel of Whisper White cardstock for the inside that measured 3" x 5 3/8" and adhered this beside the  Crushed Curry strip leaving a 1/16" gap between the two pieces.    

During the Last Chance Sale in April, I was fortunately enough to get the Rock Star Stamp Set and coordinating dies from the expiring mini catalogue.  I'm happy I did.  I stamped "Have a Rock and Roll Birthday" in Momento Black ink for the inside sentiment and I love how bold and masculine this stamp is.   

Sorry for the blur.  This stamp and die set is now retired.  


Thanks for stopping by.  I hope you enjoyed this card and will drop by again soon.  

Click her to shop in my 24/7 Online Store

HAPPY STAMPING!
PENNY TOKENS STAMPIN' SPOT

Penny Hanuszak, CDN Stampin' Up! Demo since 2006 


Sunday, April 21, 2024

Gold Foiled Wedding Cards for FMS #631

This weeks Freshly Made Sketch #  is by Jen Timko and it  features a square card design.  

Freshly Made Sketches #631

Here's My Card: 


I have a niece and a nephew from a different family both getting married on the same weekend in May.  I thought this sketch would be perfect for their wedding cards, and when the cards were finished, I wasn't disappointed. There's just something so special about square cards and this one looks so elegant.  

I began with a 10" x 5" square card base cut from Very Vanilla cardstock and scored it at 5".  A 4 7/8" x 4 7/8" layer of black cardstock followed by a 4 3/4" x 4 3/4" piece of cardstock from the Gold Foiled Flowers card kit (162589).  The final and most delightful layer is a 4 1/2" x 4 1/2" Very Vanilla mat that I embossed with the Layering Flowers 3D embossing folder.  

I cut a gold foil heart and a Very Vanilla heart with a lacy edge and layered them together for the top focal point.  Before adhering the heart to the front of the card I added a Very Vanilla taffeta bow and some black and gold leaf sprigs.  The finishing touch were three brass butterflies.


Although I didn't get this card posted in time for the sketch challenge, I'm still happy I used the sketch, as it was the perfect layout for these cards.  

Happy Stamping!

Penny Tokens Stampin' Spot
Penny Hanuszak, CDN Independent Stampin' Up Demo since 2006

Sunday, March 10, 2024

Sending a Little Sunshine

We're already a week into March and so far we've had an arctic front, snow, heavy frost,hail, wind, rain and more rain. After a weekend of gray skies, heavy rain and winds I'm trying to stay optimistic and hoping for some sunshine and dryer weather in the days to come. 

With the weather focus on mind I decided to use this week's Freshly Made Sketches Challenge #FMS626 for my inspiration. Here's the sketch:

FMS#626

HERE'S MY CARD:

I chose to design a positive card with a "rain and sun theme" that could be used for a variety of occasions.  

Remembering that the sketch challenge rules say it's okay to replace the circles with another image, I went ahead and changed the half circles with clouds. My basic white stitched clouds were die cut using the medium cloud die in the Stampin' Up! Bright Skies bundle featured on page 51 of the Annual Catalogue.  

There's also a cheerful little sun that's part of the coordinating stamp set and it has dies that make it easy to cut out and add dimension.  I stamped the sun in Daffodil Delight and used the small stitched circle die to cut a center for the sun from Daffodil Delight card stock.

I chose the "Sunshine to Brighten Your Day" sentiment from the "Sending Smiles" (#158701) stamp set on page 26 of the Annual Catalogue, and embossed it on a strip of basic black cardstock with Versamark ink and White Embossing Powder. I cut out the sentiment strip with the larger of the two label dies in the coordinating "Sending" (#159271) die set. What fun!  I love all nine of the sentiments in this stamp set, and any one of them would have worked perfectly with this theme. 

The Smokey Slate card base for this card measures 4 1/4" x 11" and is scored at the 5 1/2"  center line. I added a layer of Basic White 5 3/8" x 4 1/8", a layer of Balmy Blue 5 1/4" x 4" and a layer of Rain or Shine designer series paper that measured 3 7/8" x 51/8".  This piece of DSP has a myriad of glossing raised raindrops that capture the light when the card is turned. 

For the inside of the card I cut a 5 1/4" X 4" basic white panel and adhered another die cut sun to the bottom right hand corner.  I left the rest blank for a personal message. 

So that's my card for today.  I appreciate your dropping by to visit, and hope if my card inspired you in any way that you'll leave me a comment.  I super enjoy doing card challenges as it's a way of stimulating my creativeness and this weeks FMS#626 was perfect for that.  

Why not try out this challenge yourself, there's still a bit of time to do it.  Cheers and have a good week!


HAPPY STAMPING
PENNY TOKENS STAMPIN' SPOT


Penny Hanuszak, CDN Stampin Up Demo since 2006
Click here to visit my 24/7 Online Webstore


Saturday, February 24, 2024

Sweet Thoughts Memories & More #FMS624

I have a new sketch challenge from Freshly Made Sketches  that I want to share with you today.  I'm not overly fond of the sketch, but others might find it appealing.  Here's the sketch by Kim:

Click here for the Challenge Information

Here's My Card: 


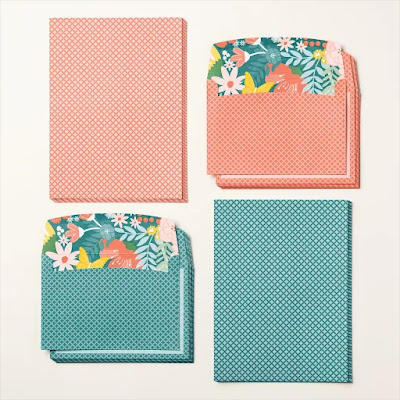
My card this week is made with the Sweet Thoughts Memories & More cards and envelopes (162931) and the Sweet Thoughts Memories and More Card pack (162930) ephemera which consists of sticker sheets, 4 x 6 cards and 50 double sided 3 x 4 cards.  


The Sweet Thoughts Memories & More Cards & Envelopes (162931) pack provides such an economical and fun way to make cards.  The kit comes with 20 cards and envelopes - 10 each of Calypso Coral and Pretty Peacock, that are a bit larger than your standard A2 card base.  And the coordinating envelopes have gorgeous floral flaps that blend Calypso Coral, Crushed Curry, Garden Green, Pecan Pie and Pretty Peacock.  

Having card bases and coordinating envelopes on hand, really cuts down on prep time when you want to craft.  With a little maneuvering you can actually double the amount of cards you can make from this kit by cutting the envelopes and the card bases down in size and using coordinating card bases from the colours offered.  What fun!  


And, mixing in the Sweet Thoughts and Memories & More Card Pack (162930) makes it even easier to create with.  This kit includes fifty 3 x 4 and 4 x 6 coordinating cards that you can use for layering, backgrounds or focal points, as well as 6 pages of stickers including some rose gold foil pieces.  

Both of these products are featured on page 44 of the January to April Mini catalogue.  

Well I hope you've enjoyed my post this week, and if you've never tried out a memories and more kit from any of Stampin' Ups! catalogues you may want to give them a try.  You can create so many great projects!  

Happy Stamping!
Penny Tokens Stampin' Spot 

Penny Hanuszak, CDN Independent Stampin' Up! Demo since 2006
  

Friday, February 16, 2024

Lovely Lavender All Occasion Card #FMS623

Here is the latest sketch challenge FMS623 from Freshly Made Sketches designed  by Linda.

FMS623

Here is My Card: 

I've been meaning to create some all occasion cards or other projects with my January 2024 Paper Pumpkin (PP) kit but my mojo just wasn't working enough to actually get started.  So, when I came across this week's Freshly Made Sketch challenge that was all I needed to get inspired.  I loved the fact that I could use any shape I wanted to create the focal point, I wasn't limited to something oval. 

My card design evolved from both the sketch and the little postage square focal point that had been hanging around on my desk for a week or two.  It was perfect for tucking some of the leaves and flower images from the Paper Pumpkin kit behind.  

It started with a standard A2 size Whisper White cardstock base, followed by a 5 3/8" x 4 1/8" piece of Blackberry Bliss.

I cut one of the PP card bases in half for the dsp mat and then cut the 4" x 5 1/4" mat on an angle to form half of the card front layer. I used a second 4" x 5 1/4" Whisper White card stock piece for the bottom half of the front mat. Before layering the two pieces of the mat, I embossed the full white piece with the Layered Florals 3D embossing folder call. The dimension this embossing folder brings to the mat is so wonderful, I simply love the effect!

I added a 1/4 strip of Blackberry Bliss cardstock on an angle across the join line and snipped off the overlap.  
The focal point began with the Perennial Postage square die cut from a scrap of Blackberry Bliss cardstock.  The lavender flowers and leaf sprigs from the PP kit were glued to the back of this piece. The square of Whisper White, also a scrap was die cut with a retired Simple Shapes die cut, and the sentiment was stamped in Highland Heather ink. 


Once the focal point was adhered with dimensionals across the center of the card I added some of the beautiful Purple Fine Shimmer gems which I got with the Perennial Lavender Suite Collection on page 23 of the Mini Catalogue.  

Supplies:
Here is a list of all the supplies used to make this card. 

Stamp Sets:  Lovely Lavender January 2024 Paper Pumpkin 

Cardstock:  

  • Whisper White 8 1/2" x 5 1/2" for base scored at 4 1/4"
  • 2 Whisper White 4" x 5 1/4" mats for the front panel and inside and a 2" x 2" scrap for the sentiment square.
  • 1 Blackberry Bliss mat 4 1/8" x 5 3/8" for card front and a 1/4" strip, and a 2 x 2" scrap for the focal mat.
Paper Pumpkin January 2024 Kit:
  • One card base piece trimmed to 4" x 5 1/4" and then cut on an angle for the front mat.
  • Three lavender floral pieces and one sprig of leaves in Lost Lagoon.
Accessories:
  • Purple Fine Shimmer Gems
  • Layered Florals 3D Embossing Folder
I hoped you enjoyed my submission to FMS623 and will check out the other submissions  Between the designers and the participants there is a bevy of card ideas.  Better yet, if you're following or thinking of following my blog why not share what you made with this sketch.  That would be fun!  
Happy Stamping!
Penny Tokens' Stampin' Spot


Penny Hanuszak, CDN Independent Stampin' Up! Demo

Click here to Shop in my 24/7 Online Store: 


Sale-a-bration Ends February 29th, 2024 ... Don't miss out 


Don't Forget to Add My February Hostess Code: 


Black and White Anniversary - FMS #669

I'm up for another sketch challenge card, how about you?  Narelle Farrugia is the sketch designer for  Freshly Made Sketches #669  this...