Showing posts with label birthday cards. Show all posts

Monday, March 11, 2024

More Jungle Pal Birthdays

Earlier in the month, I posted a card for a TSOT challenge  that was made with the Jungle Pals stamps and dies that were available during Stampin' Ups! Sale-a-Bration.  That was such a fun get well/thinking of you card and the recipient really liked it.  

Since then I've made some birthday cards using this same set and today wanted to share them with you.   

Here are the Cards I Made: 

This card started with an 8 1/2" x 5 1/2" piece of Granny Apple Green card stock scored at 4 1/4".  I added a mat of Basic Black that measures 5 1/4" x 4".  Before adhering that piece I die cut the stitched 3" circle for the backing on my focal point.  The final mat is a 5" x 3 3/4" piece of Lemon Lolly cardstock.  Before adhering this mat to the front of the card, I did two things.  First I cut a 2 1/2" stitched circle mat for my focal from the top center of the mat and then I embossed it with the Fern 3-D Embossing Folder.  

For the inside of the card I cut a Basic White mat that measured 5 1/4" x 4" and adhered that to the card base.  Before putting this mat down, I added some foliage to the bottom and stamped with a birthday sentiment. 


Here's a close up of the focal point on the card front. I coloured the Toucan with Sweet Sorbet, Pumpkin Pie, Old Olive, Daffodil Delight and Basic Black blends and cut it out with the dies from the Jungle Pals die set.  I coloured a variety of the die cut leaves with Granny Apple Green, Old Olive and Lost Lagoon blends.  The sweet little flowers were coloured with Daffodil Delight and Pumpkin Pie blends.  

The sentiment "your special day" is from the Cake Fancy (#162932) stamp set in the January Mini catalogue.  I embossed it with white embossing powder on a strip of Basic Black.  Love it! 

I stayed with the forest jungle theme for my next card which features the Tiger from the Jungle Pals bundle.  Although I was disappointed with my actual colouring of the Tiger (he's much too flat and the shaded look I was going for didn't happen), I was happy with the card as a whole.  Here it is:


Once again I used a Granny Apple Green card base to begin the card.  I followed this with a mat of Lemon Lolly that measured 4 1/8" x 5 3/8".  The top mat started out as a 4" x 5 1/4" piece of Basic White.  

If you've never tried to create your own backgrounds you're missing out on a lot of fun and creativity.  To get the plants in the jungle look (see the original card) I began by die cutting all the foliage and flowers in the die set from Basic White cardstock.  I placed them over top of the mat and coloured them with ink and blending brushes.  You could also use a sponge dauber. 

The trick is to colour them on top of the cardstock mat and keep moving the pieces around as you blend so that you're laying down colour over top of colour.  I started all the blending with Lemon Lolly, then switched to Granny Apple Green and then added Lost Lagoon.    


 I die cut the flowers from a scrap of envelope from the Sweet Thoughts Memory or More pack so no colouring was involved.  

I die cut the flowers from the Calypso coral card front featured in this photo.  The grid pattern gave a nice textured look to the flowers. 

Well that's it for today's post.  I hope you liked it and will leave me a comment as to which of the two cards you liked the most.  I'm going back to the drawing board to learn to colour the tiger more realistically.  I'm going to try using blending brushes rather than blends so I get a toned down version.  Cheers and have a good week. 

HAPPY STAMPING! 
PENNY TOKENS STAMPIN' SPOT 

Penny Hanuszak, CDN Stampin' Up! Demo since 2006
Click here to visit my 24/7 Web Store


Monday, March 4, 2024

Zany Zoo March Birthdays #FMS645

March is always a busy month for me.  I have so many friends celebrating birthdays or anniversaries that my to do calendar is full.  I don't mind though, it's fun to celebrate and make someone's day with some happy mail! 

For today's card I've used the Freshly Made Sketch Challenge #FMS625


HERE'S MY CARD: 


For today's card I used a fun birthday stamp and die bundle from the Annual Catalogue called Zany Zoo #161315.  There are 20 dies and 11 red cling stamps in this bundle.  The full suite called the ZOO Crew on pages 46 and 47 of the catalogue includes the beautiful Zany Zoo 12 x 12 designer series paper, as well as the stamps, dies and coordinating pastel ribbon  Duo pack.  Love it!  

HAPPY STAMPING!

PENNY TOKENS STAMPIN' SPOT

Penny Hanuszak, CDN Independent Stampin' Up Demonstrator

Shop in my 24/7 On-line Store: 


Saturday, February 24, 2024

Sweet Thoughts Memories & More #FMS624

I have a new sketch challenge from Freshly Made Sketches  that I want to share with you today.  I'm not overly fond of the sketch, but others might find it appealing.  Here's the sketch by Kim:

Click here for the Challenge Information

Here's My Card: 


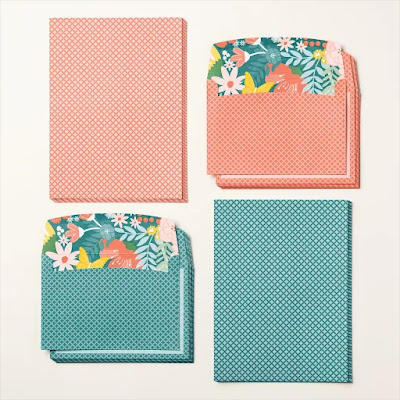
My card this week is made with the Sweet Thoughts Memories & More cards and envelopes (162931) and the Sweet Thoughts Memories and More Card pack (162930) ephemera which consists of sticker sheets, 4 x 6 cards and 50 double sided 3 x 4 cards.  


The Sweet Thoughts Memories & More Cards & Envelopes (162931) pack provides such an economical and fun way to make cards.  The kit comes with 20 cards and envelopes - 10 each of Calypso Coral and Pretty Peacock, that are a bit larger than your standard A2 card base.  And the coordinating envelopes have gorgeous floral flaps that blend Calypso Coral, Crushed Curry, Garden Green, Pecan Pie and Pretty Peacock.  

Having card bases and coordinating envelopes on hand, really cuts down on prep time when you want to craft.  With a little maneuvering you can actually double the amount of cards you can make from this kit by cutting the envelopes and the card bases down in size and using coordinating card bases from the colours offered.  What fun!  


And, mixing in the Sweet Thoughts and Memories & More Card Pack (162930) makes it even easier to create with.  This kit includes fifty 3 x 4 and 4 x 6 coordinating cards that you can use for layering, backgrounds or focal points, as well as 6 pages of stickers including some rose gold foil pieces.  

Both of these products are featured on page 44 of the January to April Mini catalogue.  

Well I hope you've enjoyed my post this week, and if you've never tried out a memories and more kit from any of Stampin' Ups! catalogues you may want to give them a try.  You can create so many great projects!  

Happy Stamping!
Penny Tokens Stampin' Spot 

Penny Hanuszak, CDN Independent Stampin' Up! Demo since 2006
  

Tuesday, April 13, 2021

Sweet Strawberries - Birthday Cards


How do you like your Strawberries?  I like mine fresh picked, sliced and served in a chilled bowl with a touch of  milk and a sprinkling of sugar.  Weird I know, but that's how I've always loved them.  

Stampin' Up! has a beautiful Strawberry stamp and coordinating builder punch bundle that's featured on page 44 of the January to June Mini catalogue.  This is fast becoming one of my favourites. I really like the images and sentiments in this set which could be used for many occasions.   

Sweet Strawberry Bundle 

Here are some cards I've enjoyed making and sending out for my February and March birthday cards.  Enjoy!


Since COVID 19 changed all our lives, I find I'm sending out more and more cards by snail mail and so I'm making them in batches instead of one card at a time.  I loved the design of the next cards because they are quick and easy to make in an assembly line fashion.

Assembly Details:

First of all a disclaimer, because I don't want you to be disappointed.  The beautiful Berry Delightful DSP you see featured on these cards is no longer available, as it was part of this year's Sale-a-bration promo.  But these cards can be made with any other designer paper or with your own One Sheet Wonders.  
  
  • For these cards I began with by cutting ten pieces of 8/12" x 5 1/2" Whisper White card stock and scoring it at 4 1/4" for the card bases.  
  • Next I cut 5  5 1/4" x 4" mats from Poppy Parade  and 5 from Garden Green.
  • Then cut ten pieces of designer paper into 3 3/4" x 5" mats and then cut each of these at 2 1/2" for top and bottom layers.  Adhere a top and bottom to the mat.  
  • Before adhering the mat to the card base, cut ten 6 1/2" strips of white cotton ribbon to hide the joint line of the dsp. Adhere each end firmly on the back of the card stock mat.  
  • Cut ten additional pieces of ribbon for the bows and adhere with glue dots. 
  • Add a sentiment (see note below).
  • Cut ten panels of Whisper White 5 1/4" x 4" for the inside of the card.  
I like to make all my sentiments separate from the cards and then I can choose which one works for the occasion.  So I made stacks of sentiments for the card fronts, by die-cutting stitched circles, ovals, and square pieces of Whisper White card stock, stamping sentiments including strawberries and leaf images, adding embellishments like rhinestones and then matting them on coordinating card stocks.   
When I'm working with a designer paper I like to make batches of sentiments that I set aside that are pre-stamped with a variety of sentiments and in all kinds of shapes, as you can see from this picture.  That way I'm always ready to make a quick card when the need calls.  


I pre-cut ten Whisper White mats for the inside of the card that measured 5 1/4" x 4".  And while I had the stamps out for the sentiments and design I stamped these inside panels.  I used left over dsp pieces to add strips to these panels.


Hope you enjoyed this selection of cards made with the Sweet Strawberry  bundle.  They were truly made with love and I enjoyed sending them out.  

Happy Stamping!

Penny Tokens Stampin' Spot

Penny Hanuszak, Canadian Independent Stampin Up Demonstrator 

April Hostess Code:

If you're planning on placing an on-line April order and it's under $200 Canadian before shipping and handling, add my April Hostess Code before checking out and I'll send you a free gift and thank you card.  If you place an order over $200.00 you automatically qualify for Stampin' Rewards based on the total of your order.  Thank you for your order and support.  

Click here to shop the Refreshed Clearance Rack

Click here to shop the Last Chance Products While They Last 


Wednesday, March 10, 2021

Hey Chick Birthday Waterfall Card

A tour of my yard this morning revealed that Spring is definitely on it's way.  Despite a few frosty mornings this week, I spyed three hardy clumps of snowdrops and a patch of hellebore in bloom in my front flower beds. If it warms up a bit more before the weekend, I think I'll plant some primroses to add some colour to the beds.

Snowdrops are known as the "harbinger" of Spring.


Red Racer Hellebore also known as Lenten or  Easter Rose 

Speaking of Spring things, have you seen all the "Spring Chicken" cards that have been appearing on Pinterest and Youtube sites?  They feature two Stampin' Up! early release stamp and die bundles called Hey Chick and Hey Birthday Chick
What fun!  

The Hey Chick Stamp Set was originally released during the 2017 Sale-a-bration promotion and proved to be one of the most popular stamp sets that year. It is very seldom that Stampin' Up! will release a stamp set but from all the demonstrator feedback they received they've done just that. Not only have they re-released Hey Chick as a 7 piece cling stamp set but they've also paired it with 19 coordinating Chick Dies. You can purchase them from my On-line store as a Hey Chick Bundle. or if you already have the Hey Chick stamp set from 2017 you can purchase the dies separately.


And, as if that's not enough fun, Stampin' Up! also released a brand new stamp set and dies called Hey Birthday Chick in the January to June mini catalogue. Even more fun chubby chickens and great dies!  Once again the stamps and dies can be purchased separately or as a bundle.  I have both sets now and believe me I'm planning to have lots of fun with them.

The Hey Birthday Chick Bundle which is available in French and English includes 9 Hey Birthday Chick Stamps and 11 Birthday Chick Dies. Whether you're planning a birthday bash or embellishing a scrap book page, you'll find this set full of celebratory images and phrases as well as quirky line art chicks, a celebratory bow, garland, and even a picket fence. My favourite is the Happy Birthday die cut, which I know I'll be using on a lot of my cards.


Here's a quick video to show how easy it is to work with the Hey Chick and Hey Birthday Chick products. 
Today I want to share a Waterfall Card I made with a combination of stamps and dies from both of these bundles. 

A Waterfall Card is a fancy fold that features a 9 1/2" x 2" card stock mechanism that sits on the front of the card base. The mechanism is folded in half and fitted under an anchoring bar. The front of the mechanism is scored at four intervals and on each score line a square with a stamped image is adhered usually in a picture sequence from top to bottom score line.

On the inside or base of the mechanism there is room for a message that remains hidden until a pull tab or ribbon at the bottom is pulled forward.  When the tab is pulled each of the squares magically begin to flip revealing the next square from top to bottom and finally the hidden message at the base.  


For this card I began with an Early Espresso card base that measures 8 1/2 x 5 1/2" and is scored at 4 1/4".  The wood grained layer measures 5 1/4" x 4" and is from the In Good Taste Designer Series Paper.

Here you can see the four stacking layers.  The little chick at the bottom of the stack is my pull tab.  I cut out two small ovals from the wood grained paper and glued them together for the tab.  The little chick was die cut from Daffodil Delight cardstock and adhered to the tab.  

For the top square I began by stamping the Wired clear mount background stamp image to the Crumb Cake cardstock in Early Espresso ink. I stamped this chick on Whisper White card stock and coloured her with Melon Mango Stampin' Blends before die cutting out the image.  To make the chick's chest stand out, I applied  heat and stick powder and iridescent glitter which really made the blended colours pop. 

The Wired Background stamp can be laid flat, set on an acrylic block, or mounted on a stamperatus platform when transferring your inked image. 


This is the second square and features the little picket fence die cut in Early Espresso card stock.  I stamped a nice little grassy area beneath the fence using a stamp from By The Dock in Crumb Cake along the bottom of the square. The sentiment was stamped in Early Espresso and cut it out with a small retired oval punch.  

The third square features a cute little birthday chick and the "Let's Celebrate You" sentiment stamped in Momento black ink.  I used the confetti stamp on the top part of the square and and the ground in Crumb Cake ink.  The little chick was coloured with Mango Melody, Smoke Slate, Pumpkin Pie and Cherry Cobbler Stampin' Blend Markers. 


The fourth square features the die cut "happy birthday" cut from Cherry Cobbler card stock.  Love, love, love this little die cut!   The chick on this square was fussy cut from the large chick with the birthday balloons image and coloured with blends. 

For the final bottom panel, I stamped the chick with the balloon and die cut it along with an extra balloon.  The sky and the ground were added with sponge daubers.  The hen is coloured with Cinnamon Cider, Soft Suede and
Cherry Cobbler Blends.


Here's a view of the inside of the card which features the cutest and my favourite chick from both bundles. I just love this image and the sweet little birthday cupcake.  

This was a fun card to make and doesn't take too long.  I enjoyed colouring all the chicks and found it very relaxing.  I hope over the coming weeks to post more cards using these two wonderful bundles.  If you're interested in purchasing them, I hope you'll drop by my Online store.  Until next time....

Happy Stamping!
Penny Tokens Stampin' Spot!
Penny Hanuszak, Canadian Independent Stampin' Up! Demonstrator 

HOSTESS CODE FOR MARCH:  

Shop at my On-line Store 24/7 just Click Here to go to my Shop Now 
Use the hostess code at the end of your order if it's under $200.00 before shipping and handling and I'll send you a thank you card and free gift.  For orders over $200. don't add the hostess code because you'll automatically receive Stampin' Up! rewards based on the total of your order and a thank you card from me.


Happy St. Patty's Day!

Rainbows, a Pot of Gold, Leprechauns green beer and shenanigans are all part of celebrating St. Patty's Day on March 17th. I have a sma...