Showing posts with label sketch challenge. Show all posts

Thursday, November 14, 2024

NESTS OF CHRISTMAS PAPER PUMPKIN ALTERNATIVES USING #fms#662

 Here's the latest sketch challenge from Freshly Made Sketches #662 and designed by Jen T.  Make sure you check out the Design Team cards as there are so many delightful samples for how to use this sketch.  And, while you're at it why not join in. This challenge is open until 3pm EST Monday November 18th, 2024.  I'd love to see your creations on the board too! 

Here's My Card:


I'm still working on Christmas cards, so for this challenge I just needed to make a decision as to what stamps and paper I wanted to use. Since I had opened but not used the October 2024 Paper Pumpkin kit called Nests of Christmas I felt this would be a good choice, and I'm glad I went with it.  

I began with an 8 1/2" x 5 1/2" base of Whisper White card stock that was  scored at 4 1/4".  I stamped the sentiment "merry CHRISTMAS" from the Nests of Christmas stamp set along the bottom in Shaded Spruce ink.


Next I cut a 3" x 5 1/2" piece of Whisper White cardstock  and embossed it with the Painted Posies (159175) 3D Embossing Folder, and added a 1/2" piece of Shaded Spruce cardstock to the bottom with only a 1/4" showing along the edge. 

To finish the design I chose some greenery and a beautiful cardinal image from the ephemera in the paper pumpkin kit and adhered it to the front panel. I added small red rhinestones to the berries on the greenery for a hint of sparkle and then mounted the front panel to the card front with dimensionals.

I kept the inside of the card fairly plain by adding a 4" x 5 1/4 piece of Whisper White card stock stamped with the "joyful thoughts to you this season" sentiment and the leaf image from the Nests of Christmas stamp set in Shaded Spruce ink.

One of the things I really like about the Paper Pumpkin kits are the envelopes.  They generally include up to 9 decorated envelopes with each kit.  These can be left as envelopes or they can be taken apart and used to further the number of cards that can be made from the kit.  I chose to leave these ones as they were.  
This card came together quickly once I had made the decision of what to make.  Having a sketch really makes cardmaking that much easier, and this card was super easy to assemble.  Hope you liked it and will leave a comment.   

Until next time.... 

HAPPY STAMPING!
PENNY TOKENS STAMPIN' SPOT

Penny Hanuszak, CDN Stampin' Up! Demo since 2006 

Click here to check out my 24/7 Online Store 

Click here to see how you can get a free gift and
use the Hostess Code on your next order! 


Wednesday, July 10, 2024

Life Is Sweet - TSOT#650

 Here is the semimonthly sketch challenge from Try a Sketch on Tuesday (TSOT #650) that happens the third Tuesday of the month. This challenge runs from July 2nd to 14th so there's plenty of opportunity for you to share your creativity and join me in this challenge.


Click here to see how to Participate 

Here's My Card: 


For this card I chose products from the June 2024 Paper Pumpkin Kit called "Life is Sweet" which has been sitting on my desk for a bit.  


Supplies:


Stamp Set:  
  • Life is Sweet - Paper Pumpkin June 2024 Kit 
Cardstock and Paper:
  • Whisper White for card Base 8 1/2" x 5 1/2" scored at 4 14" 
  • Peach Pie 2024-2026 Incolor - 4" x 51/4" for front layer  and 1 1/2" x 4" strip for card front
  • Peach Pie card base from  Paper Pumpkin kit, 3 3/4" x 5" for top layer.  Dry embossed with Cane Weave Embossing Folder 
  • Shy Shamrock 1 1/4" x 3 3/4" for front strip.  Dry embossed with Basic 3D embossing folder (R). 
  • Four Peach Ephemera shapes from Life is Sweet kit 

Blends and Ink: 
  • Momento Black Ink 
  • Peach Pie ink
  • Peach Pie and Shy Shamrock Light and Dark Stampin' Blends 
Accessories:
  • Basic 3D Embossing Folder (R)
  • Cane Weave Embossing Folder 
  • Four Square Decorative Mask (Stencil) for inside card panel 
  • Dimensionals
  • Adhesive Backed Shiny Sequins (5) 

HAPPY STAMPING!
PENNY TOKENS STAMPIN' SPOT
Penny Hanuszak, CDN Stampin' Up! Demo since 2006

Click here For Info on How To Apply the Hostess Code 


Monday, May 20, 2024

Little Dreamers Baby Card - FMS #636

This weeks Freshly Made Sketch by Cecile had me puzzled and unsure of what I could do with it.  However I loved design teams wonderful samples and they eventually inspired me to be a bit more creative.  Here's the sketch: 

Here's My Card:

I was going to make a birthday card using my Zany Zoo characters and die cuts, but while I was looking through my scraps I found a piece of designer series paper with white clouds on a pool party background that captured my interest.  I decided to  cut and use this paper for the strips on the card.  From there everything seemed to fall into place and I came up with this baby card:


Supplies Used:

Stamp Sets and Dies:

  • Little Dreamers #161569 for lion and inside panel sentiment
  • Teeny Tiny Wishes #127802 Stampin' Up! Retired for Hello Baby sentiment
  • Little  Dreamers Dies #161578 for the two clouds
Ink:
  • Memento Tuxedo Black 
  • Marina Mist (R) for sentiments 
  • Stampin' Blends: Crumb Cake Light/Dark, Light Flirty Flamingo, Petal Pink and Lemon Lolly
Card Stock and DSP:
  • Whisper White 8 1/2" x 5 1/2" and scored at 4 1/4" for base; a 3 7/8" x 5" piece for the front panel which was dry embossed with the Stars Embossing Folder (R); a 4" x 5 1/4" piece for inside panel and small scraps for the two die cut clouds. 
  • Pool Party 4" x 5 1/4" for front panel 
  • DSP Patterns Pack 112474 (R) Stampin' Up! - 2 pieces 3 1/4" x 1/2" and 2 pieces 2 1/2" x 1/2" for strips and a 4" x 1" strip for the inside panel.
Embellishments:  
  • Iridescent Pearls #158987
  • Tombow Multi Purpose Glue
  • Dimensionals


I was quite please with this card and how quickly it came together once I decided on the supplies I would use.  For me that's always the hardest part.  I was sad to see the Little Dreamer Stamp set and dies retired as they've been my go-to baby baby set, and I always love the results.

Thanks for visiting my site and leave me a comment if you liked this challenge and my end results.     

HAPPY STAMPING!
PENNY TOKENS STAMPIN' SPOT!


Penny Hanuszak, CDN Stampin' Up! Demo since 2006
Click here to visit my 24/7 Online Store 


JOIN MY TEAM - CLICK HERE FOR DETAILS 


FREE SHIPPING MAY 21ST, 2024 DON'T MISS OUT 

CLICK HERE FOR INSTRUCTIONS ON APPLYING THE MAY HOSTESS CODE 


Saturday, April 27, 2024

Butterfly Sympathy Card - AHSC#574

It's been raining cats and dogs for the past week, so the good news is I didn't have to go out a lot, however I've been stuck at my computer most days trying to finish up Council business and my own paperwork.

So today it was a nice change getting together with my stamping bestie, Sheri, and tackle some card challenges.  Even though it was wet, dark and gloomy outside we had such a good time in my craft room.  Just being able to sit for a few hours, having a laugh and giggle at the week's silly stuff and being creative together was just the best medicine to help me forget about all the work still on my desk.   

We decided to tackle some challenges that are coming to an end this weekend, so began with a simple sketch challenge from the Atlantic Hearts. Challenge. 

HERE'S MY CARD: 

Unfortunately I need another sympathy card, and decided to use the Atlantic Hearts sketch and paper supplies from Stampin' Ups@ April Paper Pumpkin Kit called Delicate Wings.  This kit really keeps on giving as this is the 18th card I've made with it so far and I know I still have enough supplies to make at least ten more. 

Apologies for the poor quality of the photos.  The very shiny basic gray and gold metallic design on the top layer of the card really casts a reflection.  


In this closeup you can   see the beautiful two layer butterfly and the gold threads that are behind the hexagon.  You can also see the lovely butterflies that are embossed on the hexagon focal point. 

The inside of the card is very plain with the sentiment and lovely butterflies stamped in Moody Mauve ink directly to the card base.  
  • This card began with an 8 1/2" x 11" piece of Sahara Sand cardstock scored at 4 1/4".
  • For the foil layer I cut one of the basic gray cards in the kit in half and then cut one piece into a 4" x 5 1/4" mat.
  • For my focal point I replaced the banner with a Moody Mauve hexagon that was embossed with the now retired Fluttering Textures Embossing folder. The hexagon was easy to cut out with the Delicate Wings dies which were an add-on to the April Paper Pumpkin kit.
  • Before adhering the hexagon to the card face I made a figure eight with some gold thread and attached it to the back of the hexagon with glue dots.
  • The sentiment banner is from the kit and was added with dimensionals.
  • To finish the card I added three 2023-2025 In Color Dots in Moody Mauve and a 2-layer butterfly that I stamped in Moody Mauve ink onto Sahara Sand cardstock and layered the dies in the kit to cut out with the butterfly.
I hope you like this week's challenge card and will drop by to leave me a comment.  Thanks again for stopping by.  

Happy Stamping!
Penny Tokens Stampin' Spot

Penny Hanuszak, CDN Independent Stampin' Up! Demo

Click here for my Web Store:    


NOTE:  I've also added this card to to Kats Scrapiness Blog Challenge following a comment by Buffy Kramer on my card.  Thanks so much! 


Saturday, April 13, 2024

Atlantic Hearts Sketch Challenge #572:

April has sure been living up to its reputation for rain showers but it's been really on the cold side which isn't normal for this time of year.  

Our townhouse complex is being re-roofed and our unit is one of the first to be done so there is a lot of pounding, things dropping and general chaos as the work progresses.  I am however thoroughly "over the roof" that it's finally getting done!  Unfortunately with the lack of sunshine its a slower go than one would expect. Today I'm excited to share a "new to me" sketch challenge called Atlantic Hearts Sketch Challenge.  It was recommended to me by my stampin' bestie Sheri, who often participates in their weekly challenges.  Her comment was this is a great challenge site because the design team give lots of feedback and there are always fun challenges.  Well that was enough to get me looking.  

Here's the Sketch Challenge Atlantic Hearts #572: 


Here's My Card:  

I'm continuing to make Anniversary cards and this one is quite elegant.  It began with an 8 1/2" x 5 1/2" Crumb Cake card base that was scored at 4 1/4".  A layer of Gorgeous Grape measuring 4" x 5 1/4" was added next and followed by a beautiful sheet of Perennial Lavender designer series paper.  I love the artistry of these papers.  

For the oval on the card sketch I chose a floral oval wreath from the retired Eden dies.  I debated about using a purple toned cardstock for the oval, however decided to use basic white to tie it in to the beautiful flowers in the dsp.  I'm glad I did as it lent a folksy whimsical look to the card.


At the top of the wreath oval I added some Gorgeous Grape and Lost Lagoon lavender sprigs and a Lost Lagoon taffeta ribbon.  I also randomly placed fine Purple Shimmer Gems to add some sparkle.  The Happy Anniversary sentiment was stamped with Versamark and Lost Lagoon inks and heat set with Clear Embossing Powder.  

This was a fun and easy card to make because the oval die and the designer paper made it come together quickly.  Please let me know if you liked this card, I love to get feedback.  Be sure to pop over to the Atlantic Hearts Sketch Challenge blog and take a look at the beautiful card entries for this week's challenge.

HAPPY STAMPING!
PENNY TOKENS STAMPIN' SPOT

Penny Hanuszak, CDN Stampin' Up Demo since 2006


Last Chance Annual Catalogue List 
Last Chance Mini Catalogue List

Sale Begins April 9th to 30th

Click here for instructions on how to apply the hostess code 


Sunday, January 21, 2024

Watercolor Melon

I liked this sketch challenge from Freshly Made Sketches so decided to make a card featuring the Sale-a-bration stamp set Watercolor Melon.  

Here's The Sketch: 

Freshly Made Sketches #619

Here's My Card:


Stamp Sets:     Watercolor Melon

Cardstock:        Whisper White, Sweet Sorbet

DSP:                 6 x 6 Designer Series Paper 2021-2023 Series (Sweet Sorbet,                            Lemon Lime)

Ink:                  Garden Green, Granny Apple Green, Momento Basic Black 

Hope you enjoyed this card 


HAPPY STAMPING!
PENNY TOKENS STAMPIN' SPOT
Penny Hanuszak, CDN Independent Stampin' Up! Demo


Sunday, October 30, 2022

Rocky Raccoon meets FMSC #559

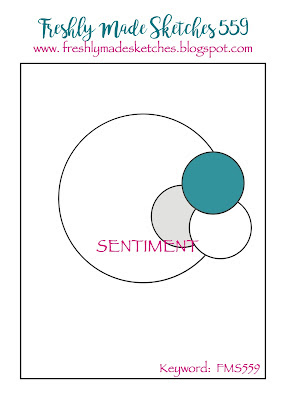
I really like having a sketch challenge to give me inspiration for creating a card, so I thought I'd play along with Jen Timko over at Freshly Made Sketches challenge #559.

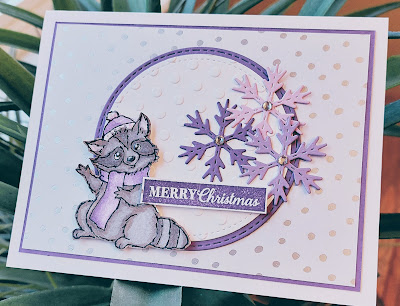
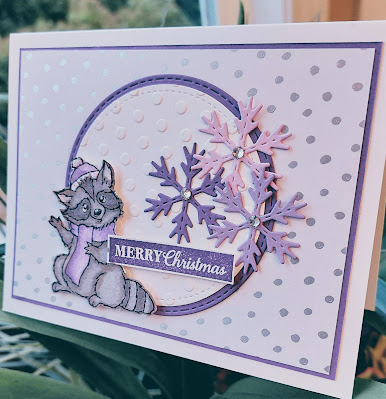
Here's My Card:
As I've mentioned before, we live on the edge of the Discovery Trail forest in Abbotsford. With the drought this summer we've had a lot of animals accessing our property looking for water and food and recently we've had recurring visits from three raccoons.  They aren't shy and visit during the day and late evening drinking water from the base of my plant pots and scooping up grubs along the concrete edge.

This threesome is probably a mother and her two juveniles and they aren't afraid of us. So far they haven't touched or broken anything, on their visits. For our part, we don't feed them, handle or encourage them in any way, we just watch and enjoy their brief visits. 
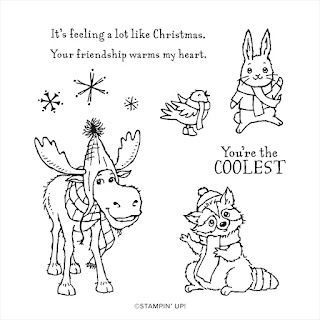
All Bundled Up 8 piece red rubber cling stamp set from the July -  December Holiday Mini catalogue. 

When I was deciding what elements to use for this sketch challenge I was influenced by these raccoons and to use the sweet little raccoon image in the All Bundled Up stamp set.   Just look at this little "Rocky Raccoon", too cute! 


Stampin' Up! Products Used:

Stamp Sets:

  • All Bundled Up Stamp Set 
  • Checks and Dots Embossing Folder for Circle 

Card Stock and Paper:  

  • Whisper White 8 1/2 x 5 1/2" for the card base, scored at 4 1/4".  A 4" x 5 1/4" piece for the inside of the card.  A 3" circle for the card front and a scrap for the white snowflake die cut.
  • Highland Heather - 4" x 5 1/4" mat for card front, 3 1/4" scrap for circle mat on card front, Scrap for the snowflake die cut. 
  • Gorgeous Grape - small scrap for snowflake die cut 
  • Specialty Paper:  3 3/4" x 4" piece of Silver and Gold DSP (retired from  July Sale-A-Bration 2022) for mat layer on card front,

Ink:
  • Momento Ink for Raccoon
  • Gorgeous Grape for the "Merry Christmas" sentiment (from retired All That Glimmers)
  • Stamping Blends:  Light and Dark Smokey Slate, Light and Dark Highland Heather, Light Flirty Flamingo, 
  • Nuvo Drops clear for nose and eyes
Dies:
  • Snowflake is from Celebrations Tag Dies #159866
  • Circles are from retired Stitched Circles die set.
  • The Merry Christmas tag was hand cut with scissors.  

Well that's it for this FMSC #559 sketch and I hope you've enjoyed my rendition.  Let me know your thoughts on this stamp set and my cards.  Very appreciated.

Happy Stamping!
Penny Tokens Stampin' Spot


Penny Hanuszak, CDN Independent Stampin' Up! Demo


Wednesday, October 5, 2016

WWC88 - Heidi's Sketch Challenge

  This week at the Watercooler our awesome and talented Heidi Weaver is presenting us with a great sketch challenge, and we encourage you to join in.  

The great thing about sketches is that you can interpret them in your own way, provided they 
have some resemblance to the original sketch.


Here's My Card: 
I took a bit of creative license with my take on Heidi's sketch for this week's challenge by omitting the scalloped circle element and substituting it with my family of bears.  I also used the background trees to replace the splatter. 
Supplies:
Stamp Sets:  Bear Hugs, Time of Year, Thoughtful Branches, Cookie Cutter Christmas
Card Stock:  Cherry Cobbler, Very Vanilla and Garden Green card stock
Paper:  This Christmas Specialty Designer Series Paper
Inks:  Cherry Cobbler, Garden Green, Soft Suede, Crumb Cake 
Accessories:  Big Shot, Trimmer, Dimensionals, Tom Bow Glue, Holly Embossing Folder, Bear Hugs Framelits, Bunch of Banners Framelits and Balloon Framelits 

When I saw the ribbon candy designer paper included in the "This Christmas" DSP pack it took me back to my youth, reminding me of the beautiful Norwegian knit sweaters we saw in the store windows at Christmas time.  I thought it would be fun to dress up these bears in that design and I was thrilled with the end results.   

Assembly:

1. The card base is a piece of 8 1/2" x 5 1/2" Cherry Cobbler card stock that was scored at 4 1/4". 
2. The Garden Green layer measures 5 1/4" x 4"
3. The Very Vanilla layer measures 5" x 3 3/4".  The three trees from the Thoughtful Bunch stamp set were stamped randomly and overlapping in the center of the card.  Three Rhinestones were attached to the top left hand corner.
4.  The three Bears were stamped on Very Vanilla card stock with Momento Tuxedo Black Ink. NoteI stamped and cut a second large bear image for the Mama bear.  The images were cut out using the Bear Hugs Framelits and they were sponged with Crumb Cake and Soft Suede inks.
For these next few pictures you won't see any sponging or colouring on the bears.
This adorable stamp set is available in the Annual Catalogue

These are the matching Framelits

5.  To make the sweaters for Papa and Baby Bear, I used some small scraps of designer paper and cut out just the sweater part with the Bear Hugs Framelits.  

For Mama Bear's dress I cut out the skirt Framelit using the same designer paper and I used a large scallop circle and a 1/2" circle punch to make the top of her dress and Baby Bear's collar.


In this photo, you can see the sweaters don't actually fit the bears well.  In Papa Bear's case, the neck is too high and the sleeves too long.  Not too worry though, as I adjusted the sizes easily by trimming away the excess dsp from the collar area and on the arms.

The arms of the sweater were trimmed back and cuffs and collars cut from small strips of Cherry Cobbler card stock were attached with adhesive. I added the bow tie from the Bear Hugs Framelit set

In this picture you can see that I actually reversed the onsie.  The collar for the onsie was made by cutting a 1/4 circle with the 1/2 circle punch.  The scallop circle for Mama Bear's outfit was attached with dimensionals and in the final version has a pretty green bow cut using the Balloon Framelit Dies


 6.  Once the clothes were adhered to the bears I used adhesive to attach the Papa bear to the left of the trees.  I used Dimensionals to attach the Mama Bear and her image overlaps the Papa Bear.  I used double mounted Dimensionals on the Baby Bear so you can tell he is out front.  

7.  The Christmas Banner was stamped with the Time of Year stamp set and cut out with the Bunch of Banners Framelits.  Love those banners.  It was mounted with Dimensionals.

8.  If you look at the sketch, there isn't a panel on the bottom of it, but I managed to get ink on the bottom of my Very Vanilla card stock, so covered it up with a 1" x 4" piece of Garden Green card stock that was embossed with the Holly Embossing Folder.  My goof up actually worked out nicely as this additional piece of card stock seemed to anchor the picture.  

9.  Three Basic Rhinestones were added to the top left hand corner of the card front.  

9.  For the inside of the card I cut a 5 1/4" x 4" piece of Very Vanilla card stock and stamped the sentiment "Warm Heartfelt Greetings for a Very Merry Christmas" in Cherry Cobbler ink.  The sentiment was from the Cooking Cutter Christmas stamp set.  A 1/4" strip of dsp was added to the right side of the panel. 


This was a really enjoyable card to make, so hats off to Heidi for a great sketch challenge this week!  I hope you enjoyed my version of it and will leave me a comment.   Hopefully my small tutorial will be of help if you decide to make sweaters for your bears 


Don't forget to check out the rest of the Watercooler Wednesday design team's cards.  They are truly wonderful.

Happy Stamping!
Penny Tokens Stampin' Spot  

Last Free Shipping of the Year - December 9, 10 11, 2024

Heads up, it's time for the last FREE SHIPPING promo of the year! From December 9–11, you can shop and save on all qualifying orders of...