Showing posts with label Christmas Card. Show all posts

Sunday, October 13, 2024

Winter Birds AHSC #598

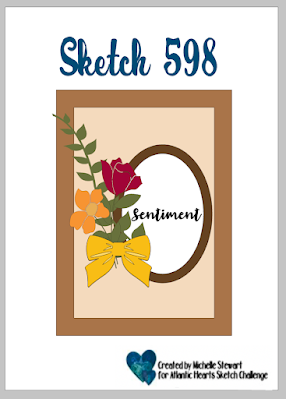
This week's sketch at Atlantic Hearts Sketch Challenge was designed by Michelle Stewart  Here is the sketch:
HERE'S MY CARD:

Today's card came together really quickly because I had all the elements on hand.  It was simply a matter of gathering the birds and leaves from the Nested Winter designer series paper and the background DSP and deciding on the sentiments to use.  


Supplies:

Stamp Set:
  • Greetings of the Season #164325
Card Stock and Paper: 
  • Crumb Cake 8 1/2 x 5 1/2 scored at 4 1/4 for card Base and scrap for Oval.
  • Whisper White cut two 4" x 5 1/4" for front mat and inside panel and scrap for 2 1/2" oval
  • Nests of Winter DSP 3 7/8" x 5 1/8" piece of Coastal Cabana with snowflakes, birds and leaves 
  • Scraps of Garden Green for leaves 
Accessories: 
  • Framed Florets Dies 1600623 (R) for Crumb Cake Oval
  • Opaque Faceted Gems  #162979 in Pool Party
  • Bow in Cherry Cobbler
  • Small paper snips for fussy cutting
I hope you enjoyed today's card.  It's another one for my Christmas stash. I'd love to hear what you think of the Nests of Winter designer paper.  I didn't purchase the stamps and dies that coordinate with this paper as I felt the paper design itself would be enough to create some great cards, and I was not disappointed.  


HAPPY STAMPING!
PENNY TOKENS STAMPIN' SPOT 

Penny Hanuszak, CDN Stampin' Up Demo Since 2006


Sunday, October 30, 2022

Rocky Raccoon meets FMSC #559

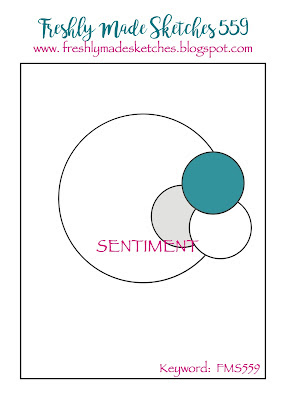
I really like having a sketch challenge to give me inspiration for creating a card, so I thought I'd play along with Jen Timko over at Freshly Made Sketches challenge #559.

Here's My Card:
As I've mentioned before, we live on the edge of the Discovery Trail forest in Abbotsford. With the drought this summer we've had a lot of animals accessing our property looking for water and food and recently we've had recurring visits from three raccoons.  They aren't shy and visit during the day and late evening drinking water from the base of my plant pots and scooping up grubs along the concrete edge.

This threesome is probably a mother and her two juveniles and they aren't afraid of us. So far they haven't touched or broken anything, on their visits. For our part, we don't feed them, handle or encourage them in any way, we just watch and enjoy their brief visits. 
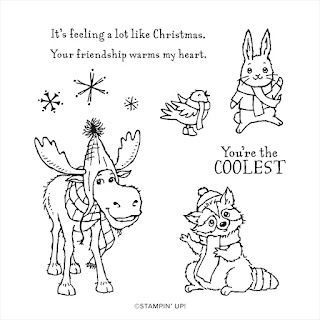
All Bundled Up 8 piece red rubber cling stamp set from the July -  December Holiday Mini catalogue. 

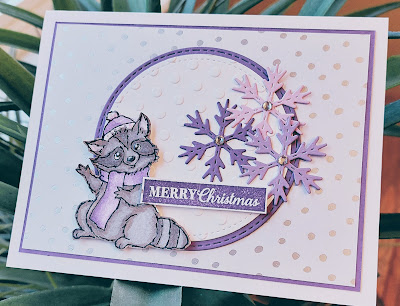
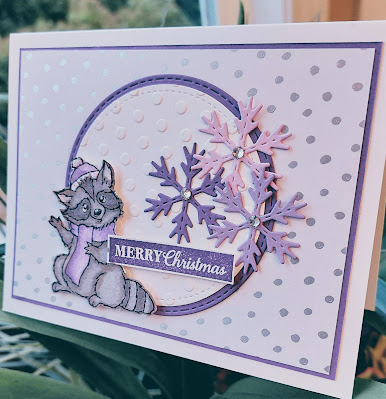
When I was deciding what elements to use for this sketch challenge I was influenced by these raccoons and to use the sweet little raccoon image in the All Bundled Up stamp set.   Just look at this little "Rocky Raccoon", too cute! 


Stampin' Up! Products Used:

Stamp Sets:

  • All Bundled Up Stamp Set 
  • Checks and Dots Embossing Folder for Circle 

Card Stock and Paper:  

  • Whisper White 8 1/2 x 5 1/2" for the card base, scored at 4 1/4".  A 4" x 5 1/4" piece for the inside of the card.  A 3" circle for the card front and a scrap for the white snowflake die cut.
  • Highland Heather - 4" x 5 1/4" mat for card front, 3 1/4" scrap for circle mat on card front, Scrap for the snowflake die cut. 
  • Gorgeous Grape - small scrap for snowflake die cut 
  • Specialty Paper:  3 3/4" x 4" piece of Silver and Gold DSP (retired from  July Sale-A-Bration 2022) for mat layer on card front,

Ink:
  • Momento Ink for Raccoon
  • Gorgeous Grape for the "Merry Christmas" sentiment (from retired All That Glimmers)
  • Stamping Blends:  Light and Dark Smokey Slate, Light and Dark Highland Heather, Light Flirty Flamingo, 
  • Nuvo Drops clear for nose and eyes
Dies:
  • Snowflake is from Celebrations Tag Dies #159866
  • Circles are from retired Stitched Circles die set.
  • The Merry Christmas tag was hand cut with scissors.  

Well that's it for this FMSC #559 sketch and I hope you've enjoyed my rendition.  Let me know your thoughts on this stamp set and my cards.  Very appreciated.

Happy Stamping!
Penny Tokens Stampin' Spot


Penny Hanuszak, CDN Independent Stampin' Up! Demo


Monday, October 26, 2020

Five Ornaments in a Row for Freshly Made Sketches #458

Kim designed this week's sketch #458  at Freshly Made Sketches and it had me really thinking this week what I would create.  Keeping in mind the FMS clean and simple themes, I wanted to make a Christmas card with clean lines.  Here's their sketch:

Here's My Card:

I wanted to fill out the five rectangles in my design with either a small Christmas stamp image or use coordinating papers.  As luck would have it I found a 6 x 6 piece of retired Stampin' Up! Designer series paper in my stash that would meet my needs.  I really liked the very delicate holly and bauble patterns on this paper and the red and green colour mix was just what I was looking for.  Perfect!   


I was able to cut out five baubles from  the design that were small enough to work as my focal point for the center panel.  I decided to match up the green and red in t he paper design with Real Red and Garden Green card stocks and threw in a layer of gold foil between the two to add some elegance to the card.    

I really liked the sprigs of mistletoe in the background of the paper, but not having a mistletoe stamp, I pulled out my retired SU Holly Embossing Folder (one of my all time faves) and I think it worked perfectly in adding some interest to the green layer.  


Supplies:

Card Base:  I used 8 1/2" x 5 1/2" Whisper White card stock for the base and scored it at 4 1/4".

Layers:  There are three layers on the card front.  The first is a 4 1/4" x 3 1/4" piece of Real Red card stock, followed by a 4 1/8" x 3 1/8" piece of gold foil and a 4" x 3" piece of embossed Garden Green card stock.

Ornaments:  I used my trusty 1" square punch to cut out the baubles and then added a 1 1/8" x 1 1/8" layers in Real Red or Garden Green.  The layering just brings these little baubles into a clearer focus and makes them stand out on the card.   

Stamps:  The sentiment "Merry Christmas" is from the Christmas Gleaming cling stamp set #150464.  I used my stamperatus to hold my scrap of Whisper White in place while I was stamping the sentiment in Real Red ink.  I find that this type of solid stamp looks best if it's stamped a few times to enhance the colour.  I fussy cut out the sentiment leaving a very narrow strip of white around it and then mounted it just below the baubles adding four mini dimensionals to the back.  I'm so happy that this set, coordinating ornament punches and designer papers made it into the Annual Catalogue this year.  This was one of my all time favourite Christmas bundles last year and I know I'll be hard pressed to part with it.  

Inside of Card:  For the inside of the card I cut a 4" x 5 1/4" panel of Real Red card stock and layered it with a 3 3/4" x 5" piece of Whisper White card stock.  The sentiment "May your days be merry and bright" is from a soon to be released stamp set called "Curvy Christmas".  Oh my is this a fun set and I can't wait to share some more samples using the dies and stamps from this bundle.  To finish the inside layer I stamped a small bauble in Real Red from the Christmas Gleaming set in the bottom right corner.  


So what do you think?  This was a super simple card to create and I hope you like it as much as I do.  What are your favourite stamp sets this holiday season?  Please leave me your comments, I'd love to hear from you.

Happy Stamping!

Penny Tokens Stampin' Spot

Penny Hanuszak, Independent Stampin' Up! Demonstrator 


October Hostess Code:  MM72ZPM

This hostess code will end at noon on October 30th, so don't miss out.  If you have an order under $200 CDN apply the Hostess Code and I will send you a free gift.  If your order is over $200 before shipping and tax, don't apply the code you will receive your own stamping  rewards.  


NOTE:  My post was not included in the FMS #458 post today because I keep forgetting it closed at 3pm EDT.  I was thinking it closed on MT.  Hopefully the next time I do one of their sketches I can do it earlier in the week.  


Wednesday, February 28, 2018

WWC#159 - Marsha's "All About Christmas" Challenge

Hi Stampers.  Thanks for dropping by for the Watercooler Wednesday Challenge which is being hosted by Marsha and is "All About Christmas".  It's never too early to get working on your cards for next season and to that end, Marsha is challenging you to build your Christmas stash by making a card and posting it on this site.
Once you've made a card just snap a picture of it, post it on your blog, Facebook or other Social Media site, and then add your link to our LINKSKY at the bottom of our challenge page. The WWC158 Challenge is open until 5:00pm Mountain Time Monday March 5th, 2018.

Here's My Card:
My project for this week involves a very simple fun fold technique that creates an amazing WOW card.  This card is called a Bridge Fold and it's one of those cards that can be dressed up or down and used for any occasion.  Here's mine:

Supplies:
Card Stock: Whisper White 
DSP:  Merry Little Christmas (R Holiday2017)
Specialty Paper:  Silver Foil 
Accessories:  Paper Trimmer, Big Shot, Silver Foil Christmas Stickers from Simply Creative. Home Town Greetings Edgelit Dies, Dimensionals, Foam Tape,
Detail Scissors.

Details:
The Bridge Fold card makes for a terrific WOW card and can be made with many variations. The bridge piece can be made wider, it can be decorated, it can even be made with a window sheet so it's transparent and there are also different sizes of cards. 


Whatever style you choose, the Bridge Fold is simple to make and very impressive to look at. And, last but not least, the best part of all is that you can make two cards from one sheet of 8 ½” x 11” cardstock. It folds flat and can be sent in a standard A2 envelope. Gotta love that!
 

1. Cut base card stock to 8” x 4 ¼” and score at 1 ¼”, 2 ½” 5 ½” and 6 ¾”.


2. Cut four 1” x 4” pieces of card stock for mats.  I used Silver Foil. adhere to the two sides of the card base.

3. Cut four 3/4" x 3 3/4" strips of DSP and adhere to Silver Foil Mat.

4. Cut a 2 3/4" x 4" Silver Foil Mat for center of card and adhere.

5.
Cut a 2 1/2" x 3 3/4" piece of DSP and adhere to the Silver Foil Mat. Note: If you just intend to stamp a sentiment or write a note sub out the DSP for Whisper White card stock or colour of your choice, and do stamping or writing before attaching the bridge.


For the inside panel I cut out images from the Home Town Greetings die cut set.  The church and house were attached to the backing with glue after silver foil inserts were added to the back of each of the buildings.  there are two rows of buildings and the second or outer one was mounted with Foam Tape. I used store bought silver stars and sentiments from Simply Creative and attached them with Tear N tape. 
6. For the bridge cut a 5 ½” x 1 1/4"” strip of Silver Foil Card Stock and a 1" x 5 1/4" strip of DSP adhere together.

For my bridge I cut out a wintery scene with the Home Town Greeting dies and positioned it over the DSP after attaching silver foil to the backs of each of the houses.  
7. To mount the bridge strip to the card base fold the left hand side of the card so that the outer flap is facing outwards.  Measure up from the bottom of the card for whatever placement you want and then adhere the strip only to the front left panel.

8.  Open up and lay the center and right side panels face up and attach the right side of the bridge strip to the last panel on the right. Note: The bridge panel is only attached to the far left and far right panels. Because this is the way the card will open and shut, I used Tear N' Tape to secure.

9.  The back of the card has ample room for writing a message.  Personally I would layer a Basic Black and Whisper White  panel using the same dimensions as in #5 and attach it to the back. This panel would be my sentiment and my message or I could make a slot to attach a gift card.   Like I said the possibilities are many.

Back view of the card showing ample room for adding a sentiment or a pocket to hold a gift card.  See my note above about adding mats.
And that's all there is to it folks. This is a fun card and there are lots of examples on Pinterest and You Tube. I hope that you enjoyed my Christmas Bridge Card and will leave me a comment about it. Let me know if you've ever made one and if so how did your dimensions very from mine. Were they the same or larger.

If you came straight here and haven't taken the time to see the other Watercooler Wednesday Design Team members creations just click here to go to the challenge.  All the rules for using the Linsky are on that page too.

Before I go I also want to share the sad news that Judy Markowitz has left our design team because of family health issues.   I personally am going to really miss Judy's originality and creativity, but hope that she'll still join in on the challenges when she gets a chance.  

In Judy's place, we are welcoming Tenia Nelson to our group of Watercooler Artists.  Tenia hails from Denver, Colorado and we've been wowed by her edgy and eye-catching creations in previous challenges.  


Happy Stamping!
Penny Tokens Stampin' Spot 

Wednesday, November 29, 2017

Watercooler Wednesday Challenge #147 - Charlotte's "Anything Goes"

Welcome to this week's Watercooler Wednesday Challenge, hosted by Charlotte.  This challenge is open to any theme or project - no holds barred.  What fun!

We hope you'll join us in the fun and enter one of your own creations.  You could be our next "Rock Star" winner.   All you have to do is make a card or project - any theme is okay - and  link it to our site via your post and follow a few simple rules.  All the stuff you need to know about playing along is located on the Watercooler Wednesday Challenge Main Page.  Our Linksy is open until 5:00pm on Monday December 4th, 2017.

Here's My Anything Goes Project:
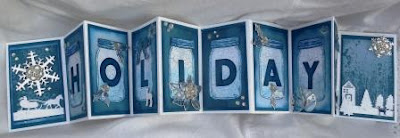
Thanksgiving is behind us now and I'm switching to Christmas mode this week. My husband spent Black Friday getting the outside of the house decorated while I was inside lugging out the Christmas ornaments.  One of the things that was missing from my collection of Christmas paraphernalia was a Christmas mantle piece, so for this week's challenge I decided to make an Accordion Card featuring the word "holidays".  

The above picture shows the deck of card sized accordion card I made all bundled up in it's belly band and here it is unfolded: 


Supplies: (All products are Stampin' Up! unless noted)

Stamps: Merry Patterns (Hostess Promo 144973), Merry Little Labels(144795), Jar of Love (141587)

Ink: Dapper Denim, Pacific Point
Card Stock: Whisper White and Dapper Denim
DSP/Specialty Papers:  Color Theory Pack (144193), Silver Foil (132178)
Accessories:Big Shot, Paper Trimmer, Tom Bow Glue, Dimensionals, Sticky Strip, Glitter Enamel Dots (144200), Clear Faceted Gems (144142)
Big Shot Accessories:  Stitched Shapes Thinlets (145372), Card Front Builder (144674), Home Town Greetings Edgelit Dies (144671), Lots of Labels (138281), Sleigh Ride Edgelits (139670 Retired), Everyday Jars (1414900
Non Stampin' Up Accessories:  Tim Holtz Snowflakes 661599, EK Tools Alphabet 54-80032, EK Tools Christmas 54-80018


How It's Made:

All of the details and measurements needed to make an Accordion Fold card are listed in my November Creative Circle Blog hop post so I won't repeat them here. Just click on this link for the details.

To make this Accordion Fold card I began with Whisper White and Dapper Denim card stocks for my card base and first layers. I super liked the way the Color Theory Designer Series paper worked out in my Thanksgiving Accordion fold, so I chose the Dapper Denim coloured papers from this paper pack for my DSP layers. I especially liked how the blue crackle design paper worked perfectly for show casing the mason jars from the Everyday Jar stamp set.

The hardest part of making this Accordion Fold card was deciding what word to showcase and how I wanted the alphabet letters to be displayed.  My  display only had room for an 8 letter word so "holidays" worked for me.  


I also chose to go with the mason jars from Everyday Jars because they conjured up all kinds of ideas for displays like mini lights or candle holders.  To get that effect I sponged Dapper Denim ink around in the middle of the jars and then added glimmer swirls to catch the light and look like tiny lights.  Here's a look at the individual sections of the card.
 
This is the belly band that holds the Accordion Card together when not on display.  I also set it to the side of card on my mantle because it adds to the overall decoration.  When designing this cover, I tried to incorporate all the elements of the accordion card - the deer, houses, mason jar etc.  See my supply list for the wide array of die cuts I used in this project.  I also used a ton of basic rhinestones, silver foil and glimmer. 

This is a back view of the Accordion Card in the Belly Band prior to my adding the "Let It Snow" tag.  To make it look finished and professional, I covered the back side of the tag with  a Dapper Denim layer cut out with the Lots of Labels  die cut. 


In this view you can see what the back of the Accordion Fold card looks like.  I added card stock and dsp to the two end pieces, because they are the front and back sides that show when the card is folded and held in the belly band. 

I really like how the Dapper Denim dark crackle design paper adds such a cool effect to this back panel.  I stamped the "Let It Snow" label from the Merry Little Labels set in Dapper Denim ink and added glued it flat to the back panel. 
The first panel features a horse and winter sled from an old SU Edgelit set called "Sleigh Ride".  This die cut works perfectly with the Home Town Greeting Edgelits I used on the front and back panel of this card.  The large snowflake was cut out using the Tim Holtz snowflake dies and I've added a rhinestone accent to the center. 

Each of the panels and the alphabet letters have been sponged around the edges with Pacific Point ink to add some depth.  The jar lids were stamped in Dapper Denim ink on Whisper White and I've added glimmer to give them some sparkle.  The beautiful foil poinsettia, holly leaves and Christmas baubles come from an EK Tools Die cut set called Christmas.  I've also added lots of basic rhinestones, glitter enamel dots and faceted gems to each panel for added bling and blitz.  What fun!
I love how the last panel turned out.  The scene is comprised of various die cuts from the Home Town Greetings and Sleigh Ridge Edgelits.  The Color Theory background paper added to the overall feel of a cold frosty night.  
Well that's it for this week's challenge.  I hope you liked my Accordion Fold Card and that you'll try this out yourself.  It's really a lot of fun deciding what will go on each panel.  Let me know how you like this one, I love receiving your comments.  And, as always before you go make sure you check out the other projects submitted by our wonderful Watercooler Wednesday Design Team Artists.  You won't be disappointed. 
 

Happy Stamping!
Penny Tokens Stampin Spot

Wednesday, November 22, 2017

Watercooler Wednesday Challenge #146 - Kath's "All About Christmas"

Hi Stampers!  Welcome to this week's Watercooler Wednesday challenge hosted by Kath. Kath is challenging you to make something related to Christmas.  Let me tell you, this  is one of our most popular challenges, especially at this time of year when every stamper is rushing to finish off their Christmas card stash. 
We hope you'll join us in the fun and enter one of your own creations.   All you have to do is make a Christmas themed card or project and link it to our site through your post and follow a few simple rules.  All the stuff you need to know about playing along is located on the Watercooler Wednesday Challenge Main Page.  Our Linksy is open until 5:00pm on Monday November 30th. 

Here's My "All About Christmas" Card:


Supplies:
Stamps:  Merry Little Patterns 
Ink:  Momento Tuxedo Black
Card Stock:  Basic Black, Whisper White

DSP and Specialty Papers:  Silver Foil, Merry Little Christmas DSP
Accessories:  Big Shot, Paper Trimmer, Stitched Shapes Circle Dies, Stitched Rectangles (Memory Box), Basic Rhinestones, 10" strip of 1/4" black satin ribbon, Dimensionals, Tom Bow Glue.


Some Details:
1.  Card Base is a 4 1/4 x 11" piece of Basic Black and score at 5 1/2".

2.  Cut a 4 1/8" x 5 1/4" piece of Silver Foil for first layer.  Note:  I don't like to waste my precious stash of foils so I always cut out something from the center of one of these layers.  In this case it was a 3" x 3 1/2" rectangle. 

3.  Cut a 4" x 5 1/8" piece of Merry Little Christmas DSP for the 2nd layer. 

4.  For the circles I began by cutting a 3" circle from  Basic Black followed by a Silver Foil and DSP layer.  I used a combination of the Stitched Shapes circle dies and old Circle dies for these layers.  The circles were glued together and then glued to the card face on the left hand side.  I also added a 10" length of black satin ribbon on this side of the card.  

5.  I stamped the beautiful deer from the Merry Little Patterns Hostess Stamp Set that I received for free in September, on a 2" x 3" piece of Whisper White.  This rectangle was cut out with the Stitched Rectangles Die.  I stamped a second image on a scrap of Whisper White and cut it out to layer on the first one with Dimensionals.  

What a fun image to play with.  Most of the stamps in this hostess set are 2-step stamps.  First you stamp a beautiful line image of the deer and then you ink up a "filler" stamp and re-stamp to add the sweater. The great thing about the filler stamp is that you can ink it up with whatever colour you want.  What fun! 


This panel was attached to the circle and card base with Dimensionals.  I had to stack two Dimensionals together to raise the rectangle in height so it was evenly mounted.  I stamped the "Merry Christmas" from the Merry Little Patterns set on Whisper White and mounted it on Basic Black.  The silver foil snowflake is from an old die set I had. 


7.  The inside of the card was finished simply by stamping another 2-step stamp, the "tis the season" stamp in Momento Tuxedo Black ink on a 4" x 5 1/4" panel of Whisper White card stock.  Beautiful imagery!
Thanks for coming and checking out my card today.  Hope you liked it as much as I do.  As always, I love to hear your thoughts on my creations as it gives me inspiration to keep on doing this blog.  Don't forget to check out the wonderful creations of the other Design Team Artists by clicking here


Happy Stamping!
Penny Tokens Stampin' Spot

Black and White Anniversary - FMS #669

I'm up for another sketch challenge card, how about you?  Narelle Farrugia is the sketch designer for  Freshly Made Sketches #669  this...