Showing posts with label fancy fold card. Show all posts

Thursday, February 29, 2024

Cascading Folds Fancy Fold Cards

Have you ever received a handmade card from a fellow stamper that leaves you speechless and wanting to craft?  That's what happened when I opened this beautiful birthday card made by my friend Debby Evoy. Honestly when I pulled it from its fancy envelope,  I just stood there checking it out for at least 5 minutes. It was the prettiest card I'd received and I didn't want to put it down.  

What impressed me so much about this card?  Well, what didn't!  I loved the double tone cardstock layers and mix for the branches. And, I was really taken with the Perennial Lavender designer series paper layers. The focal point florals, tiny butterflies, amethyst gems (my birthstone) and lovely draped folds captured and held my attention. Honestly, opening this special fancy fold card was truly a WOW, WOW, WOW moment for this cardmaker. Thanks Deb for making my day special! 


Prior to Debby's card arriving I had a couple of cards in the works, that were  inspired by posts on Youtube and Pinterest. This fancy fold card style comes in a variety of names.  It's most commonly referred to on social media as a Cascading Pleat or Three Panel Fold Card.  There are also a variety of sizes and orientations.  One thing all of these cards have in common despite their different names and sizes, is they have easy to follow directions and there are many beautiful samples to inspire you. 

I reviewed a lot of different posts and samples before I made my cards, but my favourites were those demonstrated by Lesly Kilby of the UK, Tami White, Dawn Griffith, and Susan Camfield (Suestampfield).  Sizes and measurements on each of their posts.   

Here Are My Cards:  
I was making a get well card for a very sick friend and wanted something special.  Because I wanted to send some positive vibes I chose the Sunny Days 12 x 12 Designer Series Paper and the Brighter Skies stamp set to achieve this. 

My moods are highly influenced by colour so I wanted to project a soft and soothing background for my get well card.  The colour mix of Pool Party, Shaded Spruce, Smokey Slate and Whisper White in the Sunny Days dsp provided that  soothing feel. Also raindrops, clouds, and rainbow designs when mixed together were very cheery. 

This is a back view of the card base showing a better view of the cascading pleats. I scored and cut the card base, all the mats and DSP layers and did the sentiment stamping before I started assembling the card.  It came together very quickly.


This picture shows the front panel, that began with a piece of cloud covered dsp followed by a mat of Pool Party cardstock. The rain drops on the whisper white mat were stamped in Smokey Slate.  The raindrop stamp and the sentiment are both from the Bright Skies #162787 stamp set. I finished this panel by adding 5 pool party opaque faceted gems and although you can't see it I used Wink of Stella to add some shine to the raindrops. 

For the second or middle panel I adhered a piece of raindrop dsp.  When I planned the layers for this card I decided to stamp this adorable bunny from the "Playing in the Rain stamp set. This character has just the right amount of positivity and cheer to make my "feel good" get well card.  The image was coloured with Petal Pink, Smokey Slate and Pool Party Stampin' Up! blends 

The Playing In The Rain Stamp Set #160542 coordinates beautifully with the Bright Skies #162787 stamp set and dies #162793.  It's available in the current Annual Catalogue on page 60. 

This cool rainbow dsp was adhered to the inside panel of  the card.  added a smaller mat to the center so that the dsp would be the spotlight on this panel.  The "get well wishes" stamp is from the retired Petite Pairs stamp set which retired years ago and the umbrella is from the Playing in the Rain stamp set.  

HERE'S MY SECOND CARD SAMPLE: 

My second Cascading Pleat card is for a friend's masculine milestone birthday. He loves carpentry and Mr. Fix It stuff, so I know he'll love this one.  

This card was made in the landscape or horizontal orientation mode.  Although the card is assembled in the same way as my first card, the measurements are quite different and I had to make adjustments to the PDF instructions I was following.  

The tools were fussy cut from the free Sale-a-bration 12 x 12 designer called Trusty Toolbox. I used some dies from the Trusty Tools bundle on page 56 of the January Mini Catalogue.  I love the pegboard background die and the toolbox.  Both are easy to cut and or assemble.   

Another great stamp set I used from the Sale-A-Bration flyer was called Heartfelt Hellos.  I can't tell you how many cards I've made using the Enjoy Your Day sentiment over the past two months and I'll be sad to see it retired at the end of February. In fact I wish this one would carry over into the next catalogue season. 

The birthday sentiment and cake stamps on the middle panel are from the Hey Chuck stamp featured on page 49 of the Annual Catalogue.  Both were stamped in Smokey Slate ink, on the Whisper White banner.  I used the Nested Essentials Die set to die cut the banner for this focal point as well as some silver foil nuts and a screw from the Trusty Tools dies.  


Well that's it for today and I hope you enjoyed both of my versions of the Cascading Pleat card. I'll be making and giving away more of this style of card in future because it was so much fun to make.  All you need to make this card is a good mix of dsp and coordinating cardstock.

I hope you'll give this fancy fold a try, you're sure to find it easy to make.  I suggest you watch any of the crafters videos on YouTube first so you can get the full cutting instructions and see how the cascading fold is created.  

Let me know how whether you've tried to make a Cascading Pleat card or would like  to try it out.  I love to receive your comments and hear or see what you're creating.  Cheers and have a good week.   

HAPPY STAMPING!
PENNY TOKENS STAMPIN' SPOT

Penny Hanuszak, CDN Independent Stampin' Up! Demo since 2006

Shop My  24/7 Online Store 


Wednesday, March 10, 2021

Hey Chick Birthday Waterfall Card

A tour of my yard this morning revealed that Spring is definitely on it's way.  Despite a few frosty mornings this week, I spyed three hardy clumps of snowdrops and a patch of hellebore in bloom in my front flower beds. If it warms up a bit more before the weekend, I think I'll plant some primroses to add some colour to the beds.

Snowdrops are known as the "harbinger" of Spring.


Red Racer Hellebore also known as Lenten or  Easter Rose 

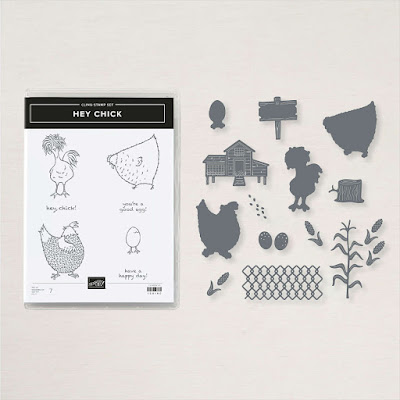
Speaking of Spring things, have you seen all the "Spring Chicken" cards that have been appearing on Pinterest and Youtube sites?  They feature two Stampin' Up! early release stamp and die bundles called Hey Chick and Hey Birthday Chick
What fun!  

The Hey Chick Stamp Set was originally released during the 2017 Sale-a-bration promotion and proved to be one of the most popular stamp sets that year. It is very seldom that Stampin' Up! will release a stamp set but from all the demonstrator feedback they received they've done just that. Not only have they re-released Hey Chick as a 7 piece cling stamp set but they've also paired it with 19 coordinating Chick Dies. You can purchase them from my On-line store as a Hey Chick Bundle. or if you already have the Hey Chick stamp set from 2017 you can purchase the dies separately.


And, as if that's not enough fun, Stampin' Up! also released a brand new stamp set and dies called Hey Birthday Chick in the January to June mini catalogue. Even more fun chubby chickens and great dies!  Once again the stamps and dies can be purchased separately or as a bundle.  I have both sets now and believe me I'm planning to have lots of fun with them.

The Hey Birthday Chick Bundle which is available in French and English includes 9 Hey Birthday Chick Stamps and 11 Birthday Chick Dies. Whether you're planning a birthday bash or embellishing a scrap book page, you'll find this set full of celebratory images and phrases as well as quirky line art chicks, a celebratory bow, garland, and even a picket fence. My favourite is the Happy Birthday die cut, which I know I'll be using on a lot of my cards.


Here's a quick video to show how easy it is to work with the Hey Chick and Hey Birthday Chick products. 
Today I want to share a Waterfall Card I made with a combination of stamps and dies from both of these bundles. 

A Waterfall Card is a fancy fold that features a 9 1/2" x 2" card stock mechanism that sits on the front of the card base. The mechanism is folded in half and fitted under an anchoring bar. The front of the mechanism is scored at four intervals and on each score line a square with a stamped image is adhered usually in a picture sequence from top to bottom score line.

On the inside or base of the mechanism there is room for a message that remains hidden until a pull tab or ribbon at the bottom is pulled forward.  When the tab is pulled each of the squares magically begin to flip revealing the next square from top to bottom and finally the hidden message at the base.  


For this card I began with an Early Espresso card base that measures 8 1/2 x 5 1/2" and is scored at 4 1/4".  The wood grained layer measures 5 1/4" x 4" and is from the In Good Taste Designer Series Paper.

Here you can see the four stacking layers.  The little chick at the bottom of the stack is my pull tab.  I cut out two small ovals from the wood grained paper and glued them together for the tab.  The little chick was die cut from Daffodil Delight cardstock and adhered to the tab.  

For the top square I began by stamping the Wired clear mount background stamp image to the Crumb Cake cardstock in Early Espresso ink. I stamped this chick on Whisper White card stock and coloured her with Melon Mango Stampin' Blends before die cutting out the image.  To make the chick's chest stand out, I applied  heat and stick powder and iridescent glitter which really made the blended colours pop. 

The Wired Background stamp can be laid flat, set on an acrylic block, or mounted on a stamperatus platform when transferring your inked image. 


This is the second square and features the little picket fence die cut in Early Espresso card stock.  I stamped a nice little grassy area beneath the fence using a stamp from By The Dock in Crumb Cake along the bottom of the square. The sentiment was stamped in Early Espresso and cut it out with a small retired oval punch.  

The third square features a cute little birthday chick and the "Let's Celebrate You" sentiment stamped in Momento black ink.  I used the confetti stamp on the top part of the square and and the ground in Crumb Cake ink.  The little chick was coloured with Mango Melody, Smoke Slate, Pumpkin Pie and Cherry Cobbler Stampin' Blend Markers. 


The fourth square features the die cut "happy birthday" cut from Cherry Cobbler card stock.  Love, love, love this little die cut!   The chick on this square was fussy cut from the large chick with the birthday balloons image and coloured with blends. 

For the final bottom panel, I stamped the chick with the balloon and die cut it along with an extra balloon.  The sky and the ground were added with sponge daubers.  The hen is coloured with Cinnamon Cider, Soft Suede and
Cherry Cobbler Blends.


Here's a view of the inside of the card which features the cutest and my favourite chick from both bundles. I just love this image and the sweet little birthday cupcake.  

This was a fun card to make and doesn't take too long.  I enjoyed colouring all the chicks and found it very relaxing.  I hope over the coming weeks to post more cards using these two wonderful bundles.  If you're interested in purchasing them, I hope you'll drop by my Online store.  Until next time....

Happy Stamping!
Penny Tokens Stampin' Spot!
Penny Hanuszak, Canadian Independent Stampin' Up! Demonstrator 

HOSTESS CODE FOR MARCH:  

Shop at my On-line Store 24/7 just Click Here to go to my Shop Now 
Use the hostess code at the end of your order if it's under $200.00 before shipping and handling and I'll send you a thank you card and free gift.  For orders over $200. don't add the hostess code because you'll automatically receive Stampin' Up! rewards based on the total of your order and a thank you card from me.


Wednesday, February 28, 2018

WWC#159 - Marsha's "All About Christmas" Challenge

Hi Stampers.  Thanks for dropping by for the Watercooler Wednesday Challenge which is being hosted by Marsha and is "All About Christmas".  It's never too early to get working on your cards for next season and to that end, Marsha is challenging you to build your Christmas stash by making a card and posting it on this site.
Once you've made a card just snap a picture of it, post it on your blog, Facebook or other Social Media site, and then add your link to our LINKSKY at the bottom of our challenge page. The WWC158 Challenge is open until 5:00pm Mountain Time Monday March 5th, 2018.

Here's My Card:
My project for this week involves a very simple fun fold technique that creates an amazing WOW card.  This card is called a Bridge Fold and it's one of those cards that can be dressed up or down and used for any occasion.  Here's mine:

Supplies:
Card Stock: Whisper White 
DSP:  Merry Little Christmas (R Holiday2017)
Specialty Paper:  Silver Foil 
Accessories:  Paper Trimmer, Big Shot, Silver Foil Christmas Stickers from Simply Creative. Home Town Greetings Edgelit Dies, Dimensionals, Foam Tape,
Detail Scissors.

Details:
The Bridge Fold card makes for a terrific WOW card and can be made with many variations. The bridge piece can be made wider, it can be decorated, it can even be made with a window sheet so it's transparent and there are also different sizes of cards. 


Whatever style you choose, the Bridge Fold is simple to make and very impressive to look at. And, last but not least, the best part of all is that you can make two cards from one sheet of 8 ½” x 11” cardstock. It folds flat and can be sent in a standard A2 envelope. Gotta love that!
 

1. Cut base card stock to 8” x 4 ¼” and score at 1 ¼”, 2 ½” 5 ½” and 6 ¾”.


2. Cut four 1” x 4” pieces of card stock for mats.  I used Silver Foil. adhere to the two sides of the card base.

3. Cut four 3/4" x 3 3/4" strips of DSP and adhere to Silver Foil Mat.

4. Cut a 2 3/4" x 4" Silver Foil Mat for center of card and adhere.

5.
Cut a 2 1/2" x 3 3/4" piece of DSP and adhere to the Silver Foil Mat. Note: If you just intend to stamp a sentiment or write a note sub out the DSP for Whisper White card stock or colour of your choice, and do stamping or writing before attaching the bridge.


For the inside panel I cut out images from the Home Town Greetings die cut set.  The church and house were attached to the backing with glue after silver foil inserts were added to the back of each of the buildings.  there are two rows of buildings and the second or outer one was mounted with Foam Tape. I used store bought silver stars and sentiments from Simply Creative and attached them with Tear N tape. 
6. For the bridge cut a 5 ½” x 1 1/4"” strip of Silver Foil Card Stock and a 1" x 5 1/4" strip of DSP adhere together.

For my bridge I cut out a wintery scene with the Home Town Greeting dies and positioned it over the DSP after attaching silver foil to the backs of each of the houses.  
7. To mount the bridge strip to the card base fold the left hand side of the card so that the outer flap is facing outwards.  Measure up from the bottom of the card for whatever placement you want and then adhere the strip only to the front left panel.

8.  Open up and lay the center and right side panels face up and attach the right side of the bridge strip to the last panel on the right. Note: The bridge panel is only attached to the far left and far right panels. Because this is the way the card will open and shut, I used Tear N' Tape to secure.

9.  The back of the card has ample room for writing a message.  Personally I would layer a Basic Black and Whisper White  panel using the same dimensions as in #5 and attach it to the back. This panel would be my sentiment and my message or I could make a slot to attach a gift card.   Like I said the possibilities are many.

Back view of the card showing ample room for adding a sentiment or a pocket to hold a gift card.  See my note above about adding mats.
And that's all there is to it folks. This is a fun card and there are lots of examples on Pinterest and You Tube. I hope that you enjoyed my Christmas Bridge Card and will leave me a comment about it. Let me know if you've ever made one and if so how did your dimensions very from mine. Were they the same or larger.

If you came straight here and haven't taken the time to see the other Watercooler Wednesday Design Team members creations just click here to go to the challenge.  All the rules for using the Linsky are on that page too.

Before I go I also want to share the sad news that Judy Markowitz has left our design team because of family health issues.   I personally am going to really miss Judy's originality and creativity, but hope that she'll still join in on the challenges when she gets a chance.  

In Judy's place, we are welcoming Tenia Nelson to our group of Watercooler Artists.  Tenia hails from Denver, Colorado and we've been wowed by her edgy and eye-catching creations in previous challenges.  


Happy Stamping!
Penny Tokens Stampin' Spot 

Wednesday, July 27, 2016

WWC78 Jean's Theme Challenge - Anything With a "B"

It's time for the weekly Watercooler Wednesday Challenge hosted by our wonderful design team artist, Jean Fitch.  This WWC78 "anything" theme challenge has a twist....you must create a card or project using anything with a "B" theme in it.  To help you out Jean's compiled a list of "B" ideas in her bannerNow, all you have to do to play along, is pick one of these themes or come up with something of your own, and link it to our challenge site by next Monday morning.  It's time to put your thinking cap on, join in and let's have some fun! I can't wait to see what everyone comes up with. 

When I saw this challenge I began wracking my brain trying to come up with something different - not on the list.  I was stumped because either the idea worked but I didn't have anything to go make  it with or I wasn't happy with the idea.  In the end I was getting a little bit frustrated when that voice in my head blurted out "man this is a BEAR of a challenge".  Blink the lights went on!  Houston we have liftoff!  I'm doing a BEAR card!
Here's My Card: 
For my project today I've actually incorporated five "B's" into my challenge. You'll see that some of the other design artists have multiplied their "B's" too, but you don't have to do that - the rules say "a B".   

As you've already guessed, BEAR is one of my "B's".  But, how about the other four, can you guess what they are?  Well, BEAR with me, because you'll have to read through to the bottom of the post to figure out all five "B's".  
Last week following the Wacky Watercooler July Anniversary Blog Hop, I received a number of requests for a tutorial on how the Rectangular Pop Up Box is actually made.  So I thought this would be a golden opportunity to show you how.  This week's version is a birthday card/gift card holder.

Aren't these bears from the Bear Hug stamp set all nestled into this card just adorable? They were my inspiration for this fun project.
BEAR TIPWhen I'm working with this stamp set, I like the bear faces to look more dimensional, so I stamp an extra bear face for each bear image I'm using.  I cut around the eyes and nose from the extra image and adhere this piece (which looks like a key hole) over the original stamped image with a dimensional.  I also touch up the eyes and black tip of the nose with  Crystal Effects.  I usually do the claws and some of the accessories like the honey jar lids and the chapeau (hat). You have to try this. Everyone is drawn into the BEAR faces as soon as they see them. It makes such a difference!
Here's the back view  of the card before I insert a gift card.  By adding foam tape on the backside of the DSP panel, it leaves enough room to slide in a gift card or some lottery tickets.  TIP:  If you need more room in the panel for whatever you're inserting, just double the foam tape height (see below).
The back panel of the card was adhered with the new foam strips instead of glue or tape, I'm able to enclose a gift card or lottery tickets.  
As you can see, I've incorporated lots of images in this card but it still folds flat and fits into a standard card envelope. If you need a bit more wiggle room with your card, try making a custom envelope using the Stampin' Up! Envelope Punch. The Bear Hugs framelits and the punches for the trees and balloons make assembly quick and easy.

Here you can see the rows of images attached to the inserts.  The back row of the card has balloons and the Birthday Banner, the first insert at the back of the card has the two bears and a grouping of trees. The front insert has a small bear and a stack of honey pots.   Layering TIP:  I find it easier to group things together with glue or glue dots, before trying to add them to the inserts, for example the stacked honey pots and cluster of trees.
Supplies:Stamp Sets:  Bear Hugs #139546, Time of Year #141790, Party Pants #141327 (R Sab 2016)
Card Stock:  Pumpkin Pie (one 12 x 12 sheet), Old Olive, Tip Top Taupe Whisper White and Gold Glimmer Paper.  DSP is from Welcome Neighbor (R)
Ink:  Old Olive, Pumpkin Pie, Tip Top Taupe, Momento Tuxedo Black
Accessories:  Big Shot, Trimmer, Tom Bow Glue, Dimensionals, Sticky Strip, Bear Hugs Framelits, Tree Builder Punch, Balloon Bouquet Punch, Tree Punch (R), Small Star Punch (R), Itty Bitty Accents Punch (R), Foam Strips and Crystal Effects.

Details for Assembling the Rectangular Box: 
Here you can see all the bits and pieces I've stamped and cut out prior to assembly.  I find it much easier to have my images and layers already completed, rather than doing it as I go. Some of the images weren't used, but that's okay they're ready for another project.

Rectangular Pop Up Card Base and Inserts:
1. Cut Pumpkin Pie base to measure 4 x 12"
2. Score the base at 2", 5 1/2", 7 1/2" and 11" 
3. Turn 90 degrees and score at 2" the length of the card base.
This is a very rough diagram of the score lines and cutting lines.  The dotted lines represent how far down on the score lines you cut. 

4. From the remaining Pumpkin Pie card stock cut two insert pieces measuring 1" x 4 11/16".  These will be your support pieces.
In this picture you can see the two support pieces.  Once you have assembled the box, you can place the insert pieces inside the box opening.  I used Tom Bow glue to attach them as it's a little more forgiving.  Start with the insert at the back of the box first.  Adhere one side, wait for it to dry and then attach the other side. Make sure the insert pieces are flush with the box and not above the top of the box. INSERT TIP:   In this picture it shows the front insert with the two tabs facing backwards.  You're going to want to turn this around as the tabs should fit flush with the front of the box corners that means the tabs have to fit in the direction of the box either front or back. 
Panels and Gift Card Holder:
1.  For the outside of the card you need the following card stock layers: Cut two pieces of Old Olive 1 7/8 x 3 3/8" and two 1 7/8 x 1 7/8".
2.  For the DSP layers, I cut two pieces of Welcome Neighbor (R) dsp to measure  1 3/4 x 3 1/4" and two measuring 1 3/4 x 1 3/4".  
3.  For the Gift card panel cut a piece of Old Olive 3 7/8 x 3 3/8", and a piece of Whisper White  3 3/4 x 3 1/4".  You will be adhering the gift card panel to this layer with foam strips.  
Here you can see the layered panel for the back of the card.  Stamp your sentiment on the Whisper White piece before attaching the bottom gift card holder panel.  I recommend using foam tape as it's easy to work with and it's higher than dimensionals. If you want more room in the gift card panel add two layers of foam tape, one on top of the other - remember to take off the paper backing on the first layer before you add the second.  This will double the height of the foam tape.

FOAM STRIP TIP:  Because the foam strips are white, they will show on the sides of the gift panel.  If you don't like that look, simply colour the foam tape around the edges with the large tip of a marker that matches your card stock.  Voila, the foam tape blends right into the card.You can do this touch-up before or after you add the foam strips; I did mine after the holder was adhered to the card back.
Outside of the card with all the DSP and card stock panels added.  Do this before shaping in to a box and gluing the tab in place.  I use sticky strip because it is strong to attach the tab.  The sticky strip should be placed on the outside of the tab.  Attach the remaining panels to the inside of the card.  Decorate the front and two side panels to match the inserts.
I've added some balloons cut out with the Balloon Bouquet punch, Gold Glimmer stars, and a honey pot.  I've used dimensionals to attach the balloons.  The Happy Birthday sentiment is from the Party Pants (R) set.  I stamped it on to the leaf portion of the Tree Builder Punch and sponged around the edges with Old Olive.
 
Bonus Project:
I was having so much fun making this box card I decided to add a BONUS treat box to this post, made with the images I had left over. Here it is:

This cute little box measures 4 x 4 18" tall.  It can hold a set of 4 small cards (3 1/2 x 3 1/2) and matching envelopes, candy, or other goodies.
The side view
Here it is "glammed" up with some crinkle wrap.
Supplies:

Stamp Sets: Bear Hugs, Oh My Goodies (R)
Ink: Momento Tuxedo Black, Tip Top Taupe, Pumpkin Pie, Old Olive,
Card Stock: Old Olive, Pumpkin Pie, Tip Top Taupe and Welcome Neighbors DSP (R)
Accessories: Big Shot, Trimmer, Crystal Effects, Basic Rhinestones, Scissors,
Simply Scored, Bone Folder, Dimensionals, Tom Bow Glue, Bear Hugs Framelits, Corner Rounder


Measurements for Gift Box:
1. Cut One piece of Old Olive card stock measuring 4 x 10" and scored at 4 1/4 and 5 3/4". Round corners on each end and fold on the score lines - this forms the bottom of the box.
2. Two pieces of Old Olive measuring 2 1/2" x 3" and scored at 1/2" on each long side are for the side supports of the box.
3. Piece of DSP measuring 4 x 3 7/8" with corners rounded for box front.


Isn't this girly bear just the cutest?   I put some Crystal effects on her claws, her nose and eyes and the center of her hair bow.  She was cut out with the Bear Hugs Framelits.  I used Tip Top Taupe and a sponge dauber around the edges of the bear and Pumpkin Pie around the hair bow and skirt for some added depth.  

The sentiment is from the Oh My Goodies retired stamp set.  I stamped it in Old Olive and then again in Pumpkin Pie.  I cut the "Umpteenth" strip from the Pumpkin Pie image and adhered it in the center of the Old Olive image with dimensionals.  Rhinestones in each corner finished it off.  

Well that's it for me today and my two projects. I'd love to have some comments.  How do you like these projects?  

Also if you try out either of my projects, I'd like your feedback on my directions and I'd like to see what you came up with.  Oh and before I forget, although I'm sure you figured out from the bold hints that I gave you what my five "B" theme items were, here they are:

1. Birthday Card
 2. Box Card (rectangle)
 3.  Bear Hugs - main stamp set
 4.  Balloons
 5.  Bonus Project  

I hope you've had an opportunity to check out the other Watercooler Wednesday design team artist's blogs.  I know they've come up with some really great ideas to share with you.  See you next week with a new project!  


Happy Stamping!
Penny Tokens Stampin' Spot
July Hostess Code: 2B9CCGQR
Reminder: Only a few more days to earn "Bonus Dollars" for your August orders.  Click her to see details

Black and White Anniversary - FMS #669

I'm up for another sketch challenge card, how about you?  Narelle Farrugia is the sketch designer for  Freshly Made Sketches #669  this...