 It's time for the weekly Watercooler Wednesday Challenge hosted by our wonderful design team artist, Jean Fitch. This WWC78 "anything" theme challenge has a twist....you must create a card or project using anything with a "B" theme in it. To help you out Jean's compiled a list of "B" ideas in her banner. Now, all you have to do to play along, is pick one of these themes or come up with something of your own, and link it to our challenge site by next Monday morning. It's time to put your thinking cap on, join in and let's have some fun! I can't wait to see what everyone comes up with.
 When I saw this challenge I began wracking my brain trying to come up with something different - not on the list. I was stumped because either the idea worked but I didn't have anything to go make it with or I wasn't happy with the idea. In the end I was getting a little bit frustrated when that voice in my head blurted out "man this is a BEAR of a challenge". Blink the lights went on! Houston we have liftoff! I'm doing a BEAR card!
Here's My Card:
For my project today I've actually incorporated five "B's" into my challenge. You'll see that some of the other design artists have multiplied their "B's" too, but you don't have to do that - the rules say "a B".
As you've already guessed, BEAR is one of my "B's". But, how about the other four, can you guess what they are? Well, BEAR with me, because you'll have to read through to the bottom of the post to figure out all five "B's".


 |
| BEAR TIP: When I'm working with this stamp set, I like the bear faces to look more dimensional, so I stamp an extra bear face for each bear image I'm using. I cut around the eyes and nose from the extra image and adhere this piece (which looks like a key hole) over the original stamped image with a dimensional. I also touch up the eyes and black tip of the nose with Crystal Effects. I usually do the claws and some of the accessories like the honey jar lids and the chapeau (hat). You have to try this. Everyone is drawn into the BEAR faces as soon as they see them. It makes such a difference! |
 |
| Here's the back view of the card before I insert a gift card. By adding foam tape on the backside of the DSP panel, it leaves enough room to slide in a gift card or some lottery tickets. TIP: If you need more room in the panel for whatever you're inserting, just double the foam tape height (see below). |
 |
| The back panel of the card was adhered with the new foam strips instead of glue or tape, I'm able to enclose a gift card or lottery tickets. |

 |
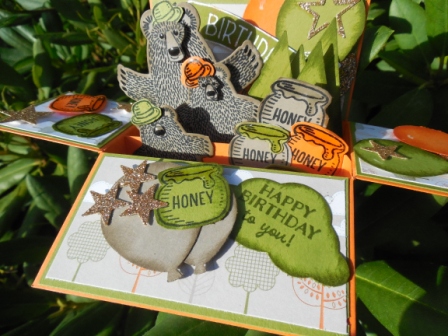
| Here you can see the rows of images attached to the inserts. The back row of the card has balloons and the Birthday Banner, the first insert at the back of the card has the two bears and a grouping of trees. The front insert has a small bear and a stack of honey pots. Layering TIP: I find it easier to group things together with glue or glue dots, before trying to add them to the inserts, for example the stacked honey pots and cluster of trees. |
Card Stock: Pumpkin Pie (one 12 x 12 sheet), Old Olive, Tip Top Taupe Whisper White and Gold Glimmer Paper. DSP is from Welcome Neighbor (R)
Ink: Old Olive, Pumpkin Pie, Tip Top Taupe, Momento Tuxedo Black
Accessories: Big Shot, Trimmer, Tom Bow Glue, Dimensionals, Sticky Strip, Bear Hugs Framelits, Tree Builder Punch, Balloon Bouquet Punch, Tree Punch (R), Small Star Punch (R), Itty Bitty Accents Punch (R), Foam Strips and Crystal Effects.
Details for Assembling the Rectangular Box:
 |
| Here you can see all the bits and pieces I've stamped and cut out prior to assembly. I find it much easier to have my images and layers already completed, rather than doing it as I go. Some of the images weren't used, but that's okay they're ready for another project. |
Rectangular Pop Up Card Base and Inserts:
1. Cut Pumpkin Pie base to measure 4 x 12"
2. Score the base at 2", 5 1/2", 7 1/2" and 11"
3. Turn 90 degrees and score at 2" the length of the card base.
 |
| This is a very rough diagram of the score lines and cutting lines. The dotted lines represent how far down on the score lines you cut. |
4. From the remaining Pumpkin Pie card stock cut two insert pieces measuring 1" x 4 11/16". These will be your support pieces.
 |
| In this picture you can see the two support pieces. Once you have assembled the box, you can place the insert pieces inside the box opening. I used Tom Bow glue to attach them as it's a little more forgiving. Start with the insert at the back of the box first. Adhere one side, wait for it to dry and then attach the other side. Make sure the insert pieces are flush with the box and not above the top of the box. INSERT TIP: In this picture it shows the front insert with the two tabs facing backwards. You're going to want to turn this around as the tabs should fit flush with the front of the box corners that means the tabs have to fit in the direction of the box either front or back. |
1. For the outside of the card you need the following card stock layers: Cut two pieces of Old Olive 1 7/8 x 3 3/8" and two 1 7/8 x 1 7/8".
2. For the DSP layers, I cut two pieces of Welcome Neighbor (R) dsp to measure 1 3/4 x 3 1/4" and two measuring 1 3/4 x 1 3/4".
3. For the Gift card panel cut a piece of Old Olive 3 7/8 x 3 3/8", and a piece of Whisper White 3 3/4 x 3 1/4". You will be adhering the gift card panel to this layer with foam strips.
 |
| Here you can see the layered panel for the back of the card. Stamp your sentiment on the Whisper White piece before attaching the bottom gift card holder panel. I recommend using foam tape as it's easy to work with and it's higher than dimensionals. If you want more room in the gift card panel add two layers of foam tape, one on top of the other - remember to take off the paper backing on the first layer before you add the second. This will double the height of the foam tape. |

 |
| FOAM STRIP TIP: Because the foam strips are white, they will show on the sides of the gift panel. If you don't like that look, simply colour the foam tape around the edges with the large tip of a marker that matches your card stock. Voila, the foam tape blends right into the card.You can do this touch-up before or after you add the foam strips; I did mine after the holder was adhered to the card back. |
 |
| Outside of the card with all the DSP and card stock panels added. Do this before shaping in to a box and gluing the tab in place. I use sticky strip because it is strong to attach the tab. The sticky strip should be placed on the outside of the tab. Attach the remaining panels to the inside of the card. Decorate the front and two side panels to match the inserts. |
 |
| I've added some balloons cut out with the Balloon Bouquet punch, Gold Glimmer stars, and a honey pot. I've used dimensionals to attach the balloons. The Happy Birthday sentiment is from the Party Pants (R) set. I stamped it on to the leaf portion of the Tree Builder Punch and sponged around the edges with Old Olive. |

Bonus Project:
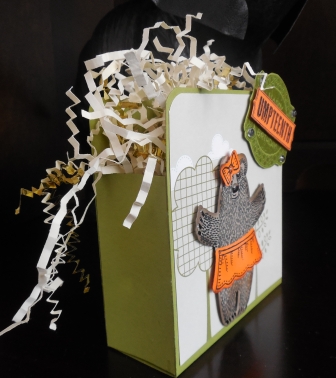
I was having so much fun making this box card I decided to add a BONUS treat box to this post, made with the images I had left over. Here it is:
Supplies:
Stamp Sets: Bear Hugs, Oh My Goodies (R)
Ink: Momento Tuxedo Black, Tip Top Taupe, Pumpkin Pie, Old Olive,
Card Stock: Old Olive, Pumpkin Pie, Tip Top Taupe and Welcome Neighbors DSP (R)
Accessories: Big Shot, Trimmer, Crystal Effects, Basic Rhinestones, Scissors,
Simply Scored, Bone Folder, Dimensionals, Tom Bow Glue, Bear Hugs Framelits, Corner Rounder

Measurements for Gift Box:
1. Cut One piece of Old Olive card stock measuring 4 x 10" and scored at 4 1/4 and 5 3/4". Round corners on each end and fold on the score lines - this forms the bottom of the box.
2. Two pieces of Old Olive measuring 2 1/2" x 3" and scored at 1/2" on each long side are for the side supports of the box.
3. Piece of DSP measuring 4 x 3 7/8" with corners rounded for box front.

Isn't
this girly bear just the cutest? I put
some Crystal effects on her claws, her nose and eyes and the center of
her hair bow. She was cut out with the Bear Hugs Framelits. I used Tip
Top Taupe and a sponge dauber around the edges of the bear and Pumpkin
Pie around the hair bow and skirt for some added depth.
The sentiment is from the Oh My Goodies retired stamp set. I stamped it in Old Olive and then again in Pumpkin Pie. I cut the "Umpteenth" strip from the Pumpkin Pie image and adhered it in the center of the Old Olive image with dimensionals. Rhinestones in each corner finished it off.
Well that's it for me today and my two projects. I'd love to have some comments. How do you like these projects?
Also if you try out either of my projects, I'd like your feedback on my directions and I'd like to see what you came up with. Oh and before I forget, although I'm sure you figured out from the bold hints that I gave you what my five "B" theme items were, here they are:
I was having so much fun making this box card I decided to add a BONUS treat box to this post, made with the images I had left over. Here it is:
 |
| This cute little box measures 4 x 4 18" tall. It can hold a set of 4 small cards (3 1/2 x 3 1/2) and matching envelopes, candy, or other goodies. |
 |
| The side view |
 |
| Here it is "glammed" up with some crinkle wrap. |
Stamp Sets: Bear Hugs, Oh My Goodies (R)
Ink: Momento Tuxedo Black, Tip Top Taupe, Pumpkin Pie, Old Olive,
Card Stock: Old Olive, Pumpkin Pie, Tip Top Taupe and Welcome Neighbors DSP (R)
Accessories: Big Shot, Trimmer, Crystal Effects, Basic Rhinestones, Scissors,
Simply Scored, Bone Folder, Dimensionals, Tom Bow Glue, Bear Hugs Framelits, Corner Rounder
Measurements for Gift Box:
1. Cut One piece of Old Olive card stock measuring 4 x 10" and scored at 4 1/4 and 5 3/4". Round corners on each end and fold on the score lines - this forms the bottom of the box.
2. Two pieces of Old Olive measuring 2 1/2" x 3" and scored at 1/2" on each long side are for the side supports of the box.
3. Piece of DSP measuring 4 x 3 7/8" with corners rounded for box front.

 | ||
The sentiment is from the Oh My Goodies retired stamp set. I stamped it in Old Olive and then again in Pumpkin Pie. I cut the "Umpteenth" strip from the Pumpkin Pie image and adhered it in the center of the Old Olive image with dimensionals. Rhinestones in each corner finished it off.
Well that's it for me today and my two projects. I'd love to have some comments. How do you like these projects?
Also if you try out either of my projects, I'd like your feedback on my directions and I'd like to see what you came up with. Oh and before I forget, although I'm sure you figured out from the bold hints that I gave you what my five "B" theme items were, here they are:
1. Birthday Card


2. Box Card (rectangle)
 3. Bear Hugs - main stamp set


Happy Stamping!
Penny Tokens Stampin' Spot
July Hostess Code: 2B9CCGQR
 |
| Reminder: Only a few more days to earn "Bonus Dollars" for your August orders. Click her to see details: |


