Showing posts with label Gorgeous Grunge. Show all posts

Wednesday, April 26, 2017

Watercooler Wednesday Challenge #116 - Kath's Masculine "Anything Goes" Challenge

This week's Watercooler Wednesday challenge #WWC116 is a Masculine "Anything Goes" theme hosted by Kath.   

If you're like me, you're probably always on the lookout for ideas and samples of masculine cards.  This is  especially true with Father's Day looming in the months to come and so many male birthdays on my calendar.

So, my card for this challenge features one of the more masculine stamp sets from Stampin' Up! called "The Wilderness Awaits"I'm sad to say this set is retiring the end of May 2017, and I wanted to give it a last hurrah!  What better way than to combine it with one of my favourite fancy fold techniques. 

Here's My Card:

This card, called a "Twist and Pop" is one of the more favourite fancy fold cards this year. I've found that making one of these cards is like pulling together a special story and they're such a challenge.  I love making these so much that I'm planning on featuring this card style in my upcoming "Father's Day" Masculine card class, so stay tuned for details. What fun! 


Supplies:

Stamp Sets: The Wilderness Awaits #139365*, Here's to Cheers #142101*, Badges and Banners #141610, Avant-Garden (SAB 2017 (R), Gorgeous Grunge #130517*, Stylized Birthday #141828
Card Stock:  Very Vanilla, Tip Top Taupe, Early Espresso
Ink:  Early Espresso, Tip Top Taupe, Crumb Cake 
Accessories:  Trimmer, Big Shot, Woodland Embossing Folder #139673, Brayer, Stitched Framelits - Ovals and Circles*(R),  Stitched Shapes Framelits #145372, Banner Punch, 1 1/4" Circle Punch, Large Oval Punch (R).
Note:  All Supplies Marked with (*) are retiring at the end of May 2017 or as long as supplies last. (R) refers to accessories that were previously retired.


For the inside top card panel, I repeated the Woodland Embossing folder layer but used the debossed side to add some interest. I cut a layer of Very Vanilla card stock with the Stitched Shapes Oval Framelits for the "Happy Birthday" sentiment. 
The sentiment was stamped with the Stylized Birthday single stamp. I'm a big fan of this large bold font and find it really works well on masculine cards. 
To finish off I stamped some of the Gorgeous Grunge splotches randomly in Tip Top Taupe on the sentiment and added some more Gold Metallic Star Embellishments. I cut a larger oval of Early Espresso card stock with last years retired Ovals Framelits and mounted this with Dimensionals.

 
Because the card stock is relatively heavy on this card and I want to hold the twist part inside until the card is fully opened, I've added a belly band to give it some stability.  I cut a piece of Very Vanilla with the smallest Stitched Shapes Oval and stamped the "for you" sentiment from the Wilderness Awaits stamp set, leaves from Avant-Garden and splotches from Gorgeous Grunge.  The two small metallic stars give it a bit of pizazz on the card front.  Note:  the Early Espresso oval was cut using the old original large oval punch. It worked perfectly for this layer. 
I really like the four panels inside of the Twist and Pop Card.  You can use them to tell a story with your stamps and sentiments or add photos..... pretty much anything you want to decorate and personalize the card.  The bottom panel was left plain except for the small leaf stamp in the bottom corner.
The Elk's image from the Wilderness Awaits stamp set was repeated for this panel and some splotches from Gorgeous Grunge were added.

This panel was stamped with the Badges and Banner stamp set and the image was cut out with the coordinating Banner Punch

This panel was stamped with the Here's to Cheer's stamp set  and Gorgeous Grunge.
This is a mirror image of the Elk from The Wilderness Awaits that was stamped on acetate and then transferred to the Very Vanilla panel.  It isn't as dark as I would have liked it, but the image came through pretty clear.  The "No. 1" is such a cute little stamp and is from the Badges and Banners.  It was cut out with a 1 1/4" circle punch.
Well that's it for today's card challenge.  I hope I've inspired you with today's card and you'll take the time to leave me a comment.  Let me know if you've ever tried this fancy fold before.  It can be tricky, but with practice and proper positioning it is a terrific card style.  I plan on making a lot of these Twist and Pop cards in the coming weeks.

If you haven't participated in our Watercooler Wednesday challenges before I hope you'll give it a try.  Our challenges are posted on Wednesdays and are open until the following Monday.  If you haven't already checked out the Design Team artists I hope you will, they've posted some amazing samples this week.

Happy Stamping!
Penny Tokens Stampin' Spot

Wednesday, August 17, 2016

WWC81- Gail's Colour Challenge

We're mid-way through August and in BC we're finally getting some weather that speaks of Summer.  It's been hot and sizzling all week with temperatures ranging in the high 30's (C) but no one's complaining, at least not yet!

I always think of Summer as the season of heat and vibrant colours and this week at the Watercooler Wednesday Challenge, our talented Gail Allen is bringing you just that.  She's pulled together some pretty exciting summer colours to challenge our imaginations. 
Here's My Card:
Since August is also a hot birthday month I thought I'd respond to this challenge with a gender neutral birthday card that's a fiesta of colour and images.   We've got balloons, splotches and sparklers and it all says fun!  

Supplies:  

Stamp Sets:  Balloon Celebrations, Stylized Birthday and Gorgeous Grunge
Ink:  Pear Pizzazz, Watermelon Wonder, Peek A Boo Peach, Daffodil Delight and Momento Tuxedo Black
Card Stock:  Pear Pizzazz, Watermelon Wonder, Peek A Boo Peach, Daffodil Delight and Very Vanilla
Accessories:  Basic Rhinestones, Balloon Bouquet Punch, Wink of Stella, Paper Trimmer, Sponge Daubers, Tom Bow Adhesive, Scissors

Assembly:
This is a pretty easy card to assemble - only ten steps required and it comes together really fast.
 1.  Cut the card base from Pear Pizzazz.  It measures 4 1/4" x 11" and is scored at 5 1/2 for a top folding card.

2.  Cut two pieces of Very Vanilla card stock measuring 4" x 5 1/4" - one is for the face of the card and the other is the inside panel.

3.  Cut a strip of Watermelon Wonder card stock 1/2" x 5 1/4" and a strip of of Peek A Boo Peach 1/4" x 5 1/4".

4.  Before assembling the front do the stamping on the Very Vanilla piece:  Stamp the sentiment "Happy Birthday" from the Stylized Birthday in Pear Pizzazz towards the top center of this card stock.  Make sure your ink pad is nice and juicy so you get a good impression.
The Stylized Birthday is a one stamp wood mount image Order #141828.  The image measures 2 1/4" x 1 3/4".

Randomly Stamp splotches from Gorgeous Grunge in the challenge colours over the remaining Very Vanilla piece.  
Gorgeous Grunge - 5 piece stamp set comes in Wood(130514)and Clear Mount (130517).  The stylized textured images really help create awesome images!
Stamp the small dandelion from the Balloon Celebrations stamp set randomly between splotches.  The overall effect you're trying to achieve is "fiesta" "confetti", "fireworks"...... in other words FUN!
 
Balloon Celebration - 35 piece Photopolymer Stamp Set #140675

 5. Cut two 1/4" x 5 1/4" strips from the Very Vanilla piece.  It should now measure 3 1/2 x 5 1/4.  Glue this to the card base lining up on the right hand side.

6.  Adhere the Watermelon Wonder strip on the left side butting it against the Very Vanilla strip.  Center the 1/4" x 5 1/4" piece of Peek A Boo Peach down the center of the Watermelon Wonder strip.
   
7.  Punch out balloons from scraps of Pear Pizzazz, Watermelon Wonder, Peek A Boo Peach and Daffodil Delight card stock.  Stamp the balloons with the dotted balloon image.  Position and stamp the balloon strings on the Very Vanilla card layer on the left side of the sentiment.  Adhere the balloons with Tom Bow adhesive.  The last balloon is mounted with dimensionals.  

For some extra detail I ran the Clear Wink of Stella Glimmer Brush around the edges of the balloons and on the dandelions in the background panel.  Love this stuff - it's subtle but picks up the light for some extra sparkle.

8.  Adhere strips of Basic Rhinestones down the center of the Peek A Boo Peach strip to the top of the first balloon and from the last balloon to the bottom of the strip.
  
9.  Finish the inside of the card with a 5 1/4 x 4" Very Vanilla card panel.  Attach the two 1/4" x 5 1/4" stamped strips to either side of this panel.  Stamp the sentiment "Let Us Celebrate" in Pear Pizzazz ink along the top left side of the strip, and add a couple of Gorgeous Grunge Splatters.


10.  Stamp the top half of the balloon strings from the left hand bottom corner of the panel towards the center.  Adhere one of each coloured balloon so they look like they are rising from the bottom of the card.  I offset the orange balloon so it actually overlapped the edge, and then I cut off the excess balloon.   

Okay now that was easy wasn't it?  Did you like this colour combo?  I hope you'll play along this week and link up your creation with our linky tool.  It's easy and our team of design artists would love to see how you've used this colour challenge.  If you're unsure go back and check out their cards - they're awesome!  Oh and while you're at it leave us some comments because we like feedback too.  

Happy Stamping!
Penny Tokens Stamping Spot

Promotions: 
August Hostess Code:  EZGKEM73 use this code on orders under $200.00 and I'll send you something FREE.

August Bonus Days -  If you earned BONUS DOLLAR(s) on your July order, don't forget to redeem by applying the code on your next order - Good until August 31st.

Paper Pumpkin BOGO PROMO - August 11th to October 10th - FIRST-time Paper Pumpkin subscribers can buy their FIRST month and get their second month FREE!

Wednesday, June 22, 2016

WWC73 - Gail's Clean and Simple Challenge - Summer

It's officially summer now, so how appropriate that this weeks Watercooler Wednesday Challenge hosted by the wonderful Gail Allen is a Clean & Simple (CAS) challenge with a Summer theme.  What fun! 

Living on the West Coast it's hard not to equate summer with being at the beach.  I have fond memories of end of school year outings to the local beach.  My classmates and I were always looking for sea life in the tidal pools, and hoping we'd be the one to discover something bigger and better than a sand crab?  It was so exciting and such fun!

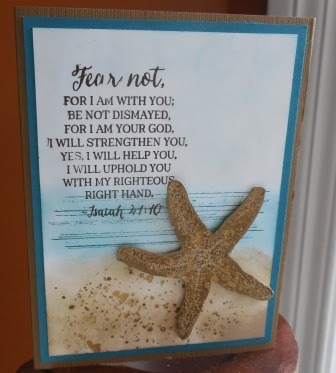
Well I had that same feeling of excitement while using the two-step star fish images from the Picture Perfect stamp set for this card. It was my first time inking up these stamps and that little star fish was calling my name. 
Here's my card:

Background Design:
Visually I divided this card into three sections, but if you wanted to you could use an acetate or post it note mask on each area.  My card base was an 8 1/2" x 5 1/2" piece of Soft Suede Textured card stock scored at 4 1/4".  I added a 4 x 5 1/4" layer of Island Indigo and a 3 7/8 x 5" piece of Whisper White card stock that was sponged with with Crumb Cake, Island Indigo and Soft Sky inks. Working with a piece of scrap paper beneath the layer of card stock I'm stamping makes it easier to manage the amount of colour I'm applying.

Sand:  Starting from the bottom and working towards the sky with Crumb Cake ink I sponged in circular motions until I had the sand a third of the way on the card stock.  To give some life to the sand I stamped the speckled image from Gorgeous Grunge in Soft Suede and then again with Versa Mark and Gold embossing powder.

Water: To get the look of movement in the water I stamped the lined image from Gorgeous Grunge in Island Indigo ink just above the sand line.  Starting off the card stock I began sponging with the Island Indigo ink in a soft circular motion until I had sponged the ink just above the lined image. 
 
The Gorgeous Grunge Set contains 5 texture images that are perfect for creating background scenes.  For this card I used the top speckled image for my star fish and sand and the lined image that looks like tire tracks for the water.

Sky:  I sponged Soft Sky ink in a circular motion from the water line to the top of the card, so it looks like soft rolling clouds on the horizon.  The sentiment is from Rose Wonder and is stamped in Early Espresso ink.   


Note:  I'd already attached the star fish to the card base before I chose this sentiment, and while I was stamping it I rocked the stamp resulting in some blurring.  If you're CASing this card I'd recommend stamping the sentiment first and then adhering your star fish. Lesson learned.

Star Fish:  To bring this star fish to life I began the process by stamping the first image in Crumb Cake ink on a scrap of matching card stock.  The second star fish stamp has more texture and I stamped it in Soft Suede.  I stamped a third time in Crushed Curry and then stamped the small speckled image from Gorgeous Grunge in Versa Mark ink across the center of the star fish and heat embossed the speckles with Gold Embossing powder. The star fish was adhered to the back ground with small strips of the new foam adhesive strips - love this stuff!  It's only 1/8" wide so perfect for this embellishment. 

Inside of the Card:
Since I didn't have any small star fish stamp images, I couldn't resist stamping these little sand pipers on the inside of my card.  There from one of my favourite Stampin' Up! sets called Wetlands.  


Supply List:
Stamp Sets:  Picture Perfect, Gorgeous Grunge, Rose Wonder, Wetlands 
Card Stock:  Whisper White, Soft Suede, Island Indigo, Crumb Cake
Ink:  Island Indigo, Soft Sky, Crumb Cake, Early Espresso, Crushed Curry, Versa Mark
Accessories:  Snips, Heat Gun, Paper Trimmer, Gold Embossing Powder, Tom Bow Glue, Foam Adhesive Strips 

Well that's it for today. I love hearing from all my visitors, so I hope you'll leave me a comment and let me know what beach or summer memories you remember.

Click here to access the WWC73- Gail's Clean and Simple Challenge and visit the other design team members to check out the details on their WWC73 CAS Summer entries.  There are some awesome designs and tips so you won't want to miss out on.  And, I hope you'll decide to play along, it's a great way hone your stamping skills.  It's easy and you have until next week to get your entry in.  In the meantime Happy Stamping! 

Happy Stamping!
Penny Tokens Stampin' Spot 

Wednesday, June 15, 2016

WWC72 Jean's Colour Challenge

Have you been waiting for this week's Watercooler Wednesday challenge?  If so, I know you're not going to be disappointed.  This week's challenge is brought to you by the fabulous Jean Fitch and she's chosen to use the new amazing 2016-2017 Incolours for her theme.  
Click here to go to the Challenge

Here's My Card:


The challenge says you can use 3, 4 or all 5 of the colours in your project and there was no specific theme, so it was a really open field to begin with.  Believe me I stared at those colours and played with them for a while before I decided to make a birthday card and showcase the colours in the balloons.  I think this was a good choice.

Supplies: 
Stamp Sets:  Gorgeous Grunge, Balloon Celebration and Birthday Blooms
Ink:  Dapper Denim, Emerald Envy, Flirty Flamingo, Peek-a-Boo Peach and Sweet Sugarplum and Momento Tuxedo Black
Card stock:  Dapper Denim, Emerald Envy, Flirty Flamingo, Peek-a-Boo Peach and Sweet Sugarplum and Whisper White
Accessories:  Balloon Bouquet Punch, Basic Rhinestones, Dimensionals, Tom Bow Glue.

 
The card base is an 8 1/2 x 11 piece of Flirty Flamingo scored at 4 1/4".  This is followed by a 5 1/4 x 4" layer of Emerald Envy and a 5 1/8" x 3 7/8" layer of Dapper Denim.  

I don't know about you, but I love those fat little "splats" or blotches in the Gorgeous Grunge set and the lines so I used both of these to create a background for the balloons.  

I began by stamping the lines vertically in Dapper Denim on a 5 1/8" x 3 6/8" piece of Whisper White card stock.  I then stamped a "splat" in each of the Incolours in an arch across the Whisper White card stock.   Originally I had planned on just stamping the balloons on the Whisper White panel, but I decided to punch balloons from the Incolour card stock and then layer them across the splats.  I was happy I did this because it really worked.  It was so easy punching out the balloon shapes with the Balloon Bouquet punch. 

To make the balloons look like they really were in flight I tried out a technique I've seen recently that plumps the balloon up and adds dimension to it.  This is easily achieved by running the fattest ball on your stylus around the edge of each balloon until the edges began to raise and take shape. 
I sponged around the edge of each balloon with the corresponding ink

I added a little crescent on the left hand side of each balloon with a white gel pen.
With the balloon face down on the sponge piercing mat I ran the stylus around the outer edge of each balloon until the edges started to curl up. 

Once I had the shape molded around the balloon I mounted the balloons  over their corresponding colour splat using dimensionals. I drew the balloon strings free hand with a neutrals black marker and I stamped the sentiment "Happiest of Birthdays to You" from the Birthday Blooms stamp set in black ink at the base of the card.
When I was finished I felt the balloons needed just a bit more "something" so I stamped some star clusters from the Balloon Celebration stamp set on the face of the balloons and added a Basic Rhinestone at the base of each balloon.  Perfect!
Well I guess that's it from me for today's challenge.  I hope you enjoyed it and will try this technique. I'd love to hear how yours turned out.

Oh and while you're at it, grab your ink and card stock and make a card of your own to enter into the challenge, we'd love to see what you come up with. You can go back and check out the other designers at this link.

Happy Stamping!
Penny Tokens Stampin' Spot

JUNE'S HOSTESS CODE IS:   XUB7WFD2

Monday, August 3, 2015

Floral Frames Sympathy Card

Sadly, I've just learned my friend Bev's mom passed away over the weekend.  I knew from talking with Bev recently that her mom's health had been failing for some time and she had been slipping away little by little.

I'm so grateful my husband and I had an opportunity to meet Norma and her sweet husband Mel, some years ago and have fond memories of those get-togethers.  

We first met this great couple from Winnipeg on one of their visits to Black Mountain Ranch, in Washington state. Our memories of Norma's friendliness, warmth and great cooking skills during those visits remain. She was one of those women you instantly took a liking to, with her great smile, strong hug and wonderful sense of humour.

Our sympathy goes out to Mel, his children and grandchildren in the loss of their wife, mom, grandma, and an all around great woman.   

Here's a card I made to express our sympathy:

Supply  List:
Stamp Sets:
Gorgeous Grunge, You’ve Got This
Inks:
Rich Razzleberry, Crumb Cake
Card Stock:
Rich Razzleberry, Daffodil Delight, Crumb Cake
Accessories:
Floral Framelits, Basic Rhinestones, Detailing Scissors, Tom Bow Glue, Dimensionals
Tools:
Big Shot, Paper Trimmer


This is the inside of the card.  I added the additional cut flowers to cover the back of the ones on the front of the card. 


Happy Stamping! 
Penny Tokens

NESTS OF CHRISTMAS PAPER PUMPKIN ALTERNATIVES USING #fms#662

 Here's the latest sketch challenge from Freshly Made Sketches #662 and designed by Jen T.  Make sure you check out the Design Team car...