Showing posts with label card making in Abbotsford BC. Show all posts

Monday, August 3, 2015

Floral Frames Sympathy Card

Sadly, I've just learned my friend Bev's mom passed away over the weekend.  I knew from talking with Bev recently that her mom's health had been failing for some time and she had been slipping away little by little.

I'm so grateful my husband and I had an opportunity to meet Norma and her sweet husband Mel, some years ago and have fond memories of those get-togethers.  

We first met this great couple from Winnipeg on one of their visits to Black Mountain Ranch, in Washington state. Our memories of Norma's friendliness, warmth and great cooking skills during those visits remain. She was one of those women you instantly took a liking to, with her great smile, strong hug and wonderful sense of humour.

Our sympathy goes out to Mel, his children and grandchildren in the loss of their wife, mom, grandma, and an all around great woman.   

Here's a card I made to express our sympathy:

Supply  List:
Stamp Sets:
Gorgeous Grunge, You’ve Got This
Inks:
Rich Razzleberry, Crumb Cake
Card Stock:
Rich Razzleberry, Daffodil Delight, Crumb Cake
Accessories:
Floral Framelits, Basic Rhinestones, Detailing Scissors, Tom Bow Glue, Dimensionals
Tools:
Big Shot, Paper Trimmer


This is the inside of the card.  I added the additional cut flowers to cover the back of the ones on the front of the card. 


Happy Stamping! 
Penny Tokens

Saturday, August 1, 2015

Sprinkles of Life Birthday Card


Samples from pg 189 of the Share the Fun Annual Catalogue
I purchased the Sprinkles of Life stamp set featured on page 189 of Stampin' Ups! new "Share the Fun" 2015-16 catalogue, and I'm having so much fun with it. 

This very special stamp set has 22 images.  It's a two-step Photopolymer stamp set that co-ordinates with the brand new Tree Builder punch seen on page 167 of the catalogue.   Two-step stamping is a really great way to layer your images.
Sprinkles of Life 22 Photopolymer stamps in English (139971) or French. Use clear acrylic blocks - a, c and g.  
Tree Builder Punch Item #7.  Multiple shapes for layering and more.  $22.00
Besides all the great sentiments and images in this set it's very special for another reason.  The purchase of this stamp set can "Make a Difference" to families with children who are receiving medical treatment far from home and supported through Ronald McDonald House Charities (RMHC).  Stampin' Up! donates $3 to RMHC from the purchase price of every Sprinkles of Life stamp set sold.  Todate, Stampin' Up! has donated  over a million dollars to RMHC and their network of local RMHC chapters.  Isn't that awesome?

Whatever your celebration is and whether you want to stamp a tree, an ice cream cone or a cupcake, this stamp set's got it all.  Here are some fun projects I've made with the set.  

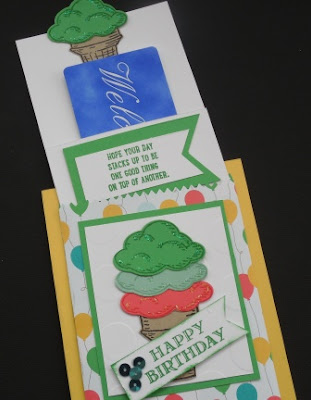
My Sprinkles of Life Birthday Card was inspired by Carol Payne's recent post in which she combined this set and the Mini Gift Bag Thinlet to make a gift card holder. Great idea! 

Here's my version:

I made a whole card, using Daffodil Delight for the card base, and I mounted the Mini Gift Bag to the front of the card.   I've added an insert with the gift card.  Here's a view of the outside front of the card.  I luv, luv, luv it! 

And, this is what it looks like opened to the center of the card.  Lots of room for writing a note and birthday wishes.
I used the  Big on You (retired) stamp set for the inside of the card.  Love the Cucumber Crush ink  with the Daffodil Delight

 Here are some more pictures showing the detail:

I love adding the Dazzling Details to these scoops of ice cream.  It just seems to bring them to life.  I also am a fan of the Big Dot Embossing Folder which adds just a subtle hint of texture behind the cone and ties in with the balloons on the designer series paper. 
 The sentiment is from the Sprinkles of Life set.  The tag was cut out with the Banner Triple punch.  The insert for the Gift bag was made with a


The ice cream on the top of the cone is used to pull the gift card from the gift bag, so you need to ensure it's really mounted securely to the top of the white card stock piece. 


Another project I made using the "ice cream cone" images from the stamp set was rosettes for my summer banner.  The ice cream cones just added the perfect touch.  Here are some close-ups:


Well that's it for today, but I'll be back on August 20th along with the other members of the Wacky Watercooler August Blog Hop.  We'll each be presenting two projects focusing on the Sprinkles of Life stamp set.  I can't wait to see what everyone comes up with.  Hope you'll bookmark that date and drop by for a visit!

Wednesday, July 29, 2015

WWC#29 - Bev's Special Folds Challenge

When I was looking through this week's challenge blogs, I came across Bev's Special Folds Challenge on the Wacky Watercooler challenge site.  

I love getting creative with fancy card folds, so this challenge was right up my alley and made me want to play along too.  


Here's My Card:
Since I have a whole slew of Fall male birthdays hanging in the wings, I chose to make a fancy fold male birthday card.  Choosing the Guys Greetings stamp set for this card was another easy choice.

Supplies:
Stamp Set: Guy Greetings
Ink:  Soft Suede
Card Stock:  Sahara Sand and Soft Suede
Accessories:  Scalloped Oval punch, Large Oval punch, Scalloped Border Punch, Detail Scissors, Woodgrain Embossing Folder (TIEF), Circle Framelits, Big Shot machine, Trimmer, dimensionals and adhesive strip. 


Measurements:
  • 5 1/2 x 4 1/4" piece of Soft Suede for card base
  • 5 1/4" x 9 1/2" piece of Sahara Sand card stock scored at 2 1/2" and 51/2"
  • 5 1/4" x 1" strip of Soft Suede for Scalloped Border layer
  • 1/8" x 5 1/4" strip of Soft Suede for inside border
  • Additional Sahara Sand for stamping two sets of hats
Special Fold Design:
The design of this card is called an Altered Z fold.  I first saw this design in a video posted by Dawn Griffiths (see link at the end of this post), and later on Pinterest.  This is a very fast and easy fun fold card and can be adapted for any occasion. 
I placed a small pencil mark on the inside of the top and bottom of the circle inside the card so my "guy" image would show well through the opening.
Add caption

I used my 2 1/2" Circle Framelits to cut the whole through the two layers of card stock.  The "guy" and the sentiment "To A Classic" were stamped in Soft Suede ink. 
Don't you just love these hats?  I stamped them once in a continuous line on the right edge of the inside of the card.  Using a separate piece of Sahara Sand card stock, I punched them again and then fussy cut and adhered the individual hats with small pieces of dimensionals, to the first stamped images. I also added a 1/8" strip of Soft Suede card stock above the hats, to give some separation between the writing space and the hats.

Note:  If you look at the picture of the stamp set above you'll see there are two sets of hats in the Photopolymer image.  From past experience, I found it really difficult to stamp the hats in a line without getting a halo on my work, so I chose to separate the solid stamp into two stamps by very carefully cutting in between the images.  


I love the old fashioned font they've used for the sentiments in the Guy Greeting stamp set.  I used Soft Suede ink for the "Happy Birthday" greeting and the sponging around the oval and mounted this piece with dimensionals to the background oval. The background layer was punched out with the Scalloped  Edge Oval punch.  Note:  When mounting the greeting layer on the card front make sure the glue only goes half way on the oval so it doesn't show from the inside of the card.  The scalloped edge on the left of the card front was punched from a 5 1/4 by 1" strip of Soft Suede card stock using the Scalloped Edge Border Punch.  Once this piece is in place, the front flap is secured with adhesive. 


The Woodgrain TIEF adds a nice manly texture to the front of the card.  I have to say I found it difficult to emboss this part of the card, it wouldn't fit sideways in the embossing folder. To compensate for this I had to emboss one side of the circle, remove and reposition the embossing folder and run the second side through the Big Shot.  This actually worked out okay and it's difficult to see where the join is. 


 I love these little hats!  I think this grouping added a nice finishing touch to the card front. They were fussy cut and mounted with dimensionals.

So that's it for my challenge card this week. I hope you liked my special fold technique.  If you want more specific information on how to make this Altered Z Fold card just take a look at this card I made last Easter and use the links to see a video by Dawn Griffith.


You can find this card here and a link to Dawn Griffith's  video showing how to make it.  Enjoy!  

Happy Stamping!
Penny Tokens

Last Free Shipping of the Year - December 9, 10 11, 2024

Heads up, it's time for the last FREE SHIPPING promo of the year! From December 9–11, you can shop and save on all qualifying orders of...