Showing posts with label Birthday Card. Show all posts

Thursday, January 12, 2023

Flying Through the Aspens


I'm excited to show you another card featuring the Adorable Owl stamp set from the Sale-A-Bration flyer.  This is card three of a series of cards I'm sharing with you using this stamp set, and there are more to come.


For today's card I wanted to feature the owl in flight, and I thought what better way to display it than if it was flying through the trees.  


How cool is that?  I combined the owl image with the Aspen Die and Fancy Flora Designer Paper from the new Mini Catalogue.  The Aspen Tree Dies which were  originally bundled with the Perched on a Tree stamp set in the holiday mini, were carried over has been carried over into the new catalogue.
Aspen Die Set coordinates with Perched in a Tree Stamp Set

Fancy Flora 6 x 6 DSP pack 

The card base is an 8 1/2" x 5 1/2" piece of Evening Evergreen cardstock and is scored at 4 1/4".  I adhered a 4 x 5 1/4" piece of the Fancy Flora papers that had a mixture of Soft Succulent and Highland Heather design for the next layer.  

For the final layer on the card front I die cut the Aspen Die from the center of a 4" x 5 1/4" layer of Whisper White and then embossed this piece with the Timber Embossing Folder. Before adhering it to the card base I used a sponge dauber and some Crumb Cake ink and added some colour to the tree trunks to bring out the texture.  The Owl was mounted with dimensionals.  

I finished off the card front with a small sentiment "Hoot! Hoot!" stamped in Evening Evergreen and mounted on a small piece of Evening Evergreen card stock.  I cut the sentiment "Hoot! Hoot! You're So Cute" into three pieces to give me more flexibility when using it.  

For the inside of the card I began with a 4" x 5 1/4" layer of Soft Succulent card stock.  I cut a 3/3/4" x 5" piece of Whisper White for the next layer and then added a 1" x 3 3/4" strip of the DSP along the bottom. 

The Happy Birthday sentiment is from a retired stamp set called Perennial Birthdays and the "It's your Day" is from the Adorable Owls stamp set.  Both were stamped in Soft Succulent ink. I couldn't resist adding the little owl with the bow tie to the bottom right corner.    

I hope you've enjoyed today's birthday card and how I've combined it with designer paper and a die to give it a whole new look.  

Happy Stamping!
Penny Tokens Stampin' Spot! 
Penny Hanuszak, CDN Independent Stampin' Up Demo 


JANUARY HOSTESS CODE: 
Click here to see how to apply the January Hostess Code to Your Online
Order and get an additional FREE Gift from me.


SHOP IN MY ONLINE STORE: 

Monday, November 7, 2022

Glitzy Glam Birthday Wishes - FMS#560


Update November 9, 2022  Winners FMS #560

Wow, I'm doing the happy dance.  I just discovered that my Glitz & Glam card for Freshly Made Sketches #560 was picked by Amy from the Clean Team as one of the Princesses. Click on this link to see who the Queen of Clean and the other Princesses were.  So many awesome cards.   Thanks so much FMS and Amy.  You made my week! 

Freshly Made Sketches #560

Happy Monday, hope your week ahead is full of good times.  

FMS#560
Jen Mitchell's sketch design for the Freshly Made Sketches challenge this week was really timely as I'd been asked to design a "glitzy glam" black, white and gold milestone birthday card.

Here's My Card: 

I started with a Whisper White 5" x 10" card base scored at 5" and added a 4 7/8" x 4 7/8" layer of gold glimmer paper. Before adhering this glimmer paper I used the beautiful oval layering dies from the Fitting Florets collection to cut the large oval from the center. 

For the next layer I cut a 4 3/4 x 4 3/4 piece of paper from the Silver and Gold designer series papers (retired Sale-A-Bration paper).  Then I cut this into 2 pieces measuring 2" x 4 3/4" and 2 1/2" x 4 3/4".  These were adhered to the glimmer paper leaving a 1/4" gap between the two.  

I cut another oval frame from Whisper White card stock and used the center oval for my sentiment.  I stamped the "For a Special Person on a Special Day" sentiment from the Framed Florets stamp set, in Momento Black Ink.  This oval was attached to the center of the glimmer oval with dimensionals.  

I also stamped off five flowers using the small and larger floral stamp on a scrap of Whisper White.  these flowers were arranged around the left side of the oval and leaves and a floral sprig were die cut from Basic Black and added to the grouping.  To finish off the card front I added five of the Gold Adhesive Backed Swirls embellishments that came in the Framed Florets collection to the flower centers.  Love them!  

For the inside of the card I cut a 4 7/8" square of Whisper White and stamped it with one of the birthday sentiments from the Framed Florets stamp set. There was a 4 3/4" x 1 1/4" strip of the Silver and Gold dsp left over from the front cut, so I adhered that along the bottom of the mat.  Love it!  
For the first time ever Stampin' Up! has named the coordinating dies the same as the stamp set.  So, in this bundle you will get the Framed Florets stamp set and the Framed Florets Dies.  I'm super excited about that, as it makes finding your dies in your stash a whole lot easier.  Way to go Stampin' Up! 

 
I couldn't help editing this photo so I could see what the same card would look like in silver, white and black............... and yes it would be beautiful too! 

I hope you enjoyed this card.  It was simple, quick and easy to make.  

Happy Stamping!
Penny Tokens Stampin' Spot 

Penny Hanuszak, CDN Independent Stampin' Up Demonstrator 

Sunday, May 22, 2022

Nuts and Bolts for Freshly Made Sketches 536

For all my Canadian friends and family where ever you are, have a happy and safe Victoria Day long weekend.  Hope you're getting sunshine like we are.  Two days in a row, whoo hoo!  Yeah, it's been such a long time.

Speaking of long times, it's been a while since I participated in a card sketch challenge, so I thought I'd dive in with this sketch from Freshly Made Sketches.  The moment I saw it I knew what I wanted to create with this fun sketch.  

Click here to see the Freshly Made Challenge

Here's My Card:  

The Details:  

I fell in love with the red rubber cling stamp set called Nuts and Bolts when the January to February 2022 Sale-a-bration (SAB) started.  It was so cute and FREE in the SAB.  My only problem was I bought so many stamp sets and bundles from the new Mini that I never got around to using it before it retired the end of February.  So when I saw the sketch from FMS I thought here's my perfect opportunity.  

Stamp Set:    

Nuts and Bolts stamp set featured in the January to February Sale-a-bration catalogue.  Product # 157650.  This item is now retired.  

Product #157650 from the 2022 Jan-Feb Sale-a-bration Sale.  
Cardstock:    

  • 8 1/ x 5 1/4" Marina Mist for Card Base scored at 4 1/4"
  • 5 3/8" x 4 1/8" Misty Moonlight card stock for 1st layer on card front, scrap for sentiment
  • Cut two 4" x 5 1/4" Whisper White layers for the front and inside of the card.  Emboss the front panel.
  • Additional scraps of Whisper White to stamp the sentiment and robots on.  All the robots were fussy cut and coloured with blends. 
Designer Series Paper:
  • 2 1/2" x 6" piece of Simply Marbelous DSP from the Jan/Feb 2022
  •  Sale-a-bration catalogue. 
  • Punch out three 1 3/4" circles from Simply Marbelous DSP  
Ink:
  • Momento Black ink  for sentiment and stamped images.
  • Blends - Petal Pink, Pool Party, Smokey Slate and Basic Black light.  
Accessories:
  • 1 3/4" circle punch
  • gemstones 
Well that's it for today's post and for this Freshly Made Sketch challenge.  I hope you enjoyed it.  


HAPPY STAMPING!
PENNY TOKENS STAMPIN SPOT 

Penny Hanuszak, Independent Stampin' Up Demonstrator 


Wednesday, April 11, 2018

WWC #165 - Tenia's "All About Occasions" Challenge

Hi stampers! Last week was a blur getting ready for weekend house guests and celebrating my mom's 96th birthday.  What a busy time with absolutely no time for stamping, which I missed.  I've spent the time cooking up a storm, cleaning and entertaining.  All worthwhile though, as it was totally great seeing and being together with my family, especially after the tragedy in Hombolt Saskatchewan.  Hug those you love and celebrate when you can.   

This week's Watercooler Wednesday Challenge is being hosted by Tenia Nelson and it's "All About Occasions".  We hope you'll play along with us and post a card or project.  Like the scrolled list says it can be "Any" occasion such as a birthday, wedding, sympathy, retirement - the sky's the limit.

It's easy to link up to our challenge  and it's open until 5:00pm on Monday April 16th, 2018.  

Here's My Card: 
I needed a milestone birthday card last week for a girlfriend who's sensitive about her age.  I wanted to give her a laugh and not emphasize her actual age  so I chose this great stamp from Artistic Impressions called "29 Again".  I think it worked out perfectly.   


Supplies:
Stamp Sets:  29 Again Artistic Impressions (AI), Picture Perfect Birthday, Swirly Birds
Ink:  Emerald Envy, Momento Tuxedo Black, Skin Toned SU Blendability Markers
Stampin' Blends:  Crumb Cake, Light Pink, 
Card Stock:  Basic Black, Whisper White, Emerald Envy
Accessories:  Paper Trimmer,  Sequins, Aqua Painter, Tom Bow Glue

Details:
1.  The card base is an 8 1/2" x 5 1/2" piece of Basic Black card stock, scored at 4 1/4".

2.  The first layer is a 5 3/8" x 4 1/8" piece of Emerald Envy card stock.

3.  The third layer is a 5 1/4" x 4" piece of Whisper White that has been stamped with the small to large swirly circles from Swirly Birds stamp set.  I only stamped from the top left corner to the bottom right corner, leaving some white space on the upper right of this panel. 

4.  There are three layers to the image panels.  The first one is a piece of Basic Black that measures 2 1/4" x 4 1/4".  The next panel in Emerald Envy measures 2 1/8" x 4 1/8", and the Whisper White panel the image is stamped on measures 2" x 4".  

5.  I stamped the "29 Again" AI image with Momento Tuxedo Black ink.  The image is coloured with an Aqua Painter directly from the Emerald Envy ink pad.  I used the skin tone Stampin' Blendabilities that were out a few years ago for the facial features, legs and arms.   
This is such an incredibly fun image to colour.  I added some sequins for some pizzazz.  I probably should have done some more shading with the hair and added some Wink of Stella here and there on her balloon or the flowers on the dress, but oh well, next time.

6.  The inside panel measures 5 1/4" x 4" and is stamped with the sentiment and party blowers from a Picture Perfect Birthday stamp set.  Love this set! 
I love these stamps from the Picture Perfect Birthday Set .... what fun!
Well that's it for this challenge.  I hope you liked my 29 Again Birthday Card.  I know the recipient will get a kick out of it.  Let me know what you think.  I hope I inspired you to get out your ink pads and start colouring your images.  

If you haven't checked out the other members of the Watercooler Wednesday Design Team, be sure to do so.  They've done such a fabulous job on their cards this week.  Click here to return to the Watercooler Wednesday WWC#165 challenge.


I'm also entering this card at the following challenges:
http://audsentimentschallengeblog.blogspot.ca/2018/04/201-happy-birthday-aud-sentiments.html
and
http://seizethebirthday.blogspot.ca/2018/04/vibrant-colors.html

Happy Stamping!
Penny Tokens Stampin' Spot 

Wednesday, May 10, 2017

Month of May Eastern Palace Series - Project #4


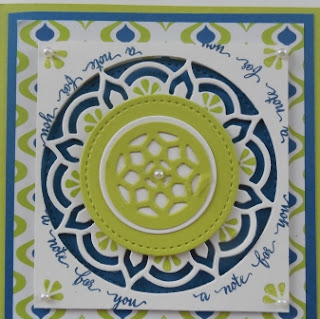
Today's project is feminine birthday card featuring products from the Eastern Palace Suite and one of the new InColours - Lemon Lime Twist

I'm going to start by saying that the color "lemon lime" has never been high on my list of colors before today.  I came around though after using the new Lemon Lime Twist ink pad, designer series paper and card stock.  

Here's my project and the reason why I'm changing my mind.

Supplies:
Stamp Sets:  Beautiful You and Eastern Beauty 
Ink:  Dapper Denim and Lemon Lime Twist
Card Stock:  Very Vanilla, Lemon Lime Twist and Dapper Denim and 
Eastern Palace Specialty Designer Series Paper
Accessories:  Big Shot, Paper Trimmer,  Eastern Gold Vinyl Stickers, Basic Pearls, Eastern Medallions Thinlet Dies, Stitched Shapes Dies, 1, 1 1/4 and 1 38" Circle Punches, Basic Pearls, Dimensionals, Tom Bow Glue, Blender Pen, Acrylic Blocks. 
 
Assembly:
Card Base: 8 1/2" x 11" Very Vanilla card stock scored at 4 1/4". 

1st layer: 5 1/4" x 4" piece of Lemon Lime Twist card stock.  Note: Cut out the 2" Stitched Shapes circle, the #1 circle and #10 flower from Eastern Medallions thinlet dies from the center of this layer before adhering it to the base. Punch out the #1 circle die shape with the 1 3/8" circle punch.

2nd layer:  5" x 3 3/4" piece of Dapper Denim card stock.  Note: Cut out a 3" circle with the Stitched Shapes die before adhering to the 1st layer. Adhere this circle to the top center of the 3rd layer.

3rd layer:  4 3/4" x 3 12" piece of  Eastern Palace Specialty Designer Series Paper. 

4th layer:  Cut a 3" x 3" piece of Very Vanilla card stock.  Center and cut out the #3 die from Eastern Medallions and punch out a 1 3/8" circle from the center.  Stamp the sentiment "a note for you" in Dapper Denim ink around the outside of the circle.  Stamp the small flower image in Lemon Lime Twist in the corners and add a basic pearl to the center of each.  Use this same stamp to stamp the half circle arches on the medallion.  Layer and adhere the 2" Lemon Lime Twist circle, the 1 3/8" Very Vanilla circle and the #1 Lemon Lime Twist circles together with Tom Bow Glue.  Adhere to the center of the medallion with a couple of Dimensionals.  Add a small basic pearl to the center.  Put a Dimensional on each corner of the back side of this square and adhere over the 3" Dapper Denim circle.  

5th & 6th layers: 1" x 3 1/2" Dapper Denim card stock and 3/4" x 3 1/4" piece of Very Vanilla card stocks. Stamp the "Happy Birthday Gorgeous" image from Beautiful You to the center of the Very Vanilla strip.  Attach this strip with Dimensionals to the Dapper Denim Strip and then attach this piece with Tom Bow glue to the bottom of the DSP layer leaving about an 1/8 of an inch gap.  Adhere 3 basic pearls to each side of this layer.
Inside: 
1st layer:  3 3/4" x 5 1/4" piece of Dapper Denim card stock
2nd layer:  3 5/8" x 5" piece of Very Vanilla card stock.  Add a strip from the Eastern Gold Vinyl Stickers along the top edge. 

Stamp the dancing girl image from Beautiful You in Dapper Denim ink in the bottom right corner of the card.  Use a blender pen to draw out the colour from the line images to the dress and hat.  Colour a sash on the hat and the girl's slip with Lemon Lime Twist.  Stamp the "life is beautiful" sentiment from the girl's right side and below her arm. Finally add a touch of Wink of Stella to the hat, the dress folds and across the shadow at the base of the image.
Beautiful You

Normally I would have been finished stamping and fiddling with the inside of this card, however I made a Boo Boo with the blender pen leaving a big smudge above the girls left arm.  What to do?  What to do?  Well, cover it up of course! 

The only way I could think of fixing this mistake apart from starting over was to "cover it up".  I decided to cut out a Lemon Lime Twist flower using the#10 die.  I stamped each of the pedals with the small curlicue stamp from Eastern Beauty in Dapper Denim.  I stamped "enjoy today" in Dapper Denim on a scrap of Very Vanilla and cut it out with a 1" circle punch and adhered this to the center of the flower image.  I glued the flower to the card base above the girl's arm and was finally done!  
I hope you liked the way I mixed the Eastern Beauty stamp set with the Beautiful You stamp set to create this unique birthday card and were inspired to try out this style of card yourself.  I totally fell in love with this Lemon Lime Twist especially  when it was combined with the Dapper Denim and Very Vanilla.  Awesome!  Enjoy! 

Happy Stamping!
Penny Tokens Stampin' Spot

Wednesday, May 3, 2017

Watercooler Wednesday Challenge #117 - Heidi's Feminine Anything Goes


It's been nothing but rain, rain and more rain here in the Fraser Valley for the past few months, so although we've got lots of Spring flowers in bloom, we've had an incredible lack of sunshine.  Lets hope the month of May brings a new weather outlook.

Speaking of change, the Watercooler Wednesday Challenge Blog is undergoing some changes too.  The first change is that our Guest Design Artist, Heather Hopson, is taking a break for the summer and hopefully will rejoin us in the Fall. Thanks Heather for inspiring with all your great cards, posts and comments.  Have a terrific summer!

The Watercooler Wednesday Design Team is also excited to announce is the addition of Fiona Whitehead and Judy Markowitz . These two very talented gals have participated in many of our weekly challenges and demonstrated some pretty impressive paper crafting skills. A big shout out and welcome for these two!  

Another change I'm excited about is the lineup for our challenges is changing beginning this month.  Make sure you check out the side-bar on the Watercooler Wednesday Challenge Blog for the new weekly challenges.  I'm sure you're going to be as excited as I am.  Love it! 

Heidi Weaver is starting us off by hosting our first "Feminine" Anything Goes theme challenge. Since we've been covering the boys pretty regularly it seemed only fair that the "girls" get spotlighted too.  Isn't this a great addition to our line-up?  

This challenge is open from May 3rd and the link closes at 5pm Mountain time on Monday May 8th.  I hope you'll join us for this challenge, by linking up your Feminine Anything Goes card.

Here's My Card: 
I've really been wanting to try out the Beautiful You stamp set from Stampin' Up! and this new challenge was the perfect opportunity to get it inky.  Regretfully I'm also showcasing the soon to be retired Balloon Pop Up Thinlet die.

I cut out the DSP with the Balloon Pop Up Die and mounted in on Basic Black card stock. I also used the balloon images from this die cut to cut out the two Mint Macaroon Balloons.  The Sweet Sugar Plum Balloon was cut out with the Double Balloon punch.  I stamped the dancing girl on Very Vanilla card stock and fussy cut out the image with my detail scissors. 

Supplies:
Stamp Set:  Beautiful You #143637
Card Stock and DSP: Very Vanilla, Basic Black and Sweet Sugarplum card stock. Playful Palette DSP Stack #141657, and the now retired Sweet Sugarplum and Mint Macaroon Glimmer papers. 
Ink:  Tuxedo Momento Black, Mint Macaroon, Sweet Sugarplum, and Blushing Bride.
Accessories:  Blender Pen, Big Shot, Trimmer, Tom Bow Glue, Dimensionals, Balloon Pop Up Thinlet Die, Stitched Shapes Oval Dies, Large Oval Punch, Double Balloon Punch, Project Life Black Marker.

The inside of this card is a little unusual in that the free writing space is on the back of the front panel.  I've added another stamped design and birthday sentiment to the bottom inside panel.  Sometimes it's just nice to change things up!   In my opinion, the inside just adds to the WOW factor in this card lay out.  
In this view you can see the whole inside of the card.  Unfortunately it was difficult to photo graph so this image is very small.
I love the openness of this panel and the two balloons.  There is plenty of writing space left for the sender to express their good wishes for the day!  The balloons were cut out with the Double Balloon punch.  The Mint Macaroon balloon is glued to the panel and the smaller Sweet Sugarplum balloon was added with a Dimensional. I drew the strings free hand with a Project Life marker.

This is the bottom inside panel and I've chosen to add one of the stamped female images and the sentiment "Happy Birthday Gorgeous".  I love how the paper from the Playful Pallet stack really adds a soft colourful touch to this card. 
Well that's it for today stampers.  If you have any questions about the layout of this card or the products used please don't hesitate to email me at pennyhanuszak@telus.net or leave a comment on this post.  I'd love to hear from you. 


Happy Stamping!
Penny Tokens Stampin' Spot

Wednesday, April 5, 2017

Watercooler Wednesday #113 - Libby's Sketch Challenge


Welcome to this week's challenge at the Watercooler.  Libby is hosting this week and has brought us a wonderful Sketch Challenge.  We're hoping you'll fall in love with this sketch as much as we did and join in the fun.  Our link is open until 5:00pm MT on Monday April 10th, 2017.

Here's My Card:
What a delightfully easy and cool sketch to work with.  It was so cool in fact, that I combined it with Stampin' Up!s Cool Treats Photopolymer Bundle to make this fun birthday card.
Cool Treats Photopolymer Bundle

Since the sketch works either horizontally or vertically, I decided to flip it and put the stripes on the left side of the card rather than the top. I like how it turned out.  I thought it would be fun to use designer paper for the stripes so chose the coordinating Tasty Treats designer paper


Supplies:
Stamp Set: Cool Treats #142982, Occasions Spring Catalogue
Ink: Early Espresso for the sentiments, Watermelon Wonder, Pool Party, Peek A Boo Peach and Crumb Cake for distressing the ice cream scoops and bowl
Card Stock: Crumb Cake, Pool Party, Watermelon Wonder, Whisper White
Designer Series Paper:  Tasty Treats  
Accessories: Big Shot, Trimmer, Misti, Acrylic Block, Large Dots and Textured Lattice (R) Embossing Folders, Tom Bow Glue, Dimensionals, Sequins, Frozen Treats and Stitched Shapes Framelits, 1/2" and 1 3/8" circle punches
Assembly:
1.  The card base is an 11" x 4 1/4" piece of Crumb Cake card stock scored at 5 1/2" for a top fold card.

2.  The first layer is a 5 1/4" x 4" piece of Pool Party card stock adhered to the card base.

3.  The second layer is a 5" x 3 3/4" piece of Watermelon Wonder that was partially embossed using the Large Dot Embossing Folder.

4.  Three strips of "Tasty Treats" DSP measuring 3/4" x 5 1/2" were cut and adhered to the left side of the Watermelon Wonder layer after it was embossed.  The excess paper from the strips were trimmed off with scissors before adhering this layer to first one.


5.  The two circles were cut from Pool Party and Whisper White card stock with the Stitched Shapes framelits. I just love the tailored look of these die cut images.   Sprinkles were stamped in Watermelon Wonder ink on the right hand side of the Whisper White circle and then the circles were adhered to the Watermelon Wonder layer. 
The Stitched Shapes Framelits offer 12 dies with the beautiful detailed stitching that gives such a professional look to your layers.  The set includes: 4 Circle dies, largest image 2-7/8",  4 Square dies, largest image 2-5/8” and  4 Oval dies, largest image 3-1/4” x 2-5/16”. 


6.  The Crumb Cake bowl was die cut and embossed with the retired Square Lattice Embossing Folder and sponged around the edges with Crumb Cake ink and a sponge dauber.


7.  I found it cumbersome to fit the ice cream scoops behind the bowl, so I cut a circle from a scrap of Whisper White card stock with a 1 3/8" circle punch and used it as a base for the scoops to sit on.  I cut three 1/2" circles for the ice cream scoops and three ice cream drips to adhere to the tops of the circles from Watermelon Wonder, Pool Party and Peek A Boo Peach card stocks.  To add some depth each of these pieces were sponged with their corresponding inks and a sponge dauber. 

To assemble the scoops I started with the Peek A Boo Peach scoop in the center of the 1 3/8" circle, followed by the Watermelon Wonder scoop on the left.  The Pool Party scoop was added with a Dimensional on the right.  Once all the circles were in place I adhered the bowl with Dimensionals.

8.  To finish the card I stamped the sentiment "You're the Cherry to My Sundae" from the Cool Treats Stamp Set on the lower right hand side of the Watermelon layer in Early Espresso ink.  Thanks to my Misti the sentiment came out nice and dark. 
Cool Treats is a 36 piece Photopolymer stamp set that also can be purchased in a bundle along with the Frozen Treats Thinlets.  This is sure to be a popular set this summer.  It's got lots of great sentiments as well as sweet treats to stamp.

10.  The inside of the card has finished with a 5 1/4 x 4" panel of Watermelon Wonder and a 5" x 3 3/4" panel of Whisper White.  The beautiful "Happy Birthday" sentiment was stamped in Early Espresso and I added a small ice cream cone die cut in the bottom right corner and a few sequins. 

Well that's it for my post for this challenge.  I think it was indeed a "Tasty Treat" and hope you'll drop me a comment to let me know how you liked it.    If you haven't already, make sure you check out the other Watercooler Wednesday Design Team Artists cards for ideas.    

I hope today's card has inspired you to create a card of your own using the WWC113 sketch challenge.  You have until 5pm MT on Monday April 10th, 2017 to enter your creation.    
Happy Stamping!
Penny Tokens Stampin' Spot

Last Free Shipping of the Year - December 9, 10 11, 2024

Heads up, it's time for the last FREE SHIPPING promo of the year! From December 9–11, you can shop and save on all qualifying orders of...