Showing posts with label Eastern Medallion Thinlet Dies. Show all posts

Wednesday, May 10, 2017

Month of May Eastern Palace Series - Project #4


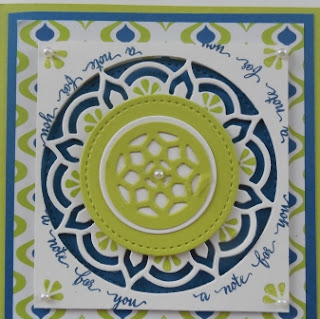
Today's project is feminine birthday card featuring products from the Eastern Palace Suite and one of the new InColours - Lemon Lime Twist

I'm going to start by saying that the color "lemon lime" has never been high on my list of colors before today.  I came around though after using the new Lemon Lime Twist ink pad, designer series paper and card stock.  

Here's my project and the reason why I'm changing my mind.

Supplies:
Stamp Sets:  Beautiful You and Eastern Beauty 
Ink:  Dapper Denim and Lemon Lime Twist
Card Stock:  Very Vanilla, Lemon Lime Twist and Dapper Denim and 
Eastern Palace Specialty Designer Series Paper
Accessories:  Big Shot, Paper Trimmer,  Eastern Gold Vinyl Stickers, Basic Pearls, Eastern Medallions Thinlet Dies, Stitched Shapes Dies, 1, 1 1/4 and 1 38" Circle Punches, Basic Pearls, Dimensionals, Tom Bow Glue, Blender Pen, Acrylic Blocks. 
 
Assembly:
Card Base: 8 1/2" x 11" Very Vanilla card stock scored at 4 1/4". 

1st layer: 5 1/4" x 4" piece of Lemon Lime Twist card stock.  Note: Cut out the 2" Stitched Shapes circle, the #1 circle and #10 flower from Eastern Medallions thinlet dies from the center of this layer before adhering it to the base. Punch out the #1 circle die shape with the 1 3/8" circle punch.

2nd layer:  5" x 3 3/4" piece of Dapper Denim card stock.  Note: Cut out a 3" circle with the Stitched Shapes die before adhering to the 1st layer. Adhere this circle to the top center of the 3rd layer.

3rd layer:  4 3/4" x 3 12" piece of  Eastern Palace Specialty Designer Series Paper. 

4th layer:  Cut a 3" x 3" piece of Very Vanilla card stock.  Center and cut out the #3 die from Eastern Medallions and punch out a 1 3/8" circle from the center.  Stamp the sentiment "a note for you" in Dapper Denim ink around the outside of the circle.  Stamp the small flower image in Lemon Lime Twist in the corners and add a basic pearl to the center of each.  Use this same stamp to stamp the half circle arches on the medallion.  Layer and adhere the 2" Lemon Lime Twist circle, the 1 3/8" Very Vanilla circle and the #1 Lemon Lime Twist circles together with Tom Bow Glue.  Adhere to the center of the medallion with a couple of Dimensionals.  Add a small basic pearl to the center.  Put a Dimensional on each corner of the back side of this square and adhere over the 3" Dapper Denim circle.  

5th & 6th layers: 1" x 3 1/2" Dapper Denim card stock and 3/4" x 3 1/4" piece of Very Vanilla card stocks. Stamp the "Happy Birthday Gorgeous" image from Beautiful You to the center of the Very Vanilla strip.  Attach this strip with Dimensionals to the Dapper Denim Strip and then attach this piece with Tom Bow glue to the bottom of the DSP layer leaving about an 1/8 of an inch gap.  Adhere 3 basic pearls to each side of this layer.
Inside: 
1st layer:  3 3/4" x 5 1/4" piece of Dapper Denim card stock
2nd layer:  3 5/8" x 5" piece of Very Vanilla card stock.  Add a strip from the Eastern Gold Vinyl Stickers along the top edge. 

Stamp the dancing girl image from Beautiful You in Dapper Denim ink in the bottom right corner of the card.  Use a blender pen to draw out the colour from the line images to the dress and hat.  Colour a sash on the hat and the girl's slip with Lemon Lime Twist.  Stamp the "life is beautiful" sentiment from the girl's right side and below her arm. Finally add a touch of Wink of Stella to the hat, the dress folds and across the shadow at the base of the image.
Beautiful You

Normally I would have been finished stamping and fiddling with the inside of this card, however I made a Boo Boo with the blender pen leaving a big smudge above the girls left arm.  What to do?  What to do?  Well, cover it up of course! 

The only way I could think of fixing this mistake apart from starting over was to "cover it up".  I decided to cut out a Lemon Lime Twist flower using the#10 die.  I stamped each of the pedals with the small curlicue stamp from Eastern Beauty in Dapper Denim.  I stamped "enjoy today" in Dapper Denim on a scrap of Very Vanilla and cut it out with a 1" circle punch and adhered this to the center of the flower image.  I glued the flower to the card base above the girl's arm and was finally done!  
I hope you liked the way I mixed the Eastern Beauty stamp set with the Beautiful You stamp set to create this unique birthday card and were inspired to try out this style of card yourself.  I totally fell in love with this Lemon Lime Twist especially  when it was combined with the Dapper Denim and Very Vanilla.  Awesome!  Enjoy! 

Happy Stamping!
Penny Tokens Stampin' Spot

Sunday, May 7, 2017

9 Tips for Using the Eastern Medallion Thinlet Dies


Yesterday was National Scrapbook Day and although I'm not a big scrapbooker, I do like to celebrate the day by inking up my stamps and creating something special.  What fun and a good excuse to spend time in my craft room.

I was thrilled to share the afternoon with one of my besties, Debby Evoy who is also a Stampin' Up! Demonstrator in the Abbotsford area.

It was a great afternoon of yakking, stamping, sharing tips, laughter and smiles.  The latter actually influenced and inspired me to create this "hello" card.

Here's My Card: 
This is the first of many Eastern Palace Suite cards I'll be sharing during the month of May.  It's my own original design.
 
Sometimes it's nice not to add a sentiment to the inside of the card, so I didn't stamp anything I just added the two strips of stamped card stock at the bottom to tie in with the front panel of the card.  

Supplies:
Stamp Sets:  Eastern Beauty Photopolymer Stamp Set and Nailed It (R)
Inks:  Fresh Fig (New), Lemon Lime Twist (New), Tranquil Tide (New)
Card Stock:  Tranquil Tide, Fresh Fig, Whisper White, Gold Foil
Accessories:  Big Shot, Acryllic Blocks, Paper Trimmer, Dimensionals, 2" Circle Punch, 2 1/2" Scalloped Circle Punch, Stitch Shapes Circle Framelit Dies, 1/2" Circle Punch, Eastern Medallions Thinlet Dies.

Eastern Medallion Thinlet Dies:
Before we look at what went into making the above card I want to give you some tips regarding the Eastern Medallion Thinlet Dies .  First of all, there are 14 individual dies with multiple options for layering.  I don't know about you, but although it's exciting to think of all the variations I wasn't sure where to begin.  

I began by cutting out a 4/78" x 6 1/4" piece of Magnetic sheeting to hold all the dies in place.  I numbered each of the dies with a bright pink Sharpie Pen, so I could see at a glance which die I was using.  Here are some pictures of my dies and during the next few weeks when I refer to these dies it will be by number, for example:  Combine dies #1, 2 and 3 to make a particular configuration.   
Here's the Magnetic Sheet I use to hold all the Eastern Medallion Thinlet DiesNote: when you first get the dies they are attached to a sheet of thin card stock with scotch tape, that is very strong and it's difficult to easily remove them. Be extremely carefully removing them because you don't want to bend or warp the dies. Here are some close-up pictures of the dies and how I numbered them.

Fig 1.  Dies 1-3 starting from the smallest die in the center.
Fig 2.  Dies 4-6 starting from the smallest die in the center of  the flower.

Fig 3.  Dies 7-9 starting with the die that looks like a driedel.

Fig 4.  The small flower is #10 and the larger flower is #11.

Fig 5.  These smaller individual dies were numbered 12-14.

When I began cutting out the various dies I was surprised that some of them didn't cut all the way through the paper.  I wasn't expecting that. See the examples below.  Figures 6, 7 and 8 show how the individual dies look. 
Fig 6.  You can see from this picture that circles 1 through 6 do not cut through the paper. The reason for this is that when you layer the dies together as in Figures 1 to 4 above, you'll get one solid medallion.  If you want to separate them and use the die shape in some other way you can use coordinating punches or dies to cut them out.

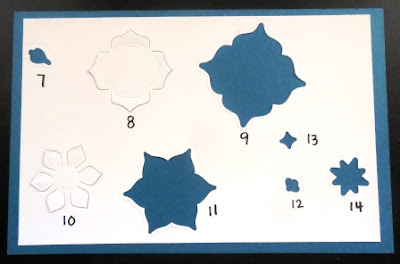
Fig 7.  In this sample you can see that two of the dies #s 8 and 10 do not cut through the paper entirely, while 7,9,11,12,13, and 14 do. 

Fig 8.  These are the negative images from the above die cuts.
Fig 9.  In this picture you can see that only the petals have cut through the card stock on the first flower image. To remove the whole flower from the card stock you need to snip the small pieces of card stock in between the petals to remove it. I used my small detail cutting scissors. I marked the cutting area on the second flower with white ink.  The blue flower shows what it looks like when it's free of the card stock. 

Assembly:
Card Base: I cut an 8 1/2" x 5 1/2" piece of Tranquil Tide card stock and scored it at 4 1/4" for the A2 card base.

1st Layer:  I cut a piece of Fresh Fig to 5" x 3 7/8".  Note:  Before adhering this layer to the card stock I punched out a 2" Stitched Shape Circle and a #10  Fresh Fig flower layer.

2nd Layer:  I cut a piece of Gold Foil to 4 7/8" x 3 3/4".  Before adhering to the Fresh Fig layer I punched out a 2" Scalloped Circle and a #14 small floral layer.

3rd Layer:  For the final layer I began with a 4 x 5 1/4" piece of Very Vanilla card stock but later reduced this piece to 4 3/4" x 3 5/8". I used the overage  for the designer strip on the bottom inside of the card. I stamped my own background by randomly stamping the small and medium circle stamps from the Eastern Beauty Photopolymer Stamp set in Fresh Fig and Lemon Lime Twist.  I randomly stamped the "hello" sentiment in Tranquil Tide. 

Large Medallion:  I started with a 2 1/2" Tranquil Tide Stitched Shapes circle layered with a 2 1/2" Scalloped Gold Foil circle, a 2" Fresh Fig Circle, and a 1 3/4" Very Vanilla Stitched Shapes layer.  I stamped the sentiment "to think of you is to smile" in Fresh Fig ink.  

Small Flower Medallion: The small flower medallion was made by cutting out and layering two #10 die cuts - the bottom one in Tranquil Tide and the top one in Fresh Fig.  Next I cut a Gold Foil layer using die #14.  I stamped one of the cute little smiley face icons from the Nailed It stamp set in Fresh Fig ink on Very Vanilla card stock and cut it out with a 1/2" circle punch.  I popped up the center on a Dimensional.  
Inside Panel:  A Very Vanilla panel measuring 4" x 5 1/4" was cut and adhered to the card base.  A 1/4" strip of the background paper was adhered to a 1/2" piece of Fresh Fig card stock and then adhered to the bottom of the card panel.  I didn't stamp a sentiment at this point because this card could be used for various occasions such as Thinking of You, Happy Birthday, Congratulations or Just a Note.  

Well that's the end of today's post.  I hope you enjoyed it and I've provided some helpful hints on using the dies.  I will continue to provide tips and tricks for using this set creatively over the coming weeks.  I'd love to hear your comments and whether you find this kind of tutorial useful.  

Happy Stamping! Penny Tokens Stampin' Spot  

Paper Pumpkin Alternatives April 2024 and Sketch Challenges

The past week was so busy that time literally flew by.  I have a number of projects on the go, including working on my April 2024 Paper Pump...