Showing posts with label Month of May Eastern Palace Series. Show all posts

Sunday, May 21, 2017

Month of May Eastern Palace Series - Project 8


Wow , who knew the month of May would be such a whirl wind.  Between renos, bridal showers and visitors from out of town, my stamping plans have been curtailed.  However I'm back today with another in my Month of May Eastern Palace Suite series, and hopefully will get a few more in before the month ends.  

Today's Project is a set of note cards with matching envelopes and a decorated box.  That's right, everything matches.  

There are four "thank you" cards in the set each featuring different products from the Eastern Palace Suite.  Here are the directions for re-creating them:
  • Card base: Cut a 4" x 8" piece of Thick Very Vanilla Card stock scored at 4".
  • Layer #1:  Cut a 3 3/4" x 3 3/4" piece of card stock in one of these colours:  Fresh Fig, Tranquil Tide, Dapper Denim and Lemon Lime Twist, layered on card base with Tom Bow glue.
  • Layer #2:  Cut a 3 1/2" x 3 1/2" piece of Eastern Palace Specialty Designer Series Paper and layer it on card stock with Tom Bow glue. 
  • Using Stitched Layers cut four 2 3/4" Stitched Shapes circles from Very Vanilla card stock and adhere to the center of DSP with Tom Bow glue.
  • Cut four medallions as follows:  2 using medallion dies #6 and 2 and 2 using medallion dies #3 and 5 and adhere them to the Very Vanilla circle with Tom Bow glue. Note: Match mix and match the colours of the medallions to two of the colours from each DSP square.
  • Punch out 4 1 1/4" circles from the coloured card stock and 4 1" circles from Very Vanilla card stock. Adhere a coloured and very vanilla card stock piece together. 
  • Before layering to the medallion, stamp the beaded circle and "thank you" sentiment from the Eastern Beauty Photopolymer stamp set on the very vanilla circle.  Adhere this layered piece with dimensionals to the medallion.


I made matching envelopes to go with these cards starting with a standard invitation sized envelope and a 2" x 4 4/16" piece of designer series paper that matched each of the cards.  
I really like it when the envelopes that accompany note cards are either stamped with a design or have designer paper on the envelope flaps.  Quite a while ago I discovered a great tutorial by Cindy Lawrence on Split Coast Stampers that shows how to make a "Tailored Envelope" to match your card.   Here is how I assembled my envelopes following Cindy's example:
  • Apply adhesive to the flap of the envelope and seal shut.  You can use tape runner or liquid glue.
  • Trim the long side of the envelope at 4 5/16".  You should now have a square. 
  • Turn the envelope over and punch half-way in on the top edge with either a 1" circle or an oval punch, and set aside.
  • Score the designer series paper strip on the long side at 1/2" and crease.  Make sure the side of the paper that matches your card is facing outward.  This is will be your new envelope flap.
  • Put sticky strip on the back of the 1/2" crease line and adhere the flap to the envelope.  
  • Round the corners to give a more finished appearance.  
  • I attached a strip of sticky strip on the inside of the flap so it can be sealed once the card has been added to the envelope.  

 Here are the finished cards and their matching envelopes:


I decided to make a matching box to hold the note cards and envelopes and I'm very pleased with how it turned out.  Here's a look at the box: 
A side and top view of the gift box. 
I layered matching DSP and card stock in the bottom of the card box to give it a more finished appearance. For the box top I repeated the card layout for the Fresh Fig card and added two additional layers of card and DSP beneath it.  The sides of the box have a 1" x 4 1/8" layer of contrasting DSP. 
The box holds 4-6 note cards and envelopes.
I followed a great video by Crafty Caroline on Youtube which actually shows all the dimensions and how to assemble this box.  Just click on Crafty Caroline and you can watch how it's made.  The fun thing about Carolyn's video is that she used the Eastern Palace Suite for her box too, so it's like getting two projects in one today.   She also follows the "1/16" rule for making box lids so you get a great fitting box.

I hope you enjoyed today's project and will come back again to see more of the Month of May Eastern Palace Suite projects that I've been working on.  If you like today's project please let me know.  I'm inspired by your comments and it really encourages me to keep posting.
 
Happy Stamping!
Penny Tokens Stampin' Spot

Wednesday, May 17, 2017

Watercooler Wednesday #119 - Judy's Masculine "Anything Goes" Challenge


Welcome to the Watercooler Wednesday challenge.  This week's WWC119 Masculine "Anything Goes" challenge is being hosted by the very talented Judy Markowitz who recently joined our DT.  
Here's My Card:
Today's card uses a mixture of stamps and die cut images and would be appropriate for a milestone birthday. I am including it in my "Month of May Eastern Palace Suite Samples as Project #6. 


Supplies:
Stamp Sets: One Wild Ride,Guy Greetings and Balloon Adventures 
Inks: Momento Tuxedo Black
Card Stock:  Basic Black, Basic Gray and Whisper White
Accessories:  Big Shot, Acrylic Blocks, Paper Trimmer, Eastern Medallions Thinlet Dies, Shaped Circles and Circles Dies, Best Badge Punch, Eastern Gold Vinyl Stickers, Hexagons Dynamic Impressions Embossing Folder, Dimensionals, Tom Bow Glue 

How It's Made:
1. Card Base:  Cut an 8 1/2" x 5 1/2" base from Whisper White card stock.  Score at 4 1/4".  Randomly stamp the "texture" image from One Wild Ride in Momento Tuxedo Black ink around the edge of the front of the card base. 

2.  1st Layer:  Cut a 4" x 5 1/4" Basic Black panel.  Before adhering it to the card base punch out a badge and a 2 1/2" circle and set aside. 

3.  2nd LayerCut a 3 3/4" x 5" panel from Basic Gray card stock. Dry Emboss  this panel with the Hexagons Dynamic Impressions Embossing Folder. 
Using the large circle medallion from Eastern Medallions cut out a medallion from the left side of the card.  Attach the outer petal ring from the Eastern Gold Vinyl Sticker around the edge of the medallion. Randomly stamp the "textured" stamp image from the One Wild Ride set in the top right and bottom left corner of this panel.

4.  3rd Layer:  Cut a small and medium Stitched Shapes circle from Whisper White Card stock.  Stamp the image of the old car from Guy Greetings on both circles.  The image on the smaller one will overlap the circles edge at the back of the car, that's okay, because this circle will be glued to the larger one and the cars will be lined up so you see a full image.  Stamp off with the textured stamp from One Wild Ridge across the front of the layers.  Layer the Vanilla circles to the Basic Black one with Dimensionals and then adhere this to the enter of the medallion.   


5. Stamp two badges from the One Wild Ride set onto Whisper White card stock.  Cut off the white edge around one of the badges to remove the white space.  Glue this badge to the one that was cut out from the 1st card layer.  Cut out the "Journey" banner and adhere it to the center of the badge with Dimensionals.  

 6.  Inside the Card:  Cut a 5 1/4 x 4" panel from Whisper White card stock.  Stamp the "Here's to Another Year Full of Adventure" from the Balloon Adventure stamp set towards the top of this panel. 

I added a 3/4" x 4" strip of Basic Gray card stock and a strip of 1/4" x 4" Basic Black to the bottom of the card.  It kind of looks like a road.  I stamped the "Route 66" image on Whisper White with black ink and then fussy cut it out and mounted it with Dimensionals on the "road".

That's all there is to making today's masculine birthday card and I hope you found it inspiring.  I really liked the way the images from the three stamp sets paired so well and I'm totally in love with those Eastern Gold Vinyl stickers.  Who knew they could be so much fun!  

Happy Stamping! 
Penny Tokens Stampin' Spot  

Month of May Eastern Palace Series - Project #6

For my 6th Project in this series I have created a Masculine birthday card.  You can see all the details on how this card was made by checking out the Watercooler Wednesday #119 - Judy's Masculine "Anything Goes" challenge this week.  

Here's the Card:


Happy Stamping
Penny Tokens Stampin' Spot

Thursday, May 11, 2017

Month of May Eastern Palace Series - Project #5 Basic Gift Card Holder

Today's Eastern Palace project is another gift card holder.  This one is super duper quick to make and I think you're going to love it. 
This little gift holder is the perfect size for stashing a gift card or a business card.

This is a simple belly band measuring 3/4" x 7".  A strip of the Eastern Gold Vinyl stickers encircles the band.  I used dies #8 and #9 for the center medallion and cut them from Fresh Fig card stock.  A coordinating sticker was used in the center of the medallion and then overlaid with a 1" Very Vanilla circle which was stamped with the sentiment "For You" from the Eastern Beauty stamp set.  Three small Basic Rhinestones were adhered below the word "you".  

This is what the full outside of the holder looks like when the belly band is removed and it's folded out. The Dapper Denim holder measures 4 1/4" x 9 3/4".  To assemble the base cut 1 piece of card stock to measure 4 1/4 x 6" and score this at 2" and 5".  Cut a second piece to measure 4 1/4" x 3 3/4" and score at 1"  Use a bone folder to burnish the fold lines. Join the sections of the holder at the 5" and 1" score lines.  I used 1/4" tear and tape placed at the bottom of the scored lines to join the two pieces.  Leave the top 3/4" open so you can insert the gift card.  I finished it off by rounding the bottom and top edges with the corner rounder on my Envelope Punch Board.   
Supplies:
Stamp Sets:  Eastern Beauty Photopolymer and Thoughtful Branches (R)
Ink:  Dapper Denim and Fresh Fig
Card Stock:  Dapper Denim and Fresh Fig and the Eastern Designer Series Specialty Paper
Accessories:  Big Shot, Paper Trimmer,  Bone Folder, Acrylic Blocks, Basic Pearls, Eastern Medallion Dies (#8 and #9, Stitched Shapes Ovals, Eastern Gold Vinyl Stickers, Tear and Tape, Dimensionals, Envelope Punch Board.

DSP Layers:
1.  Cut 4 pieces of DSP to 4 x 2 3/4".  2 will be used on the outside front of the holder and the reverse side of the remaining two will be on the inside.  For each side piece will be adhered to the center panel and the other will be adhered to the bottom panel (these are reverse of each other). Round only the bottom two corners on each side and adhere with the straight edge facing the center of the holder. 

2.  Cut 2 pieces of DSP to 4" x 1 3/4" and round the corners.  Adhere to the top inside and outside panels. 

3.  Cut 2 4" x 3/4" strips of DSP for the card holding panels and adhere.   Use the reverse design to what you used on the inside.  

4.  The ovals are cut with the Stitched Shapes dies and adhered with Tom Bow glue.  The stamps used are from the Eastern Beauty Photopolymer stamp set.  I added two Basic Rhinestones in the centers of the small stars.  I adhered a strip to the top and bottom of the inside panel from the Eastern Gold Vinyl Stickers set.  
The inside view of the gift card holder. 

Thanks for coming back today.  I'd love to hear what you thought of today's project.  Is this something you would make? What would you do differently.  I'd love to hear from you.  

Happy Stamping!
Penny Tokens Stampin' Spot

Wednesday, May 10, 2017

Month of May Eastern Palace Series - Project #4


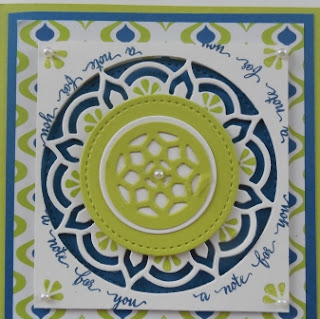
Today's project is feminine birthday card featuring products from the Eastern Palace Suite and one of the new InColours - Lemon Lime Twist

I'm going to start by saying that the color "lemon lime" has never been high on my list of colors before today.  I came around though after using the new Lemon Lime Twist ink pad, designer series paper and card stock.  

Here's my project and the reason why I'm changing my mind.

Supplies:
Stamp Sets:  Beautiful You and Eastern Beauty 
Ink:  Dapper Denim and Lemon Lime Twist
Card Stock:  Very Vanilla, Lemon Lime Twist and Dapper Denim and 
Eastern Palace Specialty Designer Series Paper
Accessories:  Big Shot, Paper Trimmer,  Eastern Gold Vinyl Stickers, Basic Pearls, Eastern Medallions Thinlet Dies, Stitched Shapes Dies, 1, 1 1/4 and 1 38" Circle Punches, Basic Pearls, Dimensionals, Tom Bow Glue, Blender Pen, Acrylic Blocks. 
 
Assembly:
Card Base: 8 1/2" x 11" Very Vanilla card stock scored at 4 1/4". 

1st layer: 5 1/4" x 4" piece of Lemon Lime Twist card stock.  Note: Cut out the 2" Stitched Shapes circle, the #1 circle and #10 flower from Eastern Medallions thinlet dies from the center of this layer before adhering it to the base. Punch out the #1 circle die shape with the 1 3/8" circle punch.

2nd layer:  5" x 3 3/4" piece of Dapper Denim card stock.  Note: Cut out a 3" circle with the Stitched Shapes die before adhering to the 1st layer. Adhere this circle to the top center of the 3rd layer.

3rd layer:  4 3/4" x 3 12" piece of  Eastern Palace Specialty Designer Series Paper. 

4th layer:  Cut a 3" x 3" piece of Very Vanilla card stock.  Center and cut out the #3 die from Eastern Medallions and punch out a 1 3/8" circle from the center.  Stamp the sentiment "a note for you" in Dapper Denim ink around the outside of the circle.  Stamp the small flower image in Lemon Lime Twist in the corners and add a basic pearl to the center of each.  Use this same stamp to stamp the half circle arches on the medallion.  Layer and adhere the 2" Lemon Lime Twist circle, the 1 3/8" Very Vanilla circle and the #1 Lemon Lime Twist circles together with Tom Bow Glue.  Adhere to the center of the medallion with a couple of Dimensionals.  Add a small basic pearl to the center.  Put a Dimensional on each corner of the back side of this square and adhere over the 3" Dapper Denim circle.  

5th & 6th layers: 1" x 3 1/2" Dapper Denim card stock and 3/4" x 3 1/4" piece of Very Vanilla card stocks. Stamp the "Happy Birthday Gorgeous" image from Beautiful You to the center of the Very Vanilla strip.  Attach this strip with Dimensionals to the Dapper Denim Strip and then attach this piece with Tom Bow glue to the bottom of the DSP layer leaving about an 1/8 of an inch gap.  Adhere 3 basic pearls to each side of this layer.
Inside: 
1st layer:  3 3/4" x 5 1/4" piece of Dapper Denim card stock
2nd layer:  3 5/8" x 5" piece of Very Vanilla card stock.  Add a strip from the Eastern Gold Vinyl Stickers along the top edge. 

Stamp the dancing girl image from Beautiful You in Dapper Denim ink in the bottom right corner of the card.  Use a blender pen to draw out the colour from the line images to the dress and hat.  Colour a sash on the hat and the girl's slip with Lemon Lime Twist.  Stamp the "life is beautiful" sentiment from the girl's right side and below her arm. Finally add a touch of Wink of Stella to the hat, the dress folds and across the shadow at the base of the image.
Beautiful You

Normally I would have been finished stamping and fiddling with the inside of this card, however I made a Boo Boo with the blender pen leaving a big smudge above the girls left arm.  What to do?  What to do?  Well, cover it up of course! 

The only way I could think of fixing this mistake apart from starting over was to "cover it up".  I decided to cut out a Lemon Lime Twist flower using the#10 die.  I stamped each of the pedals with the small curlicue stamp from Eastern Beauty in Dapper Denim.  I stamped "enjoy today" in Dapper Denim on a scrap of Very Vanilla and cut it out with a 1" circle punch and adhered this to the center of the flower image.  I glued the flower to the card base above the girl's arm and was finally done!  
I hope you liked the way I mixed the Eastern Beauty stamp set with the Beautiful You stamp set to create this unique birthday card and were inspired to try out this style of card yourself.  I totally fell in love with this Lemon Lime Twist especially  when it was combined with the Dapper Denim and Very Vanilla.  Awesome!  Enjoy! 

Happy Stamping!
Penny Tokens Stampin' Spot

Tuesday, May 9, 2017

Month of May Eastern Palace Series - Project #3


Today's project is a "no-cut patterned paper folder" to hold birthday wishes and a gift card and features a full 12 x 12 sheet of the beautiful Eastern Palace Specialty Designer Series Paper.    

For details on how this "no-cut patterned paper folder" comes together, please check out Diane Barnes Color Me Happy Blog.  Diane has very generously shared her tutorial and tips on making these folders.  Make sure you leave her a comment if you plan on using her tutorial. 
The Eastern Palace Specialty Designer Series Paper is perfect for this type of card, because you see both sides of the paper, and trust me they are all beautiful.  The Tranquil Tide and Dapper Denim are so rich looking together but pair them up with Fresh Fig and  Gold Foil card stocks, and it turns this into a WOW look.   

The inside view of the no-cut patterned folder.  Love it!

This view shows the inside of the folder with the two note cards removed.  The pockets are perfect for holding a 3 1/4" x 5 1/4" note card.  I add two of the Eastern Gold Vinyl Stickers which are fast becoming "faves" to jazz up the inside a bit.
The two note cards contain the birthday greetings and a gift card can be attached to the back of either note card. "The Happiest of Birthdays To You" sentiment is from the Birthday Blooms stamp set.  I stamped the dotted triangle image from Eastern Beauty set in Fresh Fig ink in the corners of both note cards. I stamped the sentiment "enjoy today" from the Eastern Beauty set on the second note card, but it looked too plain so I stamped this fancy square image in Tranquil Tide over top of it.  Again it looked too plain, so I stamped the scroll work image in the points of the square.  What a difference that made and it was fun experimenting with some of the smaller stamps.
Supplies:
Stamps:  Eastern Beauty Photopolymer and Birthday Blooms 
Ink:  Fresh Fig, Tranquil Tide
Card Stock:  Dapper Denim, Fresh Fig, Tranquil Tide, Very Vanilla and Gold Foil
Accessories:  Big Shot, Paper Trimmer, Banners Thinlet Dies, Eastern Medallions Thinlits Dies, Stitched Shapes Thinlet Dies, 1/2 Circle punch, Mini Tassels Assortment, Eastern Gold Vinyl Stickers, Basic Pearls, Detail Paper Snips, Dimensionals, Tom Bow Glue. 
I absolutely love how this belly band turned out.  It's got that Moroccan Arabian Knights thing going on, and promises riches on the inside of the card (or at least that's what I imagine).  The belly band started with a 1" x 9" strip of Dapper Denim card stock.   I added a strip of the Eastern Gold Vinyl Stickers to the top and bottom of the band.  Next  I cut two banners from Gold Foil and Tranquil Tide card stock and layered them together with tear and tape.  The Tranquil Tide banner was embossed with the retired Perfect Polk A Dots Embossing Folder. I combined the Eastern Medallions #6, #5 and #4 dies for the Fresh Fig layer and a #10 and 11 for the Tranquil Tide layer of the medallion. The center was a 1/2" circle punched from Fresh Fig and a small Gold Vinyl Sticker and small pearl.  Six medium sized pearls were adhered to the Tranquil Tide flower and a gold tassels from the Mini Tassel Assortment was adhered to the base of the medallion with mini glue dots.  The finished medallion was adhered to the banners and belly band with tear and tape to make sure it was secured strongly. 
 
Eastern Gold Vinyl Stickers


Mini Tassels - 6 to a pack - 2 each of Gold, Fresh Fig and Tranquil Tide


Well that's it for today's project.  I hope you liked it and will try out this "no-cut patterned paper folder".  It's an awesome way to use your DSP.  

Happy Stamping!
Penny Tokens Stampin' Spot  

NESTS OF CHRISTMAS PAPER PUMPKIN ALTERNATIVES USING #fms#662

 Here's the latest sketch challenge from Freshly Made Sketches #662 and designed by Jen T.  Make sure you check out the Design Team car...