Showing posts with label Thank You Cards. Show all posts

Monday, April 19, 2021

Another Catalogue Sneak Peek..... Pansy Patch

Over the weekend I had a chance to play with one of my new sets called Pansy Patch.  This beautiful stamp set and accessories will be available to Stampin' Up! customers for purchase on May 4th, 2021, when the 2021-22 Annual Catalogue is launched.  In the meantime only demonstrators, and those who sign up as new or returning demonstrators can get it in the Demonstrator Pre-Order.  

The designer series paper called Pansy Petals has richly coloured and designed images.  Two of the sheets in the pack had just pansy images and so I began gan by cutting out the individual pansy images.  There weren't any leaves on these pages, just the flowers, so I stamped rows of leaves to pair with the flowers.  I used my Mini Cut N' Emboss machine to cut out all the images, what fun!  


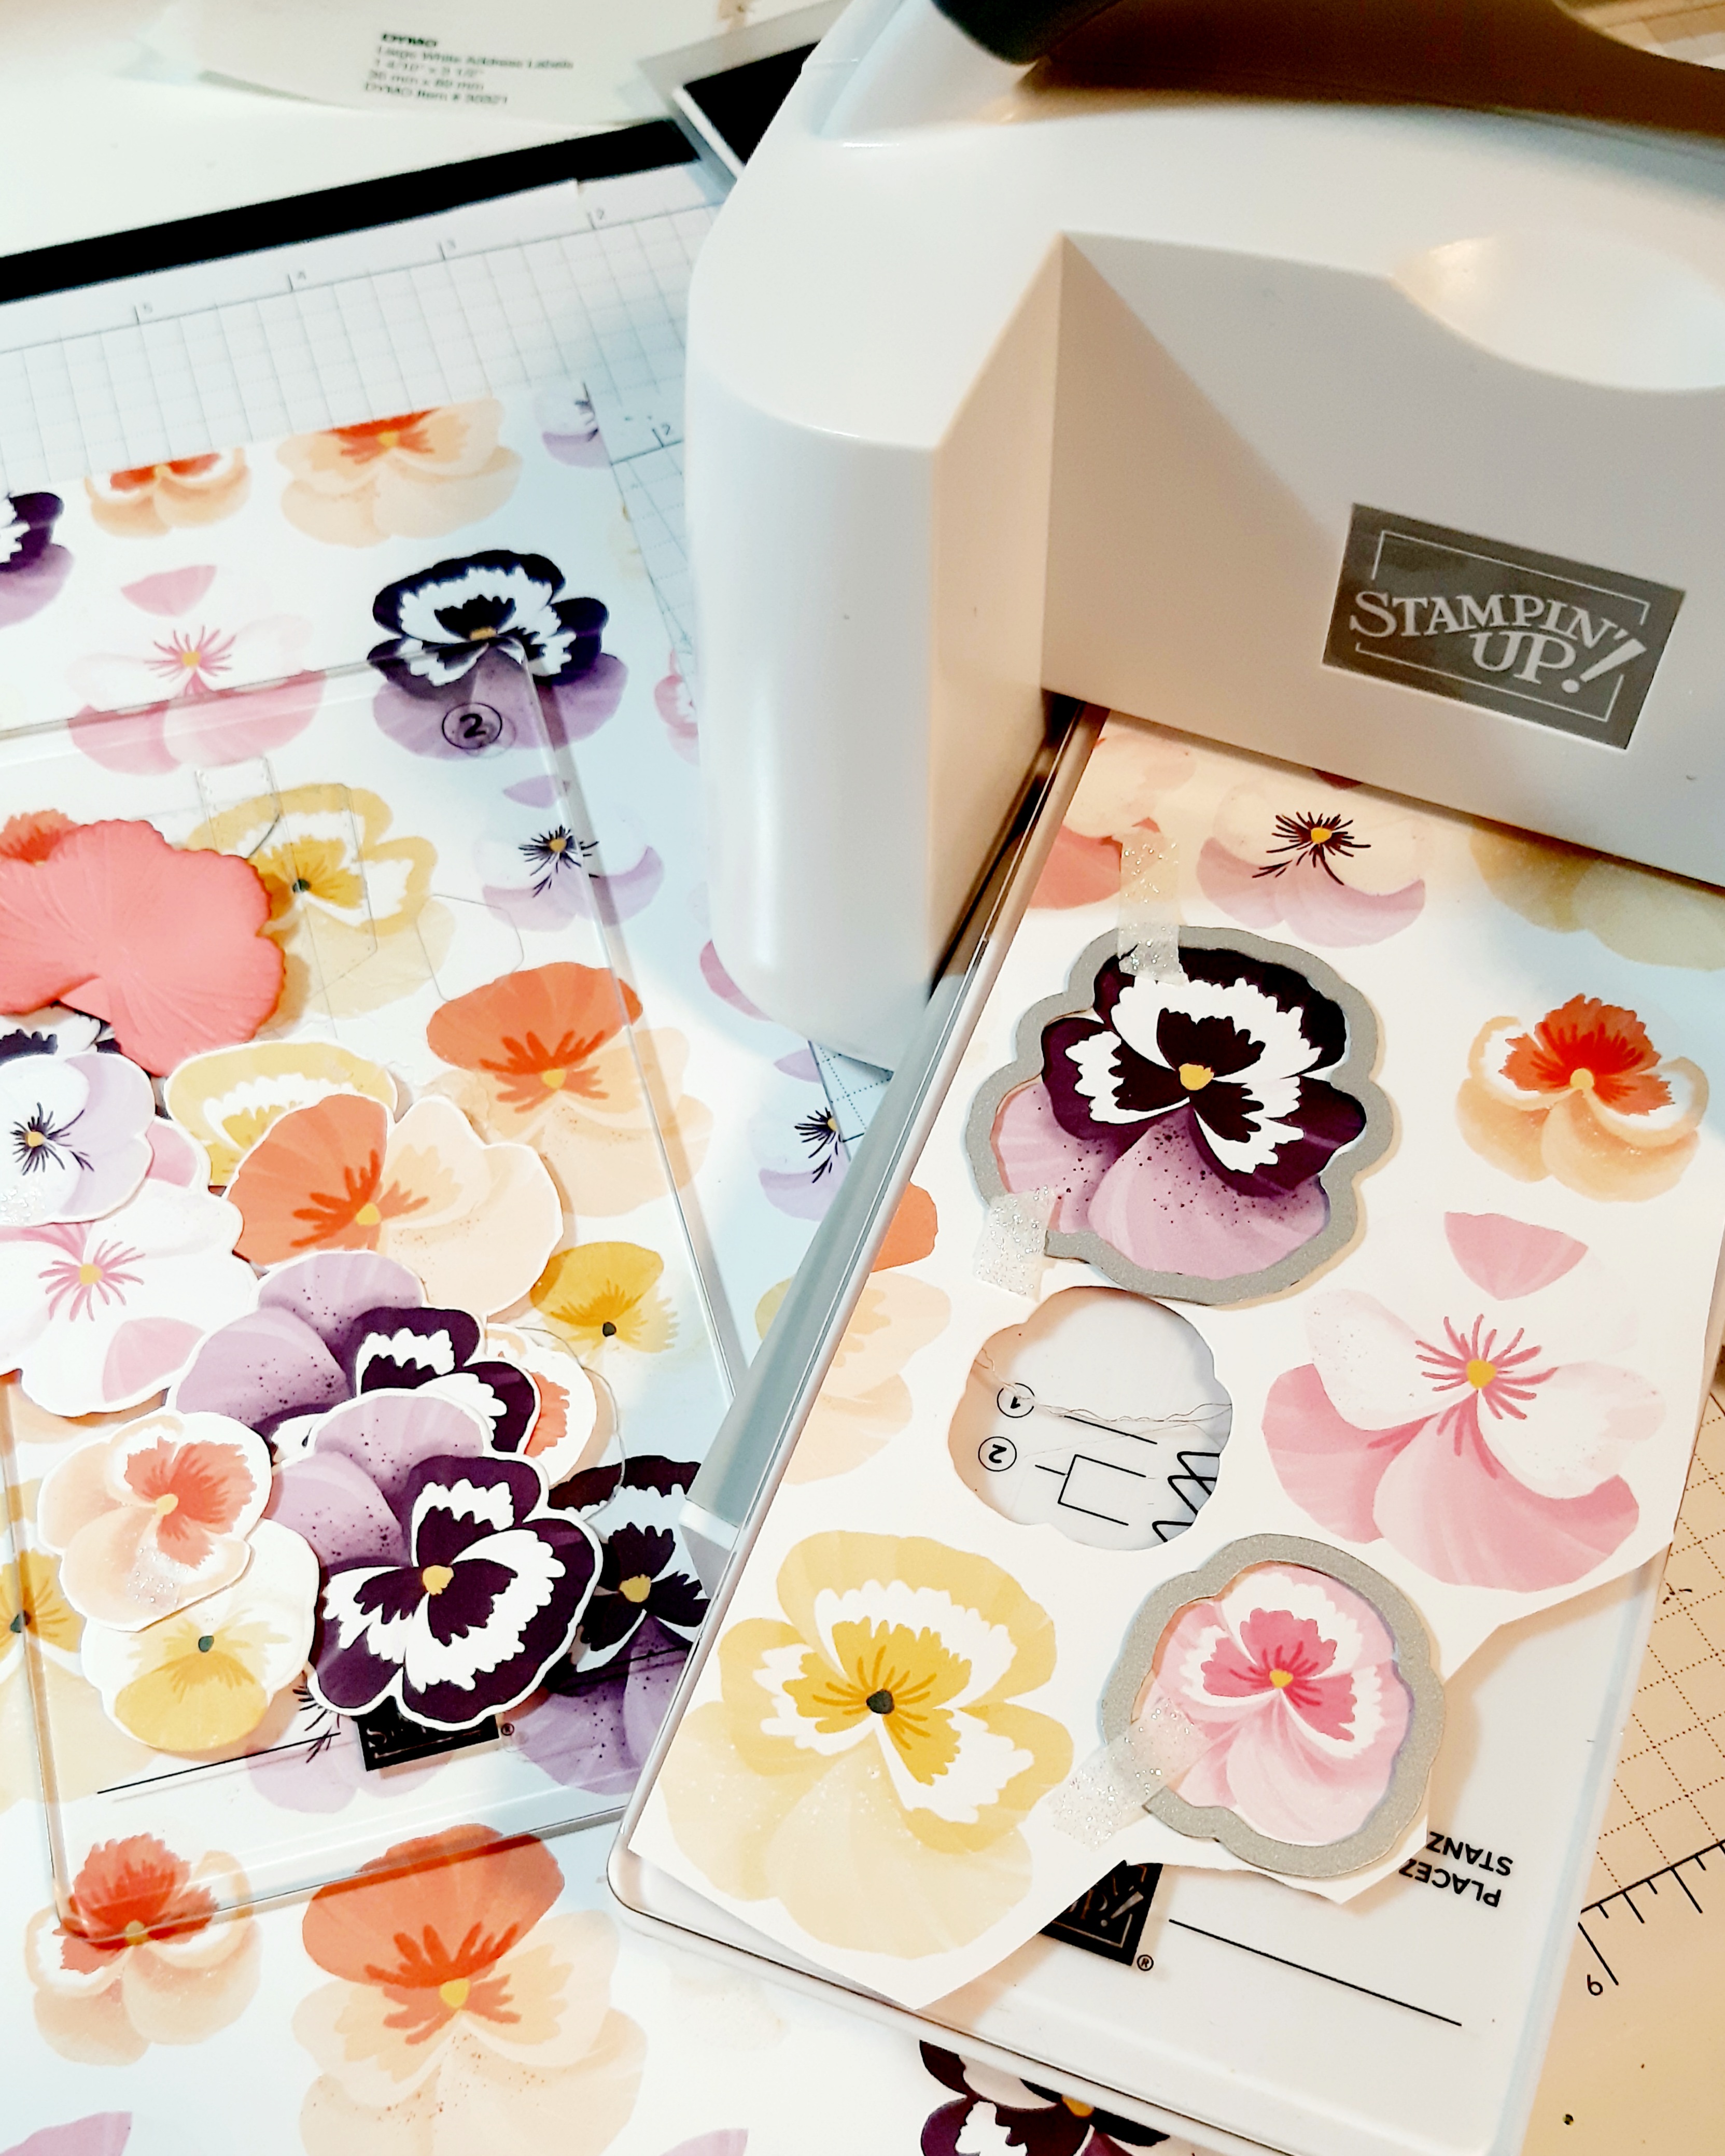
I used small pieces of washi tape to hold the dies in place on the paper, but the Pansy Dies are amazing and really hug the individual flower shapes ensuring you get good clean cuts. I stamped the leaves using the new In-colours Soft Succulent and Evening Evergreen. These also die cut beautifully, and it didn't take me long to have a stack of flowers and leaves so I could get on with my card making.

Here are my cards:

I made three cards each focusing on a particular card style that would show off the designer series paper (dsp).  

Card One: 

My first card is a flip and pop card featuring the Fresh Freesia Gingham dsp and card stock.  


This card took approximately 8 minutes from start to finish and I must say it's one of my favourite cards.  It looks so sweet and fresh.  I'm planning to make more using the new In-colour palette.  

I purchased a package of In-Colour Jewels in my pre-order, and they are absolutely beautiful.  They come in the new In-colours and I  added three in the Fresh Freesia colour.  So beautiful! 

Card Two:

My second card features a split panel of dsp.  The original piece measured 4" x 5 and I've cut it in half at the 2" mark and used the front for the top layer and the reverse side for the bottom of the card.  

I really like the combination of Soft Succulent and Evening Evergreen in this striped designer paper, and how these colours coordinate so well with the Soft Seafoam of the card base and the background design in the floral portion of the DSP.

To showcase the flowers I die cut a 3" stitched oval from Soft Sea Foam and the next smaller size from Evening Evergreen  card stock.  I chose three of the larger flower designs and layered them onto the oval with a combination of Tom Bow glue and Dimensionals.  The oval was adhered with Dimensionals to the card mat. The leaves were hand stamped on Whisper White card stock and die cut.

I cut a strip of white cotton ribbon and secured it around the center of the mat to hide the paper seam, before adhering this layer to the card base.  I tied a small  bow and attached it glue dots, once the flowers were in place.  

To finish the card I added the "thank you" sentiment which was stamped with Versamark Ink on a scrap of Blackberry Bliss card stock and then heat embossed with White embossing powder.  This tag was die cut using the smallest die in Stitched so Sweetly.  

To complete this card I attached a tiny Bumble Bee trinket with glue dots and added some sparkle around the flower centers with Star Dust Stickles.   

Card Three: 

My third and final is called a Front Flap Fold and features a double panel fold and belly band. This was also a very quick and easy card to make.  The most time consuming aspect of making this card is deciding on the blend of designer series paper and what to layer on the belly band. 


I love how this Pansy Petals designer series paper incorporates some of the other colour collections.  This card has a Blackberry Bliss base and the layered circle is cut from Bumble Bee.  Although this is a very bold paper it has a rich tone that isn't overwhelming.  

Well that's it for today's sneak peek.  Hope you enjoyed it.  The Pansy Petal Suite will be available May 4th, when the new 2021-22 Annual Catalogue goes live.

HAPPY STAMPING!
PENNY TOKENS STAMPIN' SPOT

Penny Hanuszak, Canadian Independent Stampin' Up! Demonstrator 

Contact me

April Hostess Code:

If you're placing an order under $200.00 (before s&H and tax) at my on-line store during the month of April, don't forget to add my April Hostess Code BRAKMUDX at the end of the order.  For your support I'll send you a free gift and thank you card.  If you're placing an order over $200 you'll receive your own Stampin' Up! Rewards, based on the order total.  Thank you.

Click here to see the Last Chance Products on Sale


Friday, February 5, 2021

Mini Desk Calendar Tutorial

I'm working on thank you gifts for my customers who recently placed on-line orders and used my Hostess Codes.  These gals will be receiving a Stampin' Up! Simply Shammy as a reward from me for using the code.  I'm also tucking in a Mini Desk Calendar and Post It Note holder in their thank you packages to show my appreciation.  


The calendar and Post-it Note covers are both made with the Berry Delightful Designer Series Paper featured in the Sale-A-Bration flyer. Isn't it beautiful?  I really like the colour and design on this paper and the coordinating stamp set called Berry Blessings.  


Berry Blessings is a Two-Step Stampin' set and comes with 13 photopolymer stamps.  The coordinating Berry Delightful Designer Series Paper is 12" x 12" and comes with 2 each of 6 double-sided designs. The paper coordinates with the following product colours: Balmy Blue, Blackberry Bliss, Calypso Coral, Cherry Cobbler, Daffodil Delight, Flirty Flamingo, Garden Green, Granny Apple Green, Night of Navy, Pacific Point, Poppy Parade, Rich Razzleberry, and Shaded Spruce. This coordinated bundle is free with a qualifying purchase of at least $120.00 before tax and shipping charges and is only available until the end of February 2021 or while supplies last.

Here's an inside view of the mini easel calendar.  So pretty and only a few steps needed to create this great project.  The Post It Note Holder is also a simple project and really goes compliments the calendar when giving it as a gift.    

The thank you card also features the Berry Delightful DSP.  This card design is called a Circle Card, and showcases both sides of this paper. 

This has to be my most "used" sentiment in this age of COVID-19.  It's been the star attraction on so many of my cards and gift boxes.  The sentiment is from the So Sentimental  stamp set and is stamped in Rich Razzleberry.  I used the  Stitched So Sweetly Dies to cut out both labels.  

So Sentimental Stamp Set

Stitched So Sweetly Dies  that coordinate with the So Sentimental Stamp Set.


Here's Some Other Calendar and Note Pad Samples:

I usually make these mini desk calendars for Christmas stocking stuffers and last minute hostess gifts.  Because the calendar pads are sometimes hard to find and are gone as soon as they hit the shelves I generally buy mine in the early Fall.  They come ten to a pack and the price is very reasonable.  They can be ordered directly from the manufacturer Taylored Expressions, or at local craft stores.  

Here are some pictures of the calendars I've been working on. The Dog and Sunflower calendars were both made using the directions for the Small Easel Stand Desk Calendar (tutorial below).  The Blackberry Bliss sample is actually a combination Desk Calendar and Post It Note Holder and I've provided a link for this one. 

This is the cover of my Pampered Pets Calendar.  I've had a lot of fun designing both dog and cat calendars and Post-it Note covers using the Pampered Pets Designer Series Paper.  

The 2021 calendar pads are from Taylored Expressions.  They measure 2 3/4 x 3" and are the perfect size for these holders. 

When the calendar pad is open the top flap rests against the calendar pad so it stands upright.  


Small Easel Stand Desk Calendar

I don't know who created the first template for this calendar but I really thank them for providing a simple way to dress up a mini desk calendar. Here are the simple instructions.

Base:    Cut one 8 1/2" x 3 1/4" piece of cardstock for the base. Score this piece at 2 1/8" and 4 1/4" burnish the score lines 2 1/8" score line is a mountain fold and the 4 1/4" score line is a valley.  When you work with this piece these two folds need to be pushed back.  Adhesive goes on the front piece and then the front layer from the next step is attached to the base  like this.  

Calendar Front:  Cut a 4 14" x 3 1/4" piece to match base card stock.  Cut a 3 x 4" piece in a coordinating colour to the DSP for the 1st layer and adhere.  Cut a 2 3/4" x 3 3/4" piece of DSP for the final layer and adhere.   


Inside Base:  Cut a 3 x 4" piece of coordinating card stock for first layer followed by a 2 3/4" x 3 3/4" piece of DSP.  Adhere both layers.   Attach 2 1/4" x 3" calendar pad. 

Just add embellishments to the cover of the Easel Calendar and you're all done. 

Calendar, Post It Note and Pen:

If you want to create a larger easel card calendar holder there are many templates out there, but here's one I made that measures 4 14" x 5 1/2".  It has a calendar on the front a pen holder and covered post it note pad. on the base.

I followed this tutorial by Tracy Elsom to make my calender set.  I used paper from my Love It Chop It paper stash to make this sample.  I used Perfect Plumb (retired) and Blackberry Bliss cardstock along with Whisper White for the layers and base.   

This is the Post It Note cover in the contrasting paper 


This view shows the Post It Note cover lifted. What a great and simple way of dressing up the Post It Note pad. 

I hope you've enjoyed these projects and samples.  They make great gifts.   

Happy Stamping!

Penny Tokens Stampin' Spot

Penny Hanuszak, Independent Stampin' Up! Demonstrator

FEBRUARY HOSTESS CODE:


Berry Blessings and Berry Delightful DSP available during Sale-a-bration 
Click here for details. 


Saturday, October 31, 2020

Someone Special .........Monochromatic Thank You

A few weeks ago during a Stampin' Up! Demo meeting I learned how to do the Bubble Technique and made this card and posted it to our Facebook meeting page.  As luck would have it I won a $40 prize for my card which was randomly drawn.  

For my prize, I chose the Special Day dies to go with my Special Someone stamp set I purchased earlier this year and this week I made a card with these awesome sets to send to Dale Hampshire and crew to show my appreciation for the gift. 


Last season when these were available as a bundle at a 10% savings, I debated and debated whether to buy them.  When I saw them again in the Annual Catalogue in June and all the cute samples folks had made, I decided to just purchase the stamp set. Once I started making cards with these images  I regretted not buying the dies as there are some pretty tiny images in the set.  When I won the $40.00 I knew exactly what I wanted to purchase.  Getting the Special Day dies was such a great way to round out my experience with this set and I'm totally grateful to my Canadian Direct Stamping group for giving me the opportunity to win them.

Here's my card:


I was looking for a clean and simple layout so I chose Jen Brum's sketch 459 at Freshly Made Sketches.   

I decided to do a monochromatic card again so for the two diagonal strips I chose the Sahara Sand DSP Classic Christmas 6 x 6 paper pack.  This designer paper is part of the soon to be released Curvy Celebrations promotion and will be available to everyone on November 3rd, 2020.  I know I'm going to be ordering another package because I'm totally in love with the clean look of the design and the teeny tiny images on this paper.


I've been using a One Sheet Wonder template I found on Pinterest that was originally designed by Leanne Gref, but has been making the rounds through other folks.  Part of the cutting template is a 3 x 4 inch diagonal cut, which worked perfectly for this card.  Here's what the template looks like:


Supplies:

Stamp Sets: So Sentimental #151691 for inside sentiment "I Can't Thank You Enough" and Special Someone #151643 for Raccoon and sentiment "Thank You"
Ink: Sahara Sand
Card Stock: Whisper White, Sahara Sand
DSP: Sahara Sand Design from Classic Christmas Pack #155969
Embellishments: Basic Pearls, Dimensionals


Please leave me a comment if you like this card.  I'd love to hear from you.  

Happy Stamping!
Penny Tokens Stampin' Spot
Penny Hanuszak Independent Stampin' Up! Demonstrator 

Click here to shop in my 24/7 On-line Store


Zany Birthday FMS#628

Well another week has flown by and there's a promise of Spring between the rain drops.  I'm thrilled to see all the cherry trees sta...