Showing posts with label " Penny Tokens Stampin Spot". Show all posts

Monday, November 16, 2020

Freshly Made Sketches #461

I'm back today with a rather intimidating sketch by Karen at Freshly Made Sketches.  This is definitely a clean and simple sketch, but one that sends shivers down my spine and causes sweat on my brow.  Not really, but I do find these plain sketches some of the hardest to do because the sky is the limit in terms of decision making and that field is just too vast for me.  

Here's the FMS #461 Sketch:


Since I'm trying to get caught up with making Christmas cards my focus for this card will be on one that's easily mail-able.  You know the type, one layer, lays flat without too much dimension and can be mass produced.  I chose a cling stamp set from Stampin' Up! called "Don't Stop Believing".

Here's My Card: 

One of my most loved and used bundles from last year's Holiday Catalogue was the Christmas Gleaming Bundle which included the stamp set, Brightly Gleaming Specialty Designer Paper and two ornament punches. I probably made 45-50 cards using just that bundle.  I was so enamored with it I bought two additional packages of paper thinking it wouldn't be around any longer, so imagine my delight when it was part of the Christmas lineup for this year's Stampin' Up! Annual catalogue. 

Because I love this paper so much, I started with a designer paper strip which features copper foil stars on a Night of Navy background. I adhered the strip to a 5" x 3 3/4" piece of Very Vanilla card stock. From there I dug out my Copper Foil and made a 5 1/4" x 4" layer, that I adhered to a Night of Navy A2 card base.  

Originally I visualized using a cluster of the ornaments from the Christmas Gleaming set for my focal point, but when I was grabbing the set, I spied my "never been inked yet" Don't Stop Believin' stamp set.  From there my ideas morphed into this card.


I added some glue to the tassel, hat brim and cuff of Santa's suit and sprinkled Iridescent Ice Glitter over them.  Unfortunately because I didn't stamp the Santa in a permanent ink, the Night of Navy ink on the jacket ran a bit into the cuff.  Oh well live and learn.  The next one of these cards I make I'll use Momento Black Ink - run proof when using blends or glue.   The sparkle just brought this card alive. I also added some Nuvo Crystal Drops to Santa's specs so they've got the appearances of glass lenses.  The small stars are from the Curvy Christmas stamp set.  


Supplies:
Stamp Sets: Don't Stop Believing #15332, Curvy Christmas (small stars)
Ink: Night of Navy ink, Blends: Night of Navy Light and Dark, Smokey Slate Light and Dark, and Ivory
Specialty Paper: Copper Foil, Brightly Gleaming DSP #150429 

Card Stock: Night of Navy, Very Vanilla
Embellishments: Iridescent Ice Glitter, Nuvo Crystal Drops

This was a fun and super easy card to do.  My non-traditional take on Santa worked out okay and I might try him in some other unconventional colours.  I know I'll be using the Don't Stop Believin' stamp set a lot now as it's really peaked my interest.  So many great images and sentiments, especially Frosty the Snowman.

Don't Stop Believin' #153332


HAPPY STAMPING!

PENNY TOKENS STAMPIN' SPOT
Penny Hanuszak Independent Stampin' Up! Demonstrator


November Hostess Code:  ZZ49FQKS 

Don't forget to apply the November Hostess code if you order is under $200.00 before shipping and handling. You'll get a free gift from me. If you place an order over $200.00 before shipping and handling, you will automatically earn Stampin' Rewards and can pick out your own free gifts. Everyone who orders from me will received a thank you card as I so appreciate your orders.

Click here to shop in my 24/7 Online Shop


Saturday, October 31, 2020

Someone Special .........Monochromatic Thank You

A few weeks ago during a Stampin' Up! Demo meeting I learned how to do the Bubble Technique and made this card and posted it to our Facebook meeting page.  As luck would have it I won a $40 prize for my card which was randomly drawn.  

For my prize, I chose the Special Day dies to go with my Special Someone stamp set I purchased earlier this year and this week I made a card with these awesome sets to send to Dale Hampshire and crew to show my appreciation for the gift. 


Last season when these were available as a bundle at a 10% savings, I debated and debated whether to buy them.  When I saw them again in the Annual Catalogue in June and all the cute samples folks had made, I decided to just purchase the stamp set. Once I started making cards with these images  I regretted not buying the dies as there are some pretty tiny images in the set.  When I won the $40.00 I knew exactly what I wanted to purchase.  Getting the Special Day dies was such a great way to round out my experience with this set and I'm totally grateful to my Canadian Direct Stamping group for giving me the opportunity to win them.

Here's my card:


I was looking for a clean and simple layout so I chose Jen Brum's sketch 459 at Freshly Made Sketches.   

I decided to do a monochromatic card again so for the two diagonal strips I chose the Sahara Sand DSP Classic Christmas 6 x 6 paper pack.  This designer paper is part of the soon to be released Curvy Celebrations promotion and will be available to everyone on November 3rd, 2020.  I know I'm going to be ordering another package because I'm totally in love with the clean look of the design and the teeny tiny images on this paper.


I've been using a One Sheet Wonder template I found on Pinterest that was originally designed by Leanne Gref, but has been making the rounds through other folks.  Part of the cutting template is a 3 x 4 inch diagonal cut, which worked perfectly for this card.  Here's what the template looks like:


Supplies:

Stamp Sets: So Sentimental #151691 for inside sentiment "I Can't Thank You Enough" and Special Someone #151643 for Raccoon and sentiment "Thank You"
Ink: Sahara Sand
Card Stock: Whisper White, Sahara Sand
DSP: Sahara Sand Design from Classic Christmas Pack #155969
Embellishments: Basic Pearls, Dimensionals


Please leave me a comment if you like this card.  I'd love to hear from you.  

Happy Stamping!
Penny Tokens Stampin' Spot
Penny Hanuszak Independent Stampin' Up! Demonstrator 

Click here to shop in my 24/7 On-line Store


Wednesday, April 19, 2017

Watercooler Wednesday Challenge #115 - Gail's Clean & Simple "Spring Theme" Challenge

It's time once again for the Watercooler Wednesday challenge, and this time around the talented Gail Allen is hosting.  It's the WWC115 - Clean and Simple Challenge and the theme is "Spring". 
I'll be attending a Spring wedding later this month and these two "love birds" have chosen plum and minty green for their theme colours. With this in mind, it wasn't difficult to come up with a card design.

Here's My Card:


Supplies:
Stamp Sets:  Builder Birdcage #142891, Oh So Succulent #142992 and Timeless Love #138772
Card Stock:  Elegant Eggplant, Mint Macaroon and Whisper White 
Ink:  Tuxedo Black, Elegant Eggplant, Mint Macaroon and Wisteria Wonder 
Accessories:  Dimensionals, Big Shot Machine, Paper Trimmer, Tom Bow Glue, Happy Heart Embossing Folder and Misti.

Ten Step Assembly:
1.  The card base is a standard 8 1/2 x 5 1/2" card stock scored at 4 1/4".  It is a side fold card.  The front half of the card was embossed with the Happy Heart Embossing Folder.

2.  1st layer:  3 1/4" x 4 3/4" Mint Macaroon card stock.

3.  2nd layer: 3 1/8" x 4 5/8" Elegant Eggplant card stock adhere to 1st layer.

4.  3rd. layer: 3" x 4 1/2" Whisper White card stock.  

5.  Starting with the Builder Birdcage stamp set, stamp the pedestal base of the bird cage in Tuxedo Black ink, then layer and stamp the birdcage center and top in Elegant Eggplant.  Have fun with this one, because you can make any combination of bird cage you want with this delightful set.
This 16 piece Photopolymer set is on the Retired List and is currently going for $16.30. What a great value and savings!

6.  Next, stamp the bird images in Wisteria Wonder.

7.  Finally, stamp two solid image air plants from the Oh So Succulent stamp set in Mint Macaroon.  I chose to put one in the top of the cage and the other on the opposite side on the bottom.  
The amazing Oh So Succulent 30 piece Photopolymer Stamp set is on sale for 30% off the catalogue price at $19.50, while the matching Succulent Framelit Dies are on for 40% off at $22.00.  That's quite the savings.


8.  Adhere the Whisper White layer to the first two layers and then adhere these panels to the left hand side of the card base with Dimensionals. 

9.   Stamp the sentiment "The best Love story is the one you write together" from the Oh So Succulent Stamp set in Elegant Eggplant ink on a 3/4" x 2" strip of Whisper White card stock.  I also stamped a small flower from the same stamp set in the background of the saying making sure I stamped off the ink first.  I glued the sentiment strip to a 1" x 2 1/8" piece of Elegant Eggplant card stock and attached this with Dimensionals on an angle across the bird cage pedestal.

10.  Finish the inside with a 4" x 5 1/4" panel of Mint Macaroon and a 3 3/4" x 5" panel of Whisper White.  Stamp "Congratulations" from the Timeless Love stamp set in Elegant Eggplant in the center of the Whisper White panel and add a chain  in Mint Macaroon ink below it.  The chain is from the Builder Birdcage set.

The Timeless Love Set is retiring May 31st but it is not at a reduced price. 

This card came together in all of a few minutes.  Because this is a Clean and Simple challenge I didn't feel the need to add rhinestones or other embellishments and I think it turned out beautifully. 

Regrettably all of the stamps and embossing folder used in this card are now part of the Retiring List that Stampin' Up has published.  That means they are only available while supplies last or until May 31st whichever comes first.

If you liked this card and it's bold colour combination please let me know because I really appreciate your feedback.  It gives me confidence to try different stamping techniques and card designs.  

Before you go don't forget to check out the other design team artist's creations this week at the Watercooler Wednesday Challenge #115 - Gail's Clean & Simple "Spring Theme" challenge, by clicking on this link.   

And, if you like this challenge by all means please join us by linking up your own creation.  The design team would really like to see your take on the Spring Challenge.  The link is open until Monday April 24th at 5pm Mountain Time.  Hope you'll play along! 

Click here for Online Store Access:
April Hostess Code - G6EFBVU4
USE THIS CODE FOR ALL ON LINE ORDERS IN APRIL AND YOU COULD WIN A PORTION OF THE HOSTESS REWARDS - SEE HOSTESS TAB FOR DETAILS.  
 
Click here to see the Retiring Products:

Happy Stamping! 
Penny Tokens Stampin' Spot

Thursday, February 16, 2017

Wacky Watercooler February 2017 Spring Fever Blog Hop

Hope you had a wonderful Valentine's Day this week. I know for some of you you're still getting winter storms so you'll probably welcome our thoughts of better things to come with our Spring Fever Blog Hop which runs from today through Saturday February 18th, 2017.  Hopefully no matter what your weather situation, you'll be able to have happy Spring thoughts.  

The Wacky Watercooler blog hop is a circular hop so no matter whether you start at the beginning of the list or enter at some other point, if you continue moving from participant to participant you'll always wind up where you started. 

This time around I'm very excited to be starting off the hop, so you're either beginning or ending at my site.  Hope I don't disappoint.  There are a total of 8 other talented paper crafters following me who're all eager to share their creative and exciting projects with you, so I hope you'll relax, settle in and enjoy the hop! 

My First Project - Sparkles:  
It seems I'm caught up in Sparkles and Birthdays this week, so it's appropriate that my first project combines both.  This is a fun birthday/gift card holder I've made for a very special girlfriend of mine who absolutely "sparkles" in everything she does.  

Supplies:
Stamp Sets:  Love Sparkles #143183
Card Stock:  Whisper White and Smokey Slate, Silver Glimmer Paper, Silver Foil Card Stock
DSP:  A Little Foxy Designer Series Paper Stack #141637
Ink:  Momento Tuxedo Black
Accessories:  Big Shot, Mini Treat Bag Framelit, Balloon Pop-Up Thinlet #142753, Star Blast Edgelits#142763, Tom Bow Glue, Basic Rhinestones, Stitched Rectangles (Non-Su)

 
This project started with a Mini Treat Bag made with the dies of the same name.  Since my friend is such a glam and glitzy girl, I chose this beautiful designer paper from the "A Little Foxy Designer Series Paper stack to go with my gray and white theme. It was perfect.  Note:  You need two 6x6 sheets to complete the mini bag.

I absolutely love the Star Blast Edgelits.  They just instantly create happiness and excitement on a project.  For this bag I cut both a Smokey Slate and a Silver Glimmer Paper star blast image.  I attached them with Mini Glue dots at the base so the stars would still bob and move around once they were adhered to the bag front. For some additional glam I added a strip of silver foil to the Smokey Slate card stock base and adhered this piece on an angle across the bag. 

For the sentiment I stamped the "Sparkle" sentiment In Momento Tuxedo Black ink on a scrap of Whisper White card stock and cut it out with a non-SU stitched rectangle die.  I added some silver foil stars and Basic Rhinestones to complete the sentiment piece.    

The inside gift card was made with a piece of Whisper White card stock that measures 5 1/4" x 3 7/8".  The overlay was made by cutting a piece of Smokey Slate card stock with the Balloon Pop-Up Thinlet.  

I added touches of Silver Glimmer paper for the balloons and stars and some small Basic Rhinestones.  I cut two Smokey Slate bows using the Bow die cut from this set for the handle on the card.  The sentiment "It's Your Day" is from the Love Sparkles stamp set.


The back of the insert has a 2" by 3 7/8" piece of the designer series paper across the bottom. It was attached with a small amount of Tom Bow glue on three sides. The gift card slides in length-wise in the center. The sentiment "happy birthday" was stamped at the top of the insert with Momento Tuxedo Black ink. 


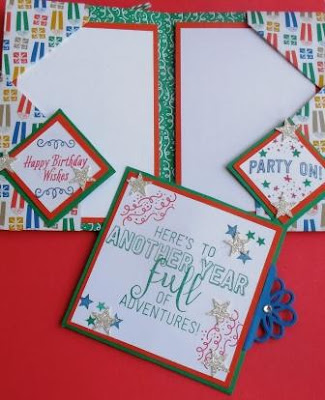
My Second Project:  A No-Cut DSP Gift Folder CASE

My second project is also birthday related and uses products from the Party Animal Collection in the Occasions 2017 catelogueMy inspiration for this project came from the very talented Diane Barnes, who has been making what she calls a "No-Cut Patterned Paper Gift Folder" since 2008.   

Here's What I Came Up With:

This is the front of the folder.  

Inside the gift folder are two side pockets where you can add notes.  I've left mine blank so I can personalize for the fellow I'm going to give this to. 


This is the back view of the gift card holder. The Pacific Point bow on the side is the gift card pullout. Because of the additional pull-out, you would have to custom make an envelope to hold this card.


Supplies:
Stamp Sets: Balloon Adventures #142823, Love Sparkles #143183, and Avante Garden (143272 - Happy Birthday)
Ink: Emerald Envy, Watermelon Wonder, Pacific Point
Paper: Party Animal Designer Series Paper, Silver Glimmer Paper
Card Stock: Emerald Envy, Tangerine Tango, Watermelon Wonder, Pacific Point, Whisper White.
Accessories: Balloon Pop-Up Thinlet Dies #142753, Star Punch from Itty Bitty Accents Punch Pack (R), Banners Framelits #132173, Lots of Labels Thinlet Dies #138281, Emerald Envy Bakers Twine, Dimensionals, Tear N' Tape, Tom Bow Glue, Simply Scored, Trimmer and Big Shot.
Side view of the Gift Folder

The blue tab on the side is for the gift card.  It is tucked into this side-seam.
 
This is the front of the actual gift card holder that I designed and added to the card.  It comes complete with it's own little tab on the side that I cut out with the Balloon Pop-Up Thinlet Dies.  I slid this into the side seam created by the fold in the card stock and it fits snugly inside. 
Here you can see I just created a small pocket on the reverse of the holder that the gift card can just slide into.
I loved the fact that there are all kinds of neat little folds and hiding places on this gift card holder. And, although I basically CASED Diane's design I like adding my own take on a project, such as adding glue on some folds so that the package didn't come apart and I also created a square gift card holder that I could tuck into the side seam. 

Assembly:
Because Diane happily shares her template and fabulous instructions for this Gift Folder, on her blog, I've provided this link so you can check out her post on this topic.  I'm sure you'll be just as eager as I was to create one or maybe several of this fun gift card bag(s).  Whatever you do please acknowledge her and drop her a comment, let her know I sent you.  

Project Three:   Avant Garden Spring Card
With Spring just around the corner and a plethora of birthdays coming up in March and April I decided to make a simple card using the Avant Garden stamp set for my third project.  You can't buy this stamp set, but you can earn it for free during Sale-A-Bration with the purchase of $60.00 CDN from any of the other Stampin' Up! catalogues currently available.  

I stamped three of the bouquet images on a piece of 3 1/2 x 3 1/2" Very Vanilla card stock.  I water coloured the flowers and stems with Sweet Sugarplum and Pear Pizazz inks.  To get the fullness in the image, I restamped three more floral images, painted them and fussy cut them out attaching various bits and pieces to the original stamped flowers with dimensionals.

Well you've come to the end of my projects for this hop and I hope that I've inspired your creative side in some way.  Now it's time to move on to the wonderful Kath Rick's blog so she can wow you with her projects.  Have fun and remember to leave some comments along the way..... we love to hear from you.


Heidi Weaver


Happy Stamping!
Penny Token's Stampin Spot

NESTS OF CHRISTMAS PAPER PUMPKIN ALTERNATIVES USING #fms#662

 Here's the latest sketch challenge from Freshly Made Sketches #662 and designed by Jen T.  Make sure you check out the Design Team car...