Showing posts with label birthday. Show all posts

Thursday, February 16, 2017

Wacky Watercooler February 2017 Spring Fever Blog Hop

Hope you had a wonderful Valentine's Day this week. I know for some of you you're still getting winter storms so you'll probably welcome our thoughts of better things to come with our Spring Fever Blog Hop which runs from today through Saturday February 18th, 2017.  Hopefully no matter what your weather situation, you'll be able to have happy Spring thoughts.  

The Wacky Watercooler blog hop is a circular hop so no matter whether you start at the beginning of the list or enter at some other point, if you continue moving from participant to participant you'll always wind up where you started. 

This time around I'm very excited to be starting off the hop, so you're either beginning or ending at my site.  Hope I don't disappoint.  There are a total of 8 other talented paper crafters following me who're all eager to share their creative and exciting projects with you, so I hope you'll relax, settle in and enjoy the hop! 

My First Project - Sparkles:  
It seems I'm caught up in Sparkles and Birthdays this week, so it's appropriate that my first project combines both.  This is a fun birthday/gift card holder I've made for a very special girlfriend of mine who absolutely "sparkles" in everything she does.  

Supplies:
Stamp Sets:  Love Sparkles #143183
Card Stock:  Whisper White and Smokey Slate, Silver Glimmer Paper, Silver Foil Card Stock
DSP:  A Little Foxy Designer Series Paper Stack #141637
Ink:  Momento Tuxedo Black
Accessories:  Big Shot, Mini Treat Bag Framelit, Balloon Pop-Up Thinlet #142753, Star Blast Edgelits#142763, Tom Bow Glue, Basic Rhinestones, Stitched Rectangles (Non-Su)

 
This project started with a Mini Treat Bag made with the dies of the same name.  Since my friend is such a glam and glitzy girl, I chose this beautiful designer paper from the "A Little Foxy Designer Series Paper stack to go with my gray and white theme. It was perfect.  Note:  You need two 6x6 sheets to complete the mini bag.

I absolutely love the Star Blast Edgelits.  They just instantly create happiness and excitement on a project.  For this bag I cut both a Smokey Slate and a Silver Glimmer Paper star blast image.  I attached them with Mini Glue dots at the base so the stars would still bob and move around once they were adhered to the bag front. For some additional glam I added a strip of silver foil to the Smokey Slate card stock base and adhered this piece on an angle across the bag. 

For the sentiment I stamped the "Sparkle" sentiment In Momento Tuxedo Black ink on a scrap of Whisper White card stock and cut it out with a non-SU stitched rectangle die.  I added some silver foil stars and Basic Rhinestones to complete the sentiment piece.    

The inside gift card was made with a piece of Whisper White card stock that measures 5 1/4" x 3 7/8".  The overlay was made by cutting a piece of Smokey Slate card stock with the Balloon Pop-Up Thinlet.  

I added touches of Silver Glimmer paper for the balloons and stars and some small Basic Rhinestones.  I cut two Smokey Slate bows using the Bow die cut from this set for the handle on the card.  The sentiment "It's Your Day" is from the Love Sparkles stamp set.


The back of the insert has a 2" by 3 7/8" piece of the designer series paper across the bottom. It was attached with a small amount of Tom Bow glue on three sides. The gift card slides in length-wise in the center. The sentiment "happy birthday" was stamped at the top of the insert with Momento Tuxedo Black ink. 


My Second Project:  A No-Cut DSP Gift Folder CASE

My second project is also birthday related and uses products from the Party Animal Collection in the Occasions 2017 catelogueMy inspiration for this project came from the very talented Diane Barnes, who has been making what she calls a "No-Cut Patterned Paper Gift Folder" since 2008.   

Here's What I Came Up With:

This is the front of the folder.  

Inside the gift folder are two side pockets where you can add notes.  I've left mine blank so I can personalize for the fellow I'm going to give this to. 


This is the back view of the gift card holder. The Pacific Point bow on the side is the gift card pullout. Because of the additional pull-out, you would have to custom make an envelope to hold this card.


Supplies:
Stamp Sets: Balloon Adventures #142823, Love Sparkles #143183, and Avante Garden (143272 - Happy Birthday)
Ink: Emerald Envy, Watermelon Wonder, Pacific Point
Paper: Party Animal Designer Series Paper, Silver Glimmer Paper
Card Stock: Emerald Envy, Tangerine Tango, Watermelon Wonder, Pacific Point, Whisper White.
Accessories: Balloon Pop-Up Thinlet Dies #142753, Star Punch from Itty Bitty Accents Punch Pack (R), Banners Framelits #132173, Lots of Labels Thinlet Dies #138281, Emerald Envy Bakers Twine, Dimensionals, Tear N' Tape, Tom Bow Glue, Simply Scored, Trimmer and Big Shot.
Side view of the Gift Folder

The blue tab on the side is for the gift card.  It is tucked into this side-seam.
 
This is the front of the actual gift card holder that I designed and added to the card.  It comes complete with it's own little tab on the side that I cut out with the Balloon Pop-Up Thinlet Dies.  I slid this into the side seam created by the fold in the card stock and it fits snugly inside. 
Here you can see I just created a small pocket on the reverse of the holder that the gift card can just slide into.
I loved the fact that there are all kinds of neat little folds and hiding places on this gift card holder. And, although I basically CASED Diane's design I like adding my own take on a project, such as adding glue on some folds so that the package didn't come apart and I also created a square gift card holder that I could tuck into the side seam. 

Assembly:
Because Diane happily shares her template and fabulous instructions for this Gift Folder, on her blog, I've provided this link so you can check out her post on this topic.  I'm sure you'll be just as eager as I was to create one or maybe several of this fun gift card bag(s).  Whatever you do please acknowledge her and drop her a comment, let her know I sent you.  

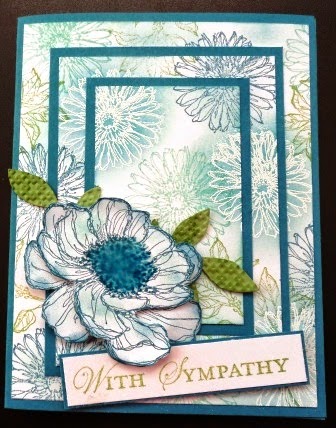
Project Three:   Avant Garden Spring Card
With Spring just around the corner and a plethora of birthdays coming up in March and April I decided to make a simple card using the Avant Garden stamp set for my third project.  You can't buy this stamp set, but you can earn it for free during Sale-A-Bration with the purchase of $60.00 CDN from any of the other Stampin' Up! catalogues currently available.  

I stamped three of the bouquet images on a piece of 3 1/2 x 3 1/2" Very Vanilla card stock.  I water coloured the flowers and stems with Sweet Sugarplum and Pear Pizazz inks.  To get the fullness in the image, I restamped three more floral images, painted them and fussy cut them out attaching various bits and pieces to the original stamped flowers with dimensionals.

Well you've come to the end of my projects for this hop and I hope that I've inspired your creative side in some way.  Now it's time to move on to the wonderful Kath Rick's blog so she can wow you with her projects.  Have fun and remember to leave some comments along the way..... we love to hear from you.


Heidi Weaver


Happy Stamping!
Penny Token's Stampin Spot

Thursday, May 14, 2015

May Retirement Blues - Wacky Watercooler Blog Hop


It's time for another Wacky Watercooler Blog Hop and this time we're dedicating it to the "Retirement Blues", and I'm not talking about retirement from work.  I'm referring to the retirement of Stampin' Up! stamps and accessories that happens every May as Stampin' Up! prepares for the new Annual Catalogue launch on June 2nd.  
Check out the retirement list here.  Products and accessories are available until June 2nd or while supplies last. 
As a Stampin' Up! Demonstrator this is often a time of mixed feelings - happy and sad. I'm super sad to see some of my favourite stamp sets designer series papers and accessories go, but I'm also super excited knowing they'll be replaced by new products that will bring a smile to my face, and a lot of enjoyment to my stamping world!   

So I hope you'll join us on this "reminiscing" blog hop.  Get yourself comfy, grab your favourite beverage and settle in for a journey through some of our favourites.  Oh and in case you're not aware, wherever you begin in our blog hop, whether you're moving forward or backwards through the participants,  you'll eventually wind up precisely where you began.  

I hope you'll take time to visit all the participating blogs and, perhaps, leave a short message letting us know what you've thought of our posts, and comment on what products were your favourites too.  

If you've been moving forward through the hop you'll have arrived here from Marsha Reed's wonderful blog.  

Here's a list of all the Wacky Watercooler Blog Hoppers, just in case you get lost. 
Here's My First Project:
Ironically when thinking about what to make for my first project, I decided to make a Triple Layer Sympathy Card.  Unfortunately this year, I needed several Sympathy Cards, and my "to go for" stamp set was one of the 2014/15 Annual Catalogue Hostess Sets called Bloom With Hope.  I am truly going to miss this artistically sketched stamp set with it's eleven flowers and hopeful phrases.  


I pounced ink from my Indigo marker on the center of the flower to enhance the image and then covered it with Crystal Effects.  I stamped the "With Sympathy" from the Loving Thoughts stamp set in Wild Wasabi and Versa Mark inks and then mounted it onto a piece of Island Indigo cardstock.  While this stamp set is no longer available you can still get the MDS Studio Brush Script set for $4.99, but hurry as it will retire in June.  This is a terrific value for a wonderful sentiment set. 

For the leaves on this card I used the Square Lattice Embossing Folder and the Flower Frenzy Bigz Die.  I'm truly blue that this BigzL Die is retiring! 
Check out the Flower Frenzy BigzL Die on the Retiring Products list it is greatly reduced in price.  This is a fantastic  die for making floral designs and it's sad to see it go.
Supplies:
Stamp Sets:   Bloom With Hope (Hostess - 2015 Annual Catalogue) and Loving Thoughts
Bloom With Hope #133952
 
Loving Thoughts only available in MDS Studio Brush Script.
Ink:  Island Indigo, Wild Wasabi, Pool Party and Versa Mark
Cardstock:  Island Indigo, Wild Wasabi, Whisper White 
Accessories:  Flower Frenzy (leaves), Square Lattice Embossing Folder, Big Shot, Clear Blocks, Snips, Dimensionals, Trimmer, Crystal Effects, Sponge Dauber.

Measurements for Triple Layers:
1.  Card Base in Island Indigo measures 8 1/2 x 5 1/2 scored at 4 1/4
2.  Indigo Layers:  2 1/4 x 3 1/2", 3 1/4" x 4 1/2" 
3.  Whisper White Layers:  2 x 3 1/4", 3 x 4 1/4" and 4 x 5 1/4"

Second Project: 
I'm also sad and blue to see the Happy Hour Stamp Set retiring.   What a fun set.  It has a total of 17 images and sentiments, that are perfect for using on invitations, festive birthday or seasonal cards and more. Here's a card I made to showcase a few of these elements:


I just love the boldness of this sentiment!  I paper pieced the contents of the glass with Moonlight DSP Paper Pack The 48 sheet Moonlight DSP is such a great little paper pack. There are 12 different paper designs and you get 4 of each.  They measure 4 1/2 by 6 inches so they're perfect for card fronts and other small projects.  The designs correspond with Hello Honey, Basic Grey, Lost Lagoon and Blackberry Bliss It's on for 50% off right now in the retiring products promotion.   

Here's the inside of the card.  I continued stamping some of the circles with sponge daubers for a fun effect. 


Supplies:
Stamp Sets:  Happy Hour and Perfect Pennants
Ink:  Lost Lagoon, Hello Honey, Basic Gray
Cardstock:  Hello Honey, Lost Lagoon, Whisper White 
Accessories:  Basic Rhinestones, Large Oval Punch, Circle Framelits, Banner Framelit, Sponge Daubers Moonlight Designer Series paper pack

Third Project:
I really enjoy the BigzL Dies and one of my all time favourites has been the Petite Purse.  What a fun tool to have.  I've used this die over and over again for wedding and party favours, so I will really regret that it's gone.  Here are a couple of purses I made with this die:
I used Crisp Canteloupe for the base of this purse, one of the retiring In-colours that I'm going to truly miss.  The top of the purse was cut from DSP that retired with the Sale-A-Bration but the mix of colours went perfectly. Unfortunately you can barely see it because of my poor picture taking skills.   


I used the Petite Flower punch to cut out the large flower and the smaller ones were made with one of the Itty Bitty Accent punches.  Basic Pearls were added to the center.  I was trying to get a cascading flower effect placing all the flowers on the front.  I also  covered the brads that are holding the handle in place with the Petite Flowers but instead of the centers being Crisp Cantaloupe I added Lost Lagoon centers to bring out some of the colour from the DSP.  


I left the Crisp Cantaloupe purse background plain but it could have been stamped with a flower design as in this Regal Rose sample.  I like them either way.  With this super cute versatile die the sky and your imagination are the limit.
This die is so easy to use and the end product always brings a smile!

I hope you liked my projects today, and will leave a comment or two.  Don't forget to continue on to see the rest of the Wacky Watercooler participants projects.  They are simply awesome!


Before I go, here are some pictures of projects made with some of the other retiring stamp sets and products that I'm going to really miss.  Enjoy:
Stippled Blossoms - I literally cried when this was retired, and then I said "I'm never going to stop using this stamp set, it truly is my all time favourite!


Too Kind
This is an amazing 8 piece two-step set - perfect for every occasion. 

Starburst Sayings and Timeless Talk 

Timeless Talk 

Starburst Sayings

Postage Due 

Post Card 


Tea Party


Perfect Blend 

Today and Everyday


Well that's the end of my retirement tour.  Hope you had a good time.  

Happy Stampin!
Penny Tokens 

Happy St. Patty's Day!

Rainbows, a Pot of Gold, Leprechauns green beer and shenanigans are all part of celebrating St. Patty's Day on March 17th. I have a sma...