Showing posts with label Post It Note Holders with Pen. Show all posts

Friday, February 5, 2021

Mini Desk Calendar Tutorial

I'm working on thank you gifts for my customers who recently placed on-line orders and used my Hostess Codes.  These gals will be receiving a Stampin' Up! Simply Shammy as a reward from me for using the code.  I'm also tucking in a Mini Desk Calendar and Post It Note holder in their thank you packages to show my appreciation.  


The calendar and Post-it Note covers are both made with the Berry Delightful Designer Series Paper featured in the Sale-A-Bration flyer. Isn't it beautiful?  I really like the colour and design on this paper and the coordinating stamp set called Berry Blessings.  


Berry Blessings is a Two-Step Stampin' set and comes with 13 photopolymer stamps.  The coordinating Berry Delightful Designer Series Paper is 12" x 12" and comes with 2 each of 6 double-sided designs. The paper coordinates with the following product colours: Balmy Blue, Blackberry Bliss, Calypso Coral, Cherry Cobbler, Daffodil Delight, Flirty Flamingo, Garden Green, Granny Apple Green, Night of Navy, Pacific Point, Poppy Parade, Rich Razzleberry, and Shaded Spruce. This coordinated bundle is free with a qualifying purchase of at least $120.00 before tax and shipping charges and is only available until the end of February 2021 or while supplies last.

Here's an inside view of the mini easel calendar.  So pretty and only a few steps needed to create this great project.  The Post It Note Holder is also a simple project and really goes compliments the calendar when giving it as a gift.    

The thank you card also features the Berry Delightful DSP.  This card design is called a Circle Card, and showcases both sides of this paper. 

This has to be my most "used" sentiment in this age of COVID-19.  It's been the star attraction on so many of my cards and gift boxes.  The sentiment is from the So Sentimental  stamp set and is stamped in Rich Razzleberry.  I used the  Stitched So Sweetly Dies to cut out both labels.  

So Sentimental Stamp Set

Stitched So Sweetly Dies  that coordinate with the So Sentimental Stamp Set.


Here's Some Other Calendar and Note Pad Samples:

I usually make these mini desk calendars for Christmas stocking stuffers and last minute hostess gifts.  Because the calendar pads are sometimes hard to find and are gone as soon as they hit the shelves I generally buy mine in the early Fall.  They come ten to a pack and the price is very reasonable.  They can be ordered directly from the manufacturer Taylored Expressions, or at local craft stores.  

Here are some pictures of the calendars I've been working on. The Dog and Sunflower calendars were both made using the directions for the Small Easel Stand Desk Calendar (tutorial below).  The Blackberry Bliss sample is actually a combination Desk Calendar and Post It Note Holder and I've provided a link for this one. 

This is the cover of my Pampered Pets Calendar.  I've had a lot of fun designing both dog and cat calendars and Post-it Note covers using the Pampered Pets Designer Series Paper.  

The 2021 calendar pads are from Taylored Expressions.  They measure 2 3/4 x 3" and are the perfect size for these holders. 

When the calendar pad is open the top flap rests against the calendar pad so it stands upright.  


Small Easel Stand Desk Calendar

I don't know who created the first template for this calendar but I really thank them for providing a simple way to dress up a mini desk calendar. Here are the simple instructions.

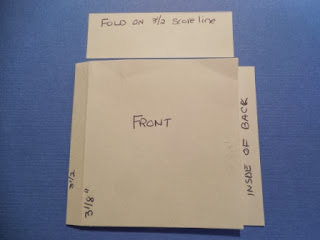
Base:    Cut one 8 1/2" x 3 1/4" piece of cardstock for the base. Score this piece at 2 1/8" and 4 1/4" burnish the score lines 2 1/8" score line is a mountain fold and the 4 1/4" score line is a valley.  When you work with this piece these two folds need to be pushed back.  Adhesive goes on the front piece and then the front layer from the next step is attached to the base  like this.  

Calendar Front:  Cut a 4 14" x 3 1/4" piece to match base card stock.  Cut a 3 x 4" piece in a coordinating colour to the DSP for the 1st layer and adhere.  Cut a 2 3/4" x 3 3/4" piece of DSP for the final layer and adhere.   


Inside Base:  Cut a 3 x 4" piece of coordinating card stock for first layer followed by a 2 3/4" x 3 3/4" piece of DSP.  Adhere both layers.   Attach 2 1/4" x 3" calendar pad. 

Just add embellishments to the cover of the Easel Calendar and you're all done. 

Calendar, Post It Note and Pen:

If you want to create a larger easel card calendar holder there are many templates out there, but here's one I made that measures 4 14" x 5 1/2".  It has a calendar on the front a pen holder and covered post it note pad. on the base.

I followed this tutorial by Tracy Elsom to make my calender set.  I used paper from my Love It Chop It paper stash to make this sample.  I used Perfect Plumb (retired) and Blackberry Bliss cardstock along with Whisper White for the layers and base.   

This is the Post It Note cover in the contrasting paper 


This view shows the Post It Note cover lifted. What a great and simple way of dressing up the Post It Note pad. 

I hope you've enjoyed these projects and samples.  They make great gifts.   

Happy Stamping!

Penny Tokens Stampin' Spot

Penny Hanuszak, Independent Stampin' Up! Demonstrator

FEBRUARY HOSTESS CODE:


Berry Blessings and Berry Delightful DSP available during Sale-a-bration 
Click here for details. 


Thursday, October 3, 2013

Post It Note and Pen Holder - Tutorial


Aren't these cute?  Post It Note and Pen Holders are one of my favourite gift items to make. Especially at Christmas time.  

These little cuties make great stocking stuffers or hostess gifts and sell quickly at craft and vendor fairs.  People can't resist them, after all everyone uses Post It Notes in some shape or form.

Another thing I like about making Post It Note holders is that they're adaptable for any season and they're quick and easy to make.  Anyone can make these!  

Today I'm going to walk you through the easy steps and show you some samples from my recent Christmas theme Post It Note & Pen Holders.   Enjoy!

Supplies and Accessories:
  • Small mini gel pens ( I buy mine at Staples - 12 to a package for $3.95)
  • Post It Notes (I'm using 3 x 3 post it notes for these holders)
  • Card stock cut to 3 1/4 x 7 3/8" for the base a contrasting card stock measuring 2 7/8 x 3 1/8" for the first layer and a neutral card stock measuring 2 3/4 x 3" for the next layer
  • Designer Series Paper in two coordinating designs enough to punch out four 1 1/4" squares
  • 1 1/4" Square Punch
  • Stamp Set of your choice or embellishment for center of cover
  • Ink to coordinate with DSP and card stock
  • Paper Trimmer
  • Adhesive - Snail and Sticky Strip
 Steps to Create Post It Note Holder:
1. Cut card stock for base to measure 3 1/4 x 7 3/8", score at 3 1/8, 3 1/2 and 3 7/8 inches.


2. Crease along each score line with a bone folder. Fold cover on the 3 1/2 score line. 


3.  Make two cuts to the score line about an inch apart for the pen holder.See picture for placement.

4.  Open up the card stock and leave the slot for the pen facing outwards but push the two outer pieces to the inside of the cover.  Apply two small strips of sticky strip to the inside score line between the 3 1/2 and 3 7/8 lines and then fold to the back to adhere.


5.  Attach the Post It Note pad to the back cover with sticky strip, and   decorate the front of the  cover in whatever design you choose.  

Here's two of my recent designs:

  • For this Post It Note and Pen Holder I used Smokey Slate for the card base, Coastal Cabanna for the 1st layer (2 7/8 x 3 1/8") and Whisper White for the next layer (2 3/4 x 3") and adhered them to the front of the note holder.  
  • I cut out four 1 1/4" DSP squares from the Winter Frost DSP Stack #132183 and adhered them to Whisper White layer, leaving a space in between the squares.  
  • I adhered a piece of Silver Glimmer Paper cut to 2 3/4 x 1/4" in the center between the squares.  
  • For the embellishment I cut out two of the small snowflakes with the Festive Flurry Framelits #132193 - one was stamped in Smokey Slate on Whisper White with the Festive Flurry stamp set #131781 and the other was cut from Silver Glimmer paper.  These snowflakes were glued together with glue dots and then mounted to the center of the DSP squares with Stampin' Dimensionals.  
  • I matched up the colour of the mini gel pen with the card stock. 
  • This Post It Note and Pen Holder is made the same as the above sample, but with the following changes:  
  • I used Real Red card stock for the base and topped it with a piece of Gumball Green card stock (1st layer).
  • I added Whisper White for the next layer and topped this with four squares punched from the Season of Style DSP Stack #132181.  
  • Red Glimmer Paper was adhered to the center.  
  • I stamped the Santa image from the Tag It stamp set #130303 for the tag in Gumball Green and Real Red inks.  Tip:  I stamped two tags, one in Gumball Green and the next in Real Red and then I cut out the Real Red Santa square and glued it to the Gumball Green base. 
  • The tag was cut out with the Chalk Talk Framelit dies and mounted to the note book base with dimensionals.  I matched up a red gel pen to the notebook cover. 
Here's what the inside of the Post It Note Holder looks like.


Black and White Anniversary - FMS #669

I'm up for another sketch challenge card, how about you?  Narelle Farrugia is the sketch designer for  Freshly Made Sketches #669  this...