Showing posts with label Wacky Watercooler Challenges. Show all posts

Wednesday, July 29, 2015

WWC#29 - Bev's Special Folds Challenge

When I was looking through this week's challenge blogs, I came across Bev's Special Folds Challenge on the Wacky Watercooler challenge site.  

I love getting creative with fancy card folds, so this challenge was right up my alley and made me want to play along too.  


Here's My Card:
Since I have a whole slew of Fall male birthdays hanging in the wings, I chose to make a fancy fold male birthday card.  Choosing the Guys Greetings stamp set for this card was another easy choice.

Supplies:
Stamp Set: Guy Greetings
Ink:  Soft Suede
Card Stock:  Sahara Sand and Soft Suede
Accessories:  Scalloped Oval punch, Large Oval punch, Scalloped Border Punch, Detail Scissors, Woodgrain Embossing Folder (TIEF), Circle Framelits, Big Shot machine, Trimmer, dimensionals and adhesive strip. 


Measurements:
  • 5 1/2 x 4 1/4" piece of Soft Suede for card base
  • 5 1/4" x 9 1/2" piece of Sahara Sand card stock scored at 2 1/2" and 51/2"
  • 5 1/4" x 1" strip of Soft Suede for Scalloped Border layer
  • 1/8" x 5 1/4" strip of Soft Suede for inside border
  • Additional Sahara Sand for stamping two sets of hats
Special Fold Design:
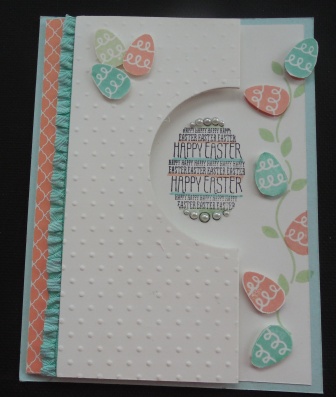
The design of this card is called an Altered Z fold.  I first saw this design in a video posted by Dawn Griffiths (see link at the end of this post), and later on Pinterest.  This is a very fast and easy fun fold card and can be adapted for any occasion. 
I placed a small pencil mark on the inside of the top and bottom of the circle inside the card so my "guy" image would show well through the opening.
Add caption

I used my 2 1/2" Circle Framelits to cut the whole through the two layers of card stock.  The "guy" and the sentiment "To A Classic" were stamped in Soft Suede ink. 
Don't you just love these hats?  I stamped them once in a continuous line on the right edge of the inside of the card.  Using a separate piece of Sahara Sand card stock, I punched them again and then fussy cut and adhered the individual hats with small pieces of dimensionals, to the first stamped images. I also added a 1/8" strip of Soft Suede card stock above the hats, to give some separation between the writing space and the hats.

Note:  If you look at the picture of the stamp set above you'll see there are two sets of hats in the Photopolymer image.  From past experience, I found it really difficult to stamp the hats in a line without getting a halo on my work, so I chose to separate the solid stamp into two stamps by very carefully cutting in between the images.  


I love the old fashioned font they've used for the sentiments in the Guy Greeting stamp set.  I used Soft Suede ink for the "Happy Birthday" greeting and the sponging around the oval and mounted this piece with dimensionals to the background oval. The background layer was punched out with the Scalloped  Edge Oval punch.  Note:  When mounting the greeting layer on the card front make sure the glue only goes half way on the oval so it doesn't show from the inside of the card.  The scalloped edge on the left of the card front was punched from a 5 1/4 by 1" strip of Soft Suede card stock using the Scalloped Edge Border Punch.  Once this piece is in place, the front flap is secured with adhesive. 


The Woodgrain TIEF adds a nice manly texture to the front of the card.  I have to say I found it difficult to emboss this part of the card, it wouldn't fit sideways in the embossing folder. To compensate for this I had to emboss one side of the circle, remove and reposition the embossing folder and run the second side through the Big Shot.  This actually worked out okay and it's difficult to see where the join is. 


 I love these little hats!  I think this grouping added a nice finishing touch to the card front. They were fussy cut and mounted with dimensionals.

So that's it for my challenge card this week. I hope you liked my special fold technique.  If you want more specific information on how to make this Altered Z Fold card just take a look at this card I made last Easter and use the links to see a video by Dawn Griffith.


You can find this card here and a link to Dawn Griffith's  video showing how to make it.  Enjoy!  

Happy Stamping!
Penny Tokens

Thursday, April 30, 2015

WCC22 - A Combination Challenge

Wow, time's been flying and I almost missed this week's Watercooler Challenge, by Heidi Weaver.  Heidi one of the very talented and long time members of the Watercooler Artists has come up with a fun challenge that involves combining a watercolour background with a silhouette.  


Here's My Card:


Nothing in Heidi's instructions indicated the watercolour background had to be the "whole" base of the card for this challenge, so I decided to use only a portion of it in my design. The card base I chose to make is called a Pop Out Swing Card.  The watercolour background and silhouette are  showcased on both the swing panel and sentiment panels at the front of the card.  

When opened the Pop Up Swing Card has three panels.  I combined stamps from the Basic Butterfly and Serene Silhouettes stamp sets for the tree silhouette and the inside sentiments  and stamped them in Blackberry Bliss ink.  I embossed the tree silhouette on the watercolour background using Clear Embossing Powder over Blackberry Bliss and Versa Mark inks.
   
 
How Did I Make It:
I really had fun trying out a variety of techniques for making a watercolour background, before settling for one I made using the Mosaic Embossing Folder and re-inkers.  My original piece of water colour paper measured 5 1/4 x 4 but as you can see from the above pictures, I cut it down to 2 3/4 x 2 34".


To create the watercolour background I simply sprinkled some ink from the re-inkers in strips across the raised side of my Mosaic Embossing Folder and then used a water spritzer to move the ink around.  When I was satisfied with the amount of ink and the intensity, I laid my piece of 5 1/4" x 4" watercolour paper over the folder.  I used a scrap of white card  stock over top of the watercolour paper and pressed down on this piece evenly to transfer the colour to the watercolour paper.  I carefully raised the watercolour panel and then set it aside of paper towel to dry.  

Once it was thoroughly dry (the next day), I inked up my tree silhouette with Versa Mark and then Blackberry Bliss ink and stamped it in the center of the watercolour panel.  I spread Clear Embossing Powder over the still wet ink and embossed the image.  Wow did it pop and give added texture to the card.  

Supplies:

Stamp Sets:  Serene Silhouettes, Basic Butterflies and Really Good Greetings
Ink:  Lost Lagoon, Blackberry Bliss, and Versa Mark for the silhouette, sentiments and sponging around the watercolour panel.
Re-inkers:  Pool Party, So Saffron and Calypso Coral
Card Stock:  Blackberry Bliss, Hello Honey, Lost Lagoon, Whisper White, Watercolour Paper

  • Card base:  Blackberry Bliss cut to 8 1/2 x 5 1/2" and scored at 4 1/4"
  • Inside Layer:  Whisper White 5 x 6" scored at 2" and 4"
  • Front Layers:  Hello Honey 3 1/4" x 3 1/4", Lost Lagoon 3 x 3", and Watercolour Paper 2 3/4 x 2 3/4" for
  • Sentiment strip 1" x 3 1/2"watercolour paper  
For instructions on how to assemble a Pop Out Swing card click here to see Dawn Griffins video tutorial.
Accessories:  Trimmer, Big Shot, Mosaic Embossing Folder, Beautiful Wings Embosslit, Squares Frame Lit Dies, Basic Rhinestones.


I hope you enjoyed this all occasion card that celebrates an accomplishment.  For me I was pleased that I accomplished the double challenge and came up with something that I really liked.  It was also fun combining the challenge with a fancy fold card that I've been wanting to make.


I hope you'll check out the rest of the samples on the Watercooler Watercolour Combo Challenge, they're truly awesome and leave these talented gals some comments while you're there.  

I also hope you'll try out both of these techniques.  I'd really like to know what you enjoyed about doing them and a link to your projects.  Oh, and there's still a bit of time to play along with this challenge, if you're up for it today.  We'd love to have you join in the fun!
Happy Stamping!
Penny Tokens


Atlantic Hearts Sketch Challenge #572:

April has sure been living up to its reputation for rain showers but it's been really on the cold side which isn't normal for this t...