Showing posts with label floral card. Show all posts

Wednesday, March 29, 2017

Watercooler Wednesday #112 - Anything Goes Challenge


It's time for our fifth challenge of the month at the Watercooler and that means there isn't a hostess, it's simply an "Anything Goes" challenge.  Hope you'll join in the fun of WWC112 - Anything Goes.

Here's My Card:
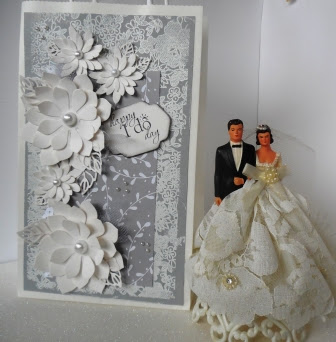
For my "Anything Goes" I've chosen to create a very romantic wedding card and gift bag for friends who are having a destination wedding.  I know this special bride and groom are going to be thrilled and I'm pretty sure you're going to love it too! 

Supplies:
Stamp Sets:  Floral Phrases #141767, Word Play (R), Something Lacy (R)
Ink: Basic Gray
Card Stock: Whisper White, Smokey Slate, Shimmery White, Acetate Window Sheet, A Little Foxy DSP Paper Stack (141637)
Accessories:  Big Shot Machine, Paper Trimmer, Stitched Circle Dies, So Succulent Dies, Stylish Stems Dies, Basic Pearls, White Embossing Powder, Heat Gun, Tom Bow Glue, Sticky Strip, Glue Dots, Sparkling White Tulle

The Card Details:  
I saw a card by Lorraine Schrendeman on Stampin' Connection last month that inspired me to make this multi-layered side-opening card.  She called hers a Peek-A-Boo card and she'd CASed it from someone else's design.  Unfortunately I was not able to see nor link to the original card but thanks to Lorraine I had the dimensions.
Front of the card
The Acetate Panel
Back Panel of the card
1. Start by cutting two 6 1/2" by 4 1/4" pieces of Whisper White card stock and score both at 1" on the left short side. Use your bone folder to crease the score line. The folds will be on the outside and the 1" flap will face the interior of the card.

2. Cut a piece of DSP to measure 5 1/4" x 4" and cut out a circle with a 3" stitched circle die and the Big Shot Machine. Adhere the DSP to one of the above pieces and place the next size of circle die inside the first circle and cut through using the Big Shot.

3. Cut a piece of Acetate 5 1/2" x 4 1/4". Line up the Acetate piece between the two folds of the front and back of the card and adhere with tear tape.
This view shows the Acetate sheet between the front and rear panels.
4.  Adhere the DSP circle to the Acetate piece.  I attached glue dots along the back of the circle then fitted it through the original hole and pressed down so the glue dots adhered to the Acetate.   To hide the glue dots I double cut another circle from Whisper White card stock and attached this to the back side of the Acetate with glue dots.


This view of the back of the Acetate window shows the Whisper White circle which hides the glue dots used to adhere the DSP circle and flowers.

5.  Stamp the sentiment and design on the smaller stitched circle and adhere this to the back Whisper White panel.  I also adhered a 4 1/4" x 3/4" panel of DSP to both sides of the card seam.

Both sentiments are from the Floral Phrases Stamp Set and are perfect for this wedding card.

6.  Decorate the outside of the card, the Acetate panel and the back panel with flowers and leaves created by layering die cuts from the Succulent and Sweet Stems thinlet die sets. For the outside I die cut one large Succulent flower and two smaller ones.  I cut 3 large and 3 small decorative leaves using the Stylish Stems Framelit set.
Succulent Dies are perfect for creating floral images too.  I used the 3 large flower shaped dies and the 3 smaller ones for my flowers.

The Bag:
You can't see the handles on this bag but they're there.  The bride and groom is my wedding cake topper, dating back to 1969.  It's still in pretty good shape after all these years, although a bit yellowed with age.
1.  Cut an 8" x 4 1/4" piece of Smokey Slate card stock. I embossed this piece with the Something Lacy (R) back ground stamp and White Embossing Powder.  Adhere this panel to the front of the bag.

2.  Cut a 3" x 6" panel of the floral paper from the A Little Foxy DSP Paper pack and adhere this to the Smokey Slate panel.  I positioned it in the center and 1 1/2" from the top of the panel.  I had actually cut out a lacey edge with the Scalloped Edge Punch (R) and it's on the left hand side of the DSP panel, but as I layered the flowers it gradually faded into the background. If I was doing this particular layout again I would place the lace strip on the right hand side. 
The flowers on the bag were constructed with Shimmery White card stock simply because I ran out of Whisper White half way through this project.  What a difference in colour.  The Shimmery White has more of a creamy colouring while the Whisper White is such a pristine white.  Quite a contrast. 

3.  I assembled two large succulent flowers and three small ones as well as five large and four small leaves for the flowers.  I cut a 2" x 6" strip of White Sparkle Tulle into three strips and inserted each strip behind the larger flowers.  I just scrunched them up into a triangle and adhered them to the back of the flowers with glue dots.  The centers of the flowers are large and smaller Basic Pearls and there are some tiny seed pearls scattered along the DSP panel in groups of three.

4. I stamped the sentiment in Basic Gray on Shimmer White card stock and cut it out with the frame from the Stylish Stems Framelit Dies   This piece was attached with dimensionals.
I used the larger of the two frames to cut out my sentiment and sponged Basic Gray ink around the edges.  The two decorative small and large leaves were used to embellish the flowers.
The "happy I do day" sentiment is from the retired Word Play stamp set.  I absolutely adore this image.  I've added a small Basic Rhinestone to the top of the "o" which symbolizes the wedding ring.  
Well that's it for today's post.  I hope you've enjoyed it and will take inspiration from this project.  Let me know if this is something you'd like to make.  I love receiving your feedback through my comments.  I so enjoy hearing from you.


Don't forget to check out the other Design Team Artist's at the Watercooler Wednesday Challenge Blog and if you feel inclined why not participate in this week's challenge WWC112 Anything Goes. The challenge is open until 5pm Mountain Time on Monday April 3rd.  We'd love to see your creations.   Who knows you might Rock the Watercooler with your winning entry!

HAPPY STAMPING!
PENNY TOKENS STAMPIN SPOT

Sunday, August 31, 2014

Freshly Made Sketches Challenge #151

It's Labour Day weekend and, as usually happens on a long weekend, we've had a mixed bag of weather, with cooling temperatures and some rain.  I feel sad that the beautiful warm weather we'd been having didn't hold for all those families trying to get in one last camping trip or day at the beach before the bustle of September and back to school starts. Oh well, it's the prelude to fall. 

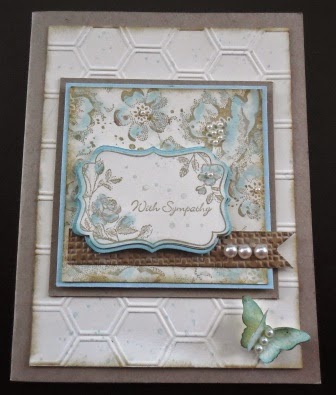
Today I've made a Sympathy card based on a sketch from Freshly Made Sketches Challenge #151.  I liked the simplicity of this sketch designed by Kim Singdalsen the Freshly Made Sketches August Guest Designer.  It was her first ever sketch, and she's done an awesome job!  Check out all Kim's other great cards on her blog Joyful Creations With Kim.  
Here's Kim's Sketch:


Here's My Card:

Supplies:
Stamp Sets: 
  • Four Frames
  • Teeny Tiny Wishes 
  • Friend to Friend (R)
  • Gorgeous Grunge
  • Papillion Potpourri
  • Stippled Blossoms
Card stock:  
  • Crumb cake for the 8 1/2 x 5 1/2" base, the 3 1/4" x 3 1/4" layer and the 1/2" x 3 1/8" banner.
  • Soft Sky for 3 x 3" layer and scrap for the Decorative Label layers
  • Very Vanilla 5 x 3 3/4" for first layer, 2 7/8" x 2 7/8" for stamped layer and a scrap for the Decorative layer and butterfly.
Ink:  Crumb Cake, Early Espresso and Soft Sky

Accessories:   
  • Decorative Label Punch
  • Bitty Butterfly Punch
  • Square Lattice Embossing Folder (R)
  • Honeycomb Embossing Folder 
  • Aqua Painter
  • Basic Pearls
  • Dimensionals, Glue Dots, Adhesive Strips
 
The Very Vanilla layer measuring 5" x 3 3/4" was embossed with the Honeycomb Embossing Folder and then randomly and lightly stamped with the speckled stamp from the Gorgeous Grunge set and Soft Sky Ink.

The banner strip was cut from Crumb Cake card stock and embossed with the now retired Square Lattice Embossing Folder.  Three medium sized basic pearls were added for some interest.

For the 3rd layer on the card I stamped the floral image from the Four Frames stamp set in Crumb Cake on a piece of Very Vanilla card stock.  Details on the flowers were touched up with Soft Sky ink and an Aqua Painter.  One small basic pearl was added to the top flower to tie it in with the flowers on the 2nd layer.  This piece was punched out with the Decorative Label punch and a border was added in Soft Sky card stock.  Some small sprinkles were added in Soft Sky with the Gorgeous Grunge stamp.
 
Decorative Label Punch coordinates with the Four Frames Stamp Set.


Four Frames Stamp set - a very stylish stamp set.

I started the design on the 2nd layer of Very Vanilla card stock by randomly stamping the sprinkle image from Gorgeous Grunge in Crumb Cake ink.  The large rose and smaller detailed petal roses from the Stippled Blossoms stamp set, were then stamped randomly in Crumb Cake  ink. I used an Aqua painter and Soft Sky ink to add shadows and hints of colour to the roses and then finished off this layer with a smattering of tiny basic pearls in the flower centers. 

I
 I wanted to keep the inside of the card simple with lots of "white space".  A 5 x 3 3/4" piece of Soft Sky was added to the inside of the card and topped with a piece of Very Vanilla cardstock measuring 3 1/2" x 4 3/4".  The sentiment "Thinking of You" from the retired Friend to Friend set was stamped in Early Espresso and the large flower image from Stippled Blossoms was stamped in the bottom corner in Soft Sky.

The beautiful little butterfly was stamped twice in Soft Sky ink on Very Vanilla cardstock and then punched out with the Bitty Butterfly punch.  The edges of the butterfly were sponged with Soft Sky and Crumb Cake inks.  The butterflies were nested with a Glue Dot and then added to the card with a dimensional.  The wings were fluffed up with the bone folder to give an appearance of flight and finally a small band of pearls was added for the body. 

Here's the finished card.  I'm pleased with how it turned out. 


Well that's it for today folks.  I hope you'll take the time to go and check out all the other entries and guest designer cards for this sketch on the Freshly Made Sketches blog site.  There is so much creativeness and awesome ideas there. 

Happy Stamping!
Penny Tokens

NESTS OF CHRISTMAS PAPER PUMPKIN ALTERNATIVES USING #fms#662

 Here's the latest sketch challenge from Freshly Made Sketches #662 and designed by Jen T.  Make sure you check out the Design Team car...