Showing posts with label wedding card. Show all posts

Wednesday, June 7, 2017

Watercooler Wednesday #122 - Libby's Feminine "Anything Goes" - Isn't It Lovely

Welcome to this week's WWC122 Watercooler Wednesday challengeLibby Fenn's our queen of Clean and Simple is our host this week and is challenging us to create a Feminine "Anything Goes" project.

The WWC122 challenge is open until 5:00pm Mountain Time on Monday June 12th, 2017.  We hope you'll enjoy this challenge and join us by sharing your creation.  Rules and instructions for the Linsky are on the Watercooler Wednesday Home page.

Here's My Card:
My card this week was inspired by my recent participation in a beautiful destination wedding in Puerto Vallarta, Mexico. The wedding itself was fairy tale fantastic and the setting just couldn't have been any better.


Everywhere you looked you were assailed with all the magnificent vibrant colours of nature.  Reds, pinks, oranges, yellows, greens and blues all mashed together and bombarding the senses.  The Bougainville were the true inspiration for this card.


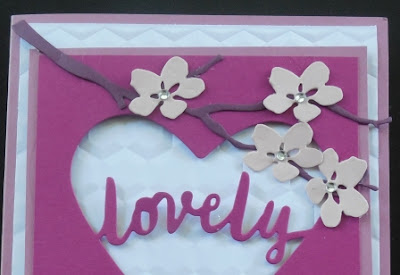
 Here's my card - "Isn't It Lovely":


Supplies:
Stamp Sets:  Floral Phrases #141767
Card Stock:  Whisper White, Sweet Sugarplum, Powder Pink*, Berry Burst*, and Fresh Fig*
Ink:  Fresh Fig 
Accessories:  Big Shot, Paper Trimmer, Hexagon Embossing Folder, Lovely Words Thinlet Dies #143733, Seasonal Layers Thinlets #143751, Hearts Thinlet Dies, Basic Rhinestones, Dimensionals, Tom Bow Glue.

These Adirondack or Muskoka chairs (as they're known in Ontario) from the Seasonal Layers Thinlets set captured my heart the moment I laid eyes on them in the new Annual Catalogue.  They smack of romance, relaxation and togetherness. 

How It's Made:
1.  Card Base:  Cut a 8 1/2" x 5 1/2" piece of Sweet Sugarplum card stock and score at 4 1/4".
2.  1st Layer:  4" x 5 1/4" piece of Whisper White card stock embossed with the Hexagon EF.
3.  2nd Layer: 3 3/4" x 4" piece of Sweet Sugarplum card stock.  Note:  I removed the center of this layer with a 3 1/2" die from the Hearts Thinlet collection.
4.  3rd Layer: 3 1/2 x 4" Berry Burst card stock with the "lovely" thinlet from the Lovely Words Thinlets Dies centered and cut out.  This was adhered to the 2nd layer with Tom Bow Adhesive, making sure the hearts were centered.  The combined layers were adhered to the 1st layer with Dimensionals.
5.  Finishing: Cut out the branch from Fresh Fig and the flowers from Powder Pink using the Seasonal Layers Thinlets and mount to the top of the card.  Add Basic Rhinestones to the flower centers. Cut out a Powder Pink and a Fresh Fig chair and attach below the heart with Tom Bow glue and Dimensionals.
 6.  Inside: Floral Phrases is such a wonderful stamp set and the sentiment "May Your Love Grow Stronger, Deeper and More Beautiful with Every Passing Year" seemed so appropriate for this card.  The inside panel of Whisper White measures 4" x 5 1/4".  The sentiment and floral image from the same set are stamped in Fresh Fig ink.  A 1/2" x 4" piece of Fresh Fig was adhered below the floral image leaving an 1/8" gap.
I hope you've enjoyed today's card.  This card is my own design and I'd love to hear your thoughts on it, comments always inspire me.  And, if you liked this design and want to re-create it please feel free to CASE it providing you acknowledge me by linking to this post.   Thanks again for joining me and the other Design Team members for this challenge.

Happy Stamping! 
Penny Tokens Stampin' Spot 

Wednesday, March 29, 2017

Watercooler Wednesday #112 - Anything Goes Challenge


It's time for our fifth challenge of the month at the Watercooler and that means there isn't a hostess, it's simply an "Anything Goes" challenge.  Hope you'll join in the fun of WWC112 - Anything Goes.

Here's My Card:
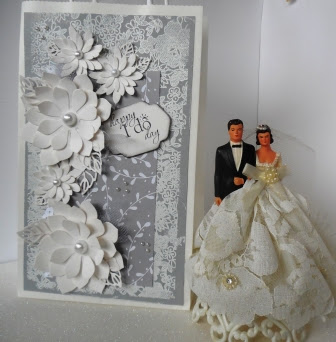
For my "Anything Goes" I've chosen to create a very romantic wedding card and gift bag for friends who are having a destination wedding.  I know this special bride and groom are going to be thrilled and I'm pretty sure you're going to love it too! 

Supplies:
Stamp Sets:  Floral Phrases #141767, Word Play (R), Something Lacy (R)
Ink: Basic Gray
Card Stock: Whisper White, Smokey Slate, Shimmery White, Acetate Window Sheet, A Little Foxy DSP Paper Stack (141637)
Accessories:  Big Shot Machine, Paper Trimmer, Stitched Circle Dies, So Succulent Dies, Stylish Stems Dies, Basic Pearls, White Embossing Powder, Heat Gun, Tom Bow Glue, Sticky Strip, Glue Dots, Sparkling White Tulle

The Card Details:  
I saw a card by Lorraine Schrendeman on Stampin' Connection last month that inspired me to make this multi-layered side-opening card.  She called hers a Peek-A-Boo card and she'd CASed it from someone else's design.  Unfortunately I was not able to see nor link to the original card but thanks to Lorraine I had the dimensions.
Front of the card
The Acetate Panel
Back Panel of the card
1. Start by cutting two 6 1/2" by 4 1/4" pieces of Whisper White card stock and score both at 1" on the left short side. Use your bone folder to crease the score line. The folds will be on the outside and the 1" flap will face the interior of the card.

2. Cut a piece of DSP to measure 5 1/4" x 4" and cut out a circle with a 3" stitched circle die and the Big Shot Machine. Adhere the DSP to one of the above pieces and place the next size of circle die inside the first circle and cut through using the Big Shot.

3. Cut a piece of Acetate 5 1/2" x 4 1/4". Line up the Acetate piece between the two folds of the front and back of the card and adhere with tear tape.
This view shows the Acetate sheet between the front and rear panels.
4.  Adhere the DSP circle to the Acetate piece.  I attached glue dots along the back of the circle then fitted it through the original hole and pressed down so the glue dots adhered to the Acetate.   To hide the glue dots I double cut another circle from Whisper White card stock and attached this to the back side of the Acetate with glue dots.


This view of the back of the Acetate window shows the Whisper White circle which hides the glue dots used to adhere the DSP circle and flowers.

5.  Stamp the sentiment and design on the smaller stitched circle and adhere this to the back Whisper White panel.  I also adhered a 4 1/4" x 3/4" panel of DSP to both sides of the card seam.

Both sentiments are from the Floral Phrases Stamp Set and are perfect for this wedding card.

6.  Decorate the outside of the card, the Acetate panel and the back panel with flowers and leaves created by layering die cuts from the Succulent and Sweet Stems thinlet die sets. For the outside I die cut one large Succulent flower and two smaller ones.  I cut 3 large and 3 small decorative leaves using the Stylish Stems Framelit set.
Succulent Dies are perfect for creating floral images too.  I used the 3 large flower shaped dies and the 3 smaller ones for my flowers.

The Bag:
You can't see the handles on this bag but they're there.  The bride and groom is my wedding cake topper, dating back to 1969.  It's still in pretty good shape after all these years, although a bit yellowed with age.
1.  Cut an 8" x 4 1/4" piece of Smokey Slate card stock. I embossed this piece with the Something Lacy (R) back ground stamp and White Embossing Powder.  Adhere this panel to the front of the bag.

2.  Cut a 3" x 6" panel of the floral paper from the A Little Foxy DSP Paper pack and adhere this to the Smokey Slate panel.  I positioned it in the center and 1 1/2" from the top of the panel.  I had actually cut out a lacey edge with the Scalloped Edge Punch (R) and it's on the left hand side of the DSP panel, but as I layered the flowers it gradually faded into the background. If I was doing this particular layout again I would place the lace strip on the right hand side. 
The flowers on the bag were constructed with Shimmery White card stock simply because I ran out of Whisper White half way through this project.  What a difference in colour.  The Shimmery White has more of a creamy colouring while the Whisper White is such a pristine white.  Quite a contrast. 

3.  I assembled two large succulent flowers and three small ones as well as five large and four small leaves for the flowers.  I cut a 2" x 6" strip of White Sparkle Tulle into three strips and inserted each strip behind the larger flowers.  I just scrunched them up into a triangle and adhered them to the back of the flowers with glue dots.  The centers of the flowers are large and smaller Basic Pearls and there are some tiny seed pearls scattered along the DSP panel in groups of three.

4. I stamped the sentiment in Basic Gray on Shimmer White card stock and cut it out with the frame from the Stylish Stems Framelit Dies   This piece was attached with dimensionals.
I used the larger of the two frames to cut out my sentiment and sponged Basic Gray ink around the edges.  The two decorative small and large leaves were used to embellish the flowers.
The "happy I do day" sentiment is from the retired Word Play stamp set.  I absolutely adore this image.  I've added a small Basic Rhinestone to the top of the "o" which symbolizes the wedding ring.  
Well that's it for today's post.  I hope you've enjoyed it and will take inspiration from this project.  Let me know if this is something you'd like to make.  I love receiving your feedback through my comments.  I so enjoy hearing from you.


Don't forget to check out the other Design Team Artist's at the Watercooler Wednesday Challenge Blog and if you feel inclined why not participate in this week's challenge WWC112 Anything Goes. The challenge is open until 5pm Mountain Time on Monday April 3rd.  We'd love to see your creations.   Who knows you might Rock the Watercooler with your winning entry!

HAPPY STAMPING!
PENNY TOKENS STAMPIN SPOT

Monday, October 5, 2015

WWC36 -- Special 3-D Challenge

The challenge over at the Watercooler Wednesday challenge site this week is all about 3-D.  I hope you'll take some time to go and check out all the entries from the design team and participants because they are simply awesome! 

We were meeting our nephew and his new bride for lunch today and I needed to make a card and gift holder for the cheque we were giving them.  

With the 3-D challenge in mind, I decided to make a floral gift bag using the Mini Treat Bag Thinlet Dies and a matching card.  

Here is what I made:

This is the Mini Treat Bag and the reverse side of the insert card. Unfortunately because of the black surface I took the pictures on, you can't see the outline of the insert card, but trust me it's there. 

I had to slip a piece of cardstock over the middle of this note card as I'd already written on it prior to remembering to take a picture.  The Whisper White note card measures 3 3/4 by 4 and is attached to a piece of basic black cardstock measuring 4" x 4 1/4.  When you turn this card over to the black side I've  attached a  3"x3"' envelope to hold the cheque (see above pictures).  

Although it's difficult to see in the above picture, I've layered tulle in between the DSP flower layers for some added sparkle.  The "for you" was cut out in Black Glimmer paper.  The mini treat bag and leaves were run through the Big Shot with the Lovely and Lacy TIEF for some dimension. 

Here is the matching card that went with this gift:


Supplies:
Stamp Sets:  Teeny Tiny Wishes, For The New Two Clear-Mount Stamp Set
Ink:  Momento Tuxedo Black
Card Stock:  Basic Black, Whisper White, Always Artichoke, Black Glimmer Paper, Retired SU DSP
Accessories:  Trimmer, Big Shot, Glue Gun, White Sparkly Tulle, Silver Sequins, Tom Bow Glue, Silver Accent piece.  Flower Frenzy Bigz Die (R)
Happy Stamping!
Penny Tokens Stampin Spot 

Wednesday, August 6, 2014

Can You Case It CYCI30 Challenge

Sheri and I just discovered Can You Case It  challenge blog and we were excited to try out this week's sketch challenge #CYCI30 for our second card on Tuesday.  

If you're visiting this site be sure to check out their "Challenges" link on their right sidebar.  It will provide all the details about their weekly challenges which being on Sundays and end on Saturdays.  Each week there is a different theme:  sketch, colour, pick a page, scrapbook/cards Project Life, and Holiday. This is an interesting site that I know I'll be visiting.

This week is a Sketch Challenge and here is sketch #CYCI30:
Sheri and I both liked this sketch because of it's simple style and layering. The two of us are such "layer queens". Our hardest choice was deciding on the card's theme and then what colours to use. 

For my card I wanted to combine the Stippled Blossoms stamp set and the Back to Black DSP series paper but hadn't chosen any contrast colours and theme.   

Sheri was in love with the  Just Add Ink Colour Challenge, from last week and decided to do a double challenge card using these colours, and with a little bit of thought, I decided to go along with that choice.  Sheri will be posting her fabulous card on her blog:  Paper Bag Create.  Make sure you go an check it out.   


Note:  Although we both intended to enter our cards in the Just Add Ink Colour Challenge, we'd both forgotten about the International Date Line.  Since Australia is a day ahead of us here in Canada we both missed entering this challenge by "one day".  Too funny.  I'm sure you'll enjoy the cards anyway. 


Here's My Card:
I love this card.  The mix of textures and colour are perfect, even if I do say so myself.  It's got a rich, elegant feel about it.  The Back to Black DSP is simply stunning and really adds the contrast this card needs, while the subtle stamping on the tag adds to the elegance. 

 
The ribbon was added before layers 2-5 were attached to the card base.  The bow was made by using the "Fork Bow" method of tying bows.  Works for me! 


The modern label punch worked out perfectly as a tag.  The best wishes sentiment is from Perfect Pairs stamp set. 

I kept the inside of the card fairly plain by just stamping the flower image. 

Supplies:
Stamp Sets:  Stippled Blossoms, Petite Pairs 
Ink:  Basic Gray, Memento Tuxedo Black
Card Stock:  Basic Gray, So Saffron, Basic Black and Whisper White *
Designer Series Paper:  Back to Black, Glimmer Paper - Silver
Accessories:  Trimmer, Big Shot Machine, Beautifully Baroque Embossing Folder, Scalloped Tag Topper Punch, Modern Label Punch, Corner Rounder punch 
Back to Black Designer Series Paper

How It's Made: 
1.  The Basic Black card base measures 8 1/2" x 5 1/2" and folded at 4 14".

2.  The second layer is Basic Gray card stock and measures 5 1/8" x 4 1/8". 

3.  The third layer is a piece of Back to Black Designer Paper (DSP) measuring 

4 x 5 1/16".  The edges were distressed with a sponge dauber and Basic Gray ink.  

4.  The next layer was a piece of So Saffron card stock measuring 3 1/4 x 4 1/2.  This piece was first stamped with the Stippled Blossom detailed rose in Basic Gray ink and then embossed with the Beautifully Baroque Embossing folder.  

5.  The final layer is the tag.  I chose to cut a Whisper White piece of card stock to measure 2 14 x 5 and then punched out the tag image with the Scalloped Tag Punch.  I trimmed off the excess on the sides and used a corner rounder on the bottom of the tag.  This edges of this tag were sponged with Basic Gray ink and it was adhered to the So Saffron layer with dimensionals.

6.  Stippled Blossoms rose and rose buds were stamped in Basic Gray and Tuxedo Black on the tag.  The sentiment "Best Wishes" from the Petite Pairs stamp set was stamped in Tuxedo Black ink.

7.  I punched a Modern Label from Basic Black card stock and Silver Glimmer paper for the small tag element of the card.  I layered these pieces and added a Basic Rhinestone to the bottom.

8.  Before adhering layers 2 to 5 on the card, I added a strip of 3/8" Basic Gray Taffeta Ribbon and small bow.  

9.  For the inside of the card I added a 5 x 3 3/4" Whisper White layer with a single rose stamped in the lower right hand corner.  

I hope you've enjoyed seeing this card and my details on how to assemble it. Let me know if you've ever prepared a card for a challenge and missed by seconds on the clock..........I'd love to hear your stories.  

Thanks for dropping by I thoroughly enjoyed making this card for you to see.

Happy Stamping!
Penny Tokens
 

Black and White Anniversary - FMS #669

I'm up for another sketch challenge card, how about you?  Narelle Farrugia is the sketch designer for  Freshly Made Sketches #669  this...