Showing posts with label sketch challenges. Show all posts

Thursday, August 15, 2024

Peace on Earth Challenge #

It's hard making Christmas cards when it's hot outside but having a mood board such as this one from Peace On Earth's #69 sketch challenge really inspired me to get creative.  When trying to decide on my winter themed card I was drawn to two of the elements in the mood board.  The first was the white horse with the jaunty Santa hat and the second was the white chenille looking trees. 

Click here to see the Design Team and Participants Cards 

HERE IS MY CARD: 

I liked the little pops of red shown in the mood board.  I added a layer of Cherry Cobbler cardstock to the card front followed by a piece of Whisper White that I embossed with the Evergreen Forest 3D embossing folder.  If I was making this card again, I think I'd spritz the Whisper White layer with water prior to embossing to make the trees a little bolder or emboss a second piece and cut around the trees and then layer them over the base layer of trees with dimensionals.  


I wanted to showcase that red Santa hat on the horse, but couldn't find any hats that small, and then I had the aha moment realizing that the sleigh riders hat would fit the horse too.  So I quickly re stamped just that portion of the stamp with the hat in it and fussy cut it out.  Before mounting it on the horse's head I coloured it with a with Cherry Cobbler Stampin' Blend.  Finally, I added a sled runner that I cut out with the coordinating die cuts from a scrap of silver foil.  

For the inside of the card I added the sentiment "Wishing You a Season of Cheer which is from the Horse and Sleigh stamp set stamped in Cherry Cobbler ink.  The smaller image of the sled is from the Christmas Barn set and is stamped with Momento Tuxedo Black ink.   


SUPPLIES:

Stamp Sets:

  • Horse and Sleigh Retired Stampin' Up! #162119
  • Christmas Barn Retired Stampin; Up! #159747
Cardstock:
  • 8 1/2" x 5 1/2" piece of Whisper White for card base
  • 3 7/8" x 51/8" piece of Whisper White for front panel
  • 3 3/4" x 5" piece Whisper White for inside panel
  • 5 1/4" x 4" Cherry Cobbler for front layer 
  • 5" x 3 7/8" piece for inside layer 
  • Scrap of Silver Foil for sled runner die cut 
Ink:
  • Memento Tuxedo Black
  • Cherry Cobbler 
  • Cherry Cobbler Dark Stampin' Blends
Accessories:
  • Tom Bow Glue
  • Dimensionals
  • Evergreen Forest 3D Embossing Folder
  • Horse and Sleigh Dies 
Thanks for dropping by and checking out my very simple card for the Peace On Earth #69 Card challenge.  This card could be stepped up very easily by adding sequins or a dusting of sparkle across the trees.  I hope you liked it.  I'd love to hear your comments.  

Happy Stamping! 
Penny Token's Stampin' Spot 
Penny Hanuszak, CDN Stampin' Up Demo since 2006

Wednesday, November 2, 2016

WWC92 - Jean Fitch's Sketch Challenge

I hope everyone had a safe and fun Halloween. Ours was totally quiet with one burst of fireworks about 8:00 followed by a big void of silence.  There was not one knock on our door, although neighbours at the beginning of our complex boasted having five.  I guess it's safe to say my husband will be munching on those Coffin Coffee Crisp chocolate bars that he bought (hmmmm.....did he plan that?). 

So it's November, the start of a new month of excitement, and it's time to put away all your Halloween stamps, paper and treats and get ready for this week's challenge over at the Watercooler Wednesday blog.  

To get our November challenges off to a great start, the talented Jean Fitch has presented us with a tricky little sketch featuring lots of layers.  Don't be intimidated by this sketch, it's really quite easy once you decide what your layers will be.  I hope you'll play along, because I'd love to see what you create with it! The challenge ends at 5pm on Monday November 7th.   Here's Jean's sketch:

Here's My Take on the Sketch:
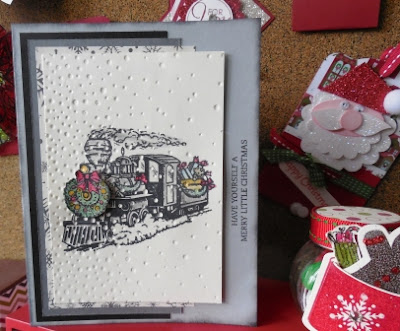
Since Christmas is just around the corner I decided to ink up my brand new Christmas Magic stamp set.  Love it!   The train is my favourite out of the set, but the other 7 stamps rank pretty high up there too. 

For the inside of my card I chose an old sentiment from a retired stamp set called Christmas Bliss. I added a strip of the "This is Christmas" Specialty Designer Series Paper.  It seemed such a shame to cover it up on the front layer and miss out on seeing all those beautiful snowflakes.  In fact this paper was the inspiration for my card.
Supplies:
Stamp Sets:  Christmas Magic, Christmas Bliss(R) 
Card Stock and DSP:  Smokey Slate, Basic Black and Basic Gray, Very Vanilla, "This Is Christmas" Specialty Designer Paper (DSP)
Ink:  Momento Tuxedo Black, Real Red, Garden Green, Delightful Dijon, Crumb Cake, Island Indigo
Accessories:  Softly Falling Embossing Folder, Trimmer, Tom Bow Glue, Dimmensionals, Aqua Painter, Wink of Stella Glimmer Stick.

Assembly:
1.  The Smokey Slate card base measures 8 1/2" x 5 1/2" and is scored at 4 1/2" for a side fold card.
2.  The first layer is cut from Basic Black and measures 2 1/2"x 5 1/4"
3.  The second layer is cut from Basic Gray and measures 2 5/8" x 5"
4.  The third layer is "This is Christmas" DSP and measures 2 3/4" x 4 3/4".
5.  The stamped layer is a piece of Very Vanilla card stock that measures 3 1/8" x 4 1/2".  I stamped the image of the train in Momento Tuxedo Black ink on this piece and then embossed it with the Softly Falling Embossing folder before colouring the greenery and bows on the train with inks and the aqua painter.  The wreath on the front of the train was stamped again, cut out, coloured and mounted on a dimensional over the original wreath.
6.  The inside layer is a piece of Very Vanilla card stock measuring 51/4" x 4" It is adhered only on the top half.  A 1/2" piece of the DSP was glued to the right side of the panel.  It measures.  12" x 5 1/4".  
7.  The two sentiments are from the retired Stamp set - Christmas Bliss.  
Voila!  Apart from stamping and colouring this card front the card came together really quickly.  I'm very happy with my Christmas Magic stamp set and I know I'll be using it for years to come.  I just love the vintage old world feel this set has. 

I hope you'll leave me a comment and let me know what is your favourite Christmas stamp set that Stampin' Up! has issued this year - or even all time. I'd love to know. Don't forget to check out the other Watercooler Wednesday Design Team artists, because i know you'll enjoy the variety of cards they came up with for this sketch. What fun!

Happy Stamping!
Penny Tokens Stampin' Spot

Wednesday, May 4, 2016

WWC66 - Libby's Sketch Challenge


I'm delighted to let you know I was invited to be a "guest" designer on Watercooler Wednesday this week. You won't believe what an honour this was for me. I'm so over the wall inspired by this group of exceptionally talented paper crafters, it was a real thrill to join them.    

This week Watercooler Wednesday is featuring a wonderful sketch challenge by the talented Libby Fens who just recently became a permanent member of the design team.  Congrats Libby!

Here's Libby's sketch - WWC66:  
  
Mother's Day is just around the corner so I decided to use this delightful sketch to design a card for my mom.

When she was younger, my mom was an avid gardener who couldn't wait for Spring so she could work in her garden. She planted a variety of fragrant and colourful plants including Pinks, Bachelor's Buttons, Forget-Me-Nots, Cosmos, and Sweet William. What joy she took in those flowers!  
Mom really enjoyed her flower garden and I can remember going to the store with her to buy her precious packages of seeds.
I'm hoping this card will bring back some of those memories not only for my mom but for those of you who are flower lovers too.  

Here's My Card:


April was a special month for Stampin' Up's Paper Pumpkin as they were celebrating not only their 3rd birthday but also their one millionth sale.  To reward new Paper Pumpkin subscribers they included an extra exclusive photopolymer stamp set called "All About Everything" which I've featured in the two stamped panels on this card.

In this closeup of the large rectangle you can see some of the detail achieved with the two-step stamping method.  This is the perfect stamp set for creating background paper.  The Lovely Lace Embossing folder which will retired later this month, was used to create the beautiful texture on the Pink Pirouette layer. 
By stamping off before applying the stamp on the oval you get a softer version of the image that looks like it's been water coloured.  To define the edge around the oval I used a retired paper piercing template to poke the holes on the Pear Pizzazz oval.

I always finish the inside of my cards and the matching envelopes with stamped or embossed images. Here's what the card looks like inside:


The "Happy Mother's Day" sentiment is from the Lovely Little Wreath stamp set which was part of the April 2016 Paper Pumpkin kit.  I really like the lettering and the small flowers on this sentiment.  
Supplies:
Stamp Sets:  All About Everything, Lovely Little Wreath (Paper Pumpkin April 2016)
Card Stock:  Pink Pirouette, Pear Pizzazz, Calypso Coral
Ink:  Pink Pirouette, Pear Pizzazz, Calypso Coral
Accessories:  Big Shot, Trimmer, Lovely Lacey EF, Decorative Edge EF, Decorative Dots,

I hope my card has inspired you and that you'll want to take part in this challenge too!  Be sure to enter your project back at the Watercooler Wednesday Challenge (#WWC66). The deadline to post your entry is Monday, May 9th, 2016. Thank you for visiting today.  I can't wait to see what you come up with!

Happy Stamping!
Penny Tokens Stampin' Spot

Tuesday, September 8, 2015

Congratulations Card ......#CCM371

I spent today with my stamping bestie, Sheri for a wonderful "Stamping on Tuesday" session.  We both love doing sketch and colour challenges, so when we get together we look at what's current and what tweaks our interest, before settling on a challenge.  Today we decided to work on the Create With Connie and Mary sketch challenge #CCMC371.  

For me there's nothing like stamping with a friend on a cloudy rainy day to let the sunshine in! And, what a blast we had! I love the collaboration and chit chat that goes on when you're trying out a challenge and of course the awesome food we always have.  Today's menu included Chicken Enchiladas that were to die for and Marbled Chocolate Cheese cake.  Yum!

Here is the Connie and Marie Sketch for this week:
 Here's My Card:


Supplies:
Stamp Sets:  Bright and Beautiful (SU Retired), I Am (SU Retired)
Card Stock:  Whisper White, Basic Black, Silver Glimmer Paper
Ink:  Momento Tuxedo Black
Accessories:  Small Star Punch (R)*, Basic Rhinestones, Thinlets Label Card dies, Small and Large Oval Punches,Trimmer, Lucky Stars Embossing Folder, Big Shot.   *(R) means it's retired.


Assembly:

1.  I cut the Whisper White card stock for the base to measure 4 1/4" x 11" and scored it at 5 1/2". 
2.  The Silver Glimmer Paper mat measures 3 7/8" x 5 1/8" and the Basic Black mat measures 3 5/8" x 4 7/8".
3.  I dry embossed the black mat with the Lucky Stars Embossing Folder and 8 stars were cut out with the now retired small star punch.  This mat was adhered to the Glimmer paper layer with Tom Bow Glue
4.  The sentiment "You Are" was stamped in Momento Tuxedo Black ink on a scrap of Whisper White card stock and then cut out with one of the small label dies from the Thinlet Label Card set(R).  
5.  Although the card already has a lot of shine from the glimmer paper I added Basic Rhinestones to each of the star centers and to the ends of the label tag to make the card front extra special

6.  I layered a 5 1/4 x 4" piece of Basic Black card stock with a piece of Whisper White card stock that measures 5 x 3 3/4".  
7.  I stamped a medium sized star from the Bright and Beautiful (R) stamp set in the center of the card with black ink. 
8.  I stamped the "A Star" sentiment from the "I Am...." stamp set onto Whisper White card stock and  punched it out with the small ovals punch.  The sentiment was mounted with dimensionals onto a piece of Silver Glimmer paper that was punched out with the large oval punch.  Note:  Dimensionals don't adhere well to glimmer paper so you need to use an adhesive that has a bit of extra bond if you want your paper to stay put. 

That's it for another fun sketch challenge.   I hope you've enjoyed it!  If you get an opportunity to try out  this challenge yourself go for it.  It closes on Thursday.  Be sure to drop by the Connie and Mary Blog to check out all the other entries into this challenge.  As always there are some great card entries and inspiration.


Happy Stamping!
Penny Tokens 

Sunday, August 30, 2015

WWC31 Heidi's Sketch Challenge


Where is the time flying to.  Suddenly summer's over and it's time for another sketch challenge at the Watercooler Challenge.  

This sketch #WCC31 was designed by the very talented paper crafter, Heidi Weaver.  If you're into cards or layouts with lots of layers then this one will be right up your alley.  

I decided to combine this great sketch with the colour challenge at Colour Me.  It's colour challenge CMCC#86 and showcases Pool Party, Lost Lagoon, Cajun Craze and Tangerine Tango with a neutral of your own choice. I chose to combine these colours with Whisper White.

Here's my entry:
My card started with a 5 1/2 x 8 1/2 Whisper White card base scored at 4 1/4".  The first mat measuring 5 1/4 x 4" is cut from Pool Party and I sponged around the edges with the same ink.

The next mat measures 5 x 3 3/4".  I started with a 5 1/2 x 8 1/2 sheet of Whisper White card stock and stamped a random pattern with Sponge Daubers in the four challenge colours. Some dots were full strength and others were stamped off almost to opaqueness. I also used the dotted image from the Watercolour Wings stamp set and stamped it over the circles in Lost Lagoon ink.  Once all the stamping was done I cut the paper down to the above size for the mat.  I also die cut the three butterflies with the Butterflies Thinlet Dies. 
Note:  If I was making this card again, I think I would have changed how I used the Tangerine Tango, because it's simply too bright a card stock and overwhelms the left side of the card creating an imbalance. In retrospect, I should have have die cut the large Butterfly image and placed it as the bottom layer of the Butterfly stack. I would have then substituted a strip of Lost Lagoon for the Tangerine Tango banner and probably embossed it with the large Polka Dot TIEF, to mimic the circles on the background paper, instead of using the smaller Perfect Polka Dots TIEF which is now retired. 
 
I stamped the sun burst from the Kinda Eclectic Stamp set on a 2 3/4 x 2 3/4" piece of Whisper White.  It makes a nice background design.  In retrospect I should have stamped it using Versa Mark and Lost Lagoon inks and then heat set it with clear embossing powder.
Kind of Eclectic Stamp Set comes in wood or clear mount.

 
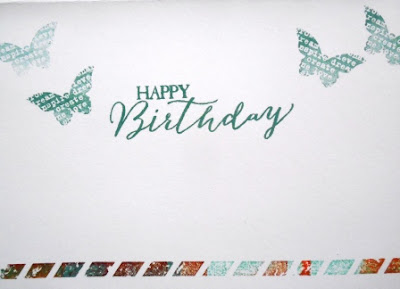
For the inside of the card I stamped the Happy Birthday sentiment the butterflies and the border strip using images from the Basic Butterfly stamp set.
This eleven piece coordinating stamp set and matching butterfly dies come in a bundle in either wood or clear mount styles. You can save 15% off the regular price of the stamps and dies by purchasing them as a bundle.  I'm totally in love with my clear mount.
I think I've fallen in love with the Boho Chic Embossing folder.  It's one of my favourites this season.  It looks great layered over other images or on it's own.  In this picture you can see a bit more of the background paper that I stamped with all the sketch colours.  Background papers are so much fun to make.
Supplies:
Stamp Sets:  Butterfly Basics, Kinda Eclectic, Watercolour Wings 
Ink:  Cajun Craze, Lost Lagoon, Pool Party, Tangerine Tango
Card Stock:  Whisper White, Cajun Craze, Pool Party, Lost Lagoon, Tangerine Tango
Accessories:  Big Shot, Trimmer, Perfect Polka Dots(R) and Boho Chic Embossing Folders, Basic Butterflies Thinlet Dies, Basic Rhinestones, Silver Charm (R), Dazzling Details, adhesive and dimensionals.

Well I hope you enjoyed today's colour and sketch challenges.  There's still a little bit of time to play along so if you want to get in on the fun, please click on the Watercooler Challenge or the Colour Me Challenge or both to find out the details.   


HAPPY STAMPING!
PENNY TOKENS STAMPING 

Wednesday, August 6, 2014

Can You Case It CYCI30 Challenge

Sheri and I just discovered Can You Case It  challenge blog and we were excited to try out this week's sketch challenge #CYCI30 for our second card on Tuesday.  

If you're visiting this site be sure to check out their "Challenges" link on their right sidebar.  It will provide all the details about their weekly challenges which being on Sundays and end on Saturdays.  Each week there is a different theme:  sketch, colour, pick a page, scrapbook/cards Project Life, and Holiday. This is an interesting site that I know I'll be visiting.

This week is a Sketch Challenge and here is sketch #CYCI30:
Sheri and I both liked this sketch because of it's simple style and layering. The two of us are such "layer queens". Our hardest choice was deciding on the card's theme and then what colours to use. 

For my card I wanted to combine the Stippled Blossoms stamp set and the Back to Black DSP series paper but hadn't chosen any contrast colours and theme.   

Sheri was in love with the  Just Add Ink Colour Challenge, from last week and decided to do a double challenge card using these colours, and with a little bit of thought, I decided to go along with that choice.  Sheri will be posting her fabulous card on her blog:  Paper Bag Create.  Make sure you go an check it out.   


Note:  Although we both intended to enter our cards in the Just Add Ink Colour Challenge, we'd both forgotten about the International Date Line.  Since Australia is a day ahead of us here in Canada we both missed entering this challenge by "one day".  Too funny.  I'm sure you'll enjoy the cards anyway. 


Here's My Card:
I love this card.  The mix of textures and colour are perfect, even if I do say so myself.  It's got a rich, elegant feel about it.  The Back to Black DSP is simply stunning and really adds the contrast this card needs, while the subtle stamping on the tag adds to the elegance. 

 
The ribbon was added before layers 2-5 were attached to the card base.  The bow was made by using the "Fork Bow" method of tying bows.  Works for me! 


The modern label punch worked out perfectly as a tag.  The best wishes sentiment is from Perfect Pairs stamp set. 

I kept the inside of the card fairly plain by just stamping the flower image. 

Supplies:
Stamp Sets:  Stippled Blossoms, Petite Pairs 
Ink:  Basic Gray, Memento Tuxedo Black
Card Stock:  Basic Gray, So Saffron, Basic Black and Whisper White *
Designer Series Paper:  Back to Black, Glimmer Paper - Silver
Accessories:  Trimmer, Big Shot Machine, Beautifully Baroque Embossing Folder, Scalloped Tag Topper Punch, Modern Label Punch, Corner Rounder punch 
Back to Black Designer Series Paper

How It's Made: 
1.  The Basic Black card base measures 8 1/2" x 5 1/2" and folded at 4 14".

2.  The second layer is Basic Gray card stock and measures 5 1/8" x 4 1/8". 

3.  The third layer is a piece of Back to Black Designer Paper (DSP) measuring 

4 x 5 1/16".  The edges were distressed with a sponge dauber and Basic Gray ink.  

4.  The next layer was a piece of So Saffron card stock measuring 3 1/4 x 4 1/2.  This piece was first stamped with the Stippled Blossom detailed rose in Basic Gray ink and then embossed with the Beautifully Baroque Embossing folder.  

5.  The final layer is the tag.  I chose to cut a Whisper White piece of card stock to measure 2 14 x 5 and then punched out the tag image with the Scalloped Tag Punch.  I trimmed off the excess on the sides and used a corner rounder on the bottom of the tag.  This edges of this tag were sponged with Basic Gray ink and it was adhered to the So Saffron layer with dimensionals.

6.  Stippled Blossoms rose and rose buds were stamped in Basic Gray and Tuxedo Black on the tag.  The sentiment "Best Wishes" from the Petite Pairs stamp set was stamped in Tuxedo Black ink.

7.  I punched a Modern Label from Basic Black card stock and Silver Glimmer paper for the small tag element of the card.  I layered these pieces and added a Basic Rhinestone to the bottom.

8.  Before adhering layers 2 to 5 on the card, I added a strip of 3/8" Basic Gray Taffeta Ribbon and small bow.  

9.  For the inside of the card I added a 5 x 3 3/4" Whisper White layer with a single rose stamped in the lower right hand corner.  

I hope you've enjoyed seeing this card and my details on how to assemble it. Let me know if you've ever prepared a card for a challenge and missed by seconds on the clock..........I'd love to hear your stories.  

Thanks for dropping by I thoroughly enjoyed making this card for you to see.

Happy Stamping!
Penny Tokens
 

NESTS OF CHRISTMAS PAPER PUMPKIN ALTERNATIVES USING #fms#662

 Here's the latest sketch challenge from Freshly Made Sketches #662 and designed by Jen T.  Make sure you check out the Design Team car...