Showing posts with label Petite Pairs. Show all posts

Thursday, May 28, 2015

Celebrate Today Birthday Wishes!

May is a totally huge birthday month for me.  Probably my biggest month of the year!  I know so many people who are celebrating their special occasion, that it's kept me busy churning out cards and today I'd like to share three of them with you.

This is a Peek-A-Boo Flip Top card in Bermuda Bay, Calypso Coral and Whisper White card stocks.  The DSP that you can just barely see is from the new Annual Catalogue, and I know it's one that you're going to want to own. 

The balloon is cut out with the Balloon Framelits which gives a perfect finish every time.  I just love these framelits! 
The Happy Birthday sentiment that's stamped in Calypso Coral ink is from the Celebrate Today stamp set.  This perfect 17 piece photopolymer stamp set has lots of sentiments and balloon images as you'll see in my next cards.
My second birthday card uses a fun combination of Watermelon Wonder and Cucumber Crush two of the 2015-2016 In Colours paired with Bermuda Bay card stock.  Wow what a happy colour combo!  You'll be seeing them a lot as summer approaches and the new catalogue season gets under way!


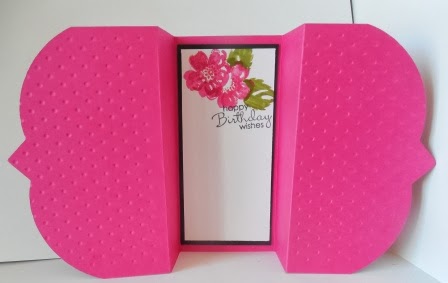
This is a shaker card that I made using a new-to-me technique with fun foam.  I'm currently writing a tutorial on this technique and for the Peek A Boo Flip Card and plan to post these tutorials in early June.  I hope you'll come back to check them out.

Once again I used the Celebrate Today stamp set, the Balloon Frame Lit dies  and that oh so special DSP from the 2015-2016 Annual Catalogue.  You can save 15% on the dies and stamp set by purchasing them as a bundle. 


The sentiment on the inside of the card is from "Remembering Your Birthday" stamp set.
Remembering Your Birthday in Wood and Clear Mount styles.

My third and final card was once again made with the Celebrate Today stamp set and is a warm mix of Cantaloupe Crisp, Island Indigo and Hello Honey card stocks and inks.  I think you're going to like this one too!  This card design could easily sub for a Grad Congratulations card and the colours could be changed up to reflect the school of the recipient..... just a thought!


The Hello Honey card base was embossed with the Lucky Stars Embossing Folder.  The DSP is from the All Abloom DSP Paper Stack that will be retiring soon. 

The birthday sentiment is from the Petite Pairs stamp set. 
And that's my three birthday designs made with the Celebrate Today and Balloon Framelit Dies.  I hope you enjoyed this post and will return in June to see the tutorials.  

Happy Stamping!
Penny Tokens 


Wednesday, August 6, 2014

Can You Case It CYCI30 Challenge

Sheri and I just discovered Can You Case It  challenge blog and we were excited to try out this week's sketch challenge #CYCI30 for our second card on Tuesday.  

If you're visiting this site be sure to check out their "Challenges" link on their right sidebar.  It will provide all the details about their weekly challenges which being on Sundays and end on Saturdays.  Each week there is a different theme:  sketch, colour, pick a page, scrapbook/cards Project Life, and Holiday. This is an interesting site that I know I'll be visiting.

This week is a Sketch Challenge and here is sketch #CYCI30:
Sheri and I both liked this sketch because of it's simple style and layering. The two of us are such "layer queens". Our hardest choice was deciding on the card's theme and then what colours to use. 

For my card I wanted to combine the Stippled Blossoms stamp set and the Back to Black DSP series paper but hadn't chosen any contrast colours and theme.   

Sheri was in love with the  Just Add Ink Colour Challenge, from last week and decided to do a double challenge card using these colours, and with a little bit of thought, I decided to go along with that choice.  Sheri will be posting her fabulous card on her blog:  Paper Bag Create.  Make sure you go an check it out.   


Note:  Although we both intended to enter our cards in the Just Add Ink Colour Challenge, we'd both forgotten about the International Date Line.  Since Australia is a day ahead of us here in Canada we both missed entering this challenge by "one day".  Too funny.  I'm sure you'll enjoy the cards anyway. 


Here's My Card:
I love this card.  The mix of textures and colour are perfect, even if I do say so myself.  It's got a rich, elegant feel about it.  The Back to Black DSP is simply stunning and really adds the contrast this card needs, while the subtle stamping on the tag adds to the elegance. 

 
The ribbon was added before layers 2-5 were attached to the card base.  The bow was made by using the "Fork Bow" method of tying bows.  Works for me! 


The modern label punch worked out perfectly as a tag.  The best wishes sentiment is from Perfect Pairs stamp set. 

I kept the inside of the card fairly plain by just stamping the flower image. 

Supplies:
Stamp Sets:  Stippled Blossoms, Petite Pairs 
Ink:  Basic Gray, Memento Tuxedo Black
Card Stock:  Basic Gray, So Saffron, Basic Black and Whisper White *
Designer Series Paper:  Back to Black, Glimmer Paper - Silver
Accessories:  Trimmer, Big Shot Machine, Beautifully Baroque Embossing Folder, Scalloped Tag Topper Punch, Modern Label Punch, Corner Rounder punch 
Back to Black Designer Series Paper

How It's Made: 
1.  The Basic Black card base measures 8 1/2" x 5 1/2" and folded at 4 14".

2.  The second layer is Basic Gray card stock and measures 5 1/8" x 4 1/8". 

3.  The third layer is a piece of Back to Black Designer Paper (DSP) measuring 

4 x 5 1/16".  The edges were distressed with a sponge dauber and Basic Gray ink.  

4.  The next layer was a piece of So Saffron card stock measuring 3 1/4 x 4 1/2.  This piece was first stamped with the Stippled Blossom detailed rose in Basic Gray ink and then embossed with the Beautifully Baroque Embossing folder.  

5.  The final layer is the tag.  I chose to cut a Whisper White piece of card stock to measure 2 14 x 5 and then punched out the tag image with the Scalloped Tag Punch.  I trimmed off the excess on the sides and used a corner rounder on the bottom of the tag.  This edges of this tag were sponged with Basic Gray ink and it was adhered to the So Saffron layer with dimensionals.

6.  Stippled Blossoms rose and rose buds were stamped in Basic Gray and Tuxedo Black on the tag.  The sentiment "Best Wishes" from the Petite Pairs stamp set was stamped in Tuxedo Black ink.

7.  I punched a Modern Label from Basic Black card stock and Silver Glimmer paper for the small tag element of the card.  I layered these pieces and added a Basic Rhinestone to the bottom.

8.  Before adhering layers 2 to 5 on the card, I added a strip of 3/8" Basic Gray Taffeta Ribbon and small bow.  

9.  For the inside of the card I added a 5 x 3 3/4" Whisper White layer with a single rose stamped in the lower right hand corner.  

I hope you've enjoyed seeing this card and my details on how to assemble it. Let me know if you've ever prepared a card for a challenge and missed by seconds on the clock..........I'd love to hear your stories.  

Thanks for dropping by I thoroughly enjoyed making this card for you to see.

Happy Stamping!
Penny Tokens
 

Sunday, February 2, 2014

Fancy Fold Birthday Card

I was recently inspired to CAS a card made by Linda Bauwin.  I watched her video which showed an extremely easy way to create a WOW card.  Check out Linda's original card  and video tutorial here.

Here is my version:

Supplies:

Stamp Sets:
Stippled Blossoms 2-step stampin set
Petite Pairs 

Card Stock:
Melon Mambo cardstock
Basic Black cardstock
Whisper White Cardstock

Ink:
Basic Black
Melon Mambo
Strawberry Slush
Pear Pizzazz
Old Olive 

Accessories:
Circle Framelits
Window Framelits
Perfect Polka Dots Embossing Folder
Adhesive
Trimmer
Big Shot 

How It's Made:
1.  For base cut a piece of Melon Mambo to 4 1/4 x 9 1/4"

2.  Score base at 2 1/4, 31/2, 5 1/2 and 6 1/2 and fold back on crease lines so you have a box on the front side. 

3.  Select the large window frame die and fit it over the box shape on the front of the card.  Make sure edges at top, bottom and sides are all even before running the die through the Big Shot.  This step creates the lovely bevelled edges on the side of the card.
Tip:   You can number your framelits from the center to the outer edge with a Scripto Marker.  This makes it easier to identify which framelit you want to use.  In this example the largest window frame would be #6.
4.  Using your Perfect Polka Dots or Embossing Folder of your choice, emboss the side edges of the card to the crease line.  

5.  For front layers cut a 4 x 4" piece of Basic Black cardstock and  the 3rd frame in the windows framelit set die cut this piece. Center and adhere to the front panel.  

6.  For the stamped layer cut a 3 x 3 inch piece of Whisper White and die cut with the 3" circle from the Circle framelits. Adhere to the black window frame. Note:  If you prefer to do your stamping before you cut this piece out go ahead, as it sometimes makes it easier to center the stamped image.


7.  Stamp the large rose solid image from Stippled Blossoms in Strawberry Slush ink on the Whisper White piece.  Using a Stamp-a-ma-jig center the lined rose image over the solid image and stamp in Melon Mambo.  I created a mask for the rose and then stamped two leaves from the set at the bottom of the rose.  Stamp "Best Wishes" from the Petite Pairs set in Basic Black ink.

8.  For the back panels cut a Basic Black piece measuring 3 15/15 x 1 15/16" for the bottom layer.  Cut a piece of Whisper White measuring 3 14/16 x 1 14/16" and stamp with the two small flowers from the Stippled Blossom set. Note: I created a mask for this flower two so I could layer them and add the leaves more easily.  They were stamped using the Stamp-a-ma-jig as in step 7 above.  The sentiment "Happy Birthday Wishes" was stamped in Basic Black ink.  


I hope you enjoyed today's birthday card and the links to Linda's video.  I'll be making more cards with this design and trying other framelits to see what I can come up with.  I told you she inspired me!  Thanks for dropping by.  

Tuesday, September 3, 2013

Festive Flurry Goes Pink

I happen to like pink and gray together.  Mix in a little glimmer paper and a rhinestone and you've got the makings of a great card, even if I do say so myself.  You be the judge.

Supplies:

Stamp Sets:
Ink:
  • Smokey Slate
  • Blushing Bride
Card Stock:
  • 5 1/2 x 8 1/2 Whisper White card base - fold in half
  • 5 1/4 x 4 Whisper White for 1st layer - emboss with Polka Dots EF #117335 and mount with dimensionals to card base
  • 4 1/4 x 4" Whisper White for snowflake images
  • Scraps of Whisper White and Blushing Bride for sentiment and backer 
  • Scrap of Silver Glimmer paper for snowflake and star  
Accessories:
  • Big Shot, Large Oval and Extra Large Oval punches, Festive Flurry Framelits #132193, Basic Rhinestones, BoHo Blossoms Punch,Perfect Polka Dots Embossing Folder, Dimensionals, Snail, 6/12" piece of Blushing Bride Chevron Ribbon and Dazzling Details glitter adhesive.
 

This is a very basic card starting with a Whisper White card base that has a single layer of Whisper White that was embossed with the Perfect Polka Dots Embossing Folder.  The 6 1/2" piece of Chevron Ribbon was adhered to the polka dot layer before the layer was added with dimensionals to the card base. Isn't the snowflake beautiful?  To achieve this look,  I stamped the medium sized snowflake in both Smokey Slate and Blushing Bride and the smaller snowflake in Smokey Slate.  The snowflakes including the smaller one on Silver Glimmer Paper were cut out using the Festive Flurry Framelits that co-ordinate with the stamp set of the same name. You can purchase these as a bundle and save 15% off the original price.  The snowflakes were stacked together with dimensionals and then mounted over top of the ribbon.  The small silver star was punched out of Silver Glimmer Paper with the BoHo Blossoms Punch and a medium sized Basic Rhinestone Jewel was mounted in the center. 

I stamped the sentiment from Winter Memories on the inside of the card.  This stamp set was one of my all time favourites from last year's Holiday Catalogue and even though it's retired I still want to use it.  I simply stamped the image in Smokey Slate on the inside of the card base and as an after thought, I added Dazzling Details on the laces of the skates.  You can't see how pretty that looks because I did it after this picture was taken, but trust me it added a subtle sparkle that worked.  

The sentiment from Petite Pairs was stamped in Smokey Slate on a scrap of Whisper White card stock and then punched out with the large oval punch.  I mounted 4 small Basic Rhinestone Jewels below the sentiment for a little extra bling.  The sentiment piece was mounted on an oval of Blushing Bride card stock with dimensionals.  To get that perfect layered look I punched the Blushing Bride piece out using the Extra Large Oval Punch.  Ta Da  all done!

Atlantic Hearts Sketch Challenge #572:

April has sure been living up to its reputation for rain showers but it's been really on the cold side which isn't normal for this t...