I was recently inspired to CAS a card made by Linda Bauwin. I watched her video which showed an extremely easy way to create a WOW card. Check out Linda's original card and video tutorial here.
Here is my version:
 Supplies:
Stamp Sets:
Stippled Blossoms 2-step stampin set
Petite Pairs
Card Stock:
Melon Mambo cardstock
Basic Black cardstock
Whisper White Cardstock
Ink:
Basic Black
Melon Mambo
Strawberry Slush
Pear Pizzazz
Old Olive
Accessories:
Circle Framelits
Window Framelits
Perfect Polka Dots Embossing Folder
Adhesive
Trimmer
Big Shot
How It's Made:
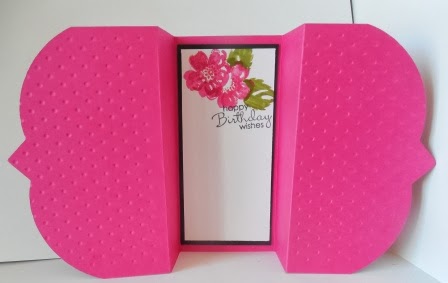
1. For base cut a piece of Melon Mambo to 4 1/4 x 9 1/4"
2. Score base at 2 1/4, 31/2, 5 1/2 and 6 1/2 and fold back on crease lines so you have a box on the front side.
3. Select the large window frame die and fit it over the box shape on the front of the card. Make sure edges at top, bottom and sides are all even before running the die through the Big Shot. This step creates the lovely bevelled edges on the side of the card.
4. Using your Perfect Polka Dots or Embossing Folder of your choice, emboss the side edges of the card to the crease line.
5. For front layers cut a 4 x 4" piece of Basic Black cardstock and the 3rd frame in the windows framelit set die cut this piece. Center and adhere to the front panel.
6. For the stamped layer cut a 3 x 3 inch piece of Whisper White and die cut with the 3" circle from the Circle framelits. Adhere to the black window frame. Note: If you prefer to do your stamping before you cut this piece out go ahead, as it sometimes makes it easier to center the stamped image.

7. Stamp the large rose solid image from Stippled Blossoms in Strawberry Slush ink on the Whisper White piece. Using a Stamp-a-ma-jig center the lined rose image over the solid image and stamp in Melon Mambo. I created a mask for the rose and then stamped two leaves from the set at the bottom of the rose. Stamp "Best Wishes" from the Petite Pairs set in Basic Black ink.
8. For the back panels cut a Basic Black piece measuring 3 15/15 x 1 15/16" for the bottom layer. Cut a piece of Whisper White measuring 3 14/16 x 1 14/16" and stamp with the two small flowers from the Stippled Blossom set. Note: I created a mask for this flower two so I could layer them and add the leaves more easily. They were stamped using the Stamp-a-ma-jig as in step 7 above. The sentiment "Happy Birthday Wishes" was stamped in Basic Black ink.
I hope you enjoyed today's birthday card and the links to Linda's video. I'll be making more cards with this design and trying other framelits to see what I can come up with. I told you she inspired me! Thanks for dropping by.
Here is my version:
Stamp Sets:
Stippled Blossoms 2-step stampin set
Petite Pairs
Card Stock:
Melon Mambo cardstock
Basic Black cardstock
Whisper White Cardstock
Ink:
Basic Black
Melon Mambo
Strawberry Slush
Pear Pizzazz
Old Olive
Accessories:
Circle Framelits
Window Framelits
Perfect Polka Dots Embossing Folder
Adhesive
Trimmer
Big Shot
How It's Made:
1. For base cut a piece of Melon Mambo to 4 1/4 x 9 1/4"
2. Score base at 2 1/4, 31/2, 5 1/2 and 6 1/2 and fold back on crease lines so you have a box on the front side.
3. Select the large window frame die and fit it over the box shape on the front of the card. Make sure edges at top, bottom and sides are all even before running the die through the Big Shot. This step creates the lovely bevelled edges on the side of the card.
 |
| Tip: You can number your framelits from the center to the outer edge with a Scripto Marker. This makes it easier to identify which framelit you want to use. In this example the largest window frame would be #6. |
5. For front layers cut a 4 x 4" piece of Basic Black cardstock and the 3rd frame in the windows framelit set die cut this piece. Center and adhere to the front panel.
6. For the stamped layer cut a 3 x 3 inch piece of Whisper White and die cut with the 3" circle from the Circle framelits. Adhere to the black window frame. Note: If you prefer to do your stamping before you cut this piece out go ahead, as it sometimes makes it easier to center the stamped image.
7. Stamp the large rose solid image from Stippled Blossoms in Strawberry Slush ink on the Whisper White piece. Using a Stamp-a-ma-jig center the lined rose image over the solid image and stamp in Melon Mambo. I created a mask for the rose and then stamped two leaves from the set at the bottom of the rose. Stamp "Best Wishes" from the Petite Pairs set in Basic Black ink.
8. For the back panels cut a Basic Black piece measuring 3 15/15 x 1 15/16" for the bottom layer. Cut a piece of Whisper White measuring 3 14/16 x 1 14/16" and stamp with the two small flowers from the Stippled Blossom set. Note: I created a mask for this flower two so I could layer them and add the leaves more easily. They were stamped using the Stamp-a-ma-jig as in step 7 above. The sentiment "Happy Birthday Wishes" was stamped in Basic Black ink.
I hope you enjoyed today's birthday card and the links to Linda's video. I'll be making more cards with this design and trying other framelits to see what I can come up with. I told you she inspired me! Thanks for dropping by.


No comments:
Post a Comment