This week the wonderfully talented Heidi Weaver is our hostess for the "All About Christmas" challenge at Watercooler Wednesday.
 I personally love these seasonal challenges as they really help me get an early start on my Christmas cards. How about you? Would you like to join us in making a Christmas themed project or card? If so check out all the information on our home page. This challenge is open until 5:00pm Mountain time on Monday May 28th, 2018.
Here's My Card:
I had so much fun making this Christmas card today and I'm delighted to share it with you.
As you're probably aware by now, Stampin' Up! has revamped it's colour families and the new colours will be available in the release of the new Annual Catalogue on June 1st, 2018. I can't wait that long however, so I though I'd give you a sneak peak at one of my favourites from the newly revamped "Brights Collection". It's called "Gorgeous Grape".
I'm a big lover of purple and honestly I haven't felt this giddy about using purple in my Christmas card making since Stampin' Up! retired Concord Crush several years ago. Check out these two favourites: November Christmas Card Class and Monkey86: Holidays & Sketch Challenge
So here's my Walking in the Winter Woods:
 |
Just imagine it's around supper time in late November, and the sun is disappearing over the hillside as you finish your walk in the woods. Snow is softly falling and the light is reflecting those last rays............
Supplies:
Stamp Up Stamp Sets:
Carols of Christmas (R), Christmas Bliss (R), Scenic Season (R)
Card Stock and Designer Papers:
Gorgeous Grape (New), Whisper White and Window Acetate 3 x 3 Sheet
Inks:
Gorgeous Grape (New), Versa Mark
Accessories:
Big Shot, Paper Trimmer, Card Front Builder Die (R), Circle Thinlet Dies (R), Stitched Shapes Circle Dies, Wink of Stella, White Gel Pen, Sparkle Blends - Fairy Dust from Doodles Paper, Modern Label Punch, Softly Falling Embossing Folder, Heat Gun, White Embossing Powder, Adhesive Strips, Tom Bow Adhesive and Dimensionals.
Details:
1. The card is an A2 Shaker Card with a top fold. The base measured 4 1/4 x 11 and is scored at 5 1/2".
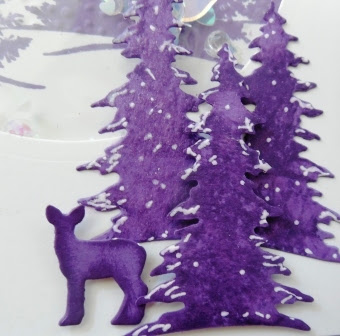
2. A 5 1/4" x 4" layer was cut from Gorgeous Grape card stock. Before adhering this layer to the base I die cut the trees and deer from the center of the card stock.
3. The next panel is 5 1/8" x 3 7/8" and I cut a 3 1/4" circle in the top half.
4. For the window cover I cut a 3 1/2 x 3 1/2" piece of Window Acetate and adhered to the back of the panel in step 3. Before adhering I wiped the Acetate Window sheet with my Stamping Buddy to remove any static electricity. To build the shaker wall I built a circle shape using adhesive strips and the cut circle as a guide.
5. The next layer is a 4" x 4" Whisper White panel that adheres to the back of the shaker outline. I stamped the tree scene from Scenic Seasons in Gorgeous Grape and embossed to the bottom of the tree line with the Softly Falling Embossing Folder. The dots from the embossing folder on the tree were gently sanded so it looked like fresh fallen snow.
6. I added Sparkle Blends Fairy Dust from Doodles Paper Playground to the inside of the shaker circle before adding the layer from step 5. I added additional Adhesive Strips to this layer and mounted it to the card front.
7. I stamped the sentiment "Seasons Greetings and A Happy New Year" in Versa Mark ink on a scrap of Gorgeous Grape card stock and then heat set it. I used the old Modern Label punch to cut out this sentiment and attached it to the top of the Acetate circle on the card front with Dimensionals.
8. Details related to the tree and deer scene at the bottom of the card are noted above in the photos.
7. I stamped the Peace on Earth sentiment from Carols of Christmas in Gorgeous Grape on a scrap of Whisper White and then cut it out with the 3" circle from Stitched Shapes dies. This was mounted on a 3 1/4" circle of Gorgeous Grape cardstock and mounted to the inside of the card.
I hope you enjoyed my Christmas card today. Although it's not considered a traditional Christmas colour I think the Gorgeous Grape is very regal and works perfectly in creating this scene. I'd love to hear your thoughts and suggestions for stamping with non-traditional colours in your creations.
If you haven't already visited the other Design Team Artists I hope you'll revist the links before moving on. Click here to return to the home page.
Happy Stamping!
Penny Tokens Stampin' Spot


