Showing posts with label #Freshly Made Sketches. Show all posts

Sunday, June 1, 2025

Monochromatic Birthday Card FMS #688

  This weeks Freshly Made Sketch challenge is hosted by Jen B.  


Here's My Card: 

I'm a big fan of Lost Lagoon so I looked through my stash for papers in that colour.  I remembered the Timeless Plaid 6x6 paper pack had some Lost Lagoon designs and because these papers are double-sided it was really easy to find a coordinating piece of dsp to go with this sketch design.  

For the center focal I added the big birdhouse from Country Birdhouse.  I was able to use the same dsp for the front panel of the birdhouse by paper piecing it.  

Supplies: 

Stamps & Dies: 

  • Country Birdhouse Stamps - sentiment "happy birthday".
  • Country Birdhouse Dies - birdhouse, flowers, bird
  • Birthday Sentiment inside card from "See You Later" Sale-a-bration stamp set(R) 
Cardstock & DSP:
  • Whisper White 
    • 8 1/2" x 5 1/2" card base scored at 4 1/4". 
    • Inside Matte 3 5/8" x 5 1/4" 
    • 2 scraps for sentiment and trim on birdhouse
  • Lost Lagoon
    • 5 1/4 x 2" for top matte on card front
    • 5 1/4" x 1 3/4" for matte on bottom card front 
  • Timeless Plaid DSP (R)
    • 5 1/8" x 1 7/8" 
    • 5 1/8" x 1 5/8"
    • 2" x 2" scrap for front of birdhouse
Ink:
  • Lost Lagoon ink and blends 
  • Momento Black 
Accessories: 
  • self adhesive backed lost lagoon gems
  • dimensionals 


Well that's it for this week.  I hope you enjoyed this card, and will leave me a comment before you go.  

Happy Stamping!
Penny Tokens Stampin' Spot!

Penny Hanuszak, CDN Stampin' Up! Demo since 2006

Monday, May 12, 2025

Mixed Media Florals Birthday Card - FMS#685

Spring has arrived and that yearning to get out in the garden has taken over. I've spent lots of  time weeding and planting my flower beds, while my husband was busy pressure washing our two decks.  The bottom one was in pretty rough shape, so he was able to get it painted and the patio furniture set up. We had a great morning visiting local nurseries, picking out baskets and other greenery.  What fun!  Just a little bit more tweaking and we'll be set for enjoying our yard and deck time.


Speaking of fun, I've just checked out the sketch challenge at Freshly Made Sketches, #685 hosted by Linda Callahan.  The Design Team has out done themselves with their designs.  So make sure you check them out, because there's so much inspiration.  Here's the sketch:

Here's My Card:
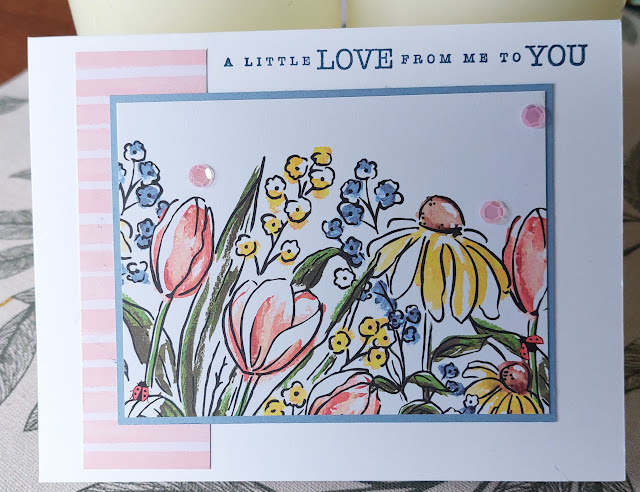
Following in the garden theme, I chose a combination from the Mixed Florals
Memories and More card pack for the images on my card.  Honestly with this sketch and the predesigned rectangle cards, the most time consuming part was choosing the images and sentiment for the front of the card.  
I was really surprised at how quickly this card came together and I like the placement of the sentiment and the striped paper piece.  I like the length of the sentiment which is from the Sending Love stamp set.  The fonts are lovely.


I cut down a pink striped Memory and More card that coordinated with the strip on the card front to 5"1/4  x 4" and used it as a matte.  A layer of Whisper White measuring 3 3/4" x 5" made up the sentiment layer.  As I often do, I stamped the Perennial Birthday "Happy Birthday" sentiment, this time in Misty Moonlight ink. The flower motif was easy to fussy cut from another memory pack card and some randomly placed sequins really finished the inside of this card. 

Supplies:

Stamps and Dies: 
  • Sending Love #162873 (R) -sentiment "A Little Love from me to You"
  • Perennial Birthday (R) - sentiment "Happy Birthday" inside matte 
Cardstock and DSP:
  • 8 1/2" x 5 1/2" Whisper White card base scored at 4 1/4"
  • Boho Blue Matte for front 3 1/8" x 4 1/8"
  • Whisper White Matte inside 3 3/4" x 5" 
  • Mixed Media 4 x 3 Floral design Memories and More card - front
  • Pink Striped Mixed Media card 1/4" x 4" for front matte
  • Pink Striped Mixed Media card 4" x 5 14" inside matte

Inks and Blends:
  • Misty Moonlight Ink for sentiments 
Accessories:
  • Trimmer
  • Purple Self-adhesive backed sequins #164970

Well that is it for today's Freshly Made Sketch card.  I think I'll make some more cards using the Memories and More Pack.  I have a tendency to forget how easy they are to work with and they take the guesswork out of layering.  Let me know if you have used these card packs and whether you like them.  For $16.00 these packs are a great addition to one's stash.  Have a great week ahead and come back again. 

HAPPY STAMPING!
PENNY TOKENS STAMPIN' SPOT

Penny Hanuszak, CDN Stampin' Up! Demo since 2006


Monday, May 5, 2025

Celebratory Sips Floral Birthday Card - FMS#684

This week's Freshly Made sketch was hosted by Jen.  Its a very simple layout and quite quick todo.  This would be a great sketch for anyone wanting to try doing a challenge.   

FMS # 684 by Jen

Here's My Card:


I just got some new Stampin' Up Supplies including a 12 x 12 paper called Celebratory Sips that I bought because of the beverage designs.  When I opened the paper package I fell in love with a floral patterned paper that had a straight olive green backing.  This paper was perfect for the card I made.  

Supplies: 

Stamps and Dies:
  • Spotlight on Nature Circle Dies #163579
  • Wanted to Say Dies - Flower #161594
  • Bough Punch #157711
  • Lacy Border Punch
  • Stitched Circle Die 2 1/4"
Cardstock and DSP:
  • 81/2" x 5 1/2" basic white card base 
  • 3 3/4 x 5" basic white matte inside and 3 x 3 scrap for circle die 
  • Blackberry Bliss for mattes 
    • 4" x 5 1/4" inside matte
    • 5 3/8" x 4 1/8"  matte card front 
    • 1" x 5" strip for scalloped edging and scraps for flowers
  • Bubble Bath 3" x 3" scrap for circle and scraps for flowers
  • Celebratory Sips 12 x 12 DSP 4" x 5 1/4" floral pattern for front panel
    • 3 2/4" x 4  7/8
    • 1/2" x 4" for inside strip 
    • 1" by 4 7/8" strip of reverse Old Olive side for front panel 
Inks and Blends:
  • Blackberry Bliss
Accessories:
  • Purple Adhesive Backed Sequins #164970
  • Dimensionals large
  • Tombow Glue 

So that's it for today's card.  I hope that you're inspired to try out this sketch challenge.  Drop me a note and let me know if this is the type of card you would send for a birthday greeting or would like to receive.  

HAPPY STAMPING!
PENNY TOKENS STAMPIN' SPOT 

Penny Hanuszak, CDN Stampin' Up! Demo since 2006 

Sunday, April 27, 2025

In Sympathy for Vancouver's Fillopino Community - FMS#683

Last night in Vancouver BC Canada a most terrible and senseless tragedy took the lives of 11 people and injured many more who were attending festivities during the Lapu-Lapu Filipino festival. A 30 year old Vancouver man plowed his car into these innocents, committing such a heinous act that words cannot even describe. 

I'm using today's sketch to design a sympathy card for all those affected by last night's loss. Obviously I can't make or send a card to all the families, first responders and others affected by this tragedy, but hopefully by posting my card and my message of condolence I can express my sadness, grief and offer my prayers for healing to those who need it.   

Freshly Made Sketches 

Here's My Card: 


Supplies:

Stamps and Dies:
  • Textured Notes #165548 - basket bottom and leaves 
  • Country Flowers #163405 - sentiment "With heartfelt sympathy" 
  • In the Moment #157987 - sentiment "You're In My Thoughts" 

Cardstock and DSP:

  • Basic Beige 8 1/2" x 5 1/2" scored at 4 1/4" for card base
    • scraps for sentiment on card front, basket and leaves 
  • Early Espresso 3 1/4" x 5 1/4" front panel 
    • 1" x 5 1/4" strip for bottom inside detail
  • Pecan Pie 4" x 5 1/4" for front matte 
  • DSP - Woven Textures 12 x 12 #165560
    • Cut 3" x 5" strip of DSP cut this piece in half at 2 1/2" flip one side over and adhere to early espresso panel. 
    • 3/4" x 5"  strip of DSP cut in half, flip one side over adhere two panels to 1" x 5 1/4" early espresso panel on inside bottom of card. 
Ink and Blends: 
  • Tuxedo Momento Black 
  • Pecan Pie 
Accessories: 
  • 2" circle punch for basket
  • Dimensionals 
  • Adhesive
  • Gold Sparkle Gems (R) 


The detail in the Textured Notes distinktive stamps is amazingly crisp.  The trick to stamping with distinktives is to not over saturate the surface with ink.  You'll get a clearer image by reinking and stamping a few times.


Well that's it for today's card.  Thank you for stopping by and having a look at my card.  Appreciate it. 

HAPPY STAMPING!
PENNY TOKENS STAMPIN' SPOT 
Penny Hanuszak, CDN Stampin' Up! Demo since 2006

Monday, April 21, 2025

Take Me Out To the Ball Game - FMS #682 by Judy Rozema

If you follow my blog you know that I make a lot of masculine cards.  The Freshly Made Sketch #682 is hosted by Judy Rozema, who pointed out that it's baseball season and the sketch has a baseball diamond feel about it.  That was all I needed to get my creative juices flowing and create a masculine card.  How about you, were you inspired by this sketch? The sketch challenge is open until 3:00pm EST, so why not come up with a card of your own.  Here is the sketch:

The triple cut design is wonderful for creating multiple cards and it's such a great way to use up your paper stash.  I love it!  Unfortunately when I was making these cards I made my second cut from the corner instead of about 1 1/2" down the right side of the card, which changes up the look a bit.  Next time I'll look at the sketch a bit longer, lol!  Oh well my "miscut" still worked out okay for me.  

Here is my card: 
Whenever I make a triple cut card, I'm always amazed at how fast the three cards come together. Probably the hardest choice for me is mixing and matching the DSP and cardstock. The retired "Hey Sports Fan" dsp made it super easy to choose my mattes and card base colours.


Here is the inside of the card.  I copied the stamping on three pieces of Very Vanilla cardstock and mounted each one on a piece of coordinating cardstock. 


Supplies:

Stamps and Dies:
  • A Goodman #149270 - "It's Your Day" sentiment
  • Good Old Sport - Graphic 45 - "baseball player, and baseball"
  • Sporting Goods 2004 circ. Stampin' Up! "bat and glove" for inside
  • Perennial Birthday - "Happy Birthday" sentiment 
Cardstock and DSP:
  • Real Red
  • Night of Navy
  • Very Vanilla
  • Crushed Curry 
  • Hey Sports Fan 12 x 12 DSP
Cutting Instructions: 
  • Very Vanilla 8 1/2 x 5 12" scored at 4 1/4" for card base.  Cut three
  • Very Vanilla 3 3/4" x 2 1/2" matte for focal matte
  • Very Vanilla scraps for sentiment - baseball
  • Real Red 4 x 5 1/4" x 2 for Mattes on front and inside of one card and one piece 2 3/8" x 3 5/8" for focal matte
  • Night of Navy 4" x 5 1/4" for Mattes on front and inside of one card and one piece 2 3/8" x 3 5/8" for focal matte
  • Crushed Curry 4" x 5 1/4" for Mattes on front and inside of one card and one piece 2 3/8" x 3 5/8" for focal matte
  • Three coordinating pieces of Designer Series Paper (DSP) measuring            3 3/4" x 5" - stack the three pieces making sure all edges are in alignment and then cut on angles to match the sketch lines. 
  • Small scraps of Very Vanilla, Real Red, Night of Navy and Crushed Curry for the 1 1/4 circle matte for baseball. 
Ink and Blends: 
  • Momento Black Ink
  • Night of Navy
  • Real Red
  • Pecan Pie - baseball bat 
Accessories:  
  • 1" and 1 1/4" circle punches 
  • Dimensionals
  • Enamel Dots - Brights - Real Red and Crushed Curry


I hope you liked my interpretation of Judy's  Freshly Made Sketch.  Let me know if you struggle with making masculine cards? What's your stash like, do you have sports stamps or paper on hand for masculine themes?  I'd love to hear from you, as I find your comments are motivating and inspiring.  Thanks for dropping by! 

HAPPY STAMPING!
PENNY TOKENS STAMPIN SPOT!
Penny Hanuszak, CDN Stampin' Up! Demo since 2006

Click here to visit my 24/7 Online shop 


Tuesday, April 15, 2025

I'm A Princess! FMS #681


Just a note of gratitude for the Design Team and especially to Kim at Freshly Made Sketches who chose my card as one of the Princesses for this week's sketch challenge!  
Congrats to the other 8 Princesses .... well deserved! 

Donna Mikasa was chosen as the Queen of Clean for her beautiful card.  I love to participate in their sketch challenges, so getting some recognition like this is really meaningful for me.  

HAPPY STAMPING!
PENNY TOKENS STAMPIN' SPOT 
Penny Hanuszak, CDN Stampin' Up! Demo since 2006


Sunday, April 13, 2025

Life's A Journey - Masculine Birthday Card FMS#681


Hey everyone.  Welcome to my blog and thanks for taking a look at my entry for this week's Freshly Made Sketch #681 hosted by the very talented Amy O'Neil

This sketch is so simple, yet so great.  If you haven't attempted to do a sketch challenge before this would be a perfect starter.  Remember to make it your own design.  And, while the sketch has a pocket shape for its focal, you can substitute any shape you want.  This sketch is open until Monday April 14th 3pm EST so if you've got a minute why not join the fun and play along.

Click here to check out the Design Team and participant entries. Awesome!

 Here is My Card:
I'm always on the lookout for sketches that have a masculine appeal. This sketch with it's clean lines and the pocket instantly conjured up the badge in the "One Wild Ride" stamp set.  So, with that image in mind, I began to design my card.

While looking through my stash of masculine papers I found the remainder of a kit called Easy Rider, by Reminisce. A piece of grey dsp with motorcycle treads across it caught my eye so I paired it up with a basic black card base. I stamped the motorcycle from One Wild Ride in Momento black ink across the bottom of the dsp. I also found a silver cardstock die cut from a bundle called Geared Up Garage, added some texture to the card front.

The next step was to stamp the badge in Momento Black ink on a scrap of Whisper White and punch it out with a coordinating punch.  The badge was mounted with dimensionals to the pocket die cut.  I used one of the medium sized dies from the Stitched Nested Labels dies to create the basic grey pocket.  To get the pocket shape I merely measured a 1/4" past the badge and cut across the die cut with my scissors. It worked perfectly. In this photo you can see a little more of the card's detail including the splotches, gears and the black stud embellishments I added.


I kept the inside of the card fairly clean, only adding the sentiment from another biker themed set called Legendary Ride #160754 and a few dark grey splotches using the very old Grunge stamp set. 

For the base mat I cut an additional piece of the Easy Rider dsp. Using dsp instead of cardstock is a great way to not only use up your paper stash, but it reduces the overall weight of the card for mailing.


Supplies:

Stamps and Dies:
  • One Wild Ride (R) #141724 - badge and motorcycle
  • Legendary Ride #160754 - sentiment for inside 
  • Geared Up Garage (R) dies #148590 - gear image in silver cardstock
  • Gorgeous Grunge (R) #130517 - splotches on card front
  • Stitched Nested Label Framelit Dies #149638 - pocket


Cardstock and DSP:
  • Card Base Basic Black - 4 1/4" x 11" scored at 5 1/2"
  • Cut two DSP mattes 4" x 5 1/4" for front and inside from Easy Rider Kit - Reminiscence Designer Paper
  • 3" x 3" Basic Grey for Badge
  • 2" x 2" Basic White for Badge
  • 3 3/4" x 5" Basic White matte for inside
  • 4" x 3 1/2" flat silver scrap for gear die cut
Ink:
  • Momento Black ink
  • Basic Grey for splotches 
Accessories:  
  • Dimensionals
  • Adhesive Backed Studs black #160767
I'm really happy with the way this card turned out.  All in all once I located the supplies in my stash the rest of the card came together pretty quickly.  I love that.  

How about you, do you keep a stash of materials that work for your masculine cards?  I'd love to hear if you do and how you keep those materials together.  I have one of those 12 x 12 plastic  containers from  the big box store and keep my dsp, neutral cardstock and masculine style stamps and dies in it.  This works really well for me.  

Okay that's it for this week.  Don't forget to leave me a comment before you move on, and come back again.  I love having visitors and I so appreciate your feedback on my cards.  Cheers and happy week ahead!
HAPPY STAMPING!
PENNY TOKENS STAMPIN' SPOT
Penny Hanuszak, CDN Stampin' Up! Demo Since 2006 

Click here to shop or browse in my 24/7 Online Store


Sunday, April 6, 2025

FMS#680 - Daisy Daydream Thank you Card

It's time for this Wednesday's Freshly Made Sketch  hosted by Narelle Farrugi:

I've been preoccupied this week with the beautiful March 2025 Paper Pumpkin kit.  If you love daisies you'll understand what I mean when I say this kit is to die for!  This kit is filled with artistically designed paper, coordinating envelopes daisy and honeycomb ephemera and accessories like ink, dimensionals, and so much more.  Oh I almost forgot to mention in true Paper Pumpkin style, this spring kit contains two wonderfully coordinated stamp sets.  

While I like the three card styles demonstrated in the kit, I prefer to just play with all the bits and bobs and see what I can come up with.  As a result, I thought it might be fun to use the Freshly Made Sketches design #680 to create an alternative card from this kit.  


Here's My Card: 


Supplies:

Stamp Set and Dies:
  • Daisy Daydream Paper Pumpkin stamps
  • Everyday Arches #164623 and Everyday Dies #164269
Cardstock and DSP:
  • Blue cardstock Daisy Daydream Paper Pumpkin kit 
    • I cut the original card  base in two at 4" x 5 1/4" on both sides of the base to use as mattes and discarded the center strip that was left.  
    • For the front matte I cut an arch  that measures 4 7/8" x 3 1/2".
    • For the inside matte I used the 4" x 5 1/4" matte.
  • Whisper White card base 8 1/2" x 5 1/2" scored at 4 1/4".
    • cut one matte for inside measuring 3 7/8" x 5" and stamp sentiment, flower and honeycomb for design
  • Lost Lagoon matte 4 1/8" x 5 3/8" first matte layer on front
  • Lemon Lolly matte 4" x 5 1/4" embossed with with Hexagon Dynamic Embossing folder (R) #143231
I forgot once again to splatter my background paper before attaching the ephemera but improvised with a white gel pen and a black marker.  I loved the "honeycomb" effect on the Lemon Lolly paper when I embossed it.  

Ink: 
  • Mossey Meadow
  • Crushed Curry
  • White Gel Pen
  • Black Marker
Accessories: 
  • Dimensionals
  • Daisy Ephemera and Bubble Bee
  • Hexagon Dynamic EF #143231 (R) - for embossing stack #1 + two #2 plates with Die Cut and Emboss or Big Shot machines 
  • Gold Glimmer gems (r) 
I hope you liked today's card.  It was very simple and fun to make.  I was really impressed with the large arched stamp from Everyday Arches.  It was fun to use.  I also was impressed with the Ephemera included in the Paper Pumpkin kit, especially that little bee, it looked so sweet.  Please leave me a comment if you liked this card, I'd love to hear your thoughts. 


HAPPY STAMPING!
PENNY TOKENS STAMPIN' SPOT

Penny Hanuszak, CDN Stampin' Up Demo since 2006


Click here to visit my 24/7 Online Store.  If you
don't already have an online account sign up for specials
and to earn Stampin' Up! Rewards on every  purchase! 

BYGO - 50% off June Promotion June 3rd to 30th

  HAPPY JUNE EVERYONE:   Just a reminder that the 50% off promo starts today and lasts until June 30th or stock is no longer available.  Cli...