Showing posts with label #handmadecards. Show all posts

Monday, March 31, 2025

Floral Delight "Hello" - FMS #679


Hi and welcome back to a new week and a new card challenge.  This week I am using the FMS #679 for my "hello" greeting card.  It's always nice to have some cards on hand that you can send to friends for no other reason than to touch base, let them know you're thinking of them and that you care.  


FMS #679
Here is my card:
One of my best purchases this year has been the Floral Delight suite.  I am totally in love with the blend of yellows, greens and blue in both the DSP and the Floral and Gingham Vellum paper pack.  


Another Online Exclusive bundle used in this card is the Everyday Arches stamp and die bundle. I'm in love with the die cuts and how beautifully they next together to create great focal frameworks. The stitching around the arches adds such a polished look.   


Instead of using cardstock for the inside coloured matte on this card, I cut an additional piece of the green Floral Delight dsp and then layered on a smaller piece of Whisper White for the messaging area. I like using dsp for this layer as it cuts down on the mailing weight and it's a great way to use up those papers that you might not showcase in your cardmaking.  

Instead of adding a sentiment to the inside of this card I kept it simple by only adding a single flower in the bottom right corner.  Tip:  A lot of times there will be half images on the outside of the dsp paper that can be fussy cut and added right to the edge of your projects.  In this case there was only a half image of the flower and it fitted perfectly into the corner of the matter.  I like cutting out these types of images because they can be used as fillers by tucking them into an arrangement or are perfect for jazzing up a corner.

Supplies:
Stamps and Dies:
  • Everyday Arches #164623 
  • Everyday Arches Dies #164628\
  • Banner Framelit Dies (R) 132173 six 4 7/8 x 2 3/4 (trimmed down to 4 3/8"
The banner was cut from one of the designs in the Floral and Gingham Vellum paper.  To hide the band of yellow DSP going across the center of the card, and to make the design on the vellum pop out a bit more, I cut a second banner from Whisper White and adhered it to the vellum one with mini glue dots.  This really made the beautiful floral design on the Vellum come to life and gave it sort of a dreamy background for the arches. 

Cardstock:
  • Whisper White card base 8 1/2" x 5 1/2" scored at 4 1/4" for card base.  
  • Whisper White 3 3/4" x 5" for inside matte, 5 1/4 x 4 for banner backing, 3 1/2" x2" for smaller arch on front matte.
  • Lemon Lolly 4" x 5 1/4" matte for card front 
  • Pool Party for 3 1/2" x 2 1/2" for larger arch on front. 
  • Floral Delight DSP:
    • 2 pieces 5" x 3 3/4" for front and inside mattes (solid green pattern)
    • 1/2" x 4" strip of patterned paper for front matte
    • 5" x 3" piece Floral and Gingham Vellum #164713 - for banner 
    • Small flowers fussy cut for decoration on Arch and inside card
Floral and Gingham Vellum #164713

Floral Delight DSP #164700
Ink:
  • Old Olive for the "hello" sentiment from Everyday Arches stamp set. 
Accessories:
  • Dimensionals large and mini
  • Adhesive Backed Shiny Sequins (green) #163484
The sprays of yellow flowers which remind me of forsythia which is currently in bloom here in Abbotsford, were fussy cut from the DSP and blued in the corners of the white arch.  To add some dimension I cut the yellow flowers from a different DSP in the package and popped them up on Dimensionals.  The shiny sequins gave a bit of sparkle as the finishing touch on this card.  


Well that's it for my "hello" card.  I love the fresh spring look achieved by layering the beautiful Floral Delight papers.  What do you think? Would this card brighten your day and make you smile?  

Thanks for visiting and come back soon!

HAPPY STAMPING!
PENNY TOKENS STAMPIN' SPOT

Penny Hanuszak, CDN Stampin' Up! Demo since 2006

Click here to visit my Online 24/7 Shop 


Monday, February 3, 2025

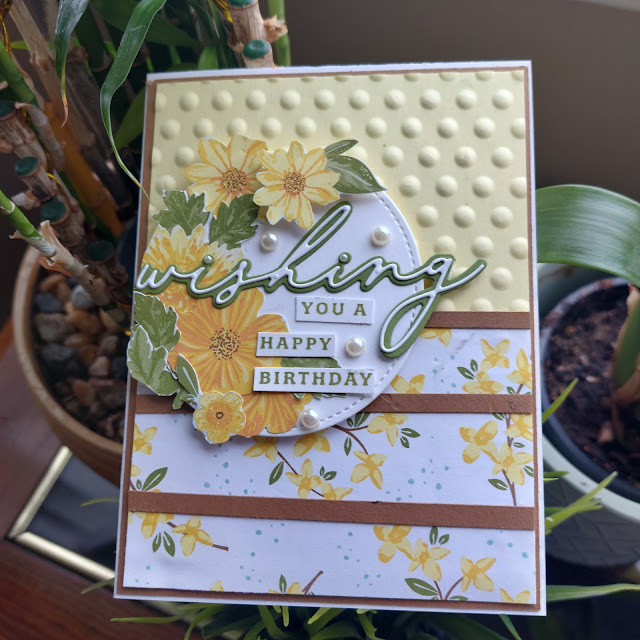
Delightful Wishes Suite and FMS#671

This weeks Freshly Made Sketch Challenge #671 is hosted by Judy.  Here is the sketch:

I decided to try out this sketch using a new suite of products from Stampin' Ups! January to April Mini Catalogue.  This suite is called "Floral Delight"  and can be found on page 35 to 37 of the catalogue. 

When you purchase a suite you get one of everything included under the description.  The Floral Delight Suite Collection #164716 includes the following at a 10% discount:
  • Delightful Wishes Photopolymer stamp set #164701 -14 stamps
  • Delightful Wishes coordinating dies #164707 - 19 dies
  • Floral Delight 12" x 12" #164700 -12 sheets  DSP 
  • Floral & Gingham Vellum 12" x 12" DSP - 6 sheets - 2 each of 3 single sided designs
  • Daffodil Delight 1/8" satin ribbon #164715
  • Tiny Bee Trinkets #164714 - 40 pieces gold
The designer series paper images coordinate with the following product colours:
Daffodil Delight, Lemon Lolly, Old Olive, Peach Pie, Pecan Pie, Pool Party

You can also purchase the dies and stamp set as a bundle #164710.

Here's My Card: 


Supplies Used: 

  • Stamps and Dies:
  • Delightful Wishes Photopolymer Stamp Set #164701
  • Delightful Wishes Dies #164707

Cardstock and DSP:

  • Basic White 8 1/2" x 5 1/2" Card Base, 5 1/4" x 4" mat for inside card, 3" x 3" for Stitched Circle, 1 1/2" x 3 1/2" strip for "Wishing" sentiment
  • Pecan Pie 5 3/8" x 4 1/8" mat and three strips 1/8" x 4" 
  • Lemon Lolly 5 1/4" x 4" mat x 2
  • Old Olive 1 1/2" x 3 1/2" for "wishing" base
  • Floral Delight DSP 3" by 4" and 4" x 3/4" strip for inside card

Ink and Embossing:

  • Old Olive Ink

Accessories:  

  • 3-D Basics Polka Dot Embossing Folder
  • Adhesive sheet for sentiment
  • Basic Pearls
  • Dimensionals 
Well that's it for this sketch challenge.  I'd love to hear your thoughts on this card.  

Happy Stamping!
Penny Tokens Stampin' Spot

Penny Hanuszak, CDN Stampin' Up! Demo since 2006 

Click here to visit my 24/7 Online Store


Sunday, January 26, 2025

Valentine Wishes - AHSC#613

It's hard to believe we are almost into the last week of January already.  It's been a month since Christmas and Valentine's Day is just two weeks and a bit away. Time's flying! Here's this week's sketch challenge by Atlantic Hearts Sketch Challenge #613.

I decided this sketch might work well with the January Hearts To You Paper Pumpkin kit that's been languishing on my desk since it arrived. Although it's a great kit I haven't been motivated to make Valentine Day cards. Being a procrastinator to the fourth degree, I sometimes need a push or an idea to get my creativity going and this sketch with its clean and simple lines was just what I needed.  

Here's My Card: 

Supplies: 

Card Stock:
  • Red striped card base from Paper Pumpkin January 2025 kit
  • Gold Glitter cardstock 5 1/4 x 4" for mat on front.  Punched the hearts out from the center before adhering to card base 
  • White Heart Strip from  the kit 
  • Scrap of Basic Black for the sentiment 

Ink:
  • Real Red for inside sentiment 
  • Momento Black 
  • Versa Mark Embossing Ink for sentiment 
  • Gold Embossing Powder 
Accessories: 
  • Dimensionals
  • Stampin' Up! Heart Punch (R)
  • Paper Pumpkin Kit - January 2025 
  • Basic D cross hatched Embossing Folder for White Hearts
  • Pink Sequins on alternate cards from kit  
This is the Hearts to You January Paper Pumpkin Kit Refill 

I found the strip of white hearts that was included in the kit to be just too white, so I dry embossed this one with the Cross Hatched Basic 3-D Embossing folder (R) to give it some texture and make it stand out a bit more.  The strip isn't quite wide enough to fit across the 5 1/8" x 4" piece of red cardstock so I cut it and centered the cut part under the two gold hearts.  It worked perfectly and later on you'll see one of these strips that I coloured with Real Red and a blending brush.  It worked perfectly to take the plainness away.  The striped red piece is cut from one of the card fronts.

Once I finished this card, I was inspired to continuing making alternate cards for the Hearts to You Paper Pumpkin kit.  So here are some of the ones I've finished so far.  I think I have enough supplies to make another 7 or 8 cards.  


Cheers and thanks for stopping by and checking out my card for this sketch challenge.  

HAPPY STAMPING!
PENNY TOKENS STAMPIN' SPOT 
Penny Hanuszak, CDN Stampin' Up! Demo since 2006

Click here to visit my online store


Sunday, January 19, 2025

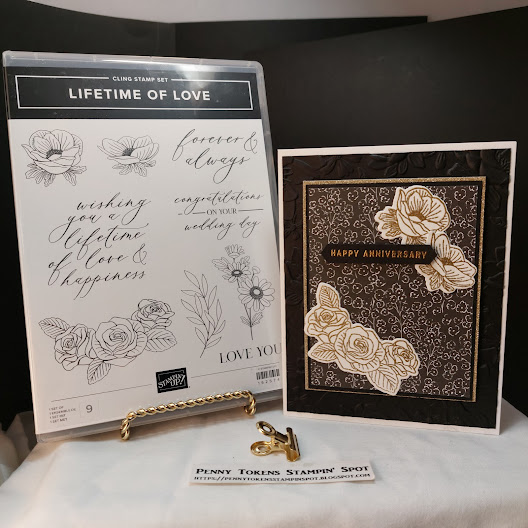
Black and White Anniversary - FMS #669

I'm up for another sketch challenge card, how about you?  Narelle Farrugia is the sketch designer for Freshly Made Sketches #669 this week.  And, what a great card she made!   

While you're checking out Narelle's and the rest of the FMS Design Team's  designs for this sketch, why not play along.  It's so easy.  Make a card, take a photo and upload it to their site no later than 3pm EST on Monday January 20th, 2025.   If you don't have a blog you can upload to your Facebook Page or Instagram.  Easy peasy!


Here's My Card: 


Supplies Used: 

Stamps and Dies:

Lifetime of Love #162574 and coordinating dies - Flowers and inside sentiment and die frame.

Love For You #160398 - Sentiment "Happy Anniversary"

Cardstock:

Whisper White:

  • Cardbase 8 1/2" x 5 1/2" scored at 4 1/4"
  • Inside Mat 3 7/8" x 5" 
  • Scraps for embossed flower images on front 
Basic Black: 
  • Front Mat - 4" x 5 1/4  Dry Embossed
  • Front Mat - 3" x 4" 
  • Inside Mat - 4" x 5 1/4" 
Gold Glimmer Paper: 
  • Front Mat - 3 1/4" x 4 1/4"

Designer Paper:

Note:  Although I really liked the Mixed Media Florals suite, I really only wanted some floral images I could use quickly and inexpensively.  For $15.95 CDN I was able to purchased the Memories and More Pack, which is totally awesome.   It comes with thirty-six 3" x 4" cards, fourteen 4" x 6" cards and four sticker sheets - 2 each of 2 different designs.  

Ink and Embossing Powder:

  • Momento Black 
  • Versa Mark
  • Gold Embossing Powder

 Accessories: 

  • Layered Florals 3-D Embossing Folder #162395.  
I love how the inside of this card turned out.  The arched floral die from the Lifetime of Love dies was perfect for highlighting the beautiful sentiment stamp. Note:  because this die is so frail I used Self-Adhesive paper behind my black cardstock scrap.  It not only made cutting the image easier - all the bits just popped right out, but it also made it easy to adhere to the mat.   

Thanks for  dropping by and checking out this week's sketch challenge card.  The hardest part of this card was deciding which floral images I wanted to use and I'm happy that I chose the Lifetime of Love stamps and dies.  I originally only bought this bundle because I loved the dies, but after using the stamps I've decided I love them both.  


HAPPY STAMPING!
PENNY TOKENS STAMPIN' SPOT

Penny Hanuszak, CDN Stampin' Up! Demo since 2006

Wednesday, May 30, 2018

WWC172 - Anything Goes Challenge

Hi stampers.  May is a five week month so that means we get to do a no host "Anything Goes" challenge at Watercooler Wednesday this week.  Are you up for the challenge.
This challenge runs until 5:00pm Mountain Time on Monday June 4th, 2018.  Check out the rules and the linky here. Hope you'll join in and have some fun!

For my project today I'd like to share a "Get Well" card that I've been working on which features one of the new Hostess sets for the upcoming catalogue year, called Hand Delivered.  I think you're going to like it.

Here's My Card:
I pulled my colour scheme for this card from the absolutely stunning new designer paper called "Tranquil Textures".  Although you're going to see this designer paper as the focus in many nautical themed projects, it also works well with other themes.  The designs are so beautiful and the colour mix is so soothing.  
The inside features more of the Tranquil Textures paper and a beautiful samp set called "Sorry For Everything".  
Supplies:

Stamp Sets:
Hand Delivered #146808 and Sorry For Everything #143820

Card Stock and Designer Paper:
Whisper White, Mint Macaron, Night of Navy and Tranquil Textures DSP #146331

Ink:  
Mint Macaron, Pineapple Punch, Night of Navy, Momento Tuxedo Black

Accessories:
Sizzix Rectangular Pin Point Frames (Non-SU), Big Shot, Paper Trimmer, Aqua Painter, Dimensionals, Tom Bow Glue, Misti

Details:


1.  This is an A2 card with a top fold.  The card base is a 4 1/4" x 11" piece of Whisper White that is scored and folded at 5 1/2".  

2. The first layer is a 5 1/4" x 4" piece of Tranquil Textures designer series paper. Because I never like to waste anything, I stamped the girl's skirt in the center of this panel and cut it out before adhering the DSP to the card base.

 3. I used Sizzix Rectangle Pinpoint Dies to cut a 3" x 4" Whisper White panel and a 3 3/8" x 4 3/4" Mint Macaron panel. The Night of Navy panel measures 3 1/8" x 4 1/8" and was cut out with my paper trimmer. All three panels were glued together with Tom Bow glue and then attached to the center of the card with Tear N' Tape. 
The Pinpoint Rectangles add a nice finished touch to these layers.

4.  The image of the girl's skirt and legs was stamped on a scrap of Whisper White with Momento Tuxedo Black ink and cut out with detail scissors.   As noted above I also stamped this image on the center of the DSP layer and fussy cut out just the skirt, which was glued to the Whisper White skirt/legs image. I lightly coloured around the DSP design on the skirt with my aqua painter and Pineapple Punch ink.  The girls legs were coloured with a skin toned blender pen.

5.  To get the mottled effect on the Whisper White layer I applied Mint Macaron ink to an Acryllic Block and stamped it straight onto the card stock.  I stamped the small cluster of dots randomly in Night of Navy ink and then stamped the flowers and coloured them with the Aqua Painter. 

6.  The sign the girl is holding was created by stamping the  image on Whisper White card stock and cutting it out with detail scissors.  I added Dimensionals to the back of this piece and it was attached above the waist band on the girl's skirt.  The sentiment "Hope You Feel Better Soon" was stamped in Night of Navy Ink on Mint Macaron.  This piece was punched out with a 1" square punch and adhered to a 1 1/8" x 1 1/8" layer of Night of Navy cardstock.  These layers were adhered to the center of the sign.  The girls fingers were coloured with a skin toned blender pen. 

7.  For the inside panel I cut a 5 1/4" x 4" panel of Whisper White Card stock and stamped the sentiment "Sorry" in Mint Macaron ink.  The "to hear you're not feeling well" sentiment was stamped in Night of Navy ink.  Two groupings of flowers were stamped in Momento Tuxedo Black ink and coloured with an aqua painter.  A 1" x 4" strip of the Tranquil Textures DSP was adhered to the bottom of the panel.  

On June 1st Stampin' Ups! new Annual catalogue will be available and you'll be able to check out all the images for the stamps and papers used in this card.  In the meantime I hope you've enjoyed this new product sneak peak and my card design.  

If you haven't had a chance to check out all the wonderful cards from the other Watercooler Wednesday Design Team you can click here.  Have fun and please come back for another visit.  

Happy Stamping!
Penny Tokens Stampin' Spot  

<a href="https://www.bloglovin.com/blog/2199104/?claim=7kgqrg74q3x">Follow my blog with Bloglovin</a>
Blogger link

BYGO - 50% off June Promotion June 3rd to 30th

  HAPPY JUNE EVERYONE:   Just a reminder that the 50% off promo starts today and lasts until June 30th or stock is no longer available.  Cli...