Showing posts with label #Atlantic Hearts Sketch Challenge. Show all posts

Friday, July 18, 2025

Berry Festival Time - AHSC #638

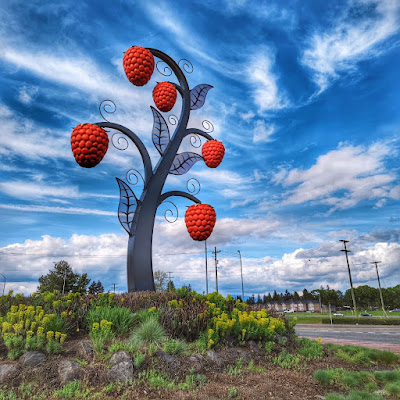
Abbotsford where I live, is well known for it's large number of berry farms.  While the crops include include strawberries, blueberries and raspberries, it's probably best known for raspberries as you can see from this huge traffic circle statue on Clearbrook Road. 
This past weekend was the 42nd annual Berry Festival held in historic downtown Abbotsford.  This is such a family-friendly event with a huge summer street party that has lots of fresh local berries, carnival rides, pie baking contests, live entertainment and all kinds of tasty treats and activities.  

With berries on my mind, when I saw this week's sketch#638 on the Atlantic Hearts Sketch Challenge site, I thought of the Berry Delightful paper pack  I've been holding on to in my stash.  So, I was very excited to make some cards with this sketch.  


Here Are My Cards:

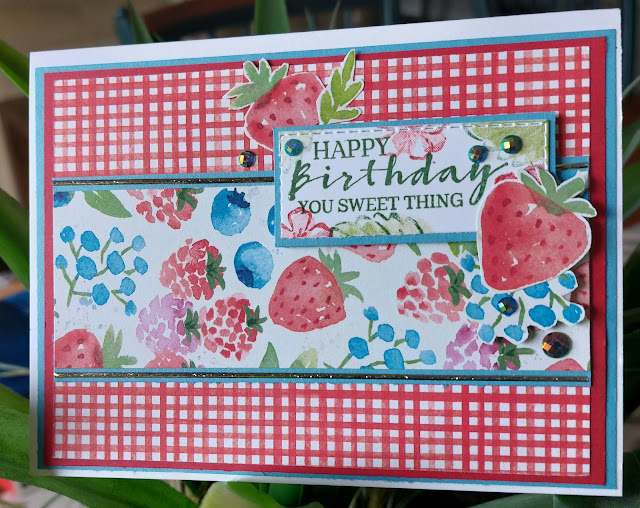
Did I mention I was excited?  I loved everything about this sketch and because it was so easy to work with, I wound up making not one but five cards using it as my template and inspiration.  What fun! Here's what I made:  

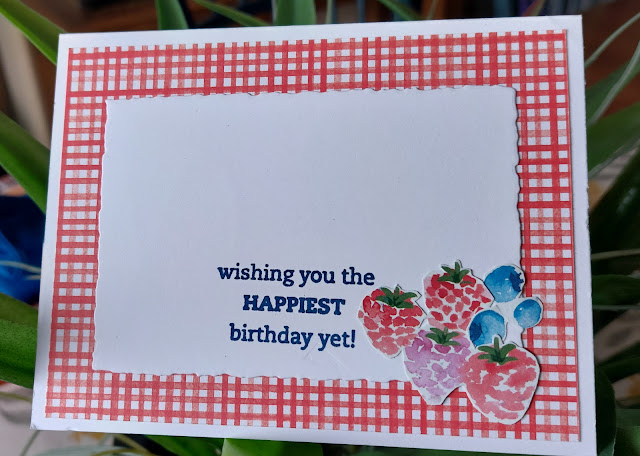
Card #1 - cover and inside view


Card #2 - cover and inside is similar to Card #1

Card #3 - cover and inside view


Card #4 - cover and inside view is the same as card #3

Card #5 - cover and inside view 


Here are some of the reasons why I was able to make five cards within an hour: 

1.  Pre-cut mattes and Designer Paper:  I already had an assortment of mattes and dsp on hand so only had to make some minor cutting adjustments and I was ready to lay them down.  

2.  Pre-cut bases and inside mattes.  

3.  Pre-made sentiment focals.  If you have all your stamps and inks out when you're playing with a card design it's really easy to make some extra focals and have them on hand.  In this case I had about fourteen different focal images already made from the last time I played with these stamps and papers.  

Supplies:

Stamps & Dies:

  • Sweet Strawberry (R)
  • Berry Blessings (R) 
  • Variety of stitched circles, squares and ovals for sentiments

Cardstock and DSP:

  • Real Red
  • Blueberry Bushel
  • Shaded Spruce
  • Old Olive
  • Garden Green 
  • Card Bases - Whisper White cardstock was used for all card bases and inside panels.  Measurements:
    • 8 1/2" x 5 1/2" for card base
    • 3 3/4" x  5" for inside mats
    • variety of scraps for sentiments
  • Mattes:
  • All cards had a front base matte that measures 5 1/4" x 4" followed by a DSP matte that measures 5" x 3 3/4"
  • I varied height of the DSP used for the center matte from 2" to 1 1/4" but the width was always the same as the DSP width - 5".
  • The card stock matte under the DSP was based on the size of the DSP and in a couple of the cards I just used 3/8" x 5" strips and glued the DSP to these
  • The gold highlight strips are a non-SU product and are self-adhesive gold metallic lines that vary in width.  See accessories. 

Ink and Blends:

  • Real Red
  • Blueberry Bushel
  • Shaded Spruce
  • Old Olive
  • Garden Green 

Accessories:

  • DSP
  • Dimensionals 
  • Rhinestones and a variety of retired Stampin' Up! gems 
  • Lines - 

Thanks for stopping by and checking out this week's cards.  I hope you liked my rendition and that I was able to make a variety of cards using the same theme and sketch.  Let me know if you have a favourite out of the five cards.  I'd love to hear from you.  


HAPPY STAMPING!
PENNY TOKENS STAMPIN' SPOT!


 Penny Hanuszak, CDN Stampin' Up! Demo since 2006

Click here to visit my 24/7 online shop


Sunday, April 27, 2025

Sweet Birthday Wishes - Storybook Moments Ephemera and #626 AHSC

Atlantic Hearts Sketch Challenge #626 is a throwback to 2013 when the sketch challenge first started.  Here is the current sketch and below it the original one.  


Here's My Card: 

I made a feminine birthday card using a combination of beige, blue and red cardstock (see below), a piece of neutral designer paper and several ephemera images from Stampin' Up!s Storybook Moments 12 x 12 designer paper.  

I'm quite happy with the way this card came together.  It took a bit to figure out what I was going to use for the background paper to keep this card in the Clean and Simple format.  Because the focal point is so busy along with the banners the decision to go with the neutral striped DSP worked well.


Here's a view of the inside of the card.  Although I love stamping images on the inside of my card along with the sentiment, I have to admit it's easy to just add an ephemera image because there's no colouring involved and the pictures pair up pretty well.  

I purposely changed the direction of the banners on my card front so they are facing the opposite way to those in the sketch.  For some reason, the focal just sat better going in this direction.  Also, I was able to move my sentiment a little higher on the card.  Sometimes you just have to try a different approach to make it work, so don't worry about changing up the sketch and trying something different, that's always an option you can choose.   

I like to mixup old and new products from Stampin' Up! so that I continue to use up my stash.  As you can see in this card, I used three old products starting with the retired dsp, then the cross hatch design embossing folder from the Basic D embossing folder collection and the bright red dots. The new products are the sentiment which is from the most recent Paper Pumpkin kit and the ephemera from the Storybook Moments paper collection.  Old or new all these materials compliment each other and really helped to bring this card together. 

Supplies: 

Stamps and Dies: 

  • Daisy Daydream stamps from March 25 Paper Pumpkin - Sentiment "Sweetest Birthday Wishes"
  • "Wishing you the Happiest birthday yet" sentiment stamp Stampin' Up! 2006
Cardstock and DSP: 
  • Crumb Cake cardbase 8 1/2 x 5 1/2" scored at 4 1/4"
  • Boho Blue cut two 4 x 5 1/4" mattes for front and inside 
    • Banner 1" x 3 1/2" 
  • Real Red Banner 1" x 3 1/2" 
    • Scrap for sentiment backer
    • 2 1/2" circle for focal base
  • Basic Beige
    • Scrap for sentiment 
    • 3 3/4" x 5" matte for inside 
  • Neutrals DSP 6 x 6 #163773 - striped Crumb Cake design 3 3/4" x 5" matte for card front 
Ink: 
  • Real Red for sentiments 
Accessories: 
  • Brights Candy Dots #130931(R) - Real Red x 3 
  • Ephemera gardening images for focal point
  • Dimensionals
  • Basic D hatched image embossing folder for red banner 

Thanks for dropping by and checking out my version of the AHSC#626.  Come back again and leave me a comment if you like this card.  

HAPPY STAMPING!
PENNY TOKENS STAMPIN SPOT!
Penny Hanuszak, CDN Stampin' Up! Demo since 2006


Click here to visit my 24/7 Online Store 

Sunday, January 26, 2025

Valentine Wishes - AHSC#613

It's hard to believe we are almost into the last week of January already.  It's been a month since Christmas and Valentine's Day is just two weeks and a bit away. Time's flying! Here's this week's sketch challenge by Atlantic Hearts Sketch Challenge #613.

I decided this sketch might work well with the January Hearts To You Paper Pumpkin kit that's been languishing on my desk since it arrived. Although it's a great kit I haven't been motivated to make Valentine Day cards. Being a procrastinator to the fourth degree, I sometimes need a push or an idea to get my creativity going and this sketch with its clean and simple lines was just what I needed.  

Here's My Card: 

Supplies: 

Card Stock:
  • Red striped card base from Paper Pumpkin January 2025 kit
  • Gold Glitter cardstock 5 1/4 x 4" for mat on front.  Punched the hearts out from the center before adhering to card base 
  • White Heart Strip from  the kit 
  • Scrap of Basic Black for the sentiment 

Ink:
  • Real Red for inside sentiment 
  • Momento Black 
  • Versa Mark Embossing Ink for sentiment 
  • Gold Embossing Powder 
Accessories: 
  • Dimensionals
  • Stampin' Up! Heart Punch (R)
  • Paper Pumpkin Kit - January 2025 
  • Basic D cross hatched Embossing Folder for White Hearts
  • Pink Sequins on alternate cards from kit  
This is the Hearts to You January Paper Pumpkin Kit Refill 

I found the strip of white hearts that was included in the kit to be just too white, so I dry embossed this one with the Cross Hatched Basic 3-D Embossing folder (R) to give it some texture and make it stand out a bit more.  The strip isn't quite wide enough to fit across the 5 1/8" x 4" piece of red cardstock so I cut it and centered the cut part under the two gold hearts.  It worked perfectly and later on you'll see one of these strips that I coloured with Real Red and a blending brush.  It worked perfectly to take the plainness away.  The striped red piece is cut from one of the card fronts.

Once I finished this card, I was inspired to continuing making alternate cards for the Hearts to You Paper Pumpkin kit.  So here are some of the ones I've finished so far.  I think I have enough supplies to make another 7 or 8 cards.  


Cheers and thanks for stopping by and checking out my card for this sketch challenge.  

HAPPY STAMPING!
PENNY TOKENS STAMPIN' SPOT 
Penny Hanuszak, CDN Stampin' Up! Demo since 2006

Click here to visit my online store


Wednesday, January 22, 2025

I Made Top Three AHSC#612


I'm so excited my Three Cheers card was chosen as one of three winners for the Atlantic Hearts Sketch Challenge #612.  Congrats to Christy Stanford and Joanne James who were also chosen.  Thanks to the design team for choosing my card and for the lovely comments made to my post.  Much appreciated!  

Here's My Card: 

Click here to see all the pictures of my card and post. 

Have a great week!

Happy Stamping!
Penny Tokens Stampin' Spot

Penny Hanuszak, CDN Stampin' Up! Demo since 2006

Sunday, September 8, 2024

Let It Snow Tag Card - AHSC #593

This week at Atlantic Hearts Sketch Challenge the sketch was designed by Michelle and digitalized by Brandi.  Here it is: 


Here's My Card: 


I was excited to make this card because I was able to use two of the dies from my new Greetings of the Season Dies and stamps set.  I'm already in love with the large tag die in this set which is the perfect size.  The stitching around the outside edge is very delicate and really gives a nice finished look to the tag.  


This Greeting of the Season Stamp and dies are not available in any of the Stampin' Up! catalogues, so don't waste any time looking for them there.  They were just released as part of the Online Exclusives and can only be purchased on line while supplies last.  The photopolymer stamp set has 21 sentiment stamps.  I used the verse "May Your Holiday Season be Filled with Warmth and Cheerful Celebration" on the inside of the card, and it has a beautiful mix of fonts, which I thought was a nice touch.  

I was also happy to use the "Let It Snow" stamp from the long retired Merry Little Labels stamp set and coordinating tag punch.  I absolutely love the deer standing in the trees.  

Supplies:

Stamps and Dies: 

  • Merry Little Labels (R) #144795 - for Let It Snow Tag
  • Perfectly Framed Stamp #151668 - for To and From
  • Greetings of the Season- #164326 - for inside sentiment

    • Greetings of the Season Dies #164112 for Stitched Labels 

    Cardstock and DSP:

    • Whisper White 8 1/2 x 5 1/2" for card base scored at 4 1/4", inside mat 4" x 5 1/4" 
    • Brushed Gold Foil - 4" x 5 1/4" for card front mat and 3" x 4" for gold gift tag
    • Basic Black 3 7/8" x 5 1/8" for card front mat, scrap piece for tag layer 
    • 3 3/4" x 5" Christmas DSP by Stampin Up Retired

    Ink:

    • Momento Tuxedo Black 

    Accessories: 

    • Gold 1/8" ribbon #134583
    • Dimensionals 


    Thanks for dropping by and checking out my card for the challenge.  That's one more towards my Christmas stash, and it's reminded me to get busy making gift tags.  Until next time...........

    HAPPY STAMPING!
    PENNY TOKENS STAMPIN' SPOT

    Penny Hanuszak, CDN Stampin' Up! Demo since 2006 


    Sweeter With You - July 2025 Paper Pumpkin Kit

    Hi to all my Paper Pumpkin subscribers and followers, welcome back.  My "Sweeter Than You" Paper Pumpkin kit arrived this past wee...