Showing posts with label #Paper Pumpkin Alternatives July 2025. Show all posts

Friday, August 1, 2025

Sweeter With You Second Eight and AHSC #640

It's been a busy time with two back- to-back garage sales held on the past weekend.  Our complex held a community garage sale on Saturday July 26th and I really worked hard getting ready for this event.  I was hoping for a good turnout, but although we had beautiful weather hardly any buyers showed up.  Thankfully I sold my sewing machine and a few odds and sods.  


The next day however was awesome!  I was a vendor at my favourite garage sale held in Cloverdale.  The RRR Craft parking lot sale is held every June and July and I was very fortunate to have a table at both events this year.  A big shout to Maggie owner of Country Lane Crafts for hosting and organizing this event.  To the hundreds of great folks who showed up thanks so much, you made my day!  


Atlantic Hearts Sketch Challenge: 
Moving on to card making, here's this week's sketch from Atlantic Hearts which was very timely and inspiring as I was still using scraps from the July Paper Pumpkin kit.  This sketch checked all the boxes for me.   

Here is My Card:  


I really enjoyed making this card using paper strips from the retired Berry Delightful designer series.  The Dotted Circles embossing on the Pool Party matte really added some great texture to the card front.  

Supplies: 

Stamps and Dies: 
  • Sweeter With You Stamps Paper Pumpkin July 2025
  • Scalloped Circle Punch (R) Stampin' Up
Card Stock and DSP: 
  • Whisper White 8 1/2" x 5 1/2"  scored at 4 1/4"
    • Matte for inside 3 3/4" x 5"
  • Pool Party 3 3/4" x 5" embossed with Dotted Circles 
  • Granny Apple Green cardstock 4" x 5 1/4" 
  • Garden Green cardstock strip  1/4" x 5 1/4" (insided)
  • DSP from Berry Delightful (R) 1 1/4" x 5 1/4" strips x 3 
  • Strawberry from Sweeter With You Paper Pumpkin kit
Ink
  • Strawberry Slush
  • Garden Green
Accessories: 
  • Dotted Circles 3D Embossing Folder 
  • Opaque Faceted Gems Pool Party 
  • Dimensionals
"Sweeter With You" Additional Alternate  Paper Pumpkin kit cards"

I made an additional eight alternate cards with the "Sweeter With You" July 2025 Paper Pumpkin kit since my last post including my card for the Atlantic Hearts sketch challenge.  Enjoy!

d

Card  Nine: 
There were only three strawberry baskets included in the PP kit, so I made extras by tracing the original image and then colouring them with a Pool Party Pencil crayon around the edges.  I think it turned out pretty good.  

Card Ten:

I added some real red grosgrain ribbon that's been kicking around in my ribbon bin for some time to this card front.  The mattes are Poppy Parade and Garden Green and I matted the saying from the Paper Pumpkin kit on to a scrap of Garden Green and then cut around the image.  I really like how that popped out the sentiment.  

For the inside of the card I once again used some leftover strips of Garden Green and a 1" x 5 1/4" piece of DSP from the Berry Delightful paper pack. 


Card Eleven:

I loved the way this card came together.  I layered two of the Contour Dies (R) nesting rectangles to make the focal point along with some strawberries and flower ephemera from the kit and a sweet little sentiment strip.  The background dsp from the Berry Delightful papers is simply stunning and really brings this card to life. 

Tip:  Before gluing your mattes to your card base, punch or die cut shapes from the cardstock centers. By cutting away card material from the matte before it's adhered to the card you reduce the density and the weight and you wind up with lots of shapes to use for future mattes or focals.

Card Twelve:

This card again features layered Contour Die rectangles that were cut from other mattes.  Having a selection of these on hand really cuts down on the guesswork when you're making cards. 

Card Thirteen:
 

I used scraps of the Berry Delightful DSP to make the layered patchwork for the center focal on this card.  I also added some Poppy Parade designer paper that was in my stash for a layer.  

Card Fourteen:

Card Fifteen:
Don't underestimate the power of a strip of designer paper.  By adding three paper strips to the garden green matte I was able to add some additional interest.  I've also used a strip of grosgrain ribbon across the center of the card.  


Don't forget the inside of our cards.  I love how these stamped strawberries pop off the white matte. 
 
Card Sixteen:  

And the final card is the one I made for the AHSC.  Thanks for dropping by and visiting my blog.  As always, I hope you enjoyed this post and if so will leave me some words of encouragement.  Until next time......

HAPPY STAMPING!
PENNY TOKENS STAMPIN' SPOT
Penny Hanuszak, CDN Stampin' Up! Demo since 2006

Wednesday, July 23, 2025

Sweeter With You - July 2025 Paper Pumpkin Kit

Hi to all my Paper Pumpkin subscribers and followers, welcome back.  My "Sweeter Than You" Paper Pumpkin kit arrived this past weekend, and I couldn't wait to take it apart and start playing with this fun summer kit. 

This kit includes enough card bases, envelopes and ephemera to make 8 cards if you follow the instructions......but who does that? Usually there is enough material to make 9 cards, so that's a bit of a change, and one I will follow up with Stampin Up Demonstrator Support to find out if it's just something for this kit or will this be ongoing.   The kit also includes a very cute 9 piece stamp set, Garden Green ink spot, dimensionals, glue dots and tear n' tape.  

There are nine photopolymer stamps in the Sweeter With You Stamp set that comes with the kit.  Each of these stamps as you'll see in my sample cards, stamps beautiful images.


I was particularly impressed with the two-step strawberry.  I recommend using Poppy Parade ink or any red ink that has an orange overtone (not blue) for the berry and then stamping the stem with Garden Green.  

I stamped off quite a few of these berry images so I'd have extra's on hand. You could even make your own background paper using the strawberry and the small flowers.   You can see how well the image stamps from this photo of the back of my cards. 

If you're a Paper Pumpkin subscriber, and you run out of supplies for this kit or others and want to make more cards, you can order refills. The Sweeter With You Kit refill is order #167283.  The refill comes with everything in the kit but the stamp set and ink.  
Sweeter With You Kit Refill Available Online Order #167883

Another item that coordinates with this kit is the Circle of Seasons Dies add-on (item 167277).  This is a great coordinating product that keeps on giving because it not only works with this kit, but it also coordinates with the July Farmhouse Florals Paper Pumpkin Kit, and  the August Fall for Toile Paper Pumpkin Kit.  And, you can pair these dies with other Stampin’ Up! products for even more creative options!  


Here Are My Sweeter With You Alternative Cards:
So far, I've made eight cards from the kit supplies, all alternates to the original card offering. I've got enough supplies for at least eight more, so that's always a plus.

Card One: This is a Faux Step card which is incredibly easy to make.  I started with a white card base that measures 


Card Two:  The Strawberry Slush and White mattes were cut out using Stampin' Ups! Decalled Rectangles dies. The 1/4" strips of card and dsp papers worked really well in filling up the white space on this card.  I used Pool Party for the ink splatters to tone down the white.  Finally, since I had a lot of the brass mini and regular sized bees from previous supplies on hand I decided to apply them to this card using mini glue dots. 

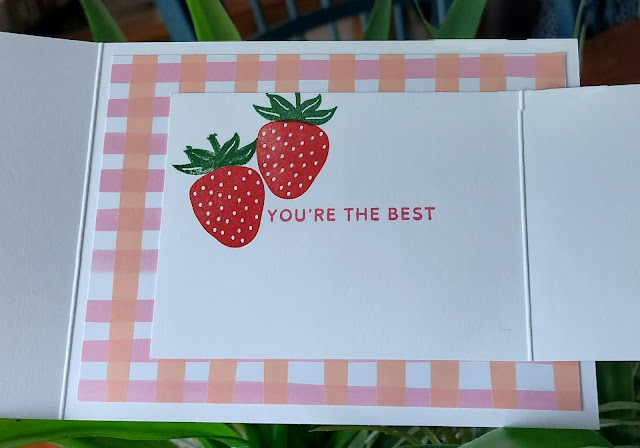
Card Three:  This flap card is one of my favourite go to designs when I'm making cards.   It starts with a card base measuring 8 1/2 x 4 1/4" and scored at 3" on the long side.  Burnish on the score line and fold the flap to card front.  The second piece on this card front measures 8" x 3" and is scored at 4".  Burnish the score line and fold in half.  This piece is adhered to the inside of the card and the flap fits across the front of the card when closed.  Decorating consists of coordinating DSP and two mats on the front of the flap.  


I stamped those beautiful strawberries on the inside of this card and the sentiment "You're the Best".  Love how they turned out. 


Card Four:  This is another easy fun fold.  The card base which is a piece of 8 1/2" x 5 1/2" piece of Strawberry Slush cardstock is scored on the front at 1 1/4" and burnished on the score line so the fold exposes the inside of the card.  The folded over piece is decorated with a 3/4" x 5 1/4" piece of coordinating designer series paper (DSP).  I usually adhere the back of this flap to the card front so it stays in place.  


Here's a view of the inside of the card where I've added 1/4" x 5 1/4" strip of the matching DSP.  


Card Five: This is just a standard card where the front is the focal.  I ran the vellum strips that were in the kit through my Cut & Emboss machine and used a retired 3D Embossing Folder called "Eyelet", to add a little texture to the card.  There were only three basket pieces in the ephemera pack, so I traced around one of them on  Pool Party cardstock and then fussy cut out several extra boxes.  To give them some life, I used a Pool Party Watercolour Pencil to trace around the image and to add some shadows.  


Card Six: This is another standard card with a multiple image focal point.  The  Garden Green and Strawberry Slush mats were cut out with the Decal Rectangle dies, and the stitched circle mat for the sentiment is Granny Apple Green cardstock. The glimmer paper sequins are also in Granny Apple green and add a touch of sparkle.  I cut the long white scalloped piece of cardstock from the kit in half after embossing it with the Eyelet embossing folder and then tucked one half behind the sentiment circle.  

I cut a 5 1/4" x 4" mat from Strawberry Slush cardstock for the inside of the card and then randomly stamped all over the piece with the small flower image from the stamp set. Before adhering this piece to the inside of the card I cut out the mat for the card front from the center using the Decal Rectangle dies.


Card Seven:
For this card I decided to build a mat using some of the strips that were left over from cutting down mattes.  They are various sizes but that's okay I used what fit.  The pink strip was embossed with the Eyelet Embossing folder and the Pool Party cardstock strip was left plain, but I added some of the pretty white flowers from the kit to give it some interest.   Once again I used some of the brass bees from my stash.  

Card Eight:
This is a very straightforward card relying on the various layers of ephemera from the kit to create the focal point.  I loved that little blue striped piece and used one of the plant pots from the kit to hold the strawberries. I splattered  Pool Party ink  on the pot and the white scalloped piece to give some highlight.  Pink self adhesive sequins from my stash were used to add some sparkle. 

I hope you enjoyed these Paper Pumpkin kit cards.  This is one of my favourite kits from this year.  Have a great week, leave me a comment, I'd love to hear which card is your favourite, and if you have any questions about any of the designs.  

HAPPY STAMPING!
PENNY TOKENS STAMPIN' SPOT 
Penny Tokens, CDN Stampin' Up! Demo since 2006


AUGUST STAMPIN' UP! SPECIALS

LAST CHANCE SALE STARTS AUGUST 5TH ! Save Up to 70% Off! of Stampin ' Up!s Last Chance & Clearance Refresh which will be open from ...