Here we go again! Last month's Wacky Watercooler Stamping blog hop "Let's Mix It Up", was such a super success, we’ve decided to do it again with our October Holiday Round-up. What fun..... it's a "free for all". Holidays, Holidays, Holidays!
This blog hop which lasts from tonight through Saturday night, will feature products from both the Holiday and Annual catalogues. You're bound to see lots of Thanksgiving (US), Halloween, and Christmas Holiday projects, so grab a cup of coffee or whatever's your pleasure, and make sure you visit all the sites on the hop.
If you started at the beginning of the blog hop you'll have arrived here from the very talented Jean Fitch's blog. Aren't her projects awesome? I always love reading her posts as they are so funny and informative.
For your entertainment this month, I've completed two spooky Halloween Projects and a Christmas card project with a twist, which I hope you'll enjoy.
My First Project:
My first project is a spooky OWL Halloween card that was inspired by this poem:
A great big OWL
in a great big TREE
on a night so DARK
you could hardly SEE
was watching the LIGHTS
in the deep RAVINE
where the WITCHES danced
on HALLOWEEN
Can't you just hear those wings batting against the window pane and the WHOO! WHOO! of the owl as he struggles to see what's going on inside the haunted house?
Okay, so I know there isn't a ravine or any witches in my card, but you have to admit that OWL with the great big eyes is pretty spooky.
Supplies:
Stamp Sets: Howl-o-ween Treat
Card Stock: Tangelo Twist, Very Vanilla, Happy Haunting DSP
Ink: Rich Razzleberry
Accessories: Hearth and Home Thinlet Dies, Boo To You Framelit Dies, Dazzling Details, Basic Big Shot, Trimmer, Large Google Eyes (Non- SU)
My Second Project:
 Halloween is such a great holiday occasion! Even though our years of having lots of trick or treaters, making costumes, going to Halloween parties have dwindled away, I still get caught up in the spookiness of the season. I love hauling out my precious collection of Halloween decor to set the stage for that special night.
 I've wanted to make a Halloween Banner for my fireplace for some time now, so when I saw the Howl-o-Ween Treat stamp set, I knew a banner was in the making! I had so much fun pulling this together, and hope you enjoy it too.
The banner consists of these four elements repeating across the length of the banner. It measured 5 feet in length.
 |
| I absolutely love the Howl-o-ween Treat Stamp set. It's one of the best Halloween sets I've ever owned. |
Supplies:
Stamp Sets: Howl-o-ween Treat, Dictionary Background Stamp
Card Stock: Tangelo Twist, Very Vanilla, Crushed Curry, Happy Haunting DSP
Black Glimmer Paper
Ink: Rich Razzleberry, Momento Tuxedo Black,
Accessories:Trimmer, Big Shot, Crop-o-dile and Large Silver Eyelets, Boo To You Framelit Dies, Lots of Layers Framelit Dies, Dazzling Details, Basic Rhinestones, Spider Web TIEF (R), Large Polka Dot TIEF, SERIF Essentials Alphabet Dies (R), Glue Gun, Dazzling Details
My Third Project:
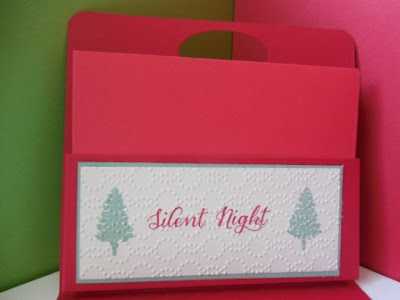
I'm not a big scrapbooker, but I have been making great use of the Project Life Card Collections, so for my third and final project, I wanted to share an alternative way to use the Project Life Hello December 2015 Photopolymer Bundle If you are pressed for time this kit is a perfect option for getting all your Christmas cards, tags or scrapbook pages finished in a jiffy.
I'm always looking for small hostess gifts so when I saw the Card Pouch tutorial by Cindy Lawrence on Split Coast Stampers, I was inspired to make one of my own. I changed up Cindy's measurements and will be doing a tutorial on this project with all the details later this month.
 |
| Here is the front of the cad pouch. I used a full sized card from the Project Life set and cut it down to size for the front of the holder. |
 |
| This is the inside of the pouch |
 |
| This side of the pouch holds the 4 note cards. The note cards are blank on the inside so they can be used for a thank you or just a note. |
 |
| This side of the pouch holds the envelopes. Although I haven't included a picture here, I made the individual envelopes with my Envelope Punch board and the Real Red Envelope Paper. |
Supplies:
Stamp Sets: Wonderland, Project Life Hello December 2015 Photopolymer
Card Stock: Mint Macaron, Real Red, Very Vanilla, Real Red Envelope Paper
Ink: Real Red, Mint Macaron
Accessories: Project Life Hello December 2015Card Collection (from the Photopolymer Bundle), Dazzling Details, Trimmer, Big Shot, Real Red Ribbon, Envelope Punch Board
The End:
I hope you're having fun on the blog hop today and that my creations have been an inspiration for you. Let me know if you have any questions about the projects I made, I'd be happy to respond.
Now it's time to jump over to Debbie Spano's amazing blog where I know she'll enchant you with her great creations. You can either click on her name or on the Next button below to connect with her.
Happy Stamping!
Penny Tokens Stamping Spot


