Showing posts with label Perfectly Penned. Show all posts

Tuesday, July 29, 2014

Pals Paper Arts Sketch Challenge PPA213

I totally missed this Pals Paper Arts Challenge (PPA213) this week, so this is going to be an uber quick post.  There's something about the timing on their challenges, that I keep missing.  It must be the East Coast time slot.  Oh well, I'll get it right next time.

Here's the sketch that got my interest up:

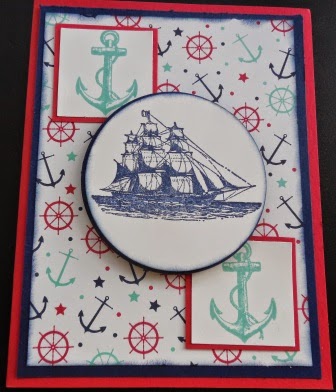
Here's My Card:
This is another Masculine Birthday card made with Maritime Designer Series Paper and the Open Sea stamp set.  If you like this Maritime DSP there's still time to get in on the Designer Series Paper Buy 3 Get The Fourth for Free - this special promo ends on July 31st. 


I'm so sad that the Perfectly Penned stamp set was retired this year.  It's one of my faves for masculine cards.  An alternative to this set is Sassy Salutations
The Happy Birthday sentiment in the Sassy Salutations stamp set isn't as large in this stamp set, however it's still got a heavy masculine quality to it.  The other bonus is the additional great sentiment stamps in this set, such as Feel Better and Congratulations. 
Supplies:
Stamp Sets:  The Open Sea, Perfectly Penned (retired)
Ink:  Night of Navy, Real Red, Coastal Cabana
Designer Series Paper:  Maritime
Cardstock:  Whisper White, Night of Navy, Read Red
Accessories:   2 1/2" Circle Punch, 3" Circle Framelit, 1 1/4" and 1 3/8" Square Punches, Adhesive and Dimensionals.

Happy Stampin!
Penny Tokens

Thursday, May 29, 2014

Soccer Theme Birthday Cards using PPA205


Earlier this week I planned to work on the Paper Pals Art Sketch Challenge PPA205 and enter it before the closing on May 27th, but guess what?  That's right, I didn't finish in time.  

My friend Sheri and I decided to tackle it anyway during our Tuesday stamping get-together just because this is such a fun sketch. We both thought it had potential as there are just so many possible ways you could use it.  

I wish I'd taken pictures of my stamping table because during our collaboration on the card it was just chaotic.  I think we hauled out most of my stamps before deciding to create our cards using the Great Sport stamp set.  

Supplies:
Stamp Set(s):  Great Sport, Work of Art, Elements of Style 
Ink:  Melon Mambo, Memento Black Ink, Versa Mark Ink
Card Stock:  Basic Black, Melon Mambo and Whisper White
Accessories:  Banner Framelits, 2 1/2" Circle Punch, Starburst Framelits, Black Embossing Powder, 1 3/8" Circle Punch, Basic Rhinestones, dimensionals, Tom Bow adhesive

My motive for this card was creating a birthday card for a teenage girl who's an avid soccer player.  I think I scored on this one!

I made a top fold card and rotated the design so the banners are facing downwards like an award ribbon.  Although the card has a sports theme, I wanted it to be really girly girl in style and that's why I chose to do it in Melon Mambo.
The soccer ball was embossed using Versa Mark Ink and Black Embossing Powder.  It was added to the center of the design with dimensionals.  Three basic rhinestones add a little bling on this part of the card.  I cut out the central design using the Starburst Framelit Dies and mounted this on a basic black circle that was punched out with the 2 1/2" circle punch.

The chevron banners were stamped with the brand new Work of Art Stamp set that will be available in the June 1st catalogue.  They were cut out with the Banner Framelit dies and mounted on Melon Mambo banners.  (Note: the Melon Mambo banners were cut out with the next largest sized banner die but it was too big for these pennants, so I adhered the chevron banner position the "v" over top of the one on the Melon Mambo banner and then hand cut about 1/8" off of each side of the pennant, to achieve this look).

Here is a view of the card and matching envelope.

I made three of these cards in Melon Mambo.

Here's the inside of the card.  I repeated the flourish stamp from Great Sport and topped it with a Happy Birthday sentiment that's mounted on a 1 3/8" circle of basic black. 
 
Great Sport, item #132010 is a six piece stamp set  that comes in Wood Mount for $32.95 or Clear Mount for $24.71.  This set has a little something for ever sports enthusiast -baseball, basketball, football, soccer and can be used to create invitations, tags, or to embellish scrapbook pages for your favorite sports lovers. Use with the 1-1/4" and 1-3/8" Circle Punches and the Bitty Banners Framelits Dies for a coordinated look that hits it out of the park!   It's on the retiring list and will no longer be available after June 1st.

Friday, April 4, 2014

Happy Birthday Mom

Today's my mom's 92nd birthday, and I wanted to share the card I made for her special celebration.  

My mom has loved flowers all her life,
so I wanted to make a card that featured some kind of floral stamping or design.  

My original idea was to stamp a Circle Thinlets card base with the Stippled Blossoms stamp set.  I was planning on working with Cranberry Crisp and Whisper White card stock and inks.  However, I changed my mind at the last minute, and I'm glad I did.

I chose instead to make the card base from Smokey Slate card stock and add  some floral designer series paper and a 3-dimensional floral image.  My inspiration for the card I'm about to show you came from my Floral Fusion class that I held last Spring. The card that influenced me sported a large free style flower on it's face.  I decided that was the perfect design to recreate for my mom's card.
Here's what I came up with:
Isn't this paper from the Watercolour Wonder Designer Series paper simply stunning?  The beautiful Cranberry Crisp and Calypso Coral rose images and Smokey Slate dots combined to create a soft and elegant background for my 3-dimensional flower and sentiment. The "happy birthday" sentiment from the Perfectly Penned stamp set, with it's bold curlicues is stamped in Basic Grey over a cluster of roses. 

I used another of the Perfectly Penned sentiments on the inside of my card and stamped the two-step rose from the Stippled Blossoms stamp set in the bottom right corner. 
Supplies:

Card stock:  Smokey Slate for the card base (5 1/2 x 8 1/2 scored at center), Cranberry Crisp for the first layer (5 1/4 x 4 sponge edges with Cranberry Crisp ink) and Whisper White for the inside of the card (5 x 3 3/4 attached with Sticky Strip at the top of card.
DSP:  Silver Glimmer Paper (scrap), Watercolor Wonder DSP (5 x 3 3/4")

Ink:  Basic Gray, Smokey Slate, Cranberry Crisp 

Stamp Sets:  Perfectly Penned, Stippled Blossoms

Accessories:
  • 2 1/2", 1 3/4", 1 3/8 , 1 1/4" and 3/4" circle punches
  • Bird Builder Punch for leaves 
  • Dazzling Details
  • Vintage Faceted Designer Buttons #127555 
  • Paper Snips
  • Sponge Dauber 
  • Adhesive, Glue Dots, Dimensionals
  • Stamp-a-ma-jig
To Make The Flower: 

    1. Punch out a 2 1/2" and a 1 3/4" circle from Smokey Slate.
    2. From both pieces snip out small "V's" leaving the same amount of space as you work your way around the circle. 
    3. Use a sponge or sponge dauber to distress edges of the flower petals with Smokey Slate ink.  Curl up the edges with your bone folder.  Adhere the smaller petal round to the larger one with sticky strip.
    4. Punch out a 1 3/8" circle from the Silver Glimmer Paper and adhere it to the center of the flower with sticky strip.
    5. Punch out a 1 1/4" circle from Cranberry Crisp Cardstock and sponge the edges with corresponding ink.  Adhere to Glimmer paper with a large glue dot.
    6. Punch a 3/4" circle from Smokey Slate.  Sponge the edges with Smokey Slate ink and adhere to center of Cranberry Crisp piece.  
    7. Adhere a small clear faceted button to the center of the flower with a large glue dot and place a medium sized basic rhinestone in the center.  
    8. Cut four wings from Pear Pizzazz card stock using the Bird Builder Punch.  Attach these with glue dots to the bottom of the flower, arranging in clusters of two.  
    9. When flower is finished add some glitter to the gray flower petals with Dazzling Details.  Just enough to give a wet look around each petal.  
    10. When the Dazzling Details is completely dry attach the flower to the card front with dimensionals. 
      Here is the card along with the one that inspired me.
    To change the look of this card I made a few simple changes such as the addition of a card stock layer, changing the DSP, the card and flower petal colours.  I also switched the layering of the flower center to card stock instead of the bottle cap.    

    Here you can see the original card along with others in the Floral Fusion set. 
    And one final look at my finished card.  My mom loved it.
    To bring out the gray dots on the Watercolour DSP piece I sponged around the edges with Smokey Slate before adhering to the Cranberry Crisp layer.  This really worked to bring in those soft gray tones.
    Thanks for taking a look at this card.  It was a joy to make.  I'd love to hear from you, so leave me a comment if you like this card design too. 
    Last Free Shipping of the Year - December 9, 10 11, 2024

    Heads up, it's time for the last FREE SHIPPING promo of the year! From December 9–11, you can shop and save on all qualifying orders of...